Back to Don's Maps
Building good looking stone walls
A method even beginners can tackle sucessfully to build rock walls, using concrete foundations, mortar, and formwork.
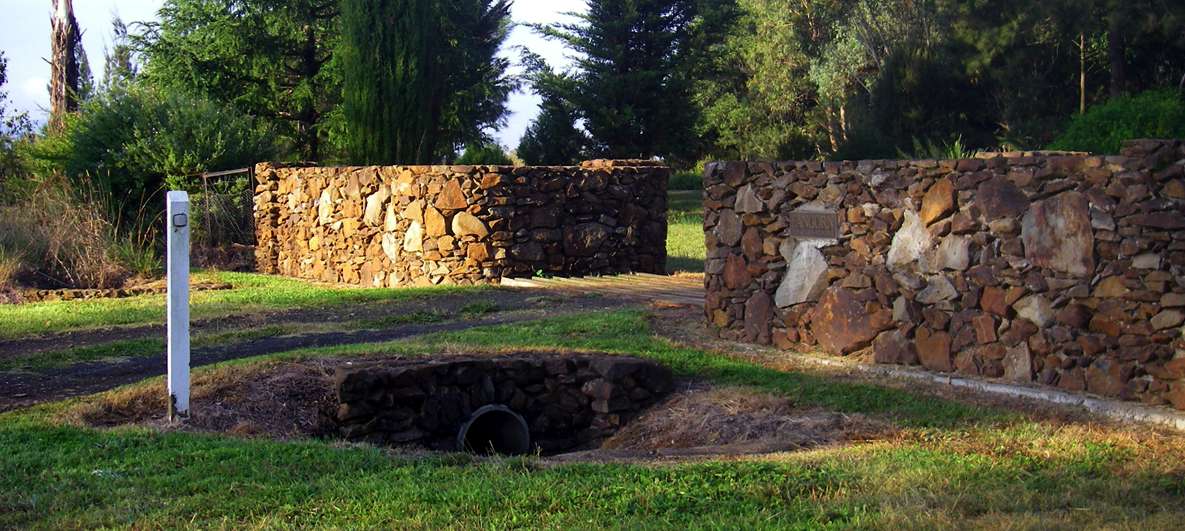
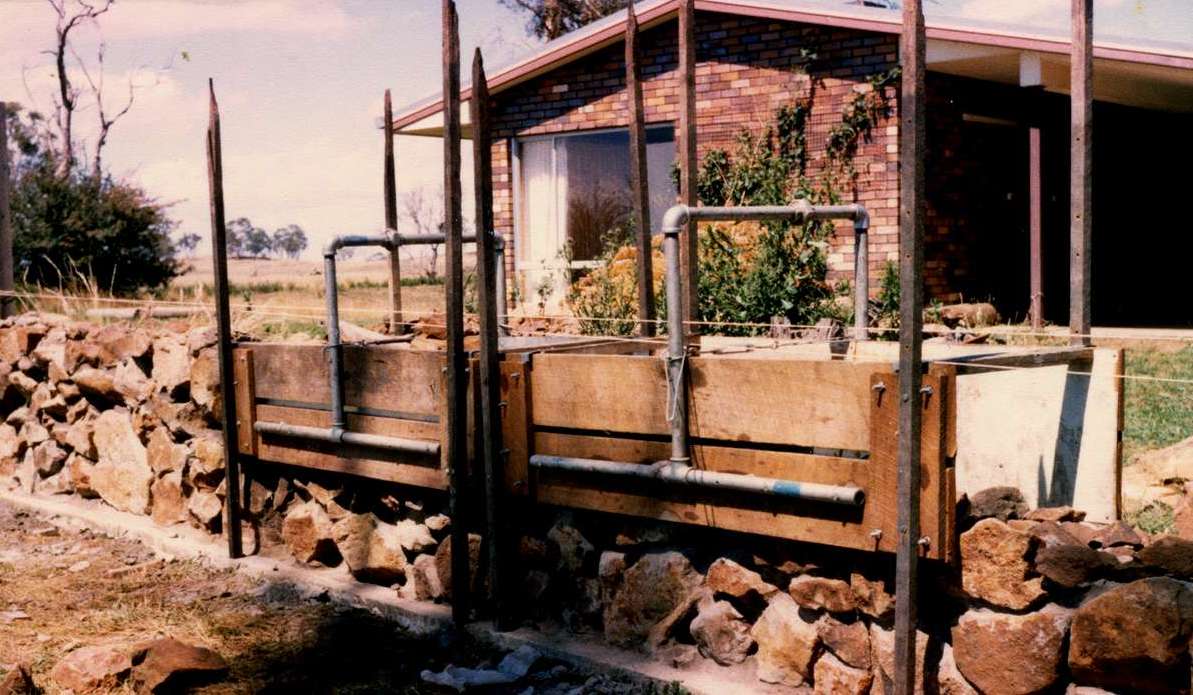
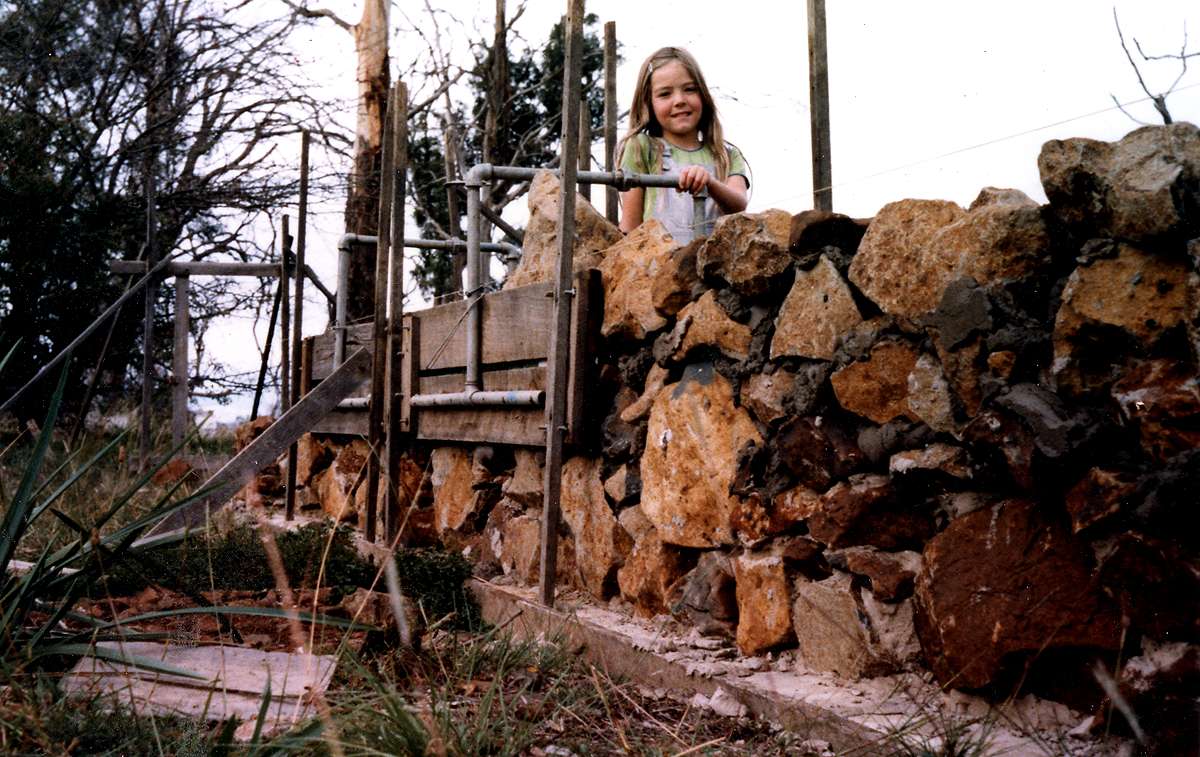
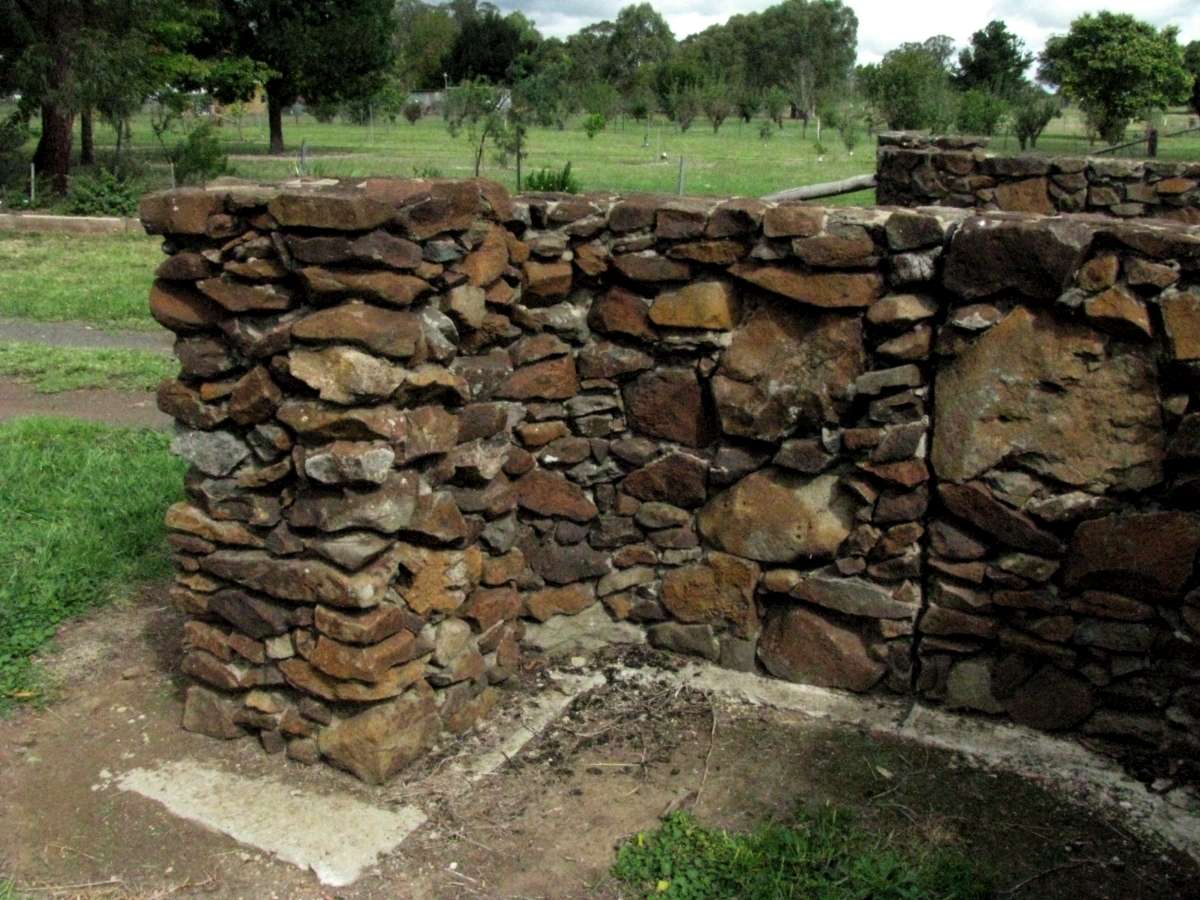
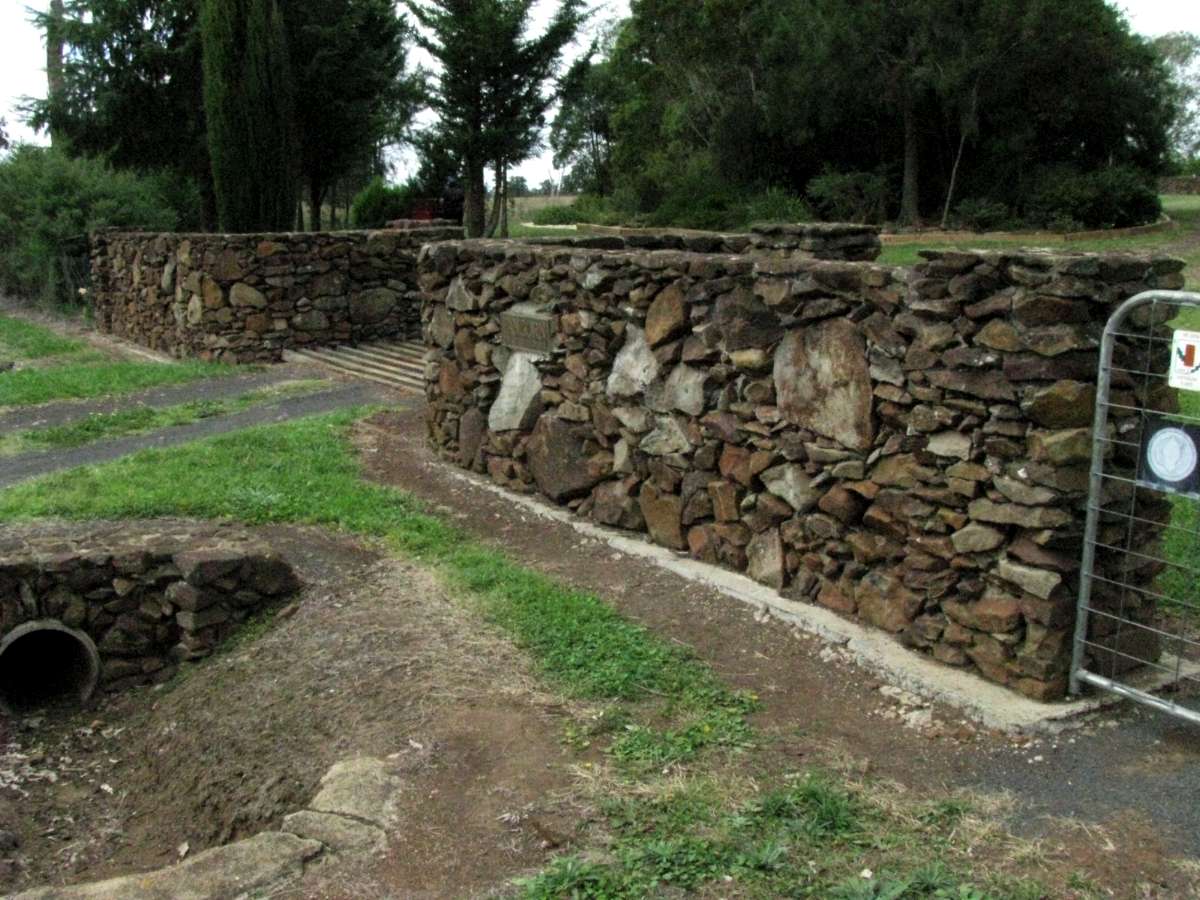
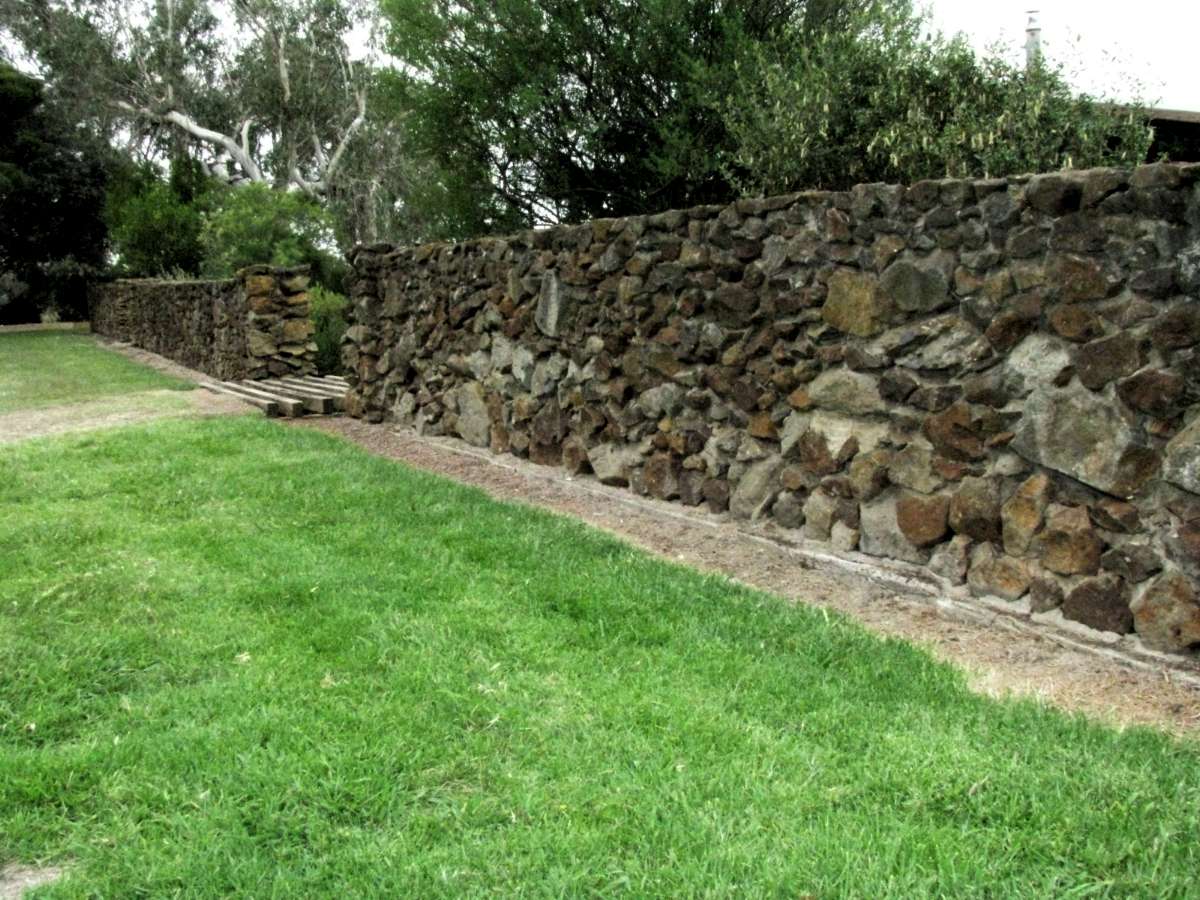
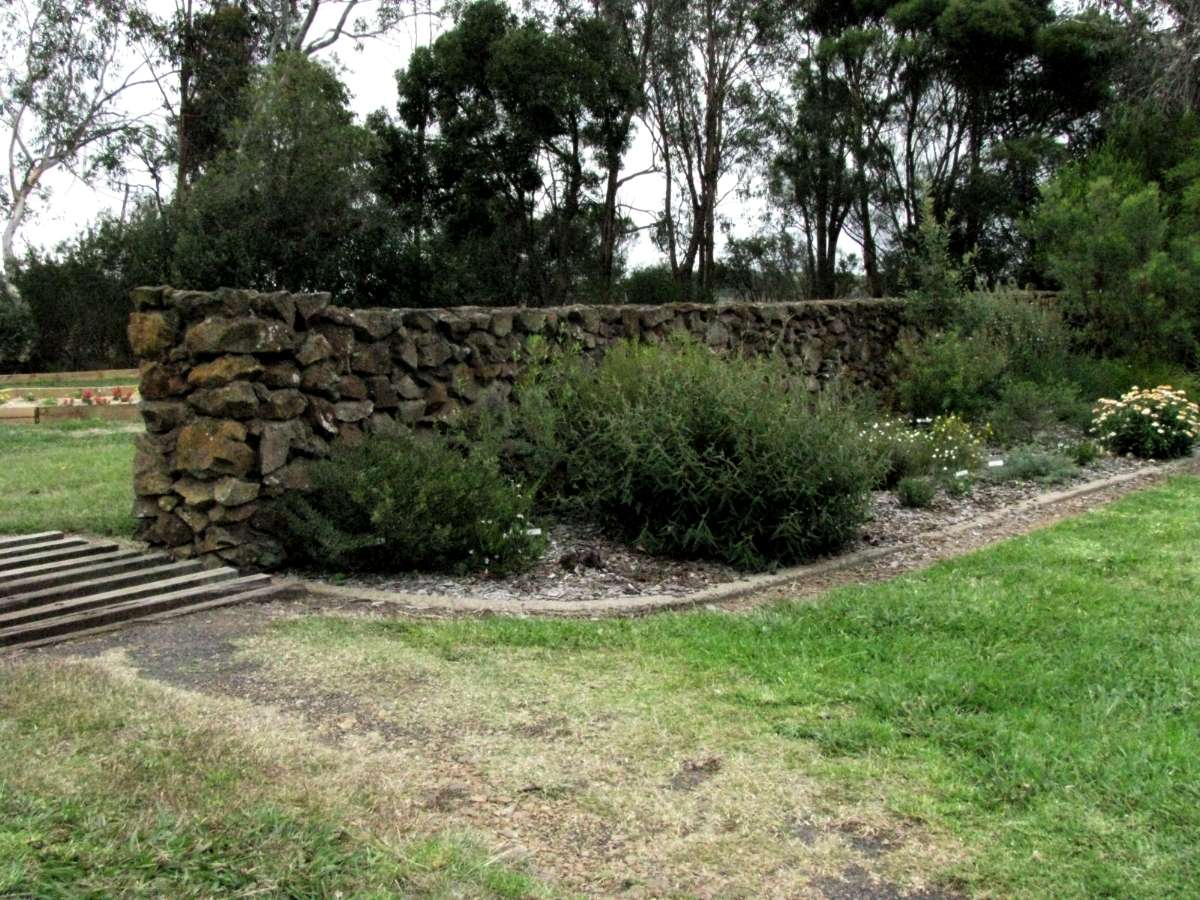
Stone walls at the entrance to our property, completed in the summer of 1993/1994.
Before I start describing this method, I would like to dispose of some hopelessly romantic and ill-founded notions about dry stone walls.
Certainly, dry stone walls are quick and easy to construct, though they soak up a staggering amount of rock for their height and utility.
Constructed properly (which in Australia they rarely are, it is a skilled craft) they are a beautiful thing. But they are never maintenance free.
There is a wonderful poem, Mending Wall by Robert Frost which begins:
Mending Wall
Something there is that doesn't love a wall,
That sends the frozen-ground-swell under it
And spills the upper boulder in the sun,
And make gaps even two can pass abreast.
The work of hunters is another thing:
I have come after them and made repair
Where they have left not one stone on a stone,
But they would have the rabbit out of hiding,
To please the yelping dogs. The gaps I mean,
No one has seen them made or heard them made,
But at spring mending-time we find them there,
I let my neighbor know beyond the hill;
And on a day we meet to walk the line
And set the wall between us once again.
We keep the wall between us as we go.
To each the boulders that have fallen to each.
And some are loaves and some so nearly balls
We have to use a spell to make them balance:
"Stay where you are until our backs are turned!"
We wear our fingers rough with handling them.
Oh, just another kind of outdoor game,
One on a side. It comes to little more:
There were it is we do not need the wall:
He is all pine and I am apple orchard.
My apple trees will never get across
And eat the cones under his pines, I tell him.
He only says, "Good fences make good neighbors."
In Australia in a garden situation, dry stone walls are a magnet for every weed in creation. Ivy, Periwinkle, Privet, Cotoneaster arrive unbidden and take up residence. The local University in Armidale has spent a fortune on trying to eradicate Ivy from their dry stone walls, which move the rocks willy nilly, and the Ivy when killed then shrinks and rots, causing the dry stone walls to collapse further.
Not only that, a good friend and wonderful gardener who built many dry stone walls in a garden near us finally pulled them all down.
He decided that the best description of them was "Tenements for Tiger Snakes"!!!!!!!!
The stone walls I describe here are close to maintenance free. No snake can take up residence, and it is almost impossible for weeds to invade, since there is no sustenance for them. Properly made, these stone walls are something which will greatly increase the market value of a property, and will give joy to the inhabitants, and shelter for plants which would otherwise struggle to survive. Armidale is a difficult place to grow plants, since we get fifty frosts a year, and drought is an ever present threat to the survival of plants. These rock walls offer protection from cold and hot winds, and radiate warmth they have soaked up from the sun during the day, during the frosty nights which follow in winter.
Foundations

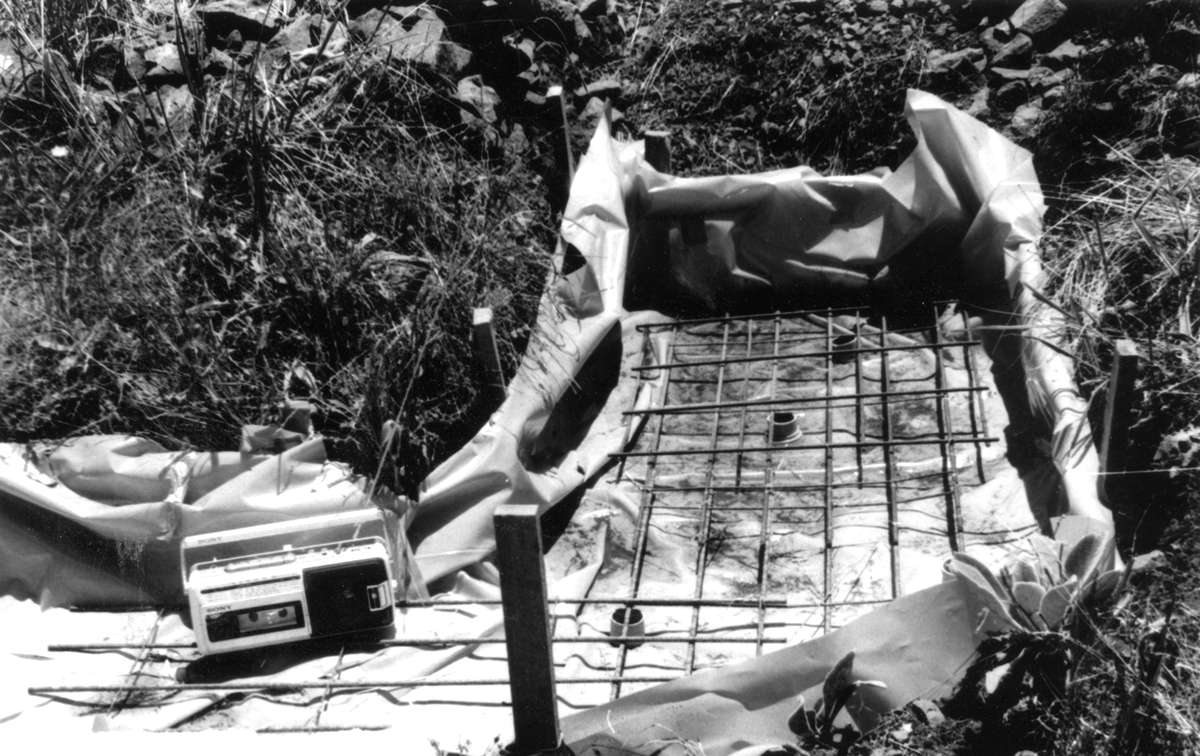
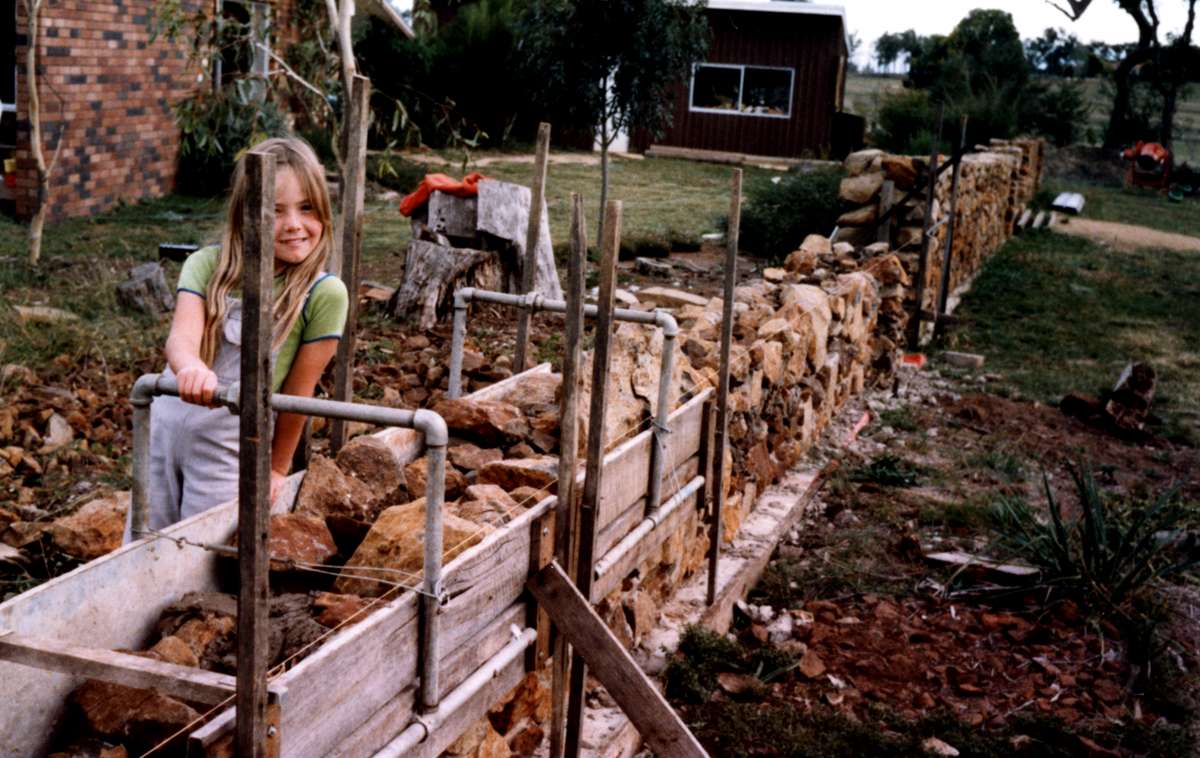
The first step is to dig the foundations. I build them very deep, at least six to nine inches. There is more weight in my stone walls than most house foundations have to cope with. Each linear metre of the front walls weighs more than one and a half tons, and the internal walls weigh more than one and a third tons per linear metre. The front walls shown in the photo above had foundations that were more than six inches thick, and with steel mesh reinforcement as shown in the photos to the left. I advise you to use steel mesh reinforcement no matter what the substrate. I dug the pier sections more than nine inches deep, and put extra steel in that part of the trench, and wired all the mesh together. Each of the piers weighs more than one and a third tons. I left an expansion joint in the foundations (near the radio in both photos) and later the wall to minimise the chance of cracking, since in this case the wall "turns the corner".
It is essential that the foundations be dead level from side to side, and for something like the front fence above, that the foundations be dead level from one end to the other. The side to side levelling can be done using a spirit level, but to get the levels from one end of the two sections of rock wall at the front entrance to the far end to be exactly right, I used a long piece of clear plastic tube filled with water, from which all bubbles had been excluded. This worked very well, and it is worth spending a lot of time and effort to get it right all the way along the trench.
If the wall is going to be going uphill or down, make sure that it is a standard steady fall or rise all the way from one end to the other, don't have waves in the foundation, they will be reflected in the top of the wall, and will greatly detract from the finished product. Remember too that although the wall itself can go down or uphill, the piers when finished must be completely vertical, and the tops of the piers must be horizontal, obtained by propping up the formwork temporarily on spacers such as wood shims at one end. This too is essential if you want a good looking result.
In addition, I lined the trenches with strong orange plastic. This had the effect of helping to keep the moisture in the concrete as it set, and also meant that the sides of the trench did not have to be concrete proof, and cut down a little on the amount of concrete needed. The width of the foundations should be at least eight inches wider than the width of the wall, with four inches of foundation showing on each side, both for the wall and the piers at each end of the wall.
The foundations should be poured in one pour, unless you are putting in expansion joints and can break up the work in that way. All foundations were mixed using an electric mixer, sand and gravel pre-mix and cement in a strong, waterproof mix of five of sand and gravel pre-mix to one of cement. Don't use too much water in the mix, it should be as stiff as possible while still being able to pour it into the trench. Good concrete is ruined by too much water.
As you pour, make sure that the steel reinforcing mesh is kept at the right height and doesn't move from the middle of the trench to the sides. Level the concrete from side to side using a wooden screed with a side to side see-saw action, and later a wooden float to get it flat but with a rough surface which keys easily to the mortar. By the time you get to the end of the pour several hours later, the first part will have begun to harden. I scratch my name and the date on the concrete which will be covered by the rock wall, as well as somewhere it can be seen but is not obvious on the margins.
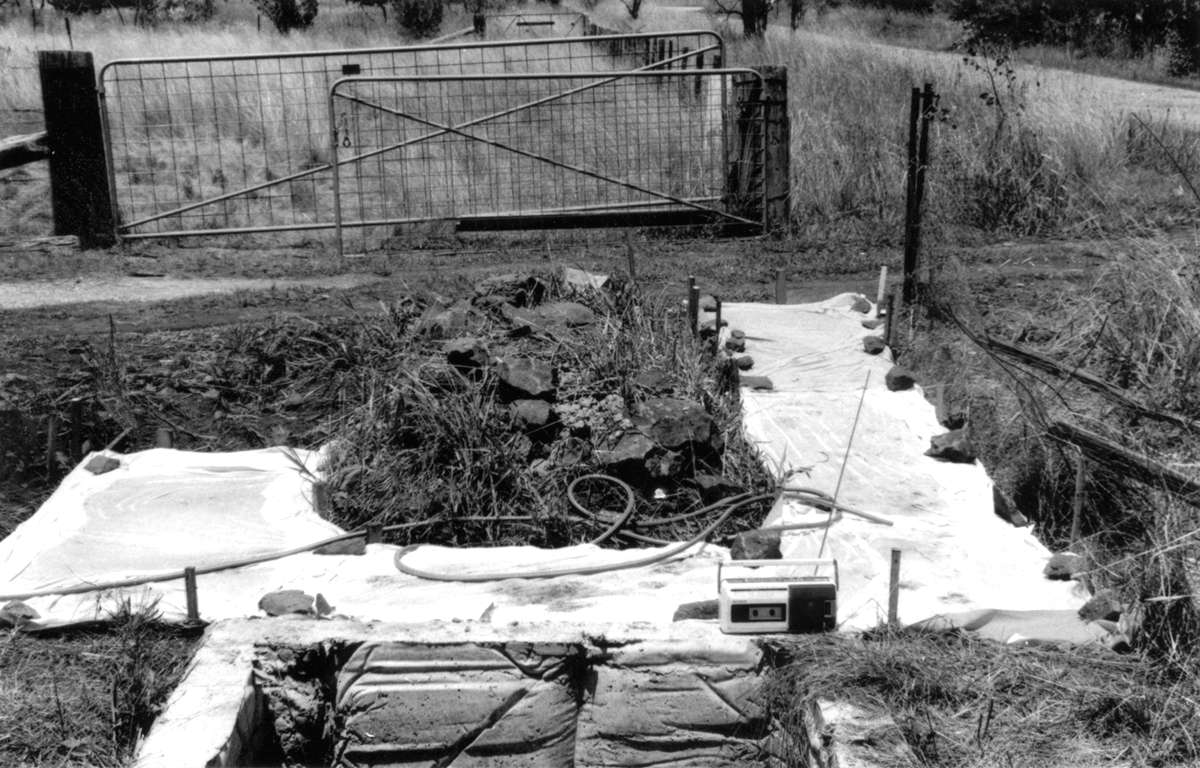
Once you have completed the pour, keep it wet for at least a week. This is easiest to do by spreading plastic over the foundations and putting the hose under the plastic a few times each day. This gives the concrete added strength.
Photo: Don Hitchcock
Once you start building rock walls, it's hard to stop....
Photo: Don Hitchcock
Getting Ready
You will need to set up two vertical posts, one at each end of the wall, but a few metres from each end of the wall, so that you can line up one edge of the formwork, using a builder's line, and still have room to move around the ends of the wall during construction without bumping the vertical post out of true. I use a nylon braided line specially made for the purpose which is light, strong, and stretchable. The two posts must be vertical over the entire height you plan to make the wall, and should be at least six inches higher than the planned height of the wall.
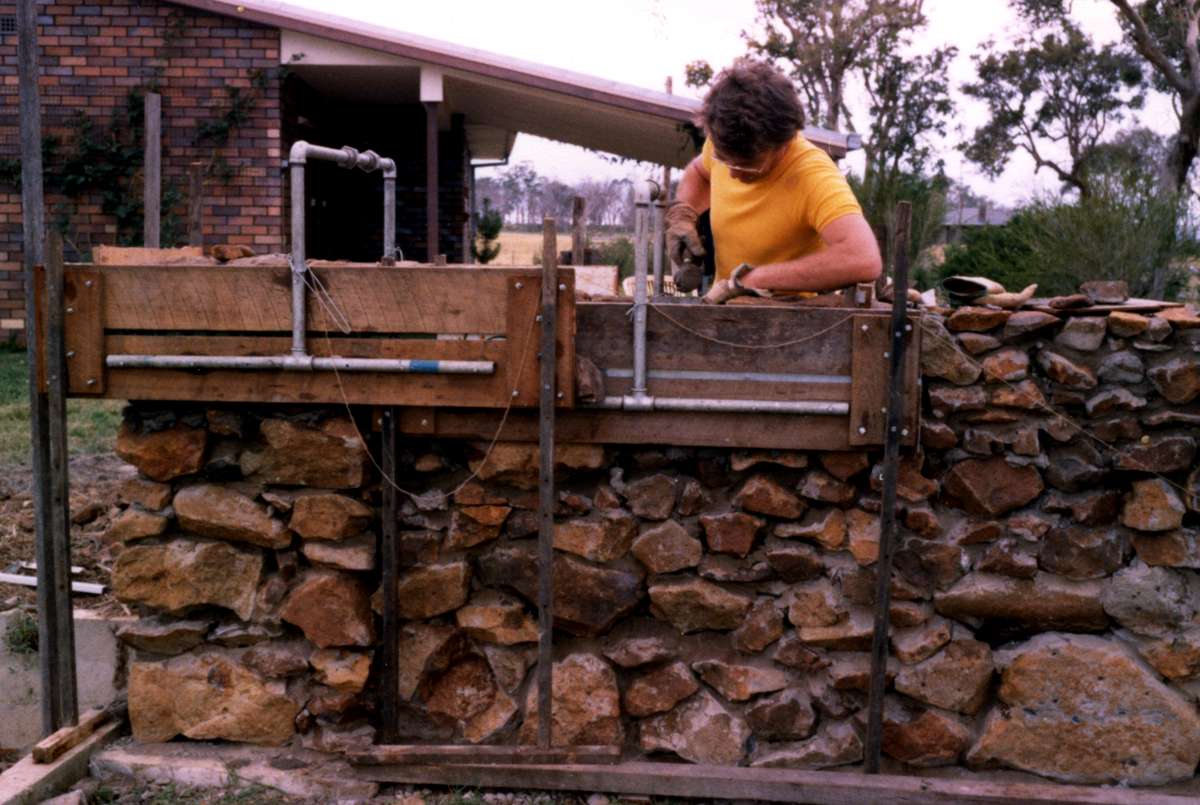
I was sometimes able to use steel fence posts, called star pickets here, for my vertical posts. Because the ground is so rocky, sometimes it was difficult to get the steel post to be vertical, and often I had to bolt a piece of wood to the steel post, making the edge of the wood vertical, or even to set up a wooden triangular formwork to carry a wooden vertical board in the right position, as can be seen in the photo at left. Be wary of wind when lining up your formwork, with a long section of wall the line can be blown significantly off true. I organised the vertical posts so that the line went along the inside edge of the formwork, and this worked well. You only need to line up one side, the other is automatically lined up by the formwork, and because the two sets of formwork (or their supports) sit on the horizontal surface of the foundations, it is always vertical as well.
Photo: Don Hitchcock
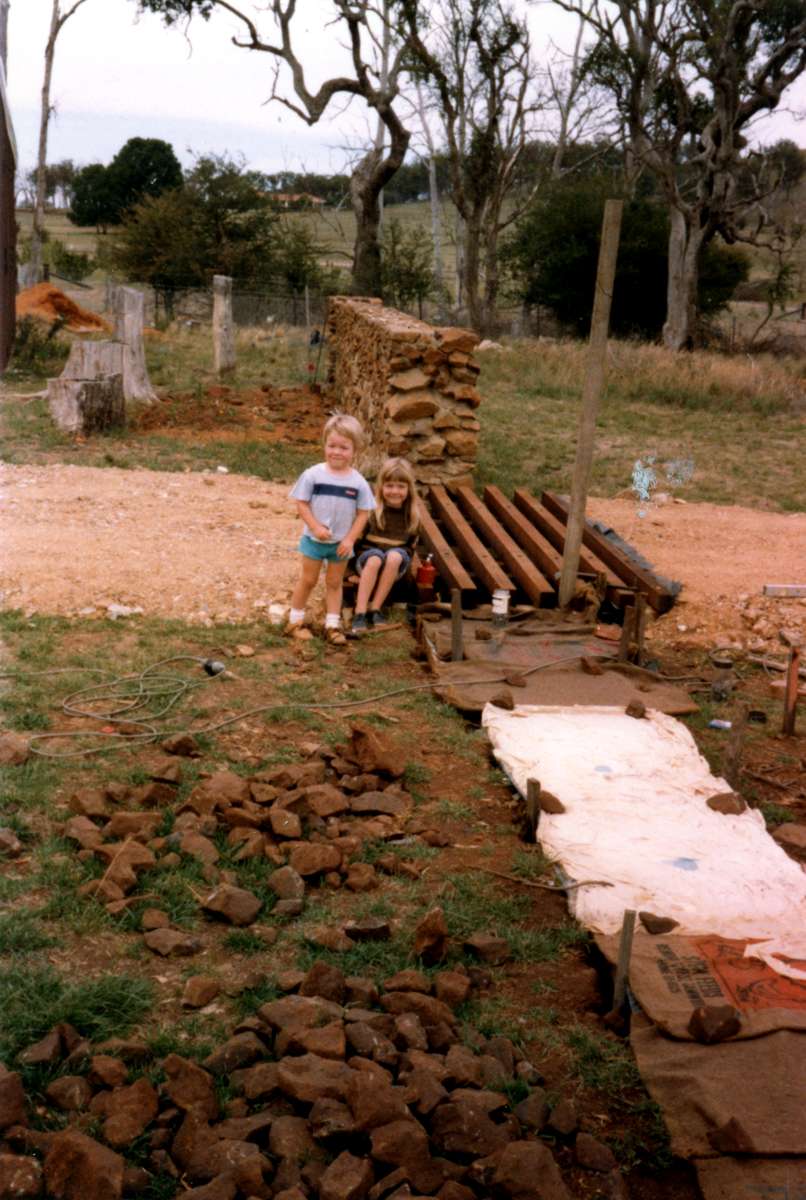
Once the concrete foundations have cured, after a week of keeping them wet, you can pull off the plastic, or in this case old sacking and waste textiles, and you can re-check the vertical posts and put the formwork on the foundations. The structure the children are sitting on is a stock grid, used here to keep stock out, without needing to open and close a gate. You should always complete structures like this before laying any foundations.
Photo: Don Hitchcock
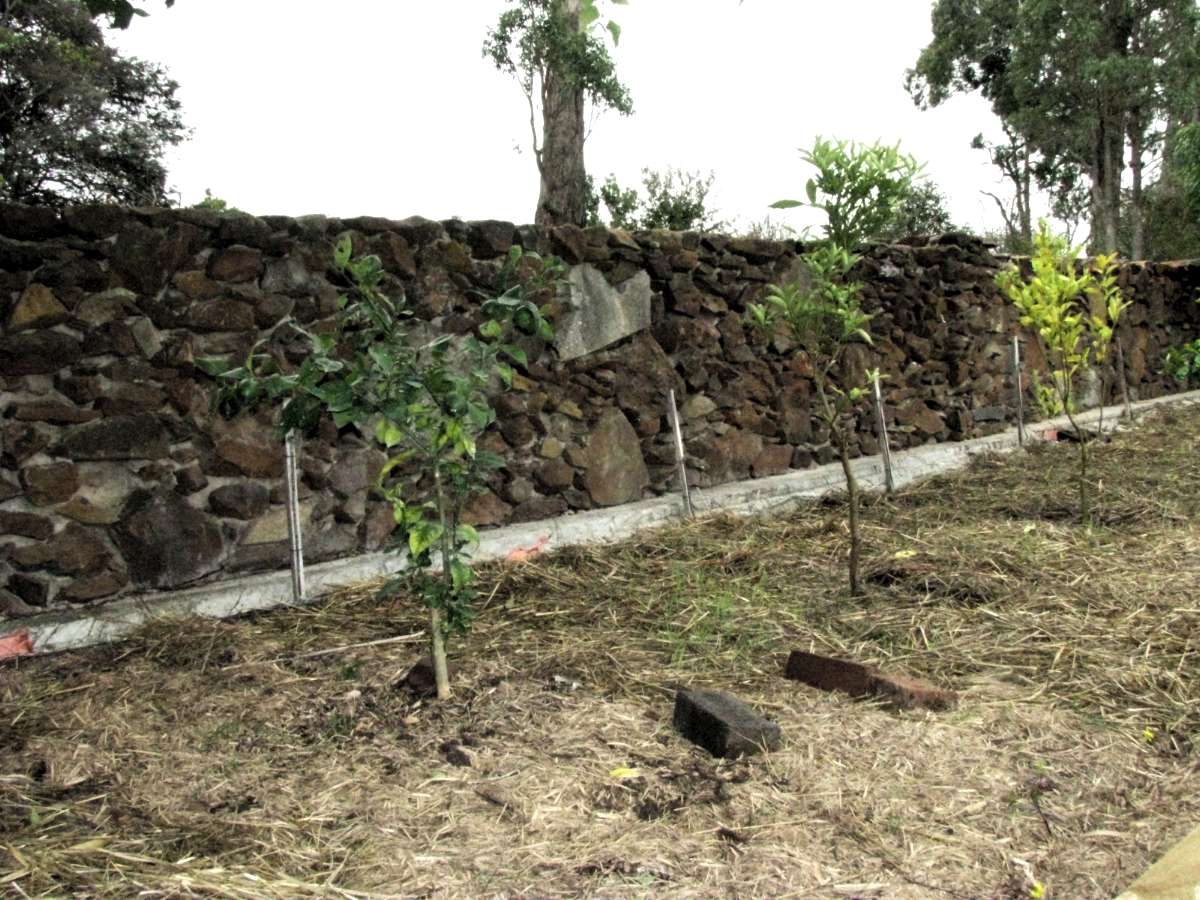
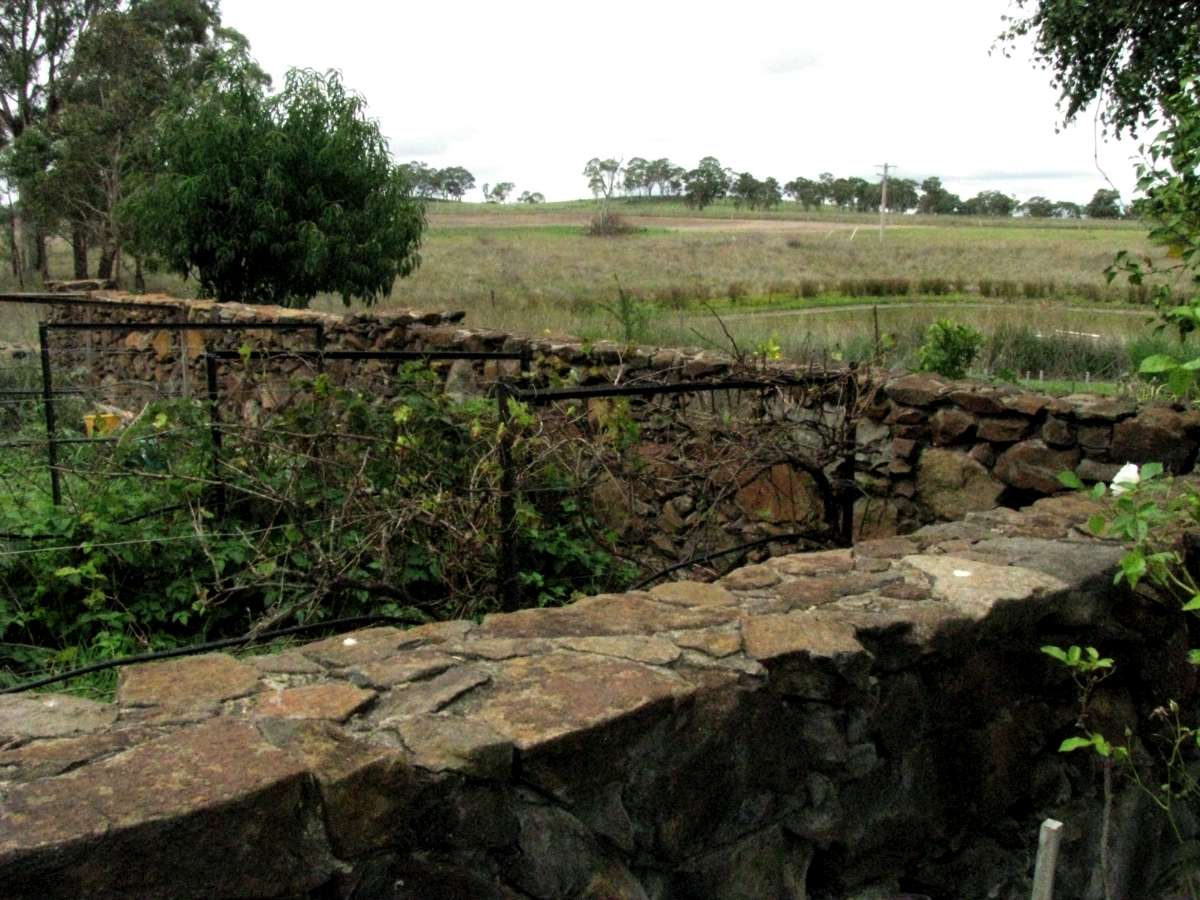
Rock walls facing east have allowed us to be able to grow citrus fruit, which are marginal in this area, since we get fifty frosts a year. They derive shelter from the stone walls, and the stone walls provide a satisfying visual backdrop for the trees. We grow lemons, cumquats and oranges, and even red grapefruit, while a self sown nectarine provides large crops of delicious fruit in season.
Photo: Don Hitchcock
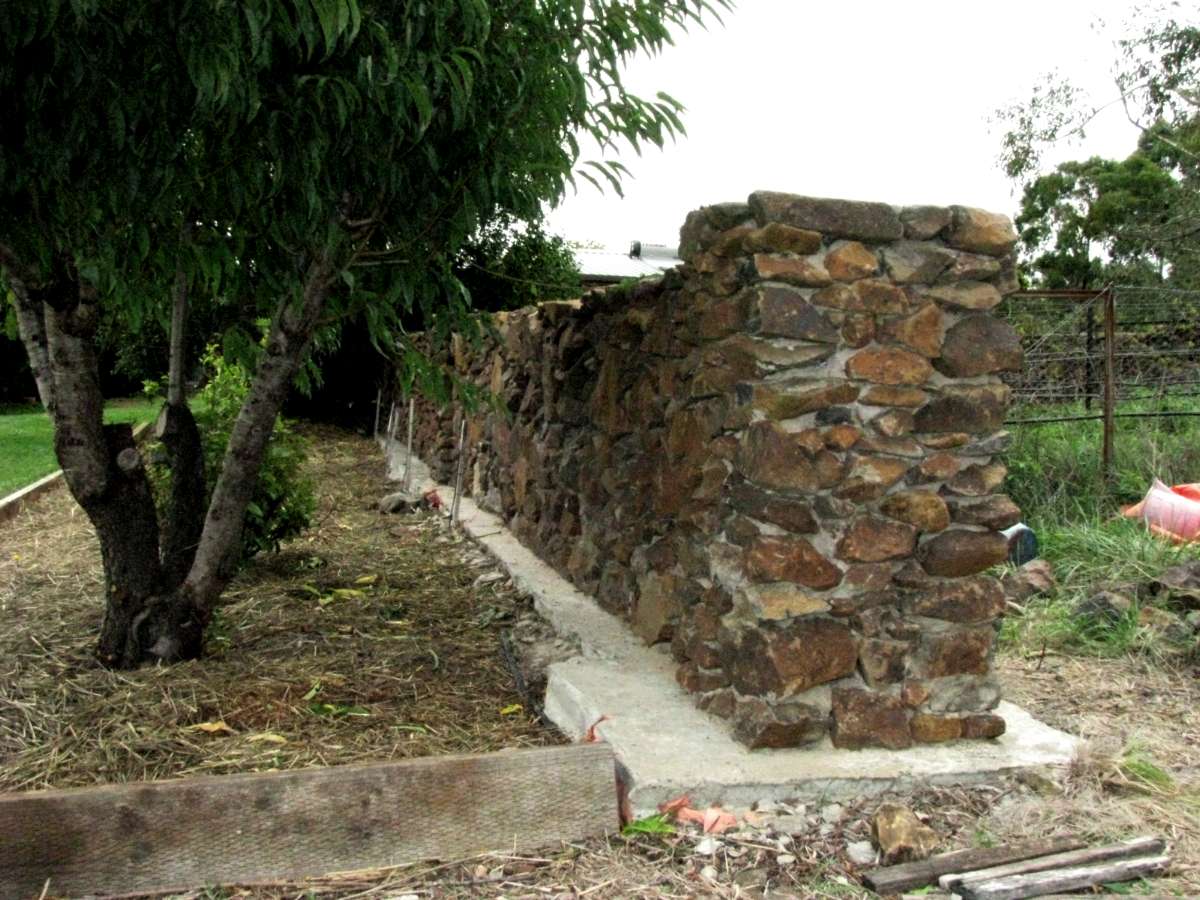
Boysenberries and brambleberries and grapes thrive on the western side of the same wall, completed in 2009.
Photo: Don Hitchcock
Standard Straight Walls Formwork
The first stone wall, photographs taken in 1980.
The internal stone walls are three feet six inches high and eighteen inches across.
The internal stone wall piers are three feet nine inches high, and are two feet square.
For the front walls, the walls are four feet high, and the piers are four feet three inches high, with the same widths, eighteen inches across, two feet square for the piers. These proportions give a very good and solid looking wall. It is a mistake to make a free standing stone wall like these too thin. If it is well made, it will be strong enough, but it will not look substantial. In addition, you will not need as much skill to build a thick wall as a thin one.
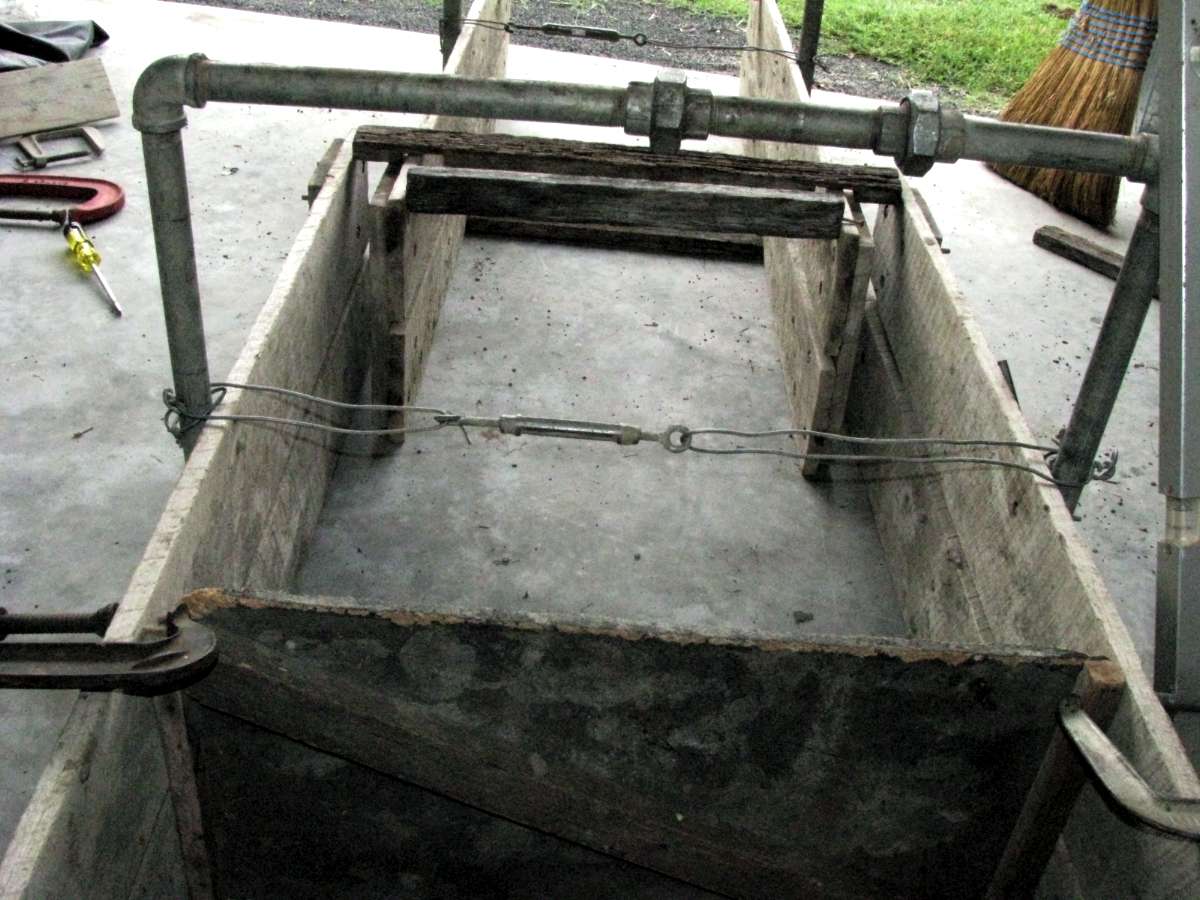
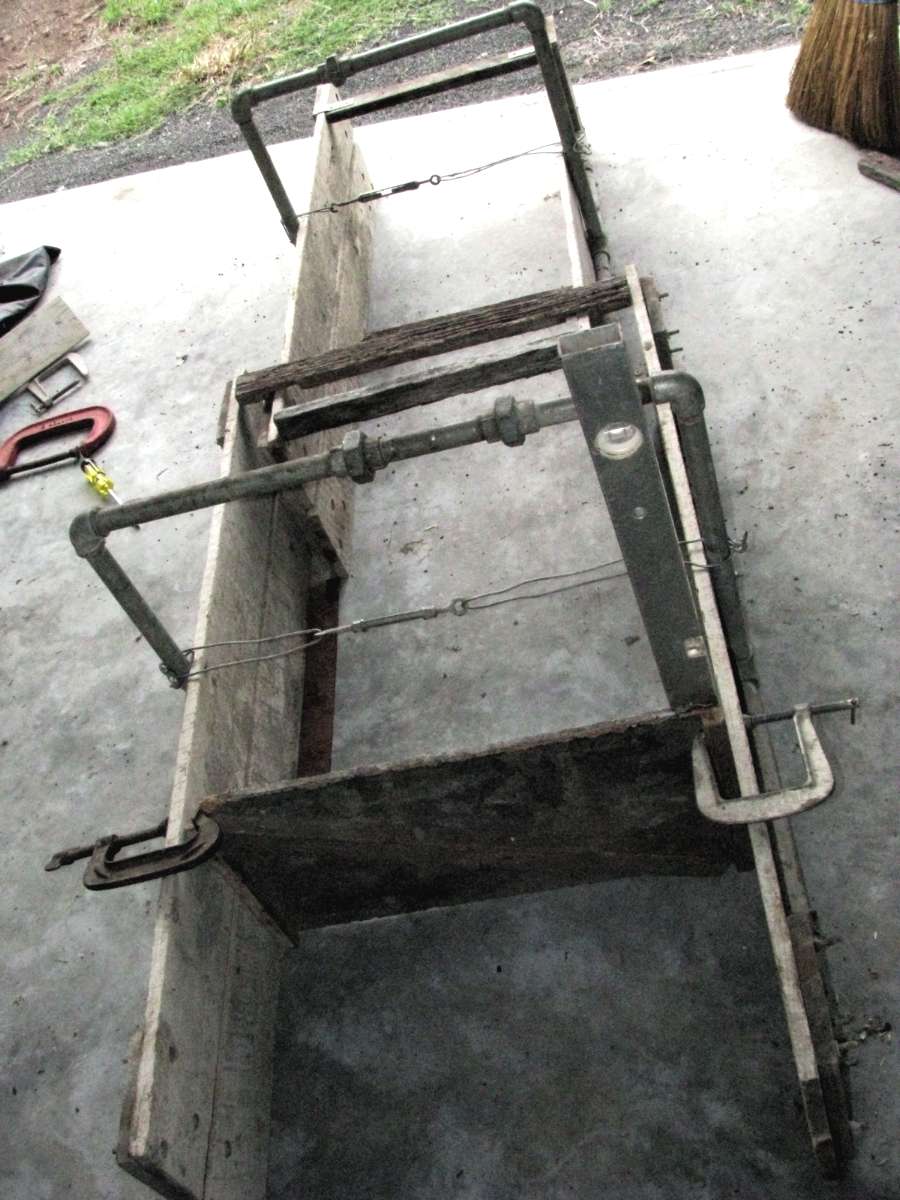
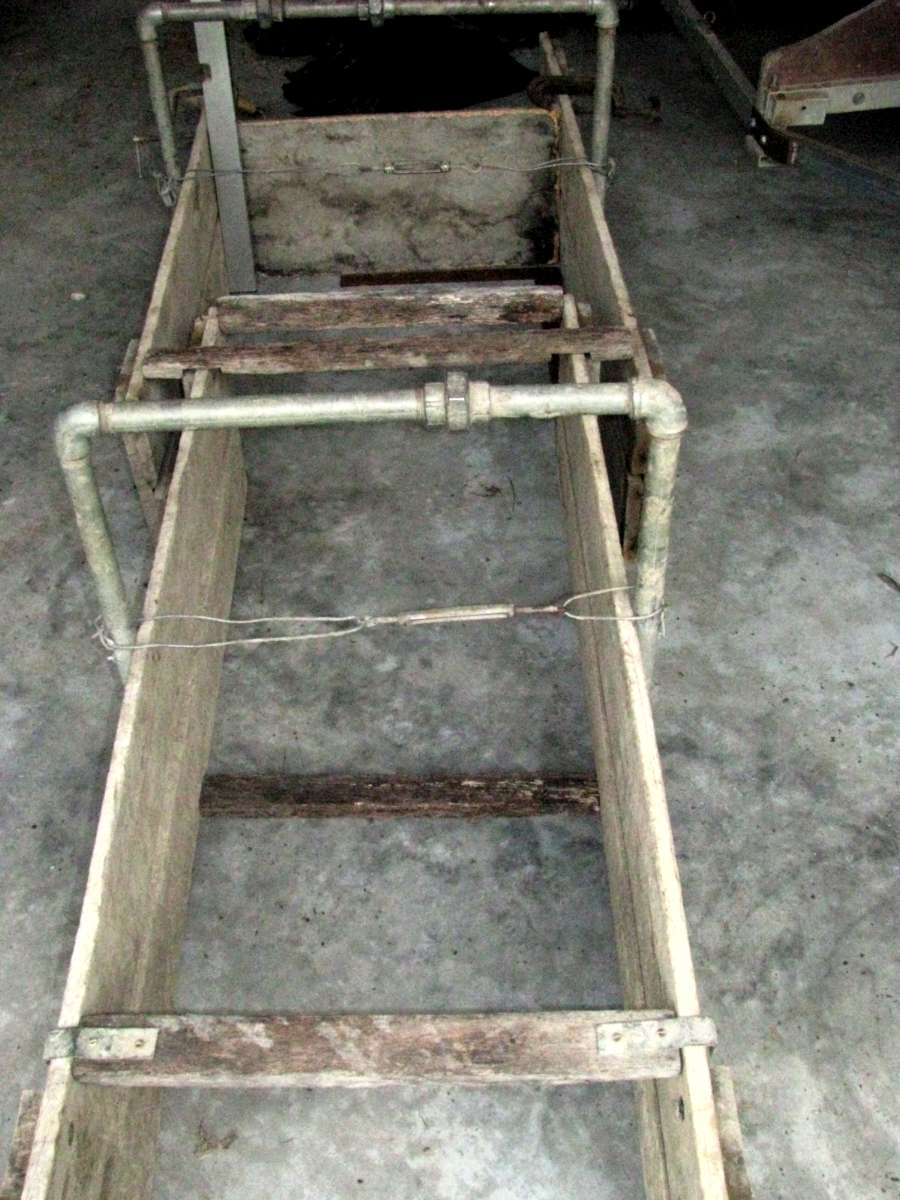
I made my formwork using hardwood wooden planks bolted together, and with pipe which I measured, cut, and threaded. This is a labour intensive process, and if I were to do it again, I would buy some thick waterproof marine ply, and use that for both the sides of the formwork and as a substitute for the pipe, bolting uprights to the middle of each side of the formwork, then using a heavy metal angle bracket without triangulating reinforcement (which I found got in the way when I used them in the curved section formwork) to hold overlapping horizontal pieces of marine ply, drilled to accept bolts and wingnuts, with one slightly higher than the other to account for the thickness of the ply. This method has the advantage that you just drill some extra holes and move the bolts when you want to widen the formwork for the piers. You will need two sets of formwork, so that you can work on both the pier and the wall at the one session. Only one set needs to be able to be widened to the width of the pier.
When using the formwork for the piers, I inserted a short piece of pipe to widen the formwork by six inches, which can be seen in two of the photos above. To get the extra height of the piers, I simply stood the legs of the piers formwork on bricks or wood to get it the three inches higher that I needed.
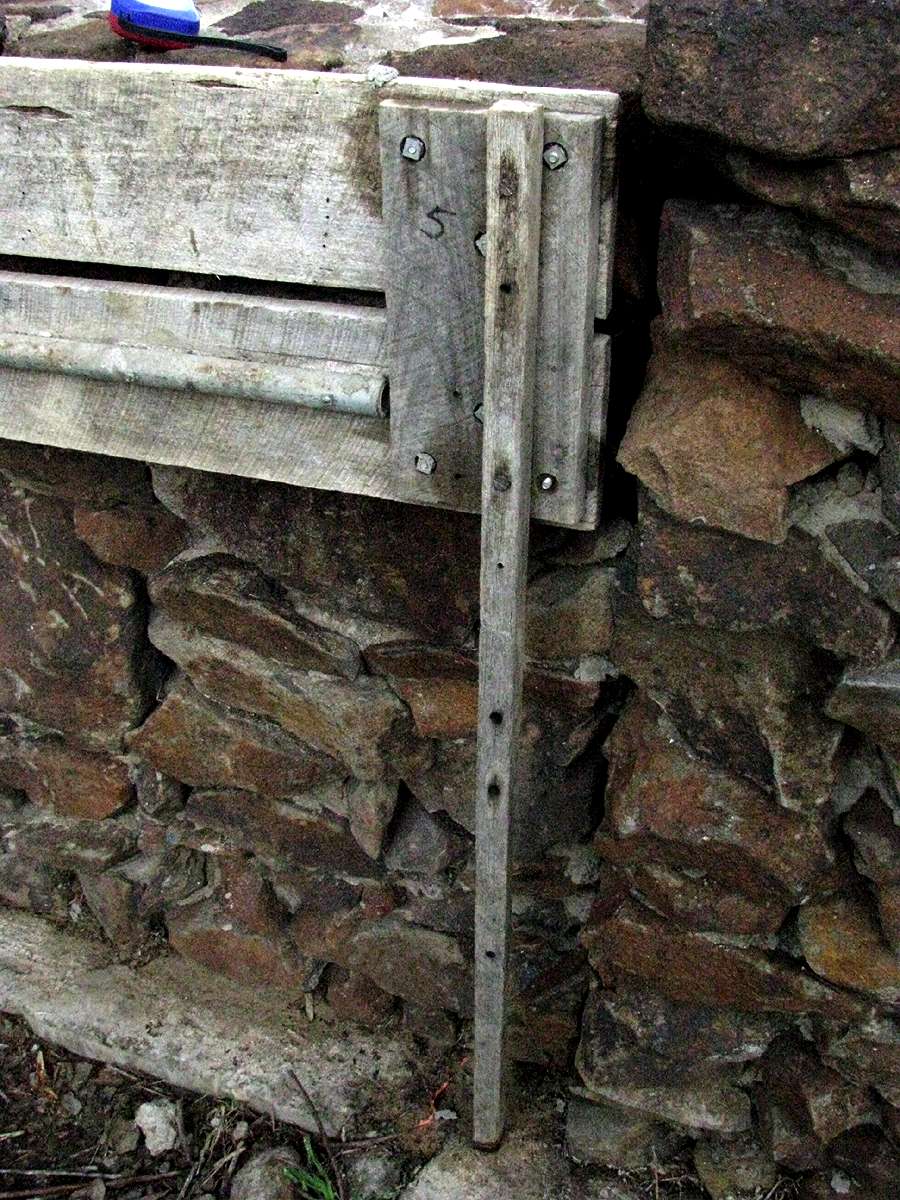

The basic measurements for the formwork are four feet long by one foot wide. I used tomato stakes as a method of moving the formwork up the stone wall. I attached the stakes with ordinary wood screws. Originally I had sheet metal lining the form work, but eventually took it off when it did nothing useful and got coated with mortar which was difficult to remove. Mortar falls off, it does not need to be removed from raw wood.
It is important to have a method of tightening the formwork. I used a turnbuckle, and constructed the formwork modified from the diagram of what is called the "Modified Magdiel form" in an inspirational book called "Stone Masonry" by Kern, Magers and Penfield, 1976, published by Owner Builder Publications. Although it is out of print, it is still available in used but good condition from booksellers such as Amazon. I read this book over and over until it was dog-eared. I got the principle of finishing the top of a stone wall "effortlessly" from this book. I highly recommend it.
You will also need to make up an end piece for the piers. I used a number of methods, but finally settled on a piece of chip board strengthened with pine off-cuts, and with vertical off cuts on each side, to which I attached G-clamps when I wanted to do the end of the wall.
Photo: Don Hitchcock
Rounded Corners Formwork
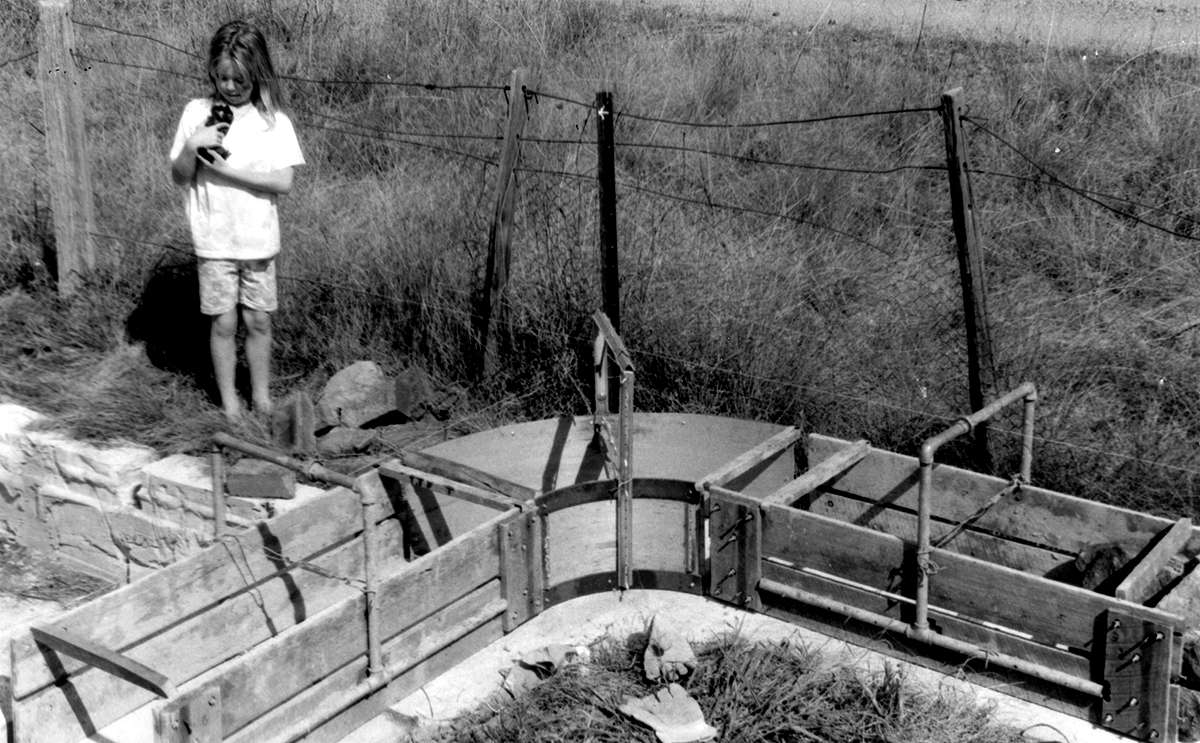
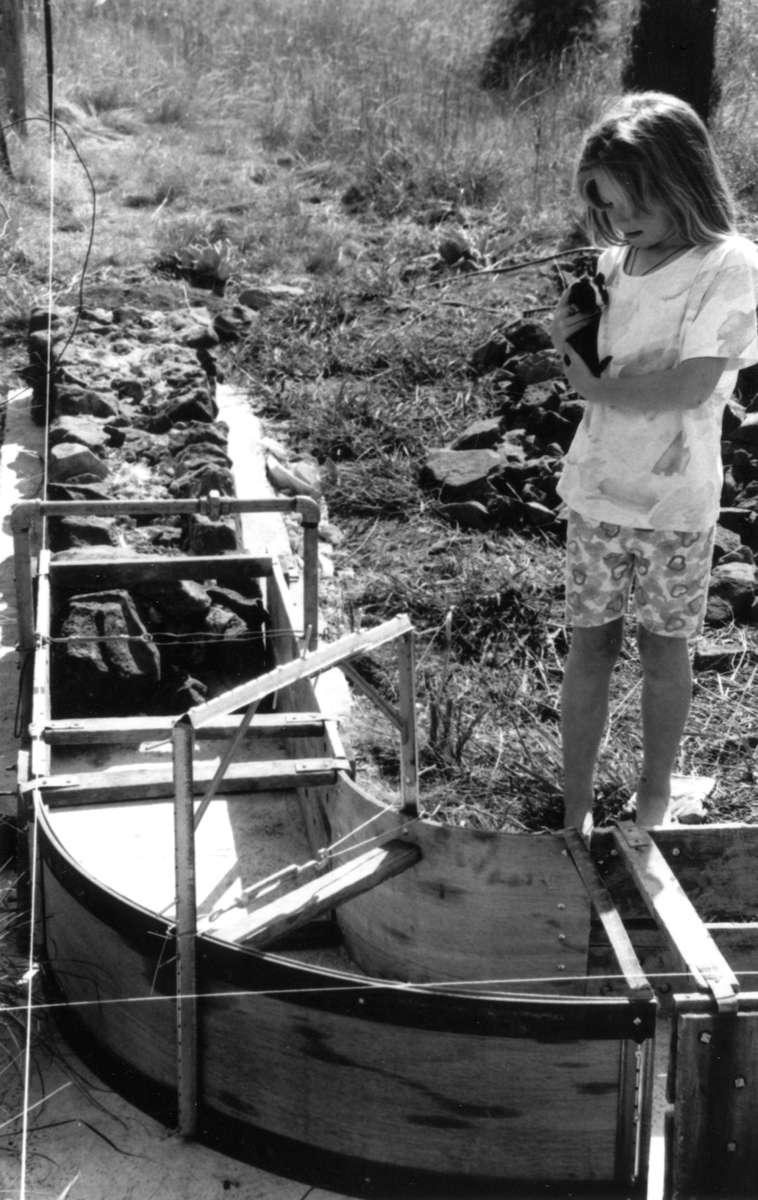
To get a good result for the rounded corners I wanted for the front entrance walls, I needed two pairs of heavy steel bars bent to the dimensions I needed. I calculated the radius of each of the turns, worked out how long the bars had to be, and took the plans to a local engineering works. They had no trouble cutting and bending the four bars into perfect arcs for me, and it was not expensive.
I then drilled holes in the bars, and attached thin three ply to the bars, and made up an arch to hold the whole thing together using fence droppers, thin bolts and nuts, and a couple of shelf brackets. It was not worthwhile spending a lot of time and money on this formwork, it was specific to this job only. It held up well, and was perfect for what I wanted.
Photo: Don Hitchcock
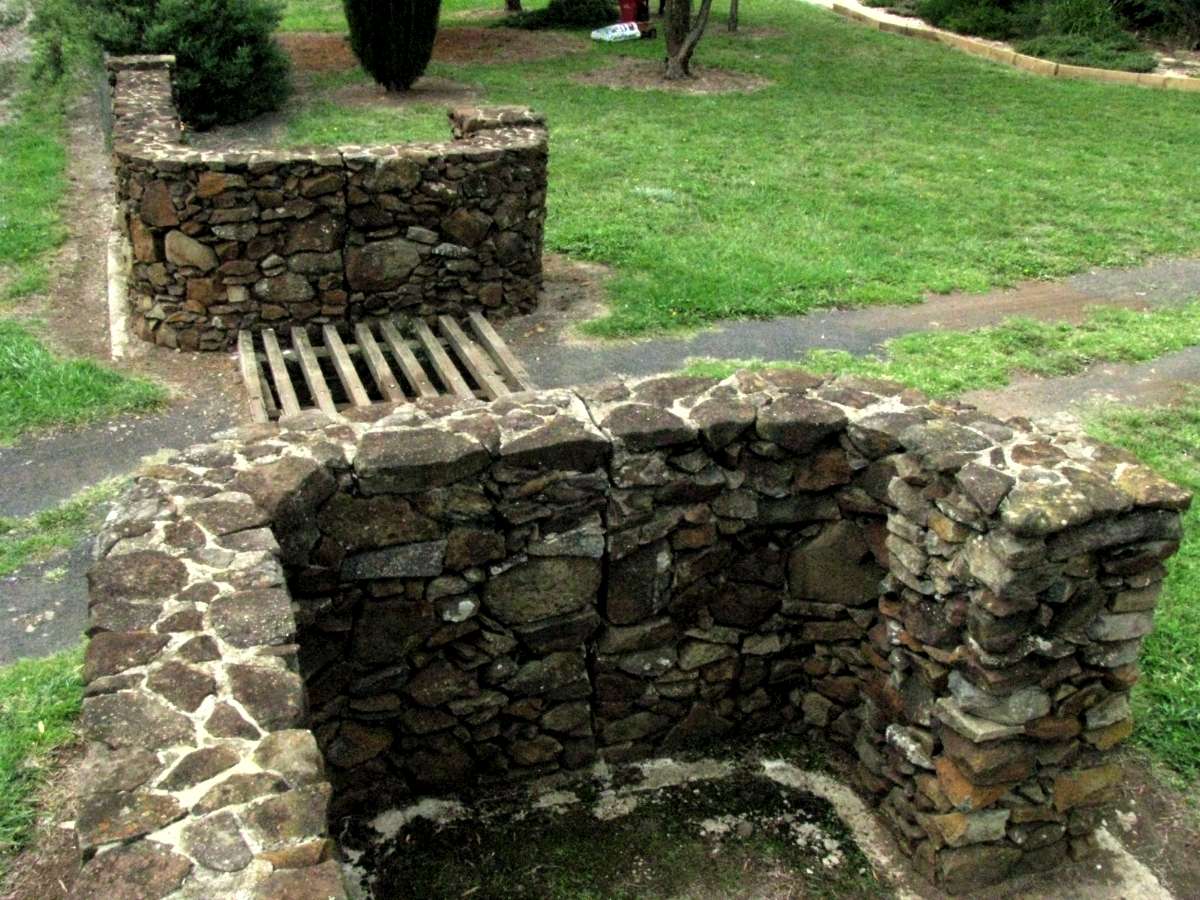
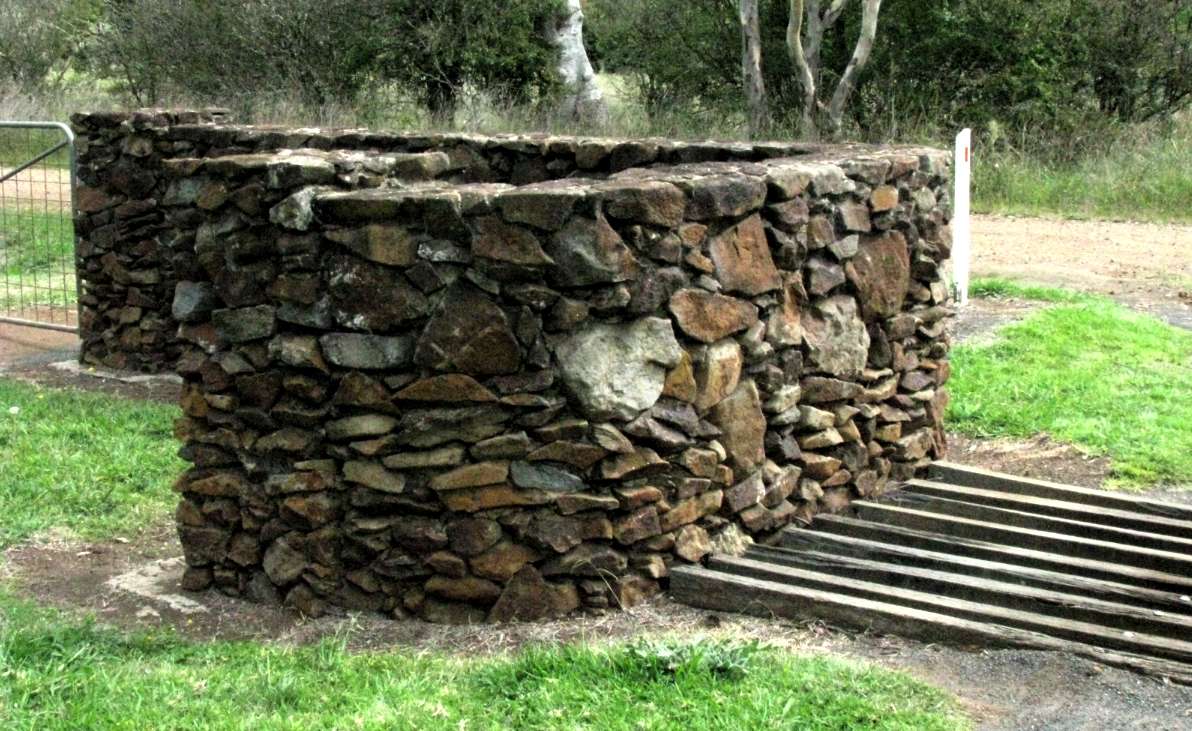
The front entry walls and grid are my pièce de résistance. I could only have attempted it after a long apprenticeship of building many uncomplicated straight rock walls. If you are contemplating building rock walls for the first time, I advise you to do the same, and complete a number of smaller projects before tackling something this ambitious. If you get it wrong, it is not easy to undo.
Don't be tempted to plant a foundation destroying tree in the space defined by a construction such as this!
Photo: Don Hitchcock
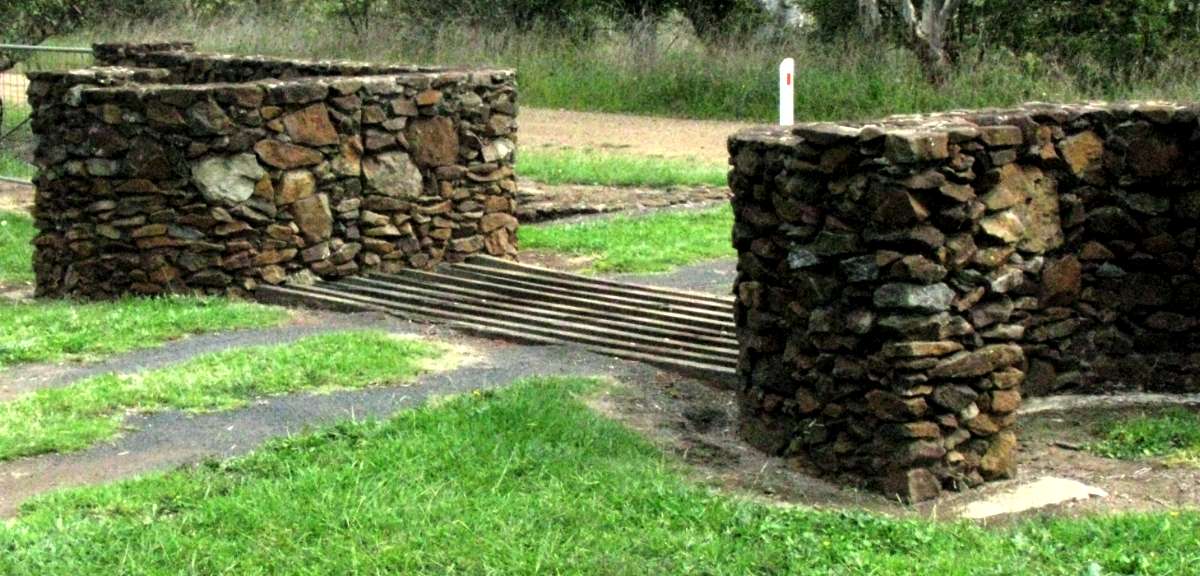
There were a number of problems to solve, not least that I wanted the entry to be rounded, not a sharp rectangle form, since cars enter it at a reasonable speed. I wanted the stock grid to be generous in width, in marked contrast to most entries to country properties in our area. I first completed the pit for the grid, constructing it from concrete very well strengthened by good quality steel mesh, and using a very strong mix. Large trucks have used it with no ill effects, a tribute to its design and strength.
Photo: Don Hitchcock
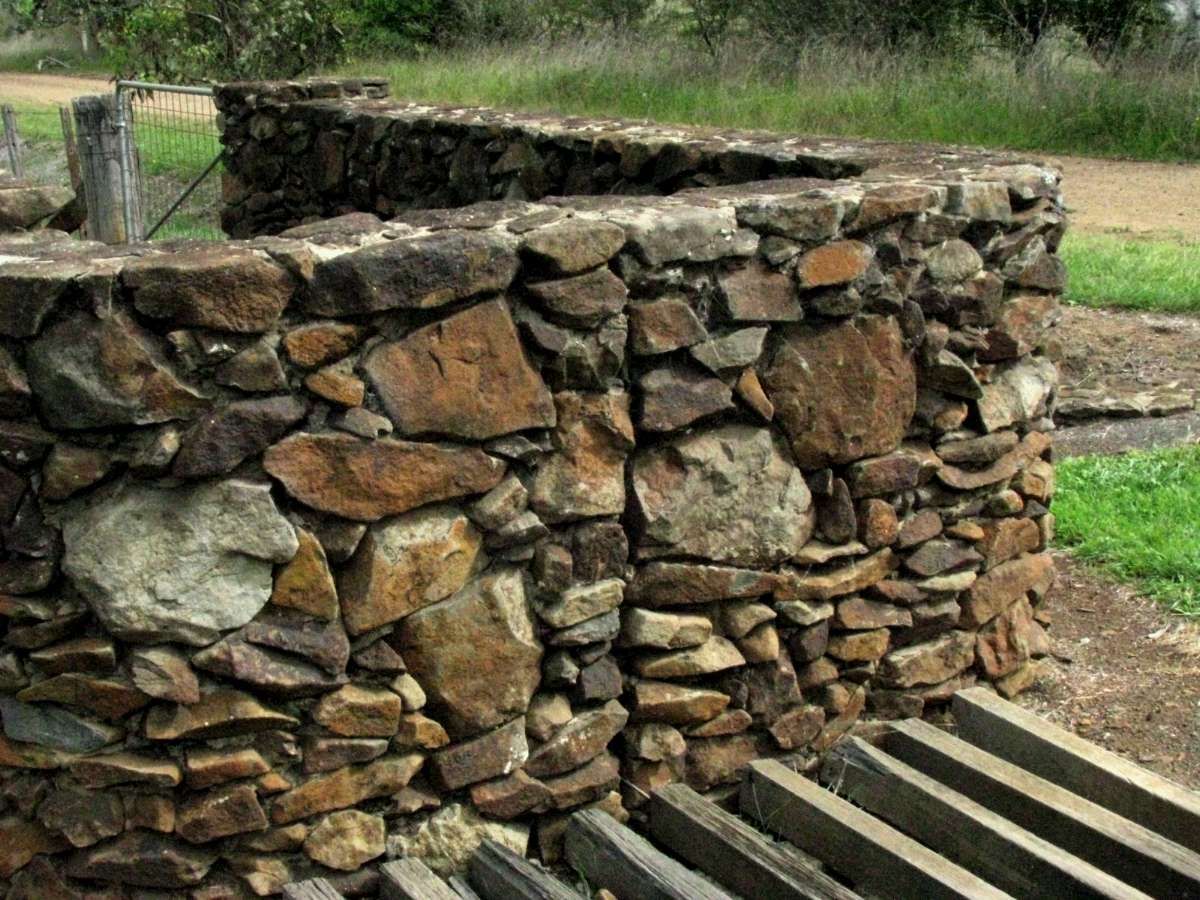
I was advised by Les White, a good friend of mine with a lot of experience in building not only grids and other utilitarian farm structures, but also houses, that the grid needed to be above the general level of both sides of the grid, to avoid the pit becoming filled with gravel. This advice was invaluable, and the grid works well.
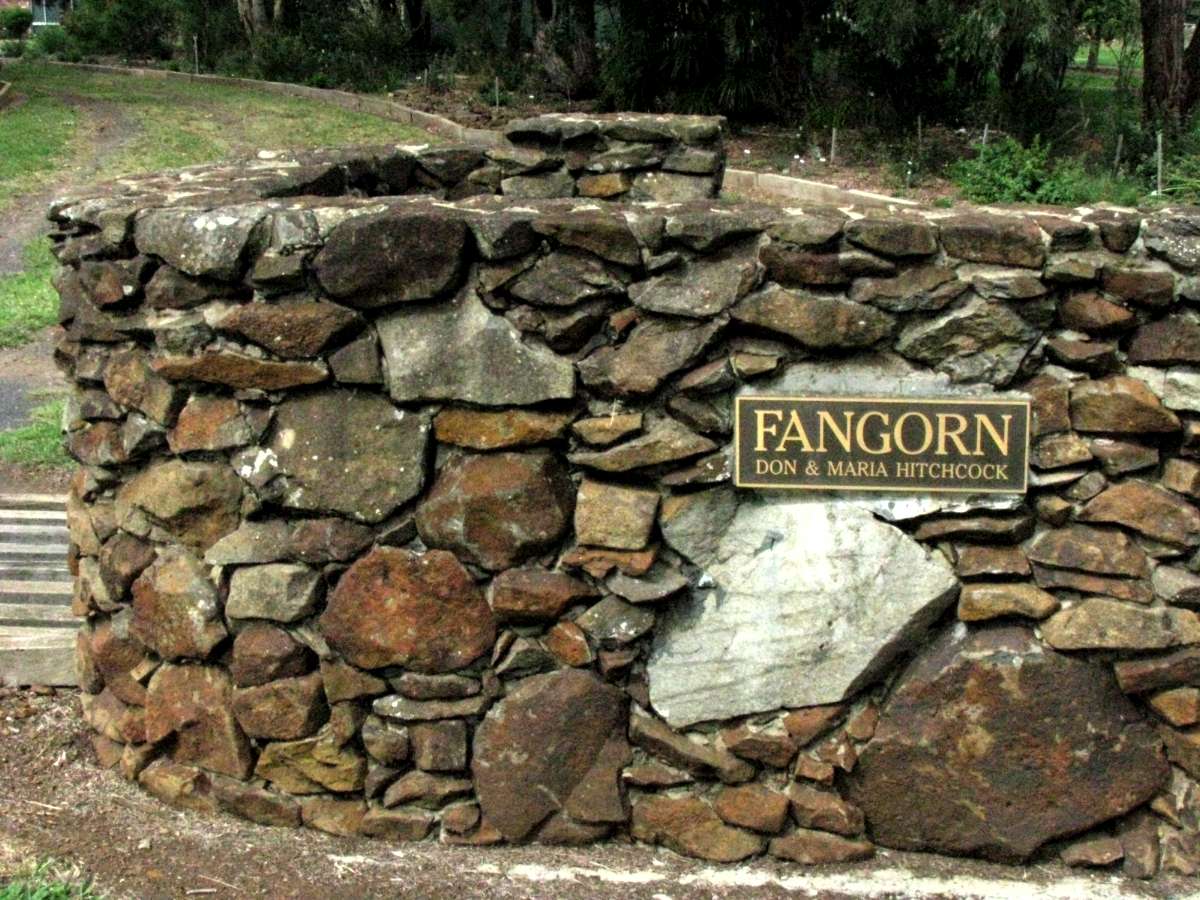
Photo: Don Hitchcock
Les also advised me to put an expansion joint in each of the walls, both in the foundations and in the rock walls. I was not sure how easy this would be to do, but I followed his advice, and all went well, and most visitors would never know they are there.
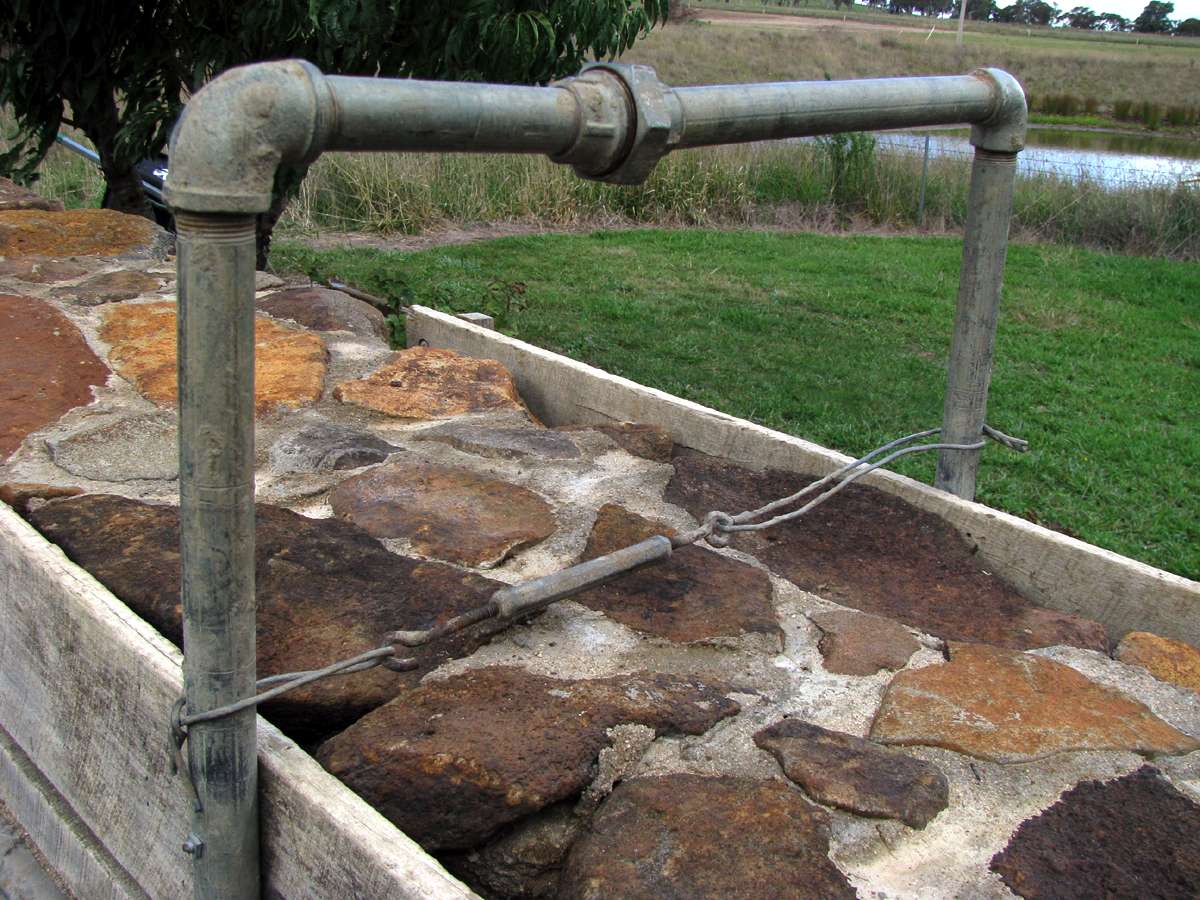
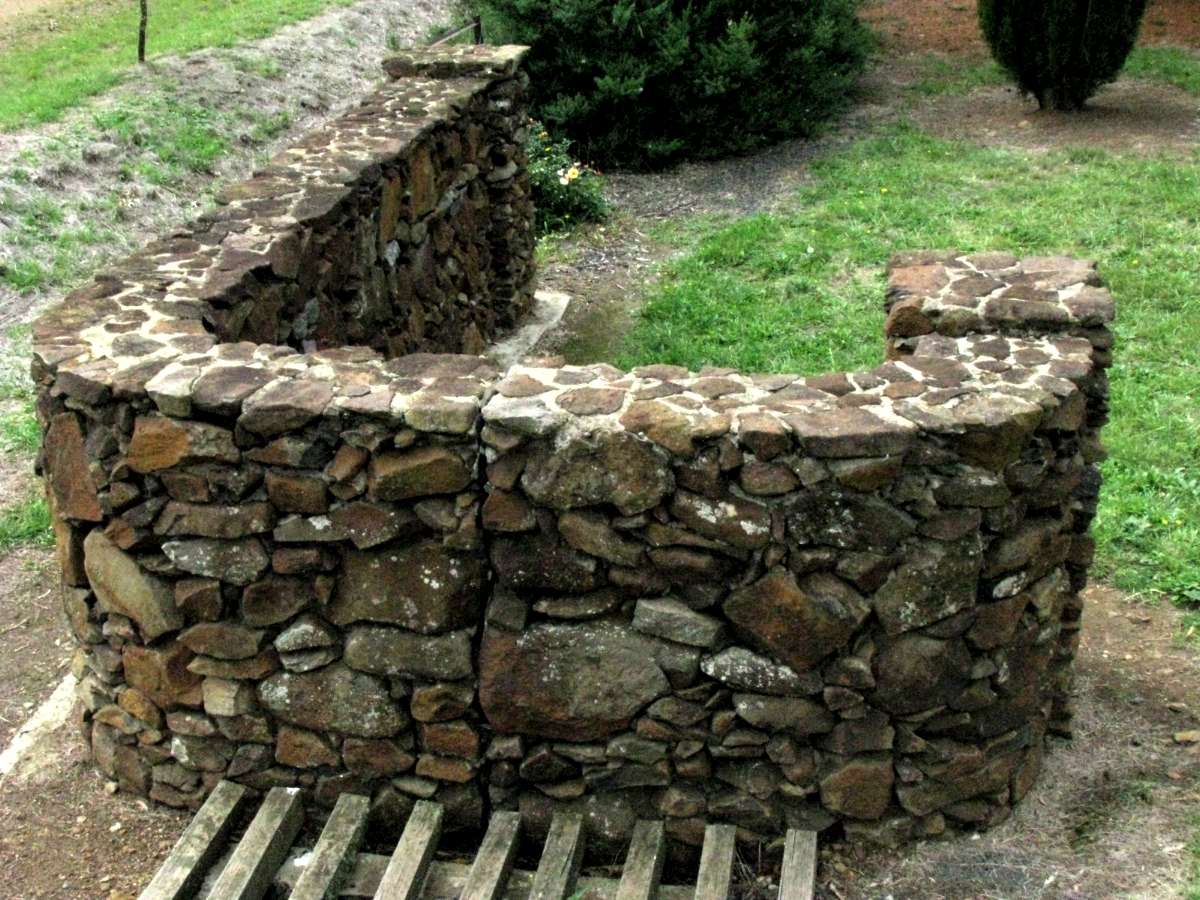
The top of the walls are dead level and flat as a tack from side to side and from one end of the two walls to the other. This is a source of great satisfaction to me. It took time and effort to do, but there was nothing inherently difficult in the task, and it improves the project immeasurably.
Photo: Don Hitchcock
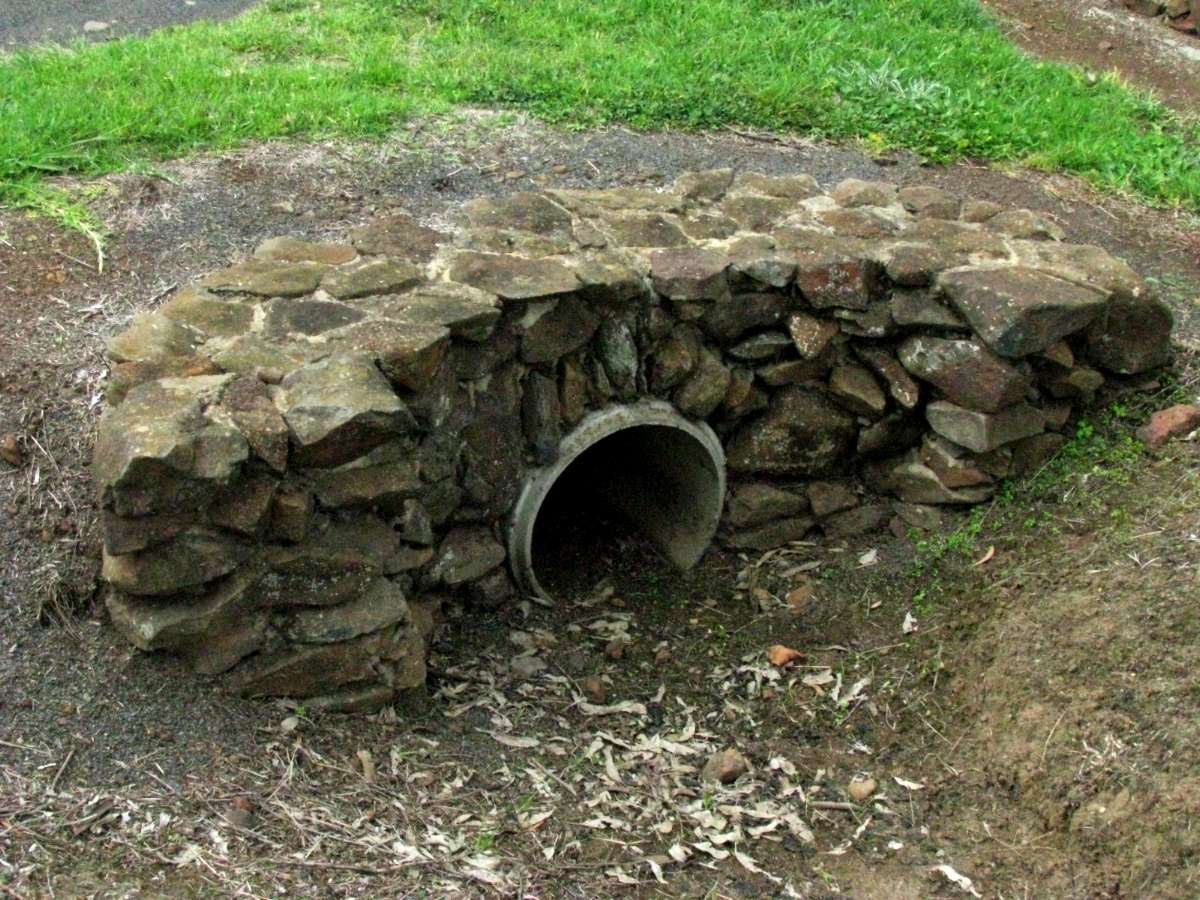

A minor detail was the finishing off of the ends of the pipes under the entry from the road. Normally this is done by council workmen, but by this time our road was no longer a main road, and we were the only residents on a cul de sac, so I was allowed to do the whole thing myself, from ordering and laying the pipes, to the fill over them, to the finishing off of the ends of the pipe.
I tackled it with gusto, and decided to finish it off using the same methods I had used for the rock walls. I flatter myself that my treatment is a great deal better than anything else I have seen on council constructed entry ways. They use standard precast concrete, and all of them look the same. I used the formwork for the rounded corners of the walls, and it came up a treat. After building the surrounds of the ends of the pipes, I backfilled with what we call "crusher dust" which is a gravel made of crushed basalt. Fitting for a basalt wall, I thought.
Photo: Don Hitchcock
Setting up the formwork ready to start
It is advisable to start with the pier and the wall adjacent to it. Set up one pair of the formwork at the wider setting, and put the end piece in so that it is vertical, attaching it with G-clamps. Make sure that it is square to the line of the wall, and absolutely vertical. Get a permanent felt pen or some paint and mark the position of the end piece on the concrete. This is very important for the next layer, when you are going to have to set up the end piece exactly above where it was the first time.
Set up the brickie's line on the vertical posts a little higher than the formwork.
Both sets of formwork need spacers. In the case of the thinner, wall formwork, you need three spacers:
Two at either end, holding the ends out to the finished width of the wall. I used a piece of wood the correct width, eighteen inches, and two pieces of metal which hooked over the outside of the wall. I've thought later that a better plan would be to have a piece of wood wider than the wall, and take a lap joint out of each end, eighteen inches apart.
One in the middle, a piece of wood exactly the width of the finished wall, but placed (temporarily) towards the bottom or at the bottom of the formwork, on the concrete foundations. This is to counter the tendency of the turnbuckle to pull the bottom of the formwork thinner than the finished width of the wall.

These images demonstrate the basic method for setting up the pier and straight wall formwork. The pier formwork should be in line with the straight wall formwork, the pier should be two feet by two feet, and the end piece must be square and vertical. You will need two G-clamps on the end piece for the first course, but four are better for subsequent courses.
Mark on both the pier spacer and on the end piece a mark where the brickie's line should go, three inches in from the outside.
You will need a carpenter's square and a spirit level. I used a carpenter's square with one leg two feet long, which was ideal, but even a small carpenter's square works fine.
Photo: Don Hitchcock

In the case of the pier, the end piece will function as an end spacer for one end of the formwork, and often as the middle spacer as well, though have one made up just in case, two feet long. You will still need a spacer for the end which overlaps the thinner formwork, and you will need to take out a generous chunk of the spacer so that it fits over the top of the thinner formwork, but still fits snugly against the pier formwork. This spacer will not need metal hooks or a lap joint, since it sits on the thin set of formwork - except for the final course, when the thin formwork is lower than the pier formwork. A screw in each end works fine instead of a metal hook.
You need to make sure that the end of the thin set of formwork is exactly two feet from the end piece of the pier, and that everything is square in every direction, and that the end piece is vertical, and check again that you have marked the edge of the end piece on the concrete foundations with permanent marker.
Photo: Don Hitchcock
Preparing the Mortar
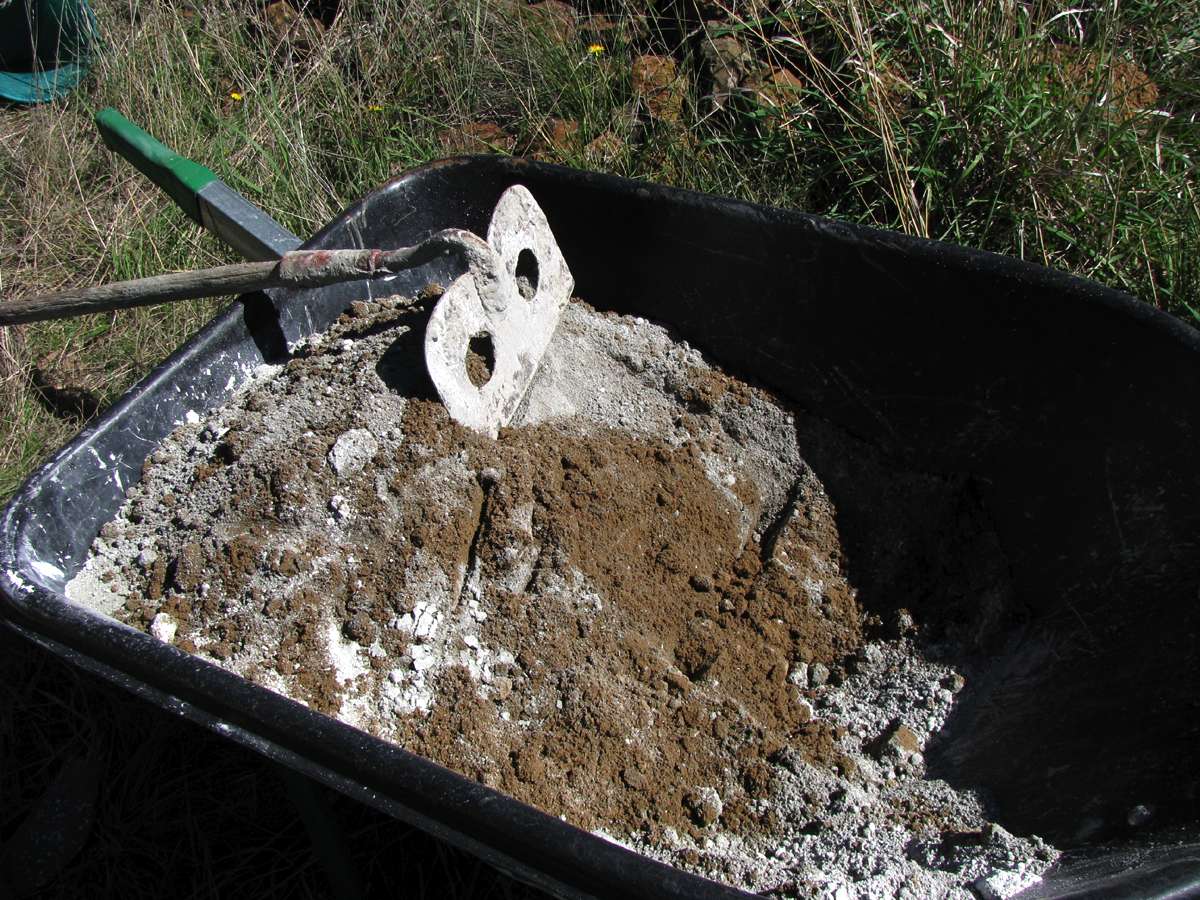
If you have a cement mixer, by all means use it, but you can get by perfectly well with a brickie's hoe, as shown here. It is a broad hoe with big holes in it, which aids in mixing the mortar.
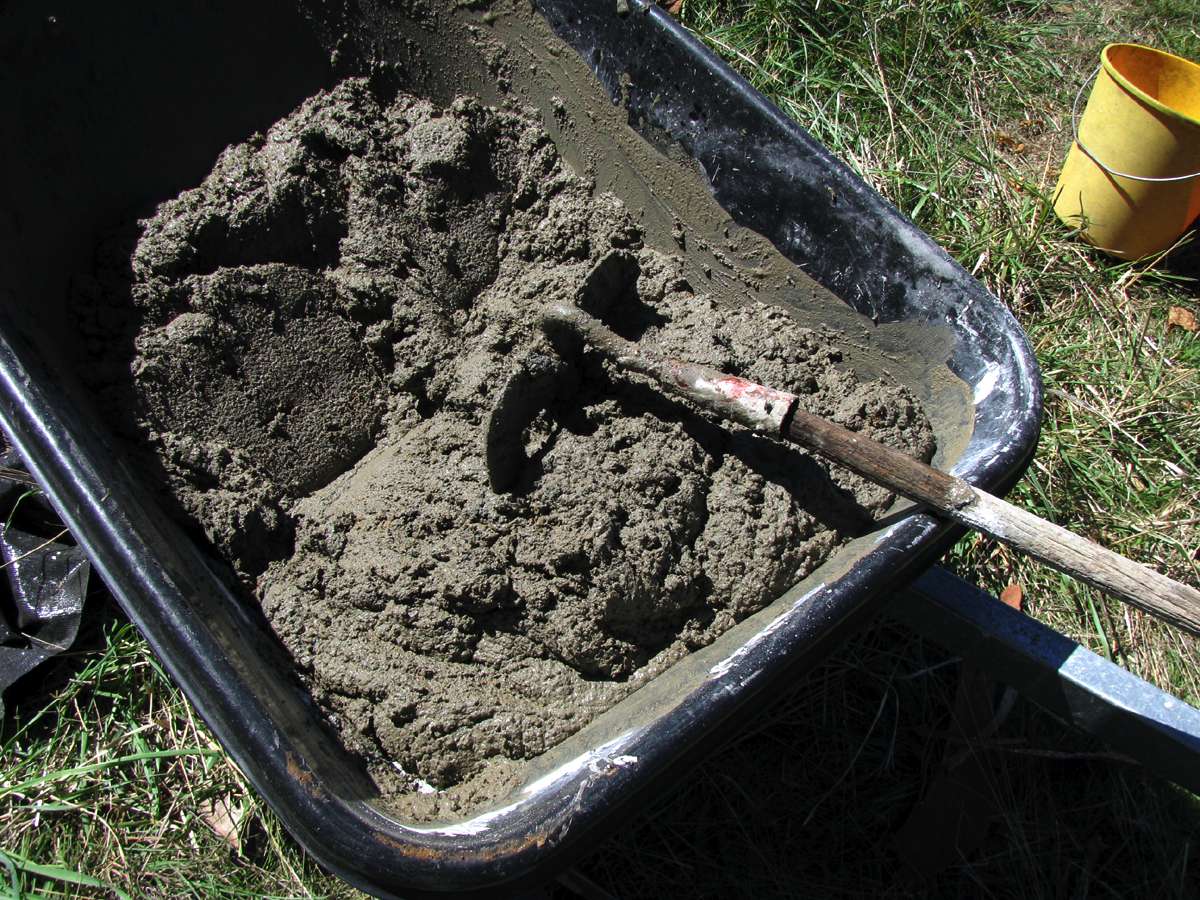
I use a strong mortar of a little less than one bucket of cement to half a bucket of hydrated lime to three full buckets of brickie's loam, which is a sand mix available locally which contains a little extra clay to improve workability. By using just less than a bucket of cement I get two loads of mortar from a twenty kilogram bag of cement. I add one bucket of water to this, but you should work out what amount of water you need by adding it gradually the first time, and keeping a note of how much water you need. If the sand is out in the weather, and it rains, it will contain enough extra moisture to throw your calculations out. As for concrete, too much water spoils mortar. It should be easily workable, but not sloppy.
I mix by slicing down the face of the mixture with the hoe and drawing it to one end of the barrow. I do this three times from alternate ends, then add the water, and it usually takes six goes before the mortar is fully mixed. The advantage of the hoe is that there is less set up and pull down time, and it is a lot cheaper than getting a mixer - though you need one for the foundations anyway unless you get in ready mix concrete.
Adding the right amount, or close to it, of water right at the start makes the mixing much easier and faster.
Photo: Don Hitchcock
Basic Principles
There are a number of basic principles that should be adhered to:
1. The first and most basic principle is that you are always thinking of what goes on top of the rock you are about to lay. There is no point laying a rock on the face of the rock wall which is otherwise perfect if its top surface slopes downward to the outside of the wall. The top surface of every rock should at least be horizontal, but preferably should slope inwards to the centre of the rock wall.
This means that any rock you lay will have the tendency to fall inwards, not outwards, and will ensure the long term integrity of the wall. In addition, you will have a much larger choice of rocks for the next layer, not just ones with a horizontal lower surface, but ones which have an obtuse angle between the face and their lower surface, which would not be suitable for laying on a horizontal surface.
2. Lay the rocks on the outside edges of the rock wall first, then fill in the inside, doing one layer at a time. At all times, the inside will be below the level of the outside, even when you are filling in the inside.
In other words, do the hardest part first. Use the smaller and poorly shaped stones for the inside, and keep the large flat ones for the outside face and the top surface of your wall.
3. You should try as much as possible not to paint yourself into a corner, so to speak. That is, try to lay each rock beside another, and not leave a space of a particular size to fill.
Failure to adhere to this third principle will have you feverishly turning over your rock pile looking for an elusive rock of a particular size and shape. If you are using sandstone or limestone, you can shape it to fit, I guess, but with the basalt that I used, this was seldom an option. Basalt is particularly resistant to shaping, unless you are an Inca tradesman. I was often able to knock corners off for a particular purpose, but wholesale reshaping of a rock was impossible for me with my skills and equipment.
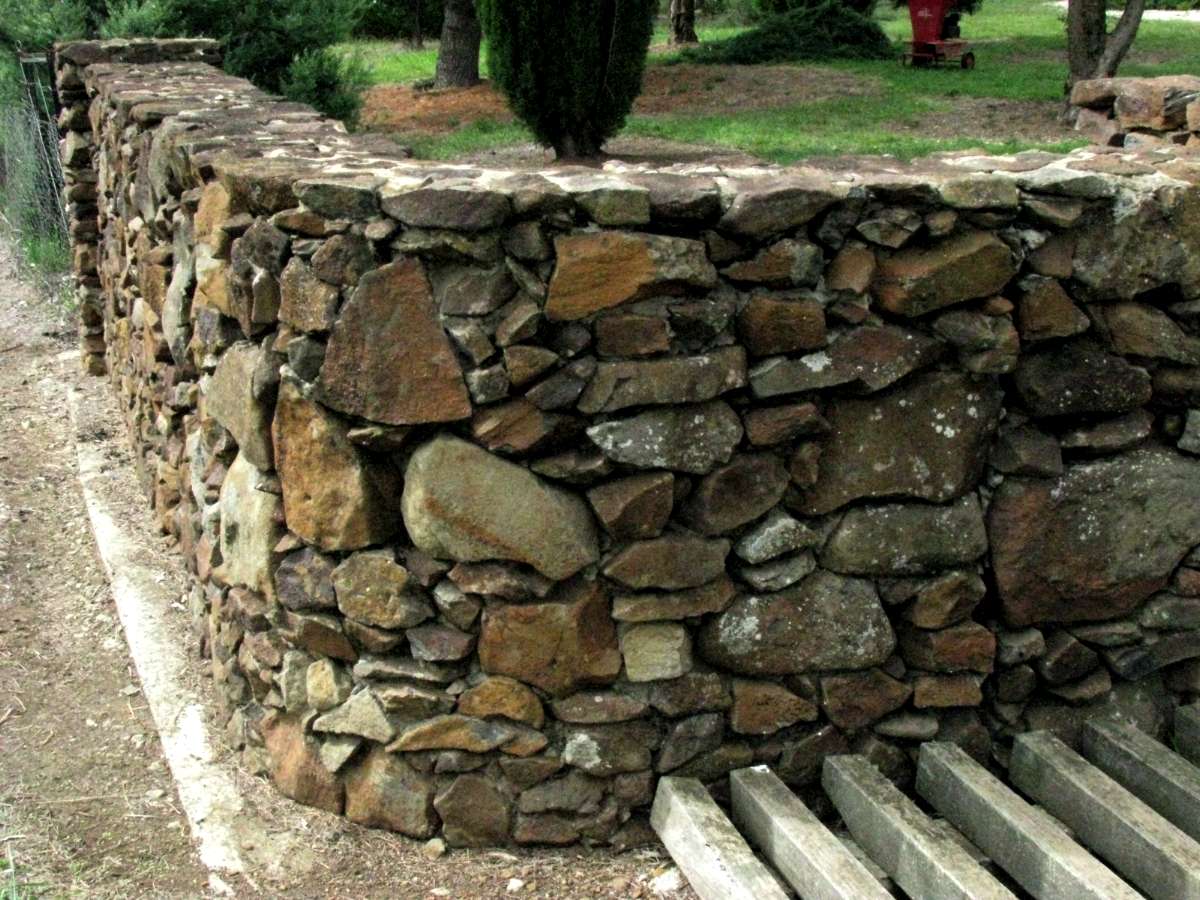
4. Where possible, the large rocks go to the outside, and there should be large rocks all the way up the outside face of the wall, not just in the lowest layer.
Nothing spoils a rock wall of this type like having obvious "courses" of smaller stones. In particular, at the top of the wall, the rock wall should finish "effortlessly". By this I mean that there should not be just small stones in the top layer. Try to have some stones on both faces of the wall which extend from the bottom to the top of that last layer. Put some large rocks on the face of every "course", extending into the next "course".
This restriction does not apply, of course, to cut and dressed stone, such as sandstone or limestone or granite which is laid in courses of the same width throughout the construction. But it does apply to the "Random Ashlar" style, where for example sandstone with flat tops and bottoms but of different sizes are laid not necessarily in continuous courses but in essentially a random manner, (albeit with perfectly flat tops and bottoms) like the stone walls I illustrate here.
It is also a good idea to occasionally lay a large rock horizontally within the wall, ideally one which stretches from one side of the wall to the other, if that can be arranged. A large rock like this ties the whole structure together and ensures the integrity of the structure.
5. Remember that mortar is not glue. Don't rely on mortar to keep your rocks in place, they should be stable from the moment you lay them.
6. In general, stones should be laid with their longest dimensions close to horizontal. While this rule can be broken occasionally, stones laid in this manner make the wall look more stable.
7. Each stone should sit on two other stones, or at least the situation should never arise that a vertical joint is perpetuated. A stone wall is stronger if every joint is crossed, which you can see in any brick wall. It is perfectly ok to have smaller stones on top of a larger stone, and smaller stones beside the edge of a larger stone, which is in fact inevitable at some point, but you should avoid where possible having two vertical joints one on top of another. Even if the strength of the wall is not compromised because the joint is crossed further in within the wall, out of sight, it looks bad. The goal is to have a stone wall which is not only strong and well made, but looks strong and well made.
8. My personal preference is that the mortar should be as unobtrusive as possible. In particular, I try to avoid completely what I call the "plum pudding" look, where much of the face of the stone wall you are looking at is mortar, with stones poking out of the mortar here and there.
At the same time, I realise that there are many beautiful and well made rock walls out there with obvious edges of mortar around each stone, rather like a brick wall. However it is my preference that there should be as little mortar as possible, and the mortar should be heavily recessed from the face of the rock wall. I achieve this by having each stone lying on another stone, with virtually no mortar separating them at most places. The mortar is simply filling in the gaps where the stones don't touch.
In addition, after pulling off the formwork, I then immediately scrape back the mortar back as far as possible between the stones, then get out the hose and hose the face of the stone to remove the excess mortar, and remove as much as possible of the film of mortar that adheres to the stone. When the stone wall is finished, I wash it down with a dilute solution of hydrochloric acid.
9. My personal preference is that the rock wall should consist entirely of rocks and mortar. Each rock is laid carefully, bedded down on mortar, even if it is on the inside, far from prying eyes. I abhor the practice used by some builders of filling the inside of the rock wall with any rubbish you can find, such as broken bricks or glass bottles, or with fillers such as concrete. I've even seen hollow rock walls - and I know they are hollow because they have not stood the test of time, and the evidence is there for all to see. I am well aware that there are some superb rock walls out there which have been laid as a veneer on concrete blocks, but that method is not one that interests or attracts me. I believe that a rock wall should be a rock wall, through and through.
10. However, remember that there are as many different styles of rock walls as there are builders of rock walls - or possibly more! You will need to find your own style, based on both personal preferences and the rocks you have available. This page represents my personal preferences, and the methods have made rock walls I am proud of. Others will have quite different, and equally valid methods and preferences.
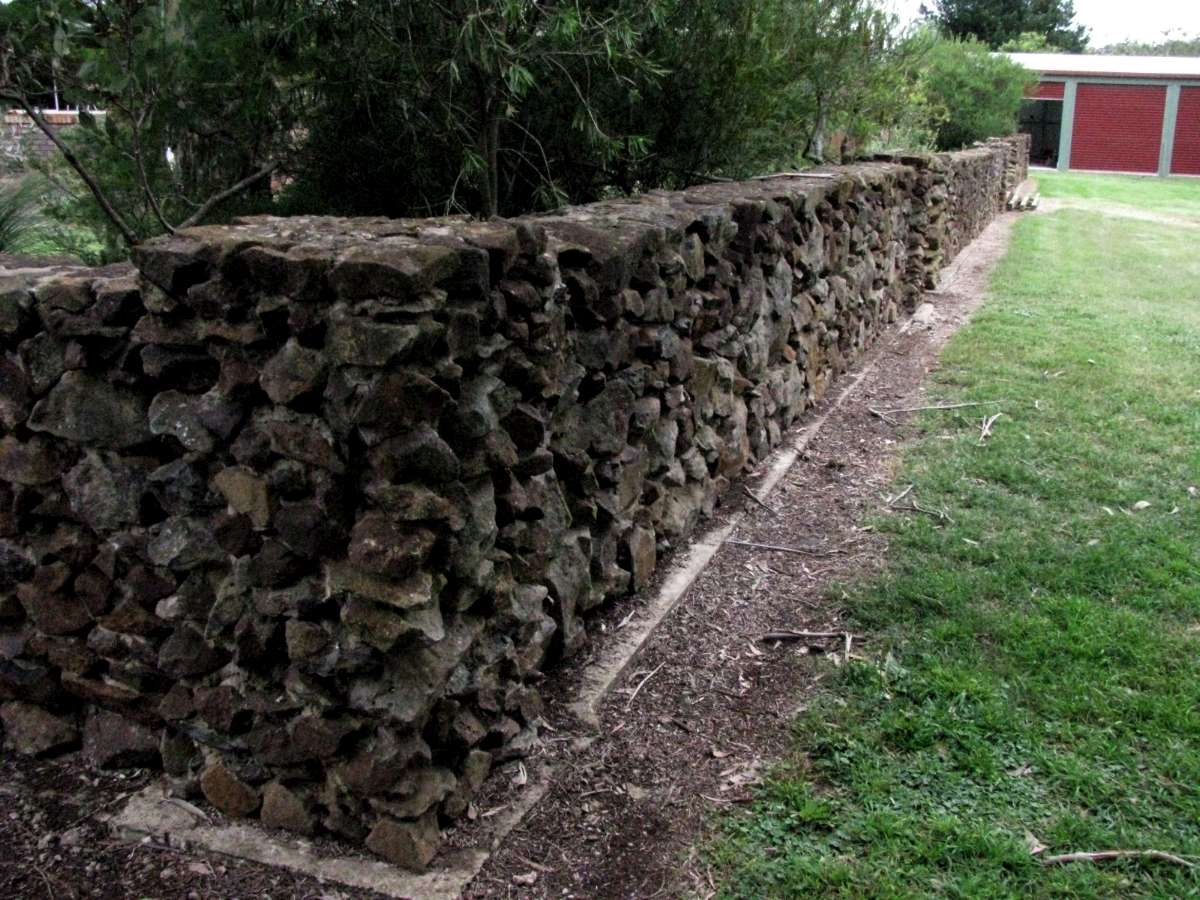
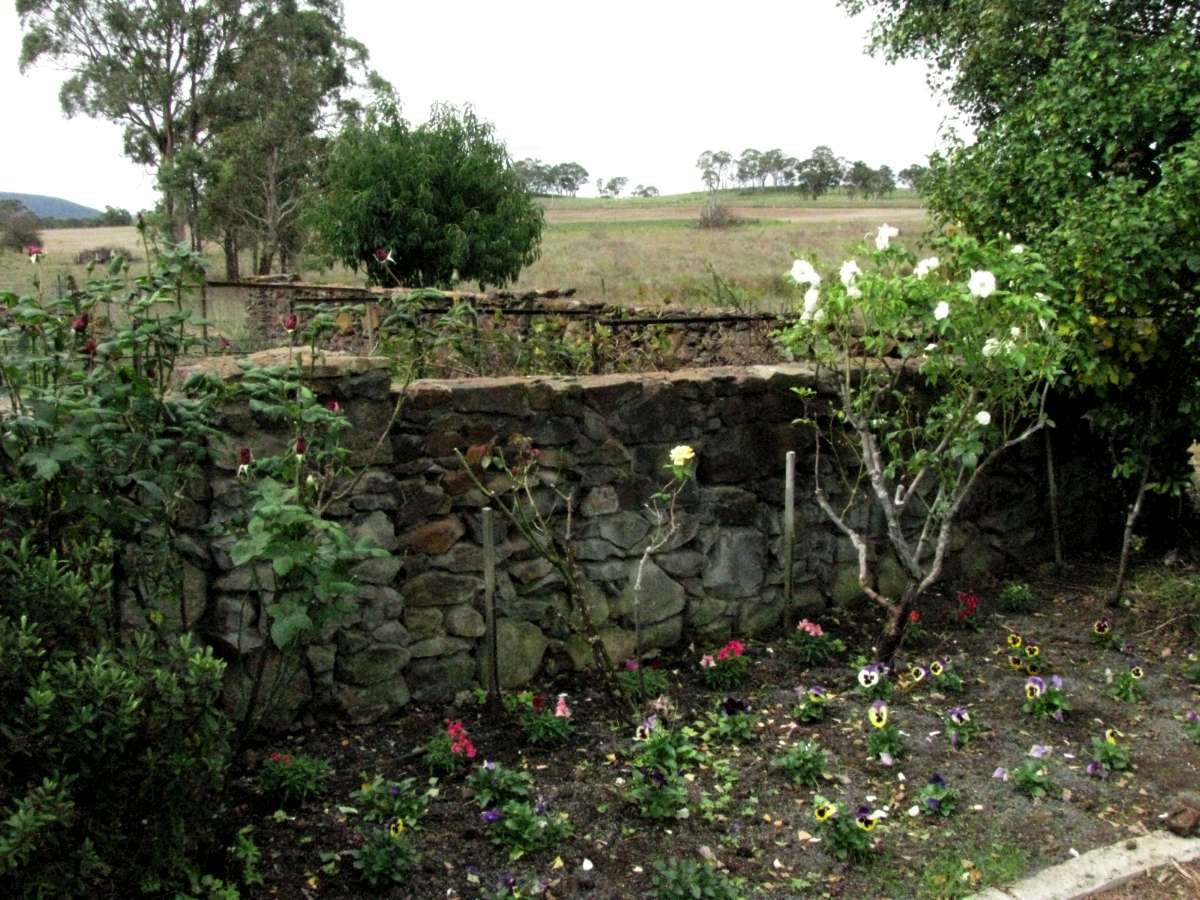
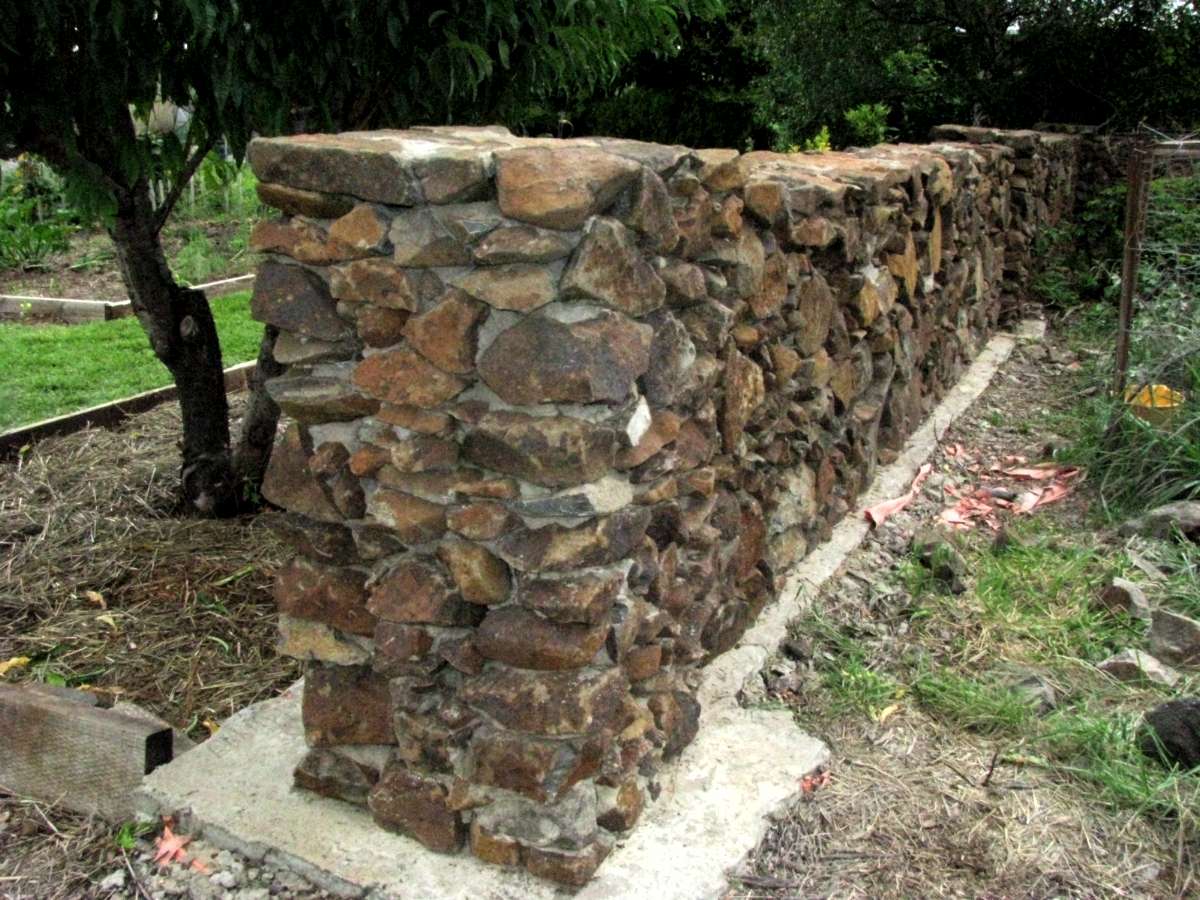
The rock walls around the house define the garden area.
Photo: Don Hitchcock
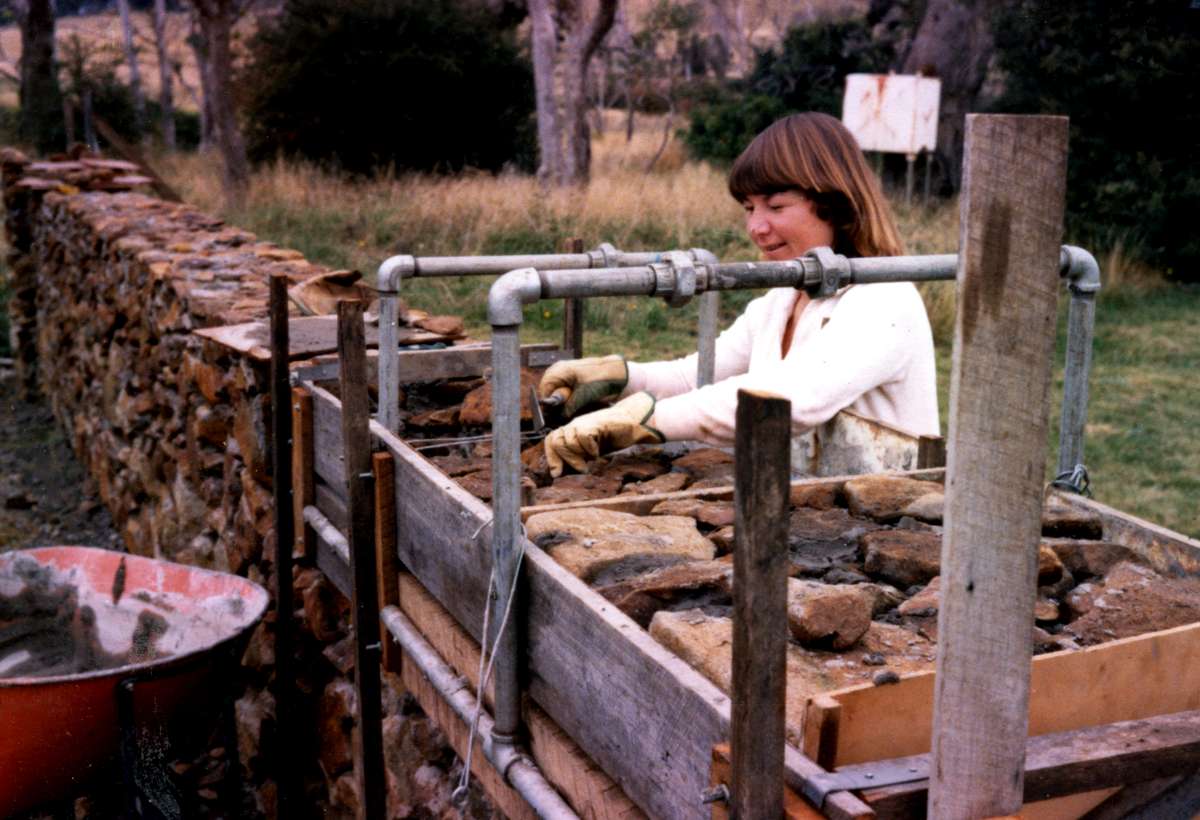
Laying the Stone
At last you can begin what you wanted to start with - laying the stone!
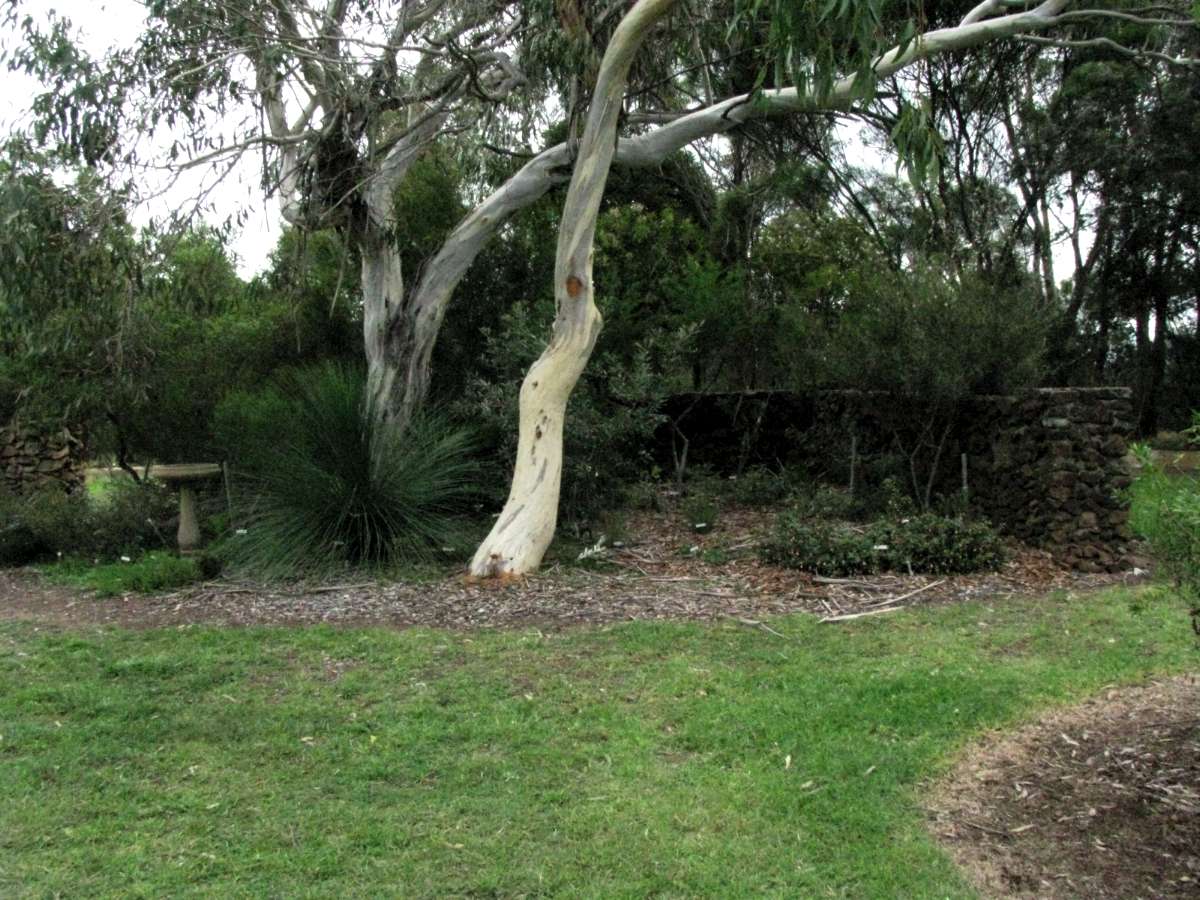
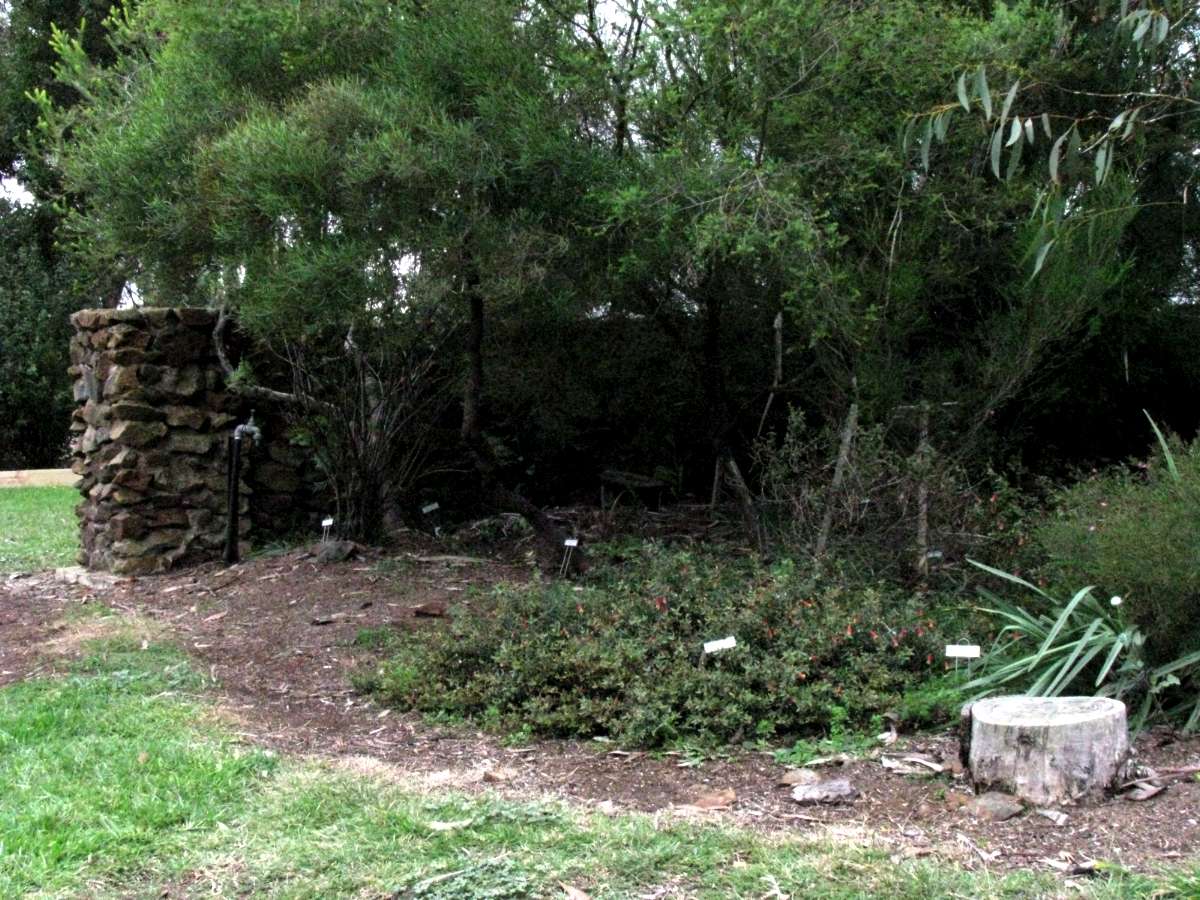
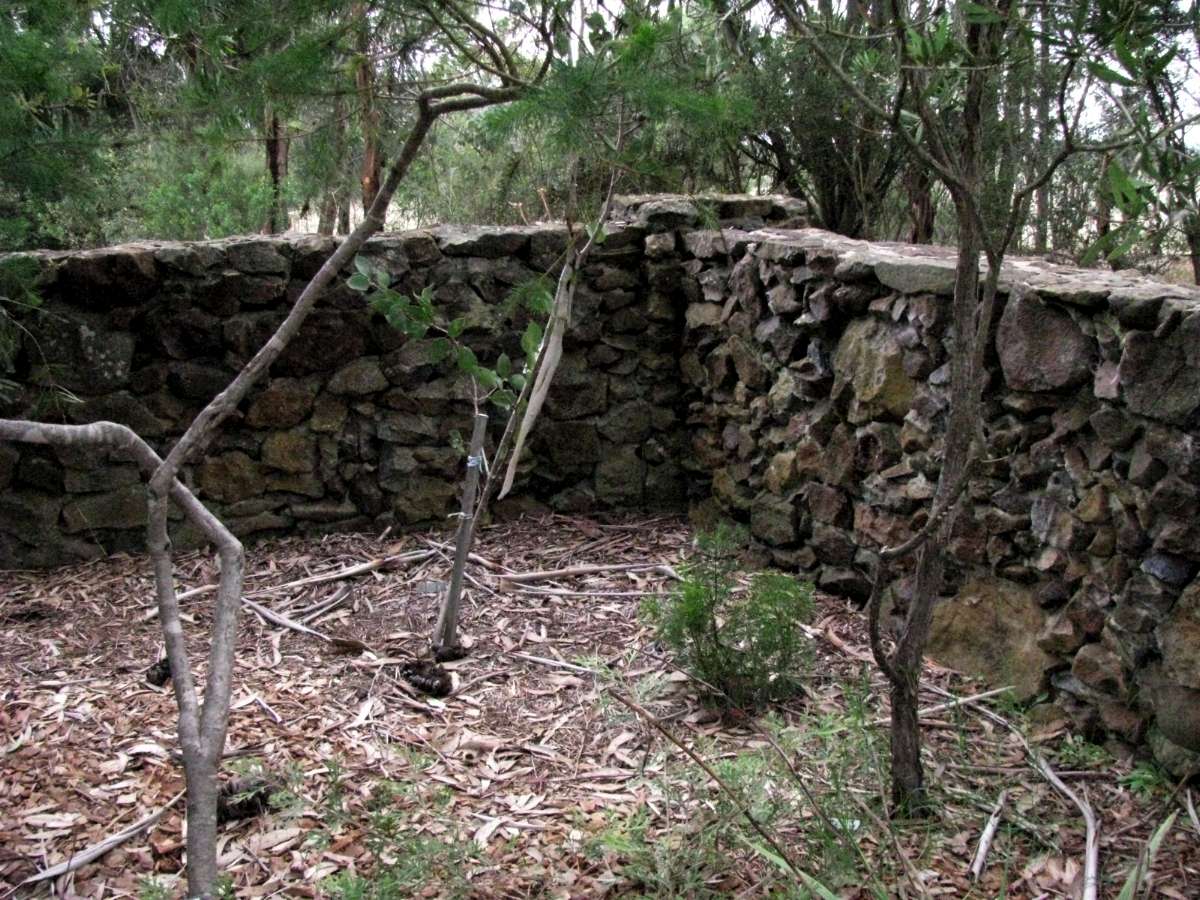
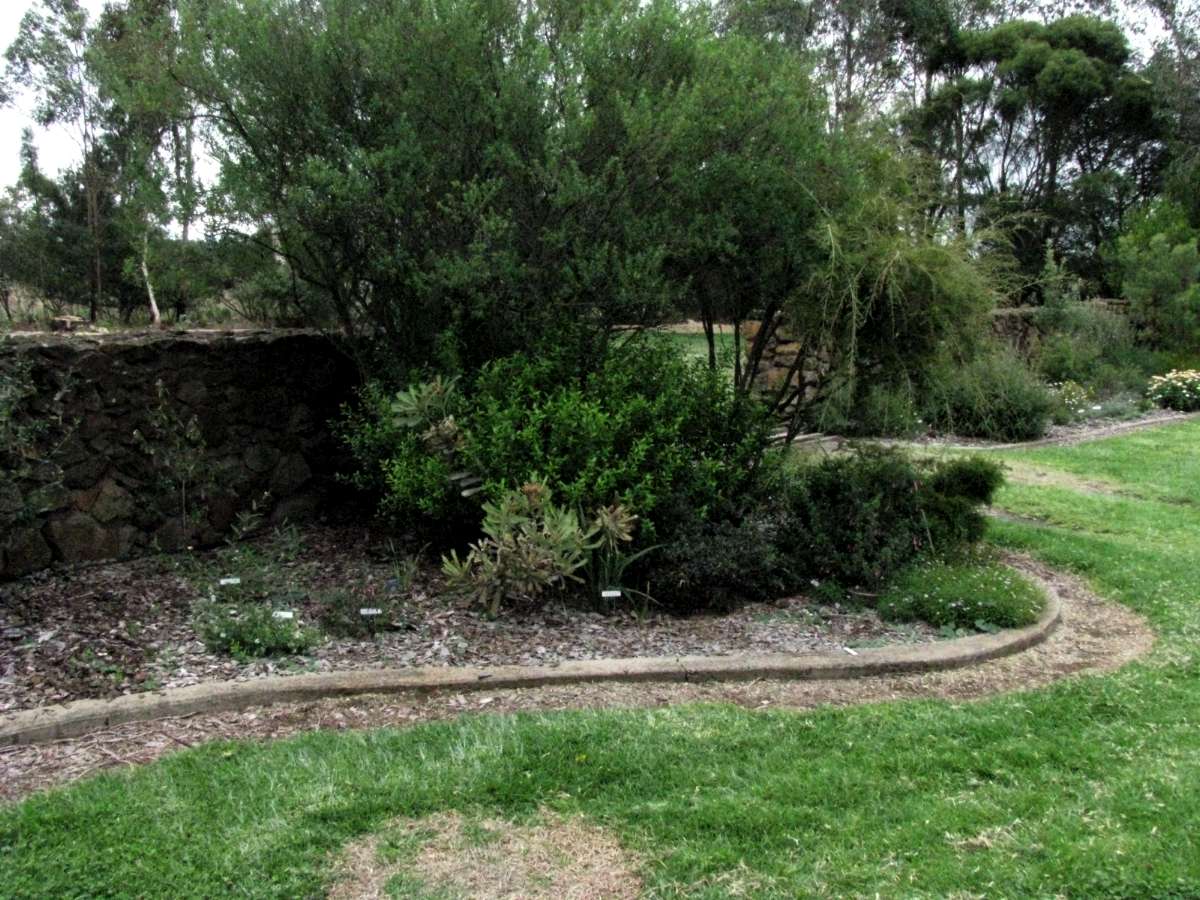
This is one of our favourite sections of the whole property, what we call the corner garden, in the shelter of two rock walls.
It is a place of tranquility and peace, a section of the garden that never fails to heal what ails you. There is a bird bath, a superb grass tree, and a number of rare and endangered native Australian species which have thrived from the moment they were planted.
The white trunked snow gums are far enough away from the walls that they do not endanger the foundations, yet they provide perches for tiny honey eaters who survey the area before darting to the bird bath to drink, as well as daytime cover for tawny frogmouths, the cryptic nightjars which are almost impossible to see when they imitate a dead Eucalypt branch. Then in the evening they head off on silent wings to look for insects and other prey.
Photo: Don Hitchcock
Start laying the pier and associated wall first.
Try to find four rocks with almost square ends for the corners of the pier, at least for this first layer. It looks better.
Lay the rocks on a bed of mortar, hard up against the formwork, but try as much as possible not to rely on the formwork to hold the rock in position. The formwork is there purely to make it easy to line up your wall, it is not there to hold everything together. To check for a particular rock, pull the formwork away just a little by pressing on it, and see if the rock starts to move. If so, rethink what you are doing, alter the orientation of the rock, or use a different rock.
It is worth remembering that rock walls laid with this method are just like a stone wall laid with nothing but lines and eye. The formwork plays no part in holding up the rock wall, it is simply a guide to make it easy for an amateur to keep the edge perfectly straight and vertical. The formwork is sometimes invaluable, however, to hold a rock without it dropping on your toes while you find just the right orientation for it and the rocks around it, so that when you are finished, the rock is sitting firmly, with gravity doing its work to hold the rock in position.
Remember that the first layer is the easiest, because you are laying rock on the completely horizontal surface of the concrete foundations. Always think about where the next rock will go on top of the rock you are laying at the present. Try to arrange the top surface of a rock you are placing on the edge of your wall so that the slope of the top surface is downwards to the inside of the rock wall.
Note that the pier and the rest of the wall are all of a piece, and the rocks you put in should extend between the two where appropriate. The piers are not separate constructions, except right at the end when you need to extend the pier above the general height of the rock wall by three inches. That part can get tricky, but not impossibly so, and by the time you get to that point, your skills and confidence will have increased tremendously.
Cover the whole foundation covered by the pier with one layer of rock, and start on the thinner part of the wall, as far as the eighteen inches thick spacer half way down the thin formwork. At this point the entire foundation under the pier and half way down the body of the thin formwork will be covered with rocks and mortar.
As you lay the rocks, ensure that there are no voids, no holes unfilled by rocks and mortar. The rock wall should be completely solid all the way through.
Then go back to the pier, and start again. This is the moment of truth, when any stone wall sins will catch up with you. Take what you want and pay for it is a Spanish proverb I live by. If you have followed the basic principles above, the second layer (still, probably, not even half way up the formwork for the most part) will be easy to lay, because you have prepared for the second layer by leaving horizontal or sloping-inward surfaces to lay the face rock on.
As you lay each rock, make sure that it is laid in mortar. Fill in with mortar any gaps between the rocks on the inside of the wall, so that there is no air inside the rock wall whatsoever.
Continue in this way, so that eventually the pier formwork is full of stone, some of it poking up above the formwork, so that there will be no obvious "course" in the wall. At this point there will be a gradual fall off from the height of the stone in the pier to the middle of the thin formwork.
Loosen the turnbuckle on the first thin formwork, and remove the spacer, then retighten the turnbuckle, so that the formwork is now pressing on the laid stone. Remove the pier formwork and the end piece, and reduce its width to eighteen inches, and place it on the end of the thin formwork already in place, lining it up using the brickie's line. Put the three spacers into the formwork, two at the top at each end, one in the middle at the base of the formwork, and tighten the turnbuckle.
At this point, remove the excess mortar from the now exposed joints, and use water from the hose to recess the mortar back as far as possible, if you are using the method outlined here. Otherwise, prepare the mortar joints in your own style.
Now you can continue building the wall, filling in the first thin formwork to the top of the formwork, and extending the stone to the middle of the next set of formwork, again having a slope from the middle of the second set of formwork to the end of the first.
I find that three loads of mortar is a good day's work, when you include finding the stone, barrowing it to the site, cleaning it, mixing the mortar, and laying the stone, then cleaning up the mortar joints.
When you stop for the day, make sure that all the mortar joints are prepared in the way you want them to remain, clean your barrow and mixer (if used) as well as your tools. Remove any mortar which has finished up on the edge of the foundations, it is important to have a level and true surface to put the legs of the formwork on for the next layer, and hose down the rock you have laid, and the edges of the foundations.
Put the formwork away out of the weather, or set it up ready for the next day's stone laying, making sure to cover it with heavy plastic to protect it from the weather. If you lay plastic over the finished stonework, this will protect it from frosts if there are any, and will make the mortar stronger by preventing it from drying out prematurely.
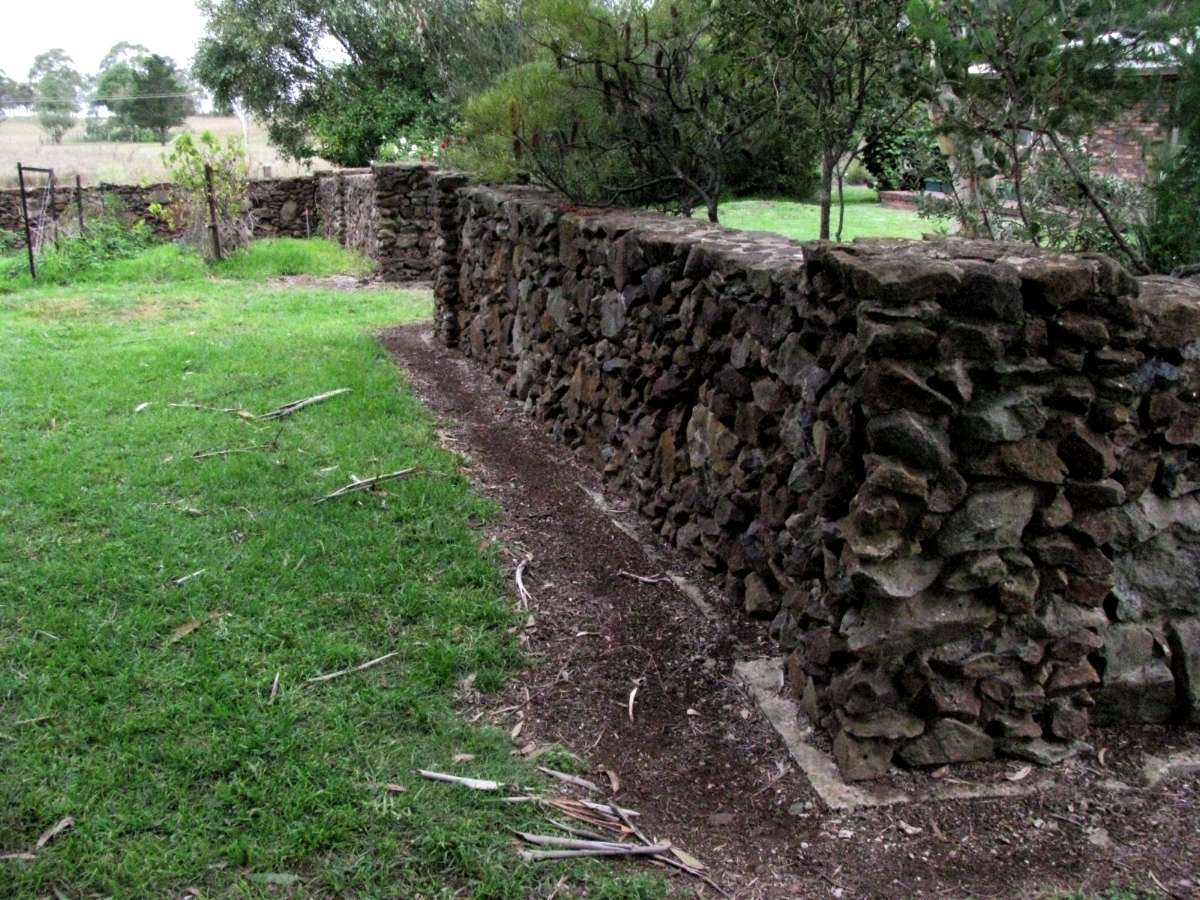
The gardens in front of the rock walls have been planted with native plants, which need little extra water.
Photo: Don Hitchcock
Continue in this leapfrog pattern until you get close to the end of the foundations.
At this point, set up the formwork for the pier, repeating the method of inserting the end piece vertically, and making sure that the pier formwork is square and true. Again, mark the edge of the vertical end piece with permanent marker on the concrete foundation. Fill in the rest of the stone in the pier and thin formwork, so that the first course is complete.
Now add the "legs" to the formwork. It is best to raise the height of the formwork by eleven inches, not twelve inches, the height of the formwork. This allows you to more easily align the formwork, because it is tightened onto the existing stone which, you remember, was extending above the formwork for much of the length of the wall. If you have mislaid stone slightly, getting the formwork to line up exactly to the brickie's line may not be straightforward. I have often had to jam lengths of wood onto the formwork so that the top of the formwork more closely follows the line.
Set up the pier and thin formwork as before. This time, however, the end piece of the pier formwork will need to be aligned as exactly as possible vertically above the line you marked with permanent marker on the foundations. It takes a while to get this exactly right, but it is worth it to have a wall which looks good, rather than just slapped together.
Continue as before, and the wall will begin to take shape, and you will get some idea what the finished wall will look like.
If you make the wall the same height as I did for the internal walls, three feet six inches tall, then the fourth course will be the last, and you will need less rock for this final course. Raise the pier formwork to its final height, in this case three feet nine inches, and again make sure that the end piece is exactly vertical and directly above the mark on the foundations below. Place a three inch board against the pier formwork on top of the thin wall formwork three inches below it. This gives a surface to work against for the pier which projects above the rest of the wall.
At this point, take your time and do it right. Again, try to have large rocks which project right to the top of the wall, rather than filling in with little rocks. As noted above, the rock wall should finish "effortlessly", with no concession to the fact that you are running out of room.
For the very top of the wall, try to have large rocks with flat tops for the edges at least. Keep a piece of sawn timber wider than the formwork handy to use to check whether a rock is projecting above the surface of the formwork. You can often get the top surface much closer to level by rapping the rock with the sawn timber, held so that both ends project past both edges of the formwork. It is very satisfying to find that the rock has sunk to the point (and no further) where the sawn timber is hitting both the rock and both edges of the formwork, at least on a good section of its top surface.
Another important thing to remember at this point is that a well made rock wall of this type is an open invitation for any red blooded adventurous child to climb it, and walk along the top. With this in mind, make sure that every rock you lay is securely laid, and is in no danger of being pushed off by young (or old!) feet, with possibly disastrous consequences should they fall.
When all the rock is laid, and the wall is essentially finished, I like to come back and completely fill with mortar the joints on the top, horizontal surface of the wall. The logic for this, despite what I have said about keeping joints as mortar free as possible, is that the rock on top is exposed to the weather, and is not kept in place by any rock above it. The mortar also stops dirt from accumulating, and therefore weeds from taking root, which thus helps to maintain the integrity of your wall, and helps to keep the wall maintenance free. There is no reason why a wall of this type should not stand for hundreds of years with only minimal attention.
The wall will probably have excess mortar on it, either in blobs that you did not see and have hardened onto the rock, or at least as a thin film of mortar, which tends to obscure the rock. Get some full strength hydrochloric acid from the hardware store, dilute it about seven of water to one of acid, and use a brush to paint all exposed surfaces. Wear protective clothing and safety glasses, as well as long rubber gloves. Hydrochloric Acid burns the skin, and is quite dangerous if you get it in your eyes, even if it is diluted. As you paint it on, you will no doubt see bubbles of carbon dioxide as the acid attacks the mortar. It will not get rid of the blobs of mortar, but you can remove them by tapping with a small hammer. Then paint where the blobs were with acid, and the rock will come up very clean and "new".
Finally, hose down the entire wall with a strong jet of water, and clean up the foundations, chipping off any deposits of mortar which you have missed.
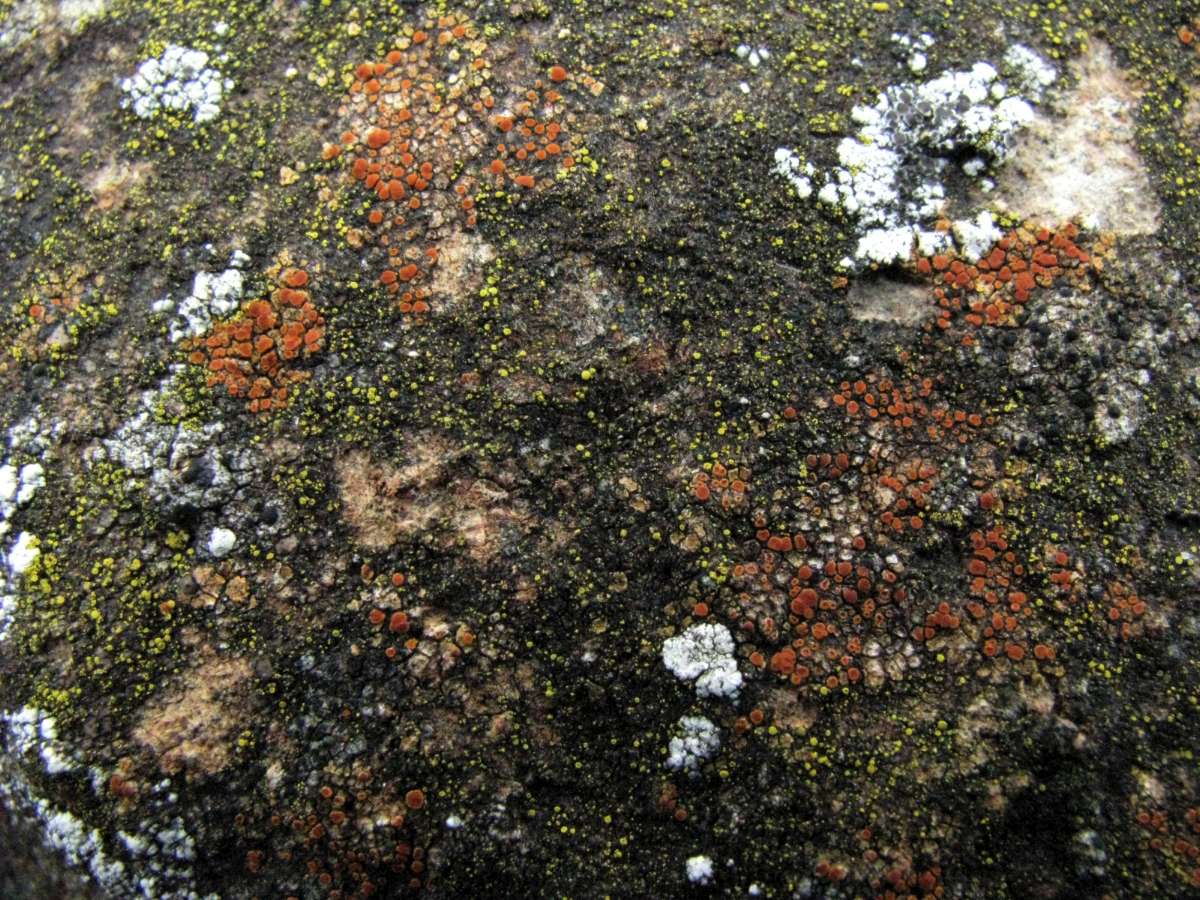
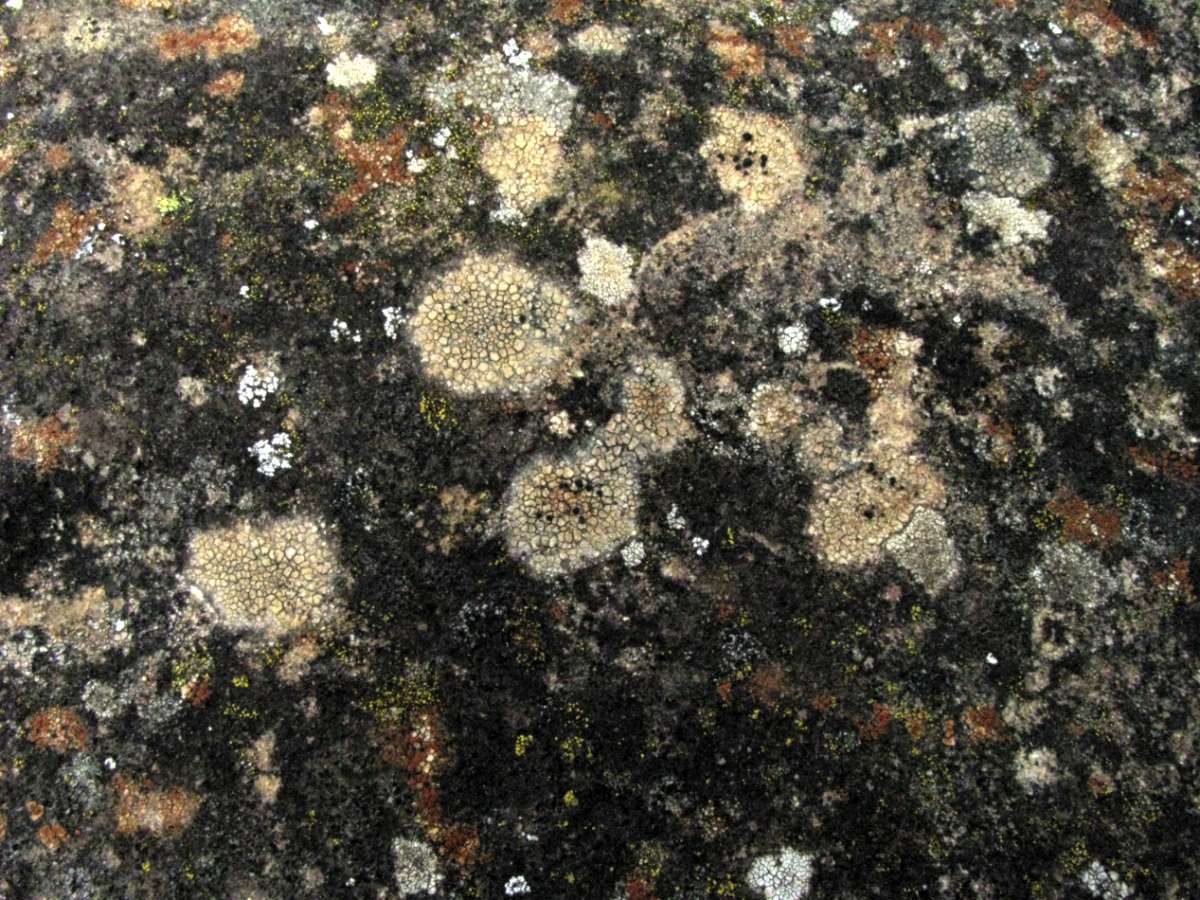
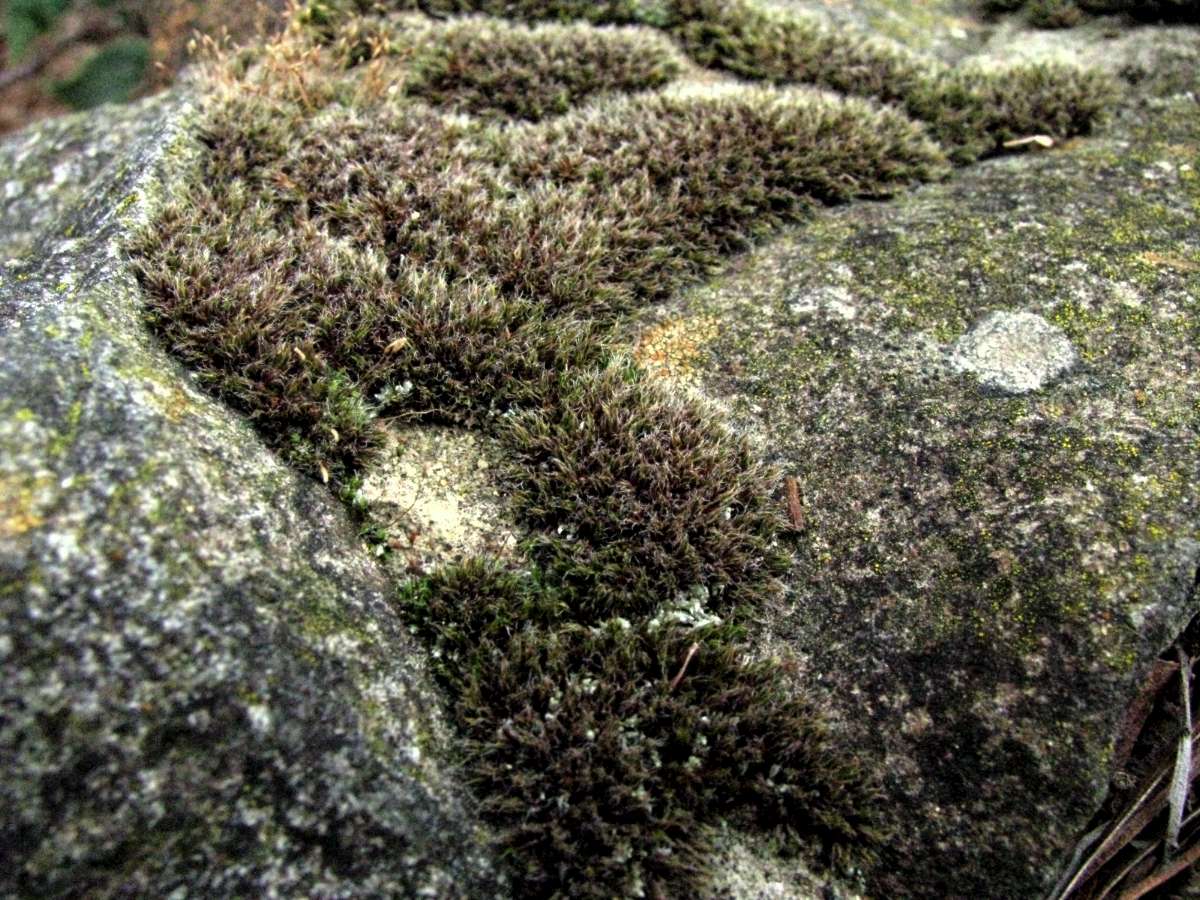
It will take a while, but eventually mosses will colonise the moister areas, and lichens will form, especially on the top horizontal surface of the rock, and on the side away from the sun. I am told you can speed the process up by painting or spraying the rock with milk, but I have never tried that method.
Time works.
Photo: Don Hitchcock
Once the wall is finished, try to avoid planting anything bigger than rose bushes anywhere close to the wall.
Trees are the enemies of rock walls. Their branches lean on the wall and push rocks off the top, and their roots lift the foundations and send the best constructed rock wall tumbling. And in any case, they hide your magnificent work!