Back to Don's Maps
 Back to Archaeological Sites
Batavia - the ship
Batavia was a ship of the Dutch East India Company (VOC). It was built in Amsterdam in 1628, and armed with 24 cast-iron cannons and a number of bronze guns. Batavia was shipwrecked on her maiden voyage, and was made famous by the subsequent mutiny and massacre that took place among the survivors. A twentieth-century replica of the ship, also called the Batavia can be visited in Lelystad, Netherlands.Text above: Wikipedia
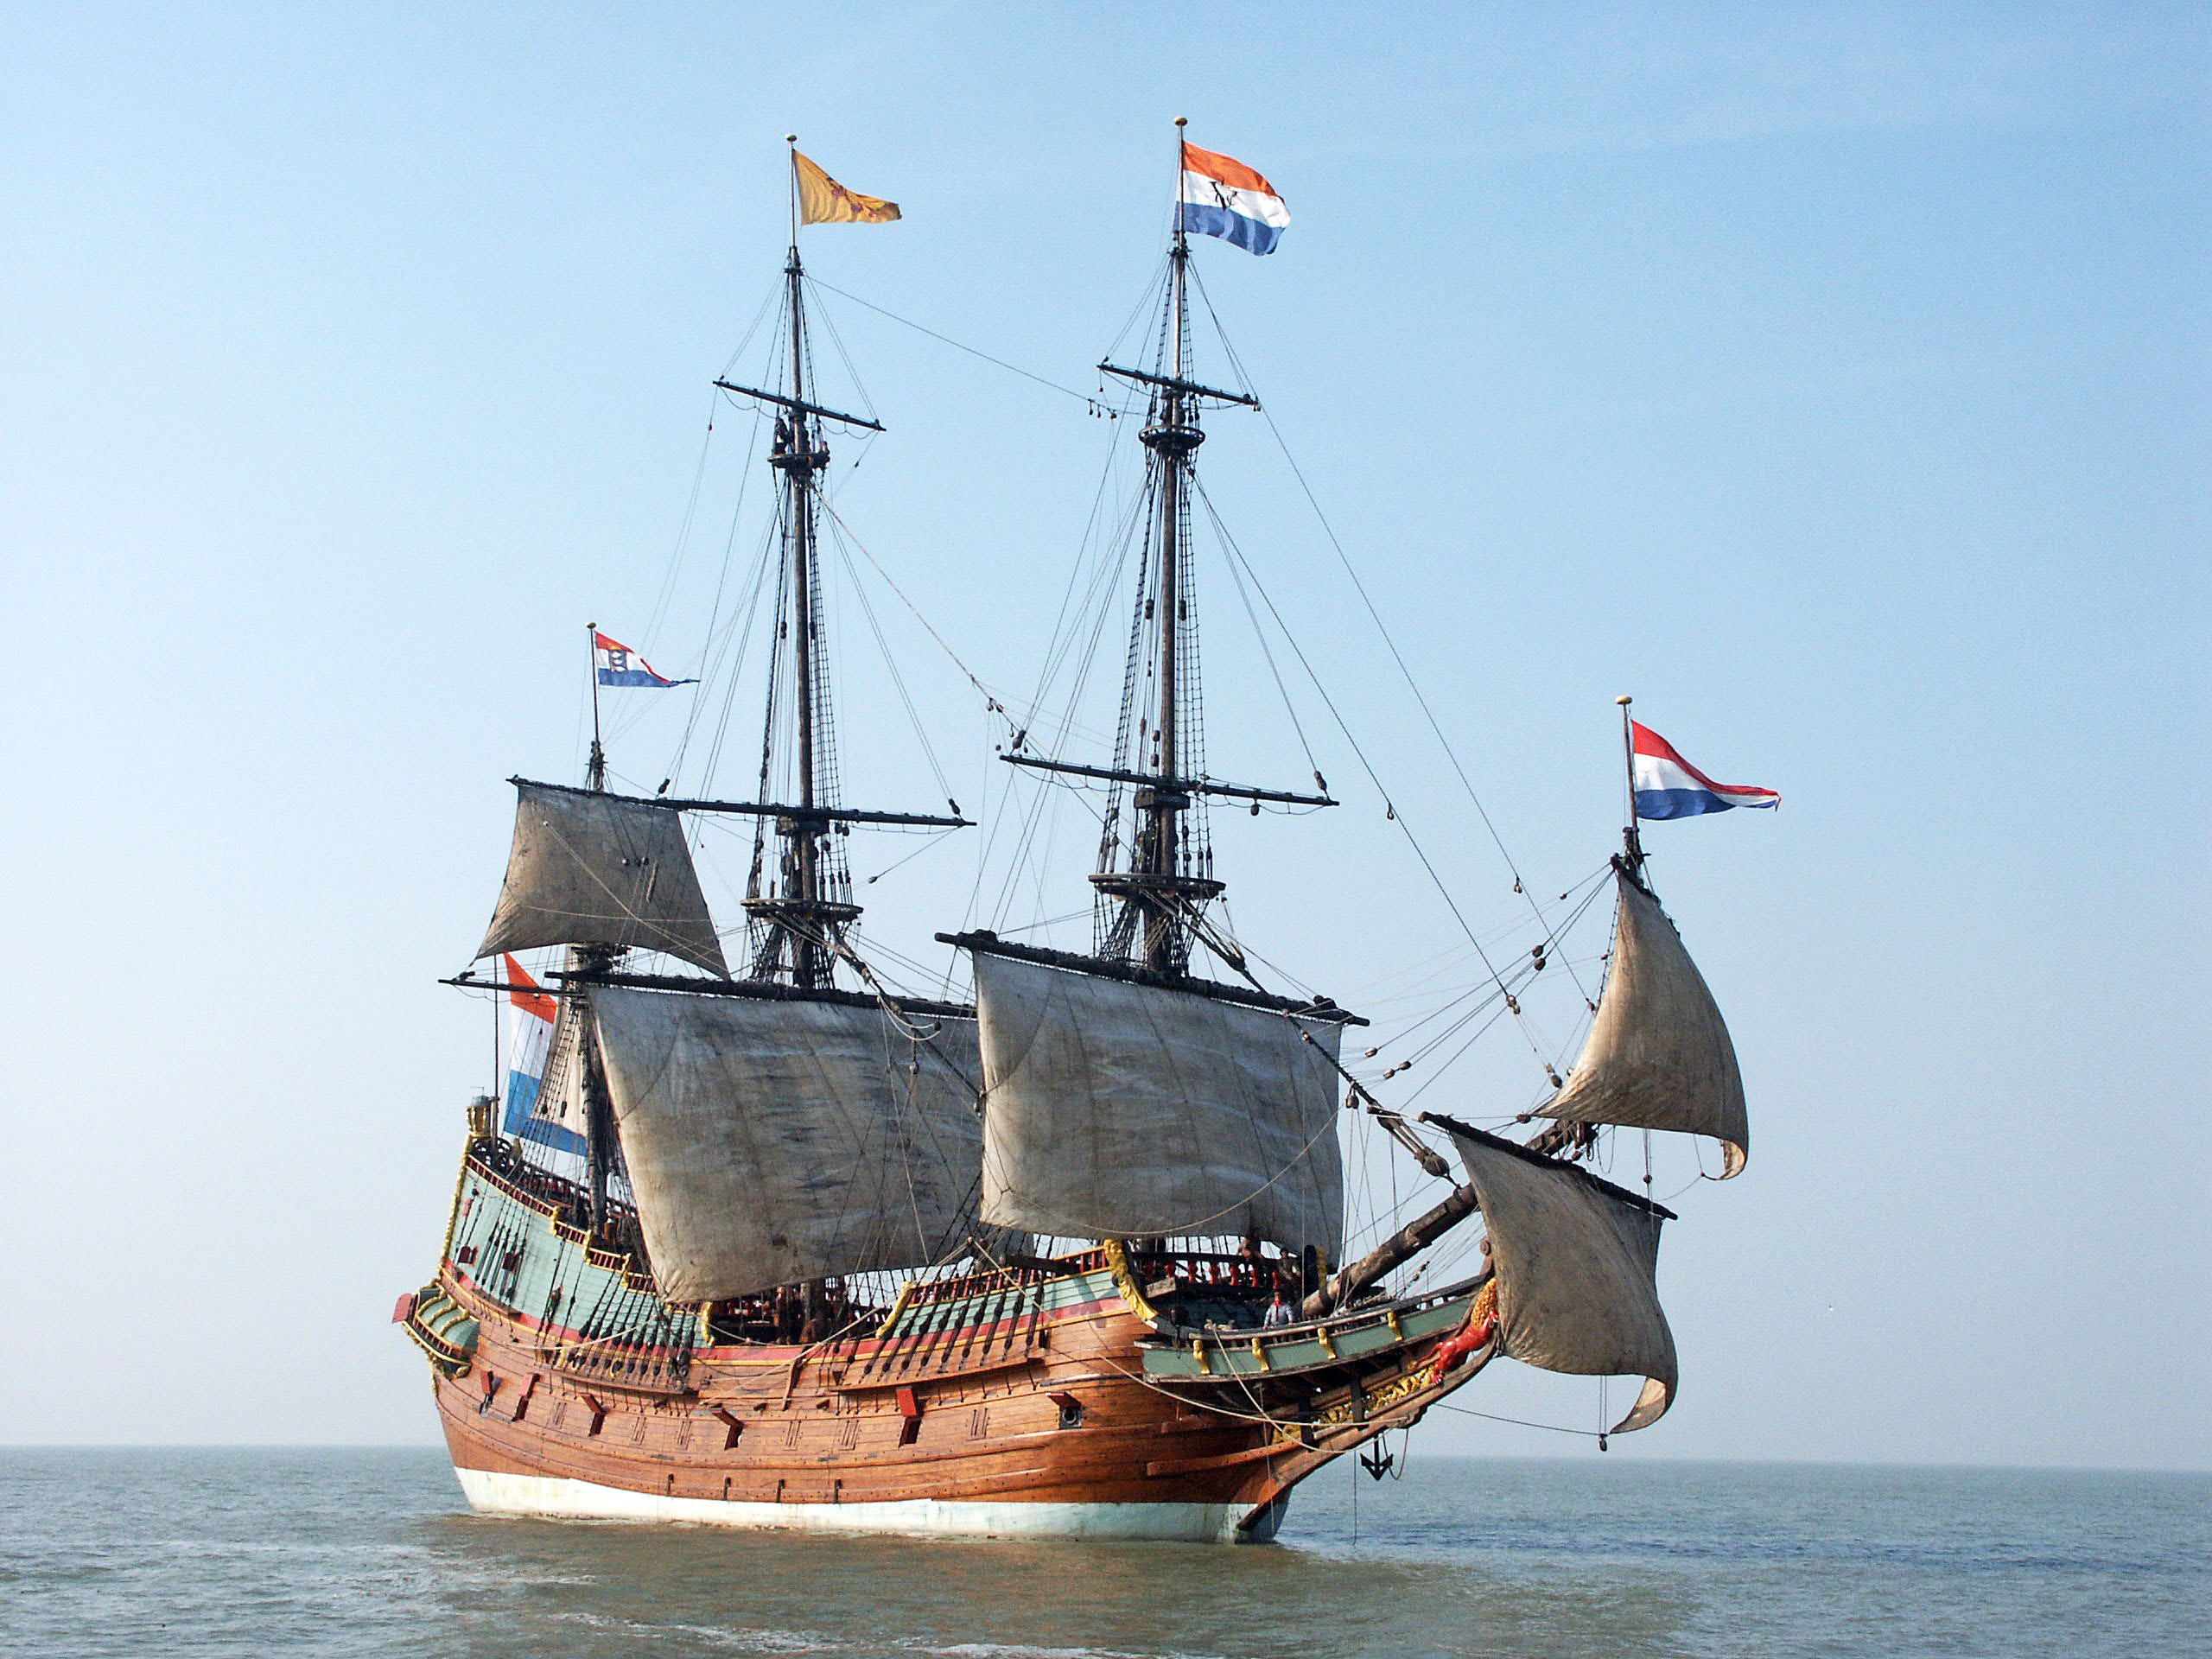
A superb replica of the Batavia under sail.
This replica was transported to Australia by barge in 1999, and was moored at the National Maritime Museum in Sydney. In 2000, the Batavia was the flagship for the Dutch Olympic Team during the 2000 Olympic Games. During its stay in Australia, the ship was towed to the ocean once, where it sailed on its own. On its return to harbour after the cruise, the mast was so high that the ship had to wait for an exceptionally low tide to clear Sydney Harbour bridge, on its way to the inner harbour. Even then, it only just got through.
Photo: http://de.academic.ru/dic.nsf/dewiki/144816
Text: Wikipedia
The Dutch East India Company (Vereenigde Oostindische Compagnie, VOC) was a chartered company established in 1602, and is often considered to have been the first multinational corporation in the world and it was the first company to issue stock. It was also arguably the first megacorporation, possessing quasi-governmental powers, including the ability to wage war, imprison and execute convicts, negotiate treaties, coin money, and establish colonies. The VOC enjoyed huge profits from its spice monopoly through most of the 17th century.
(Above text adapted from Wikipedia)
One of these voyages occurred in 1628, when 8 ships of the VOC sailed from Texel bound for the East Indies on the 28th of October 1628 - the Batavia, under the command of François Pelsaert, of Antwerp; Dordrecht, having for her merchant-captain the collector of revenue, Isaac van Swaenswyck, of Leyden; and the yacht Assendelft, under the command of the second merchant-captain, Cornelis Vlack, of Amsterdam.
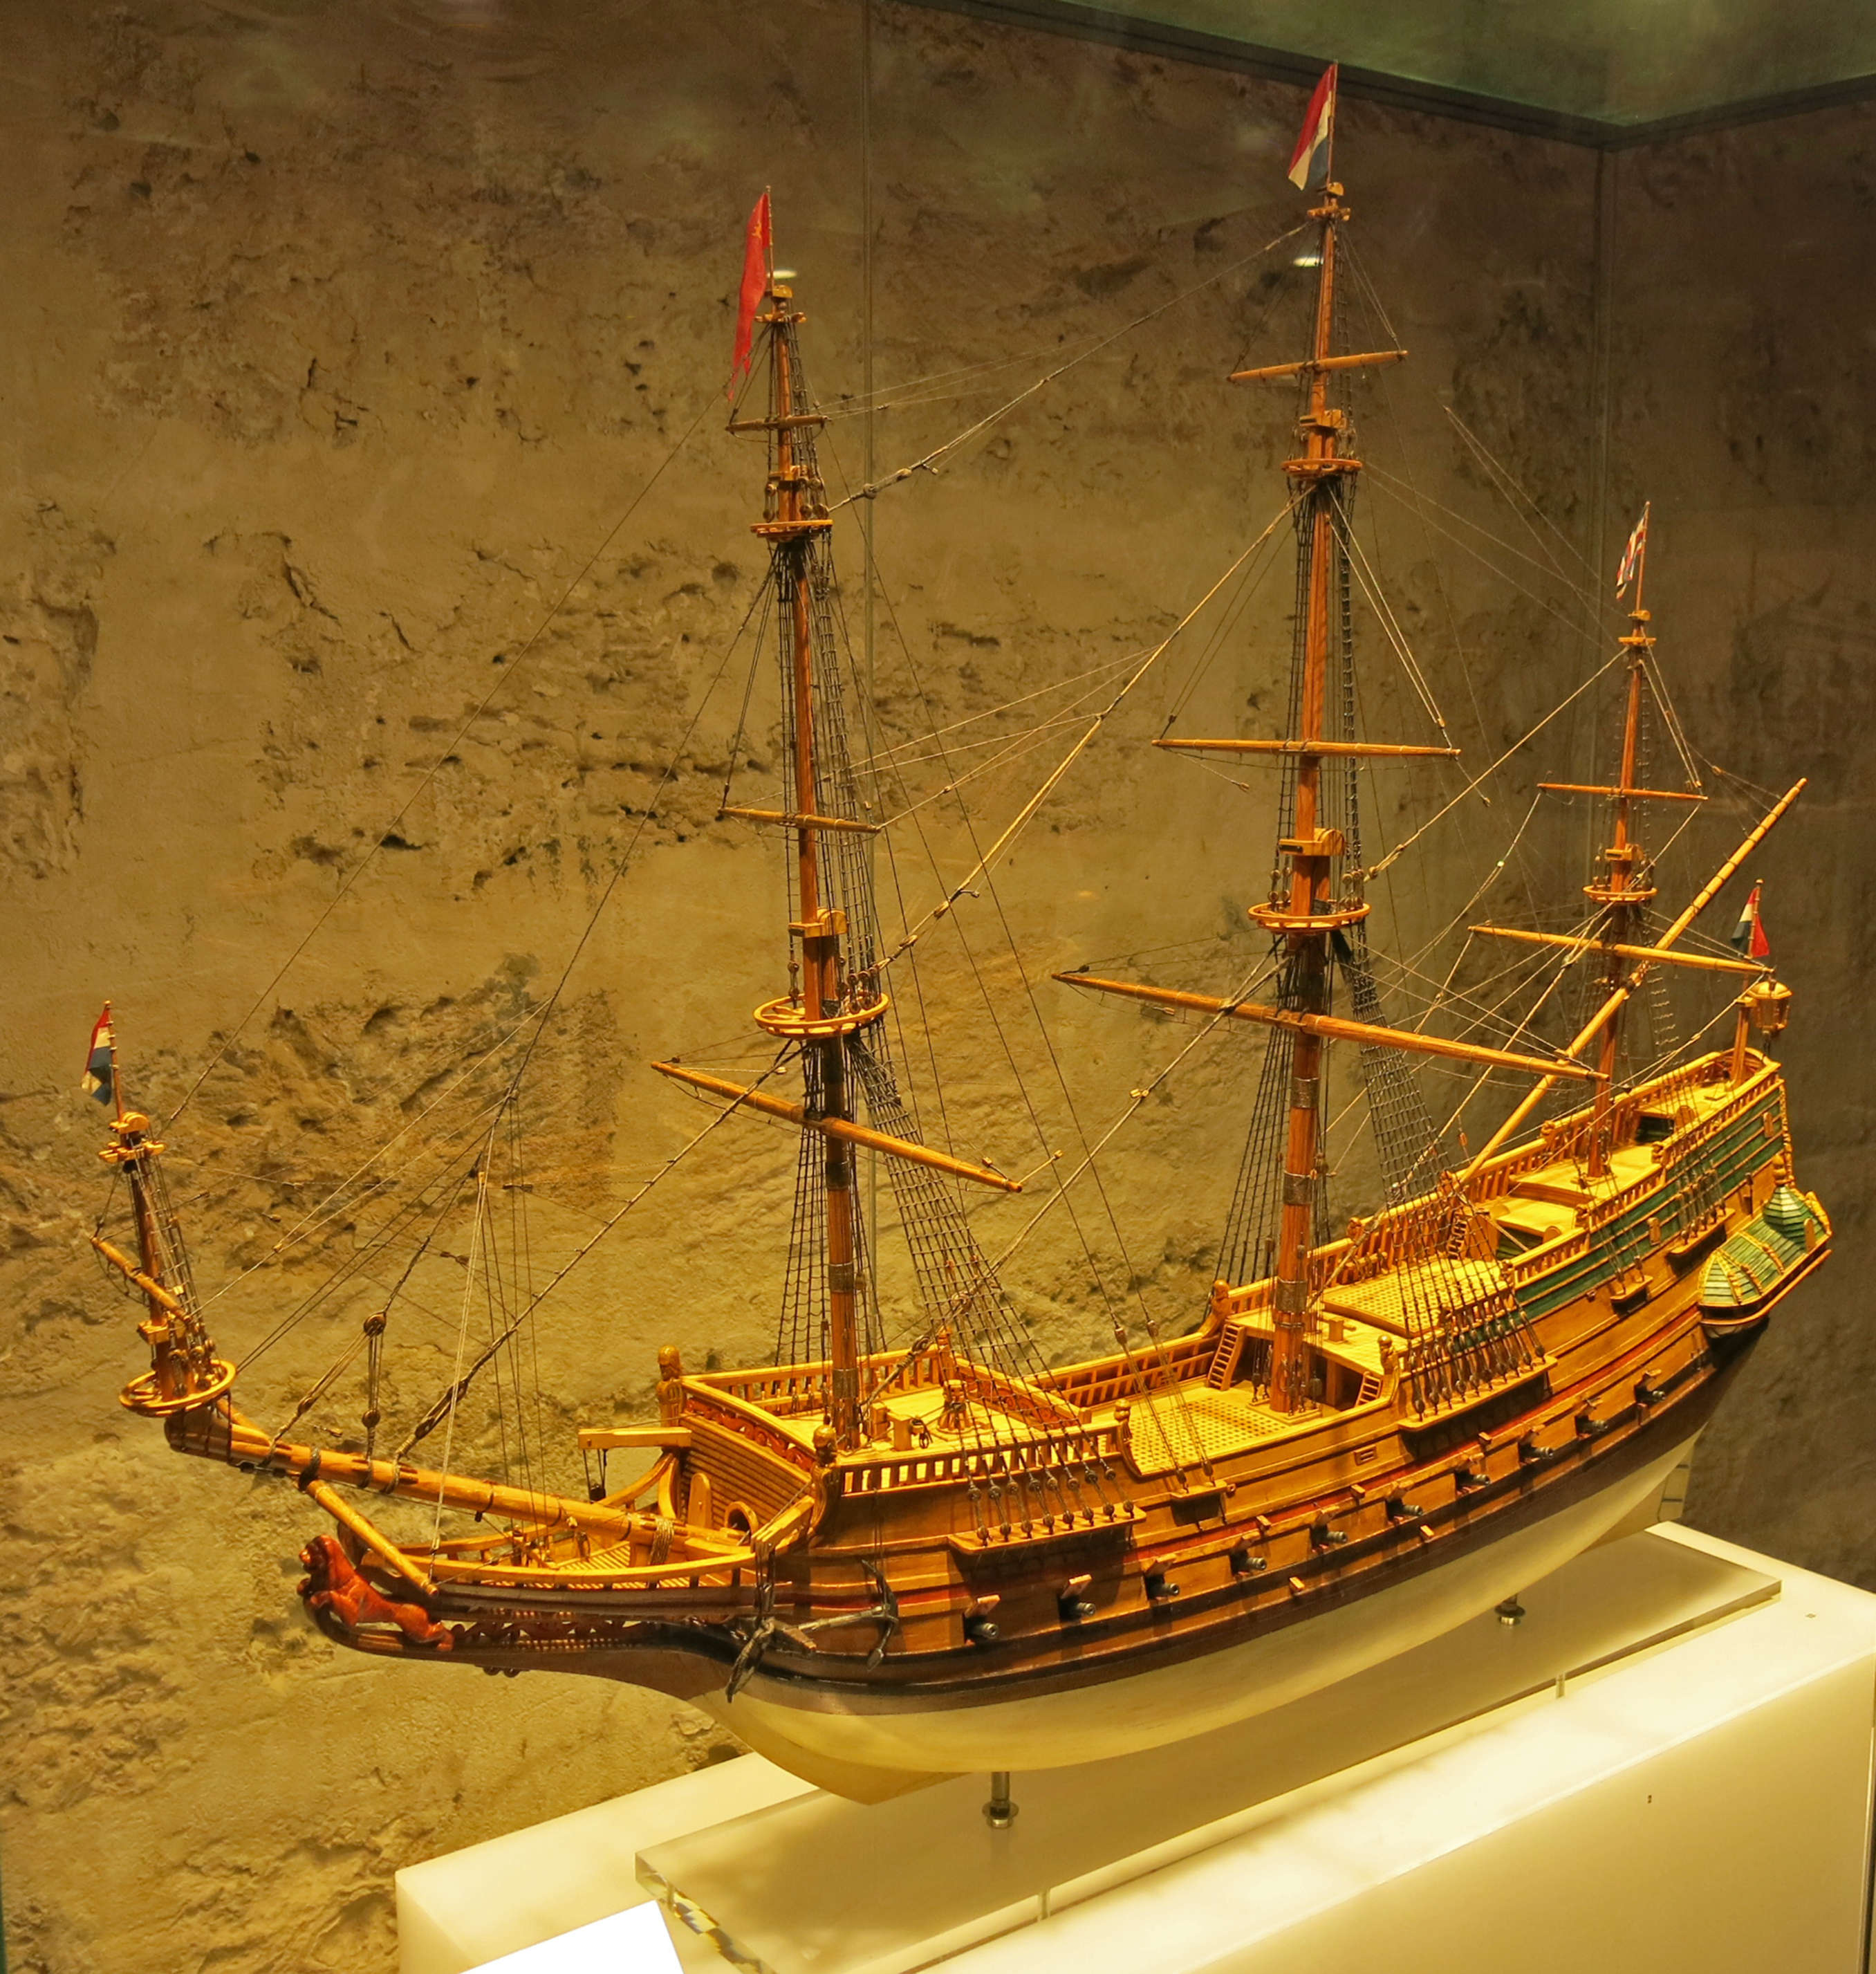

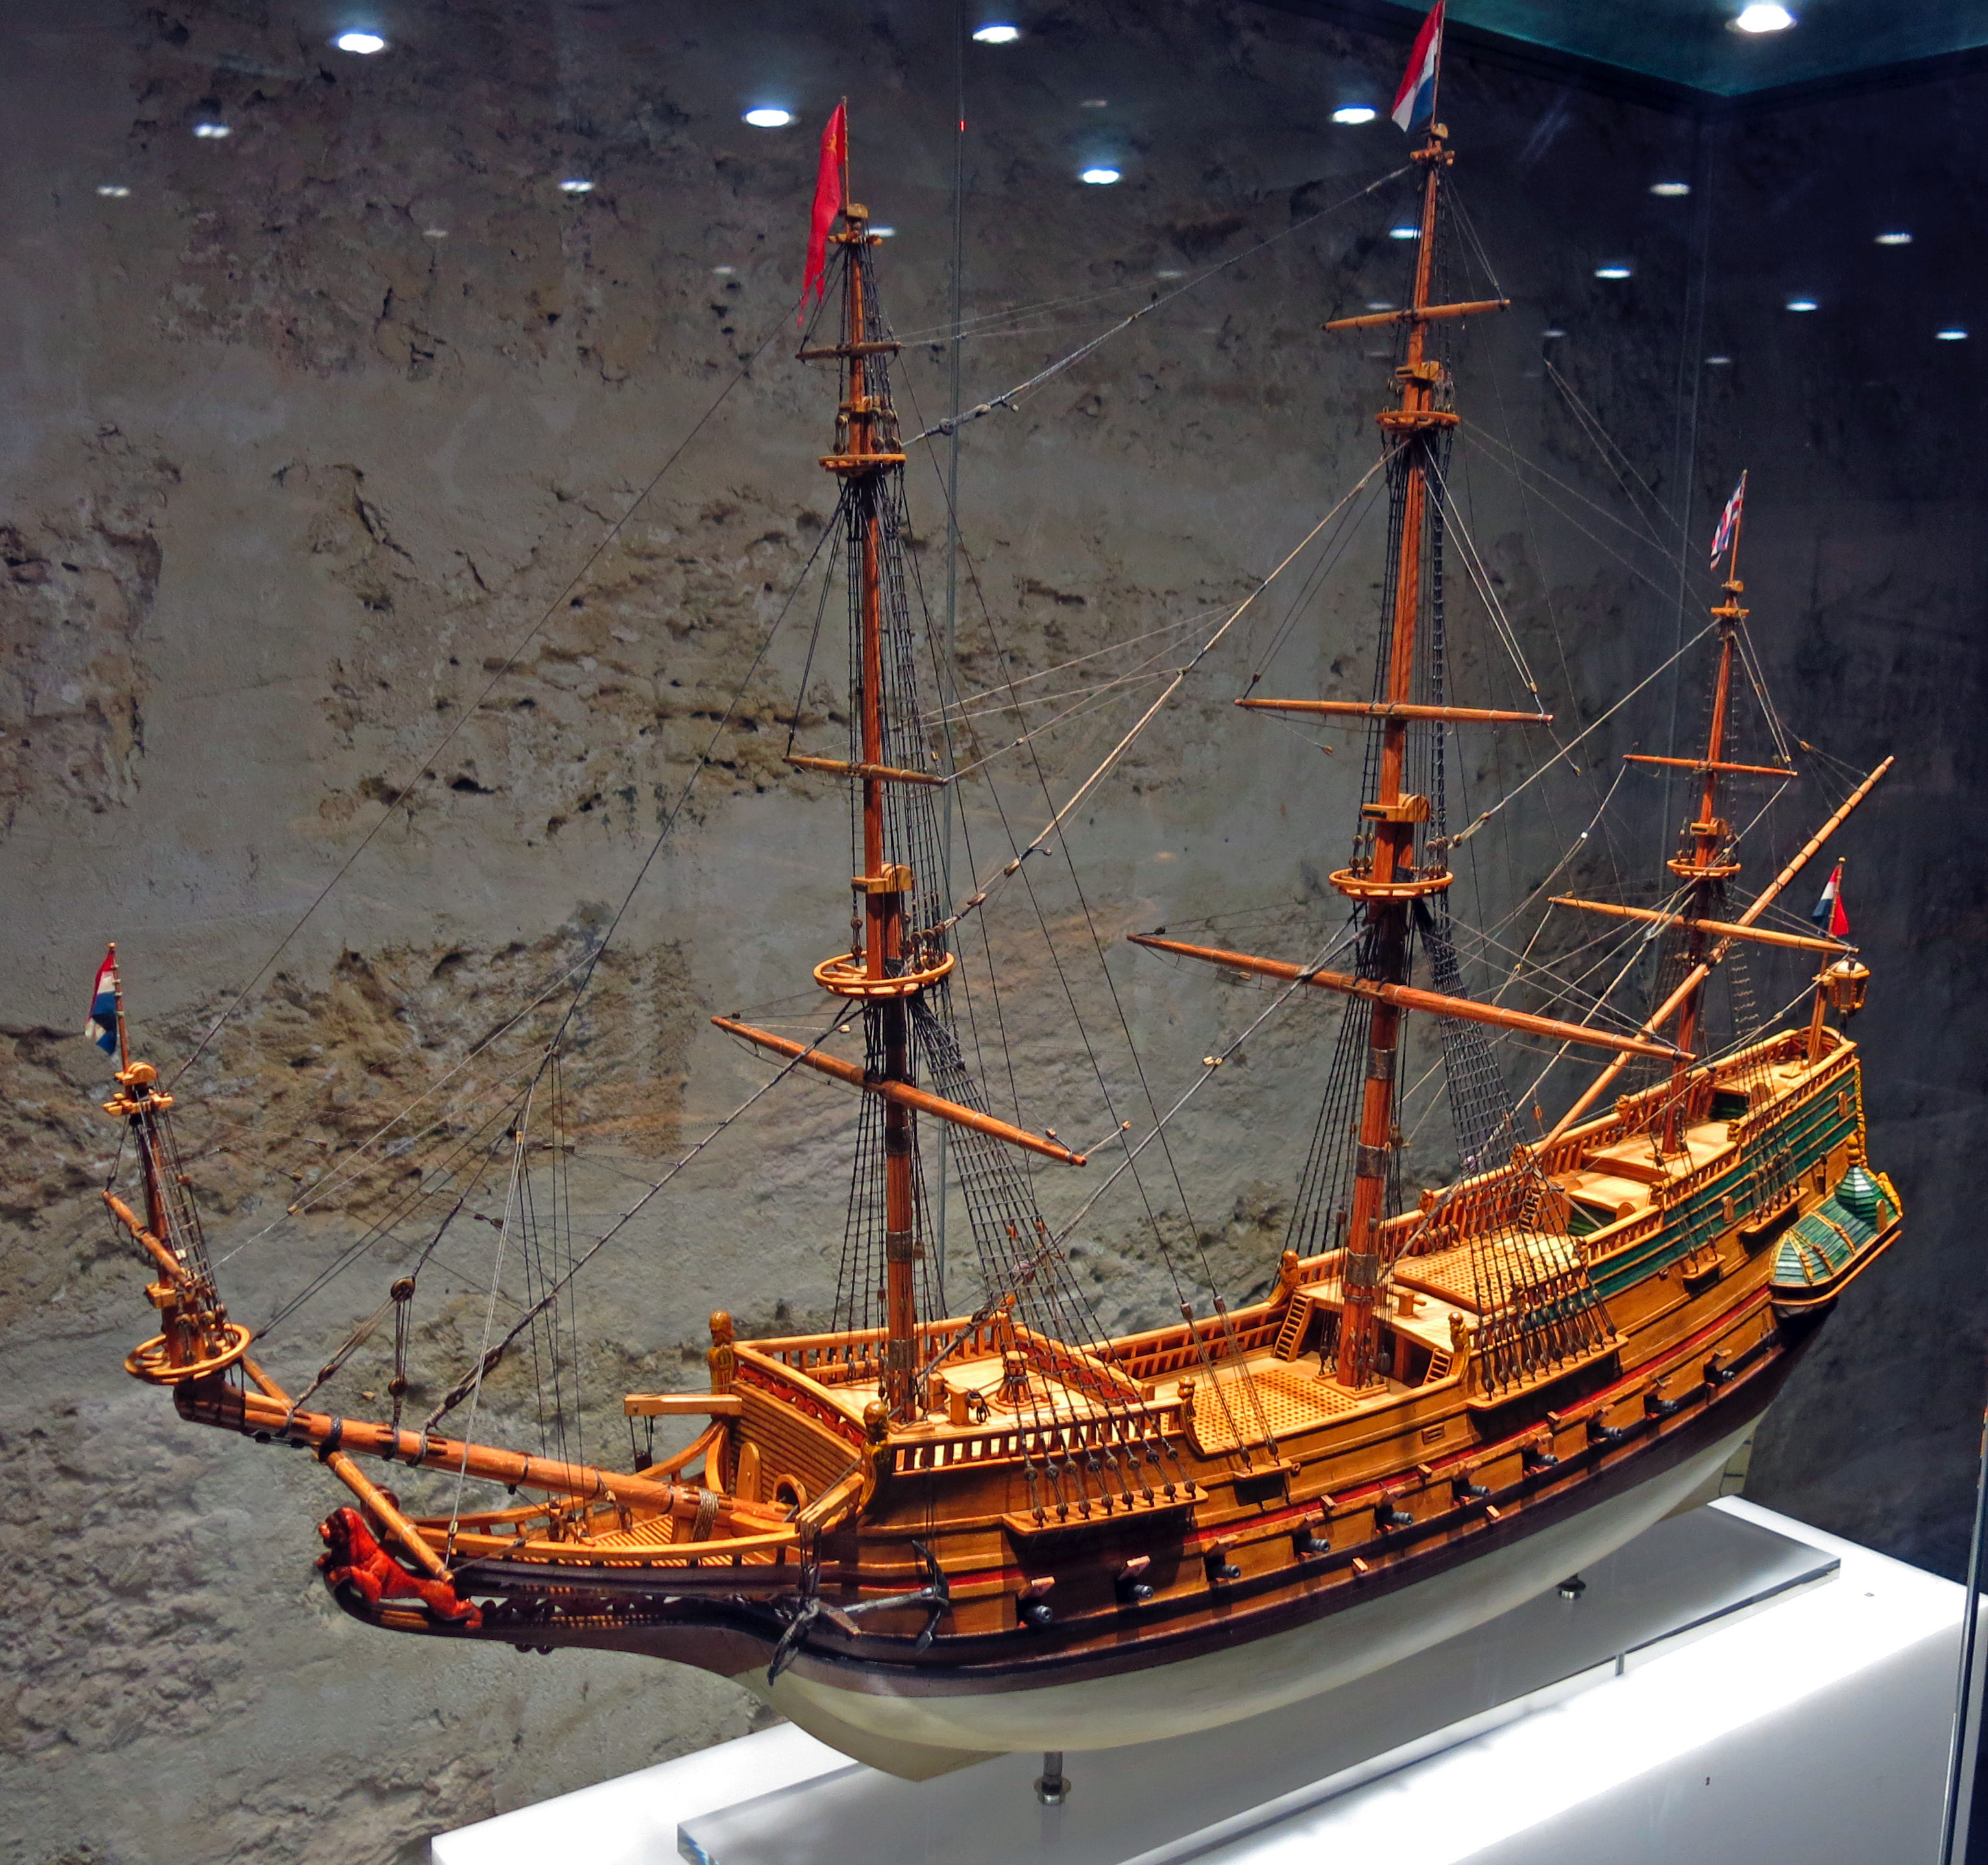
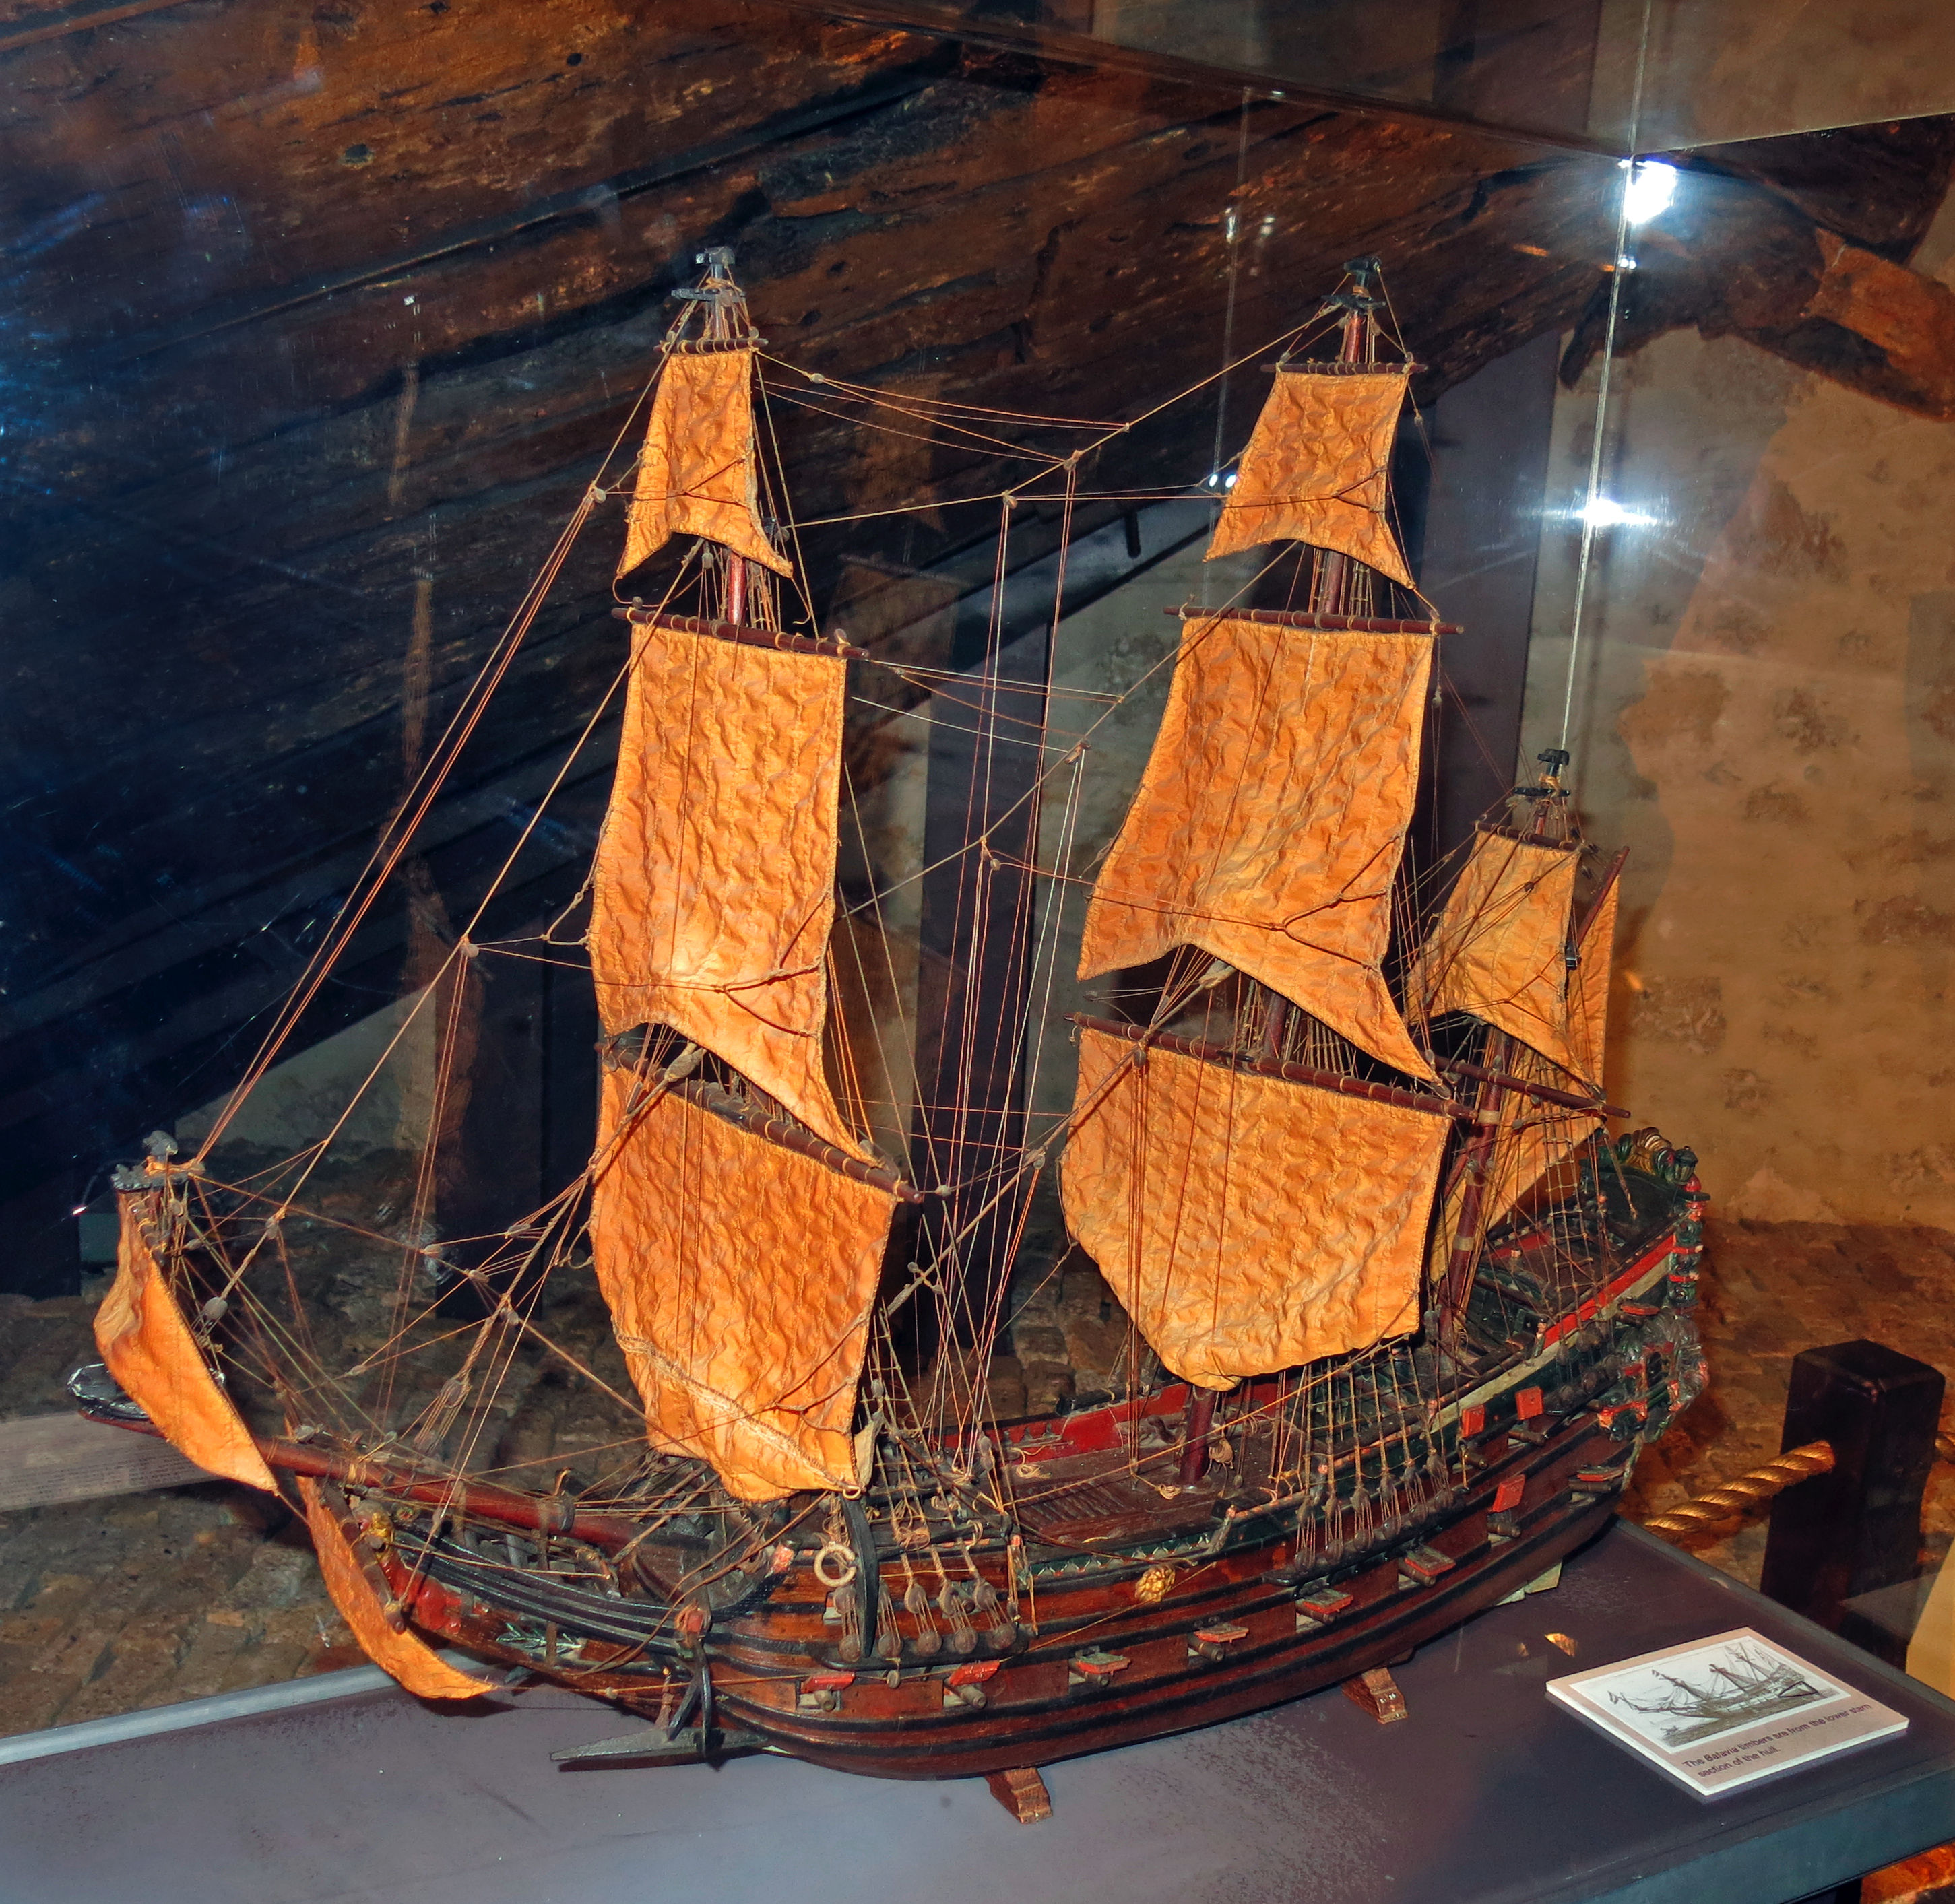
Model of the Batavia (1628).
This model was constructed by Geoffrey (Geoff) Kimpton, a former member of the Western Australian Museum's Department of Maritime Archaeology, who generously donated it to the department in April 2013. The model was built over a ten year period.
Geoff was also responsible for fabricating the steel frame for the Batavia hull reconstruction, and assembling the timbers recovered from the wreck site. These are currently displayed in the Batavia Gallery.
Catalogue BAT6514
Photo: Don Hitchcock April 2014
Source and text: The Shipwreck Galleries, Western Australia Museum, Fremantle, Western Australia
The Batavia Technical Details
VOC East Indiaman Batavia
Built in accordance with the decision of the Gentlemen Seventeen [i.e.VOC directors] of 17 March 1626
Length between perpendiculars 45.30 m
Overall length 56.60 m
Beam 10.50 m
Maximum draught 5.10 m
Height main mast 55 m
Empty weight 650 tons
Ballast 220 tons of lead
Artillery 24 cast-iron guns
Total surface area of sails 1180 m2
Total length of rigging 21 kilometres
Total number of persons on board 341 (in 1628)
Technical details above are from http://www.bataviaphotos.com/batavia_history.html
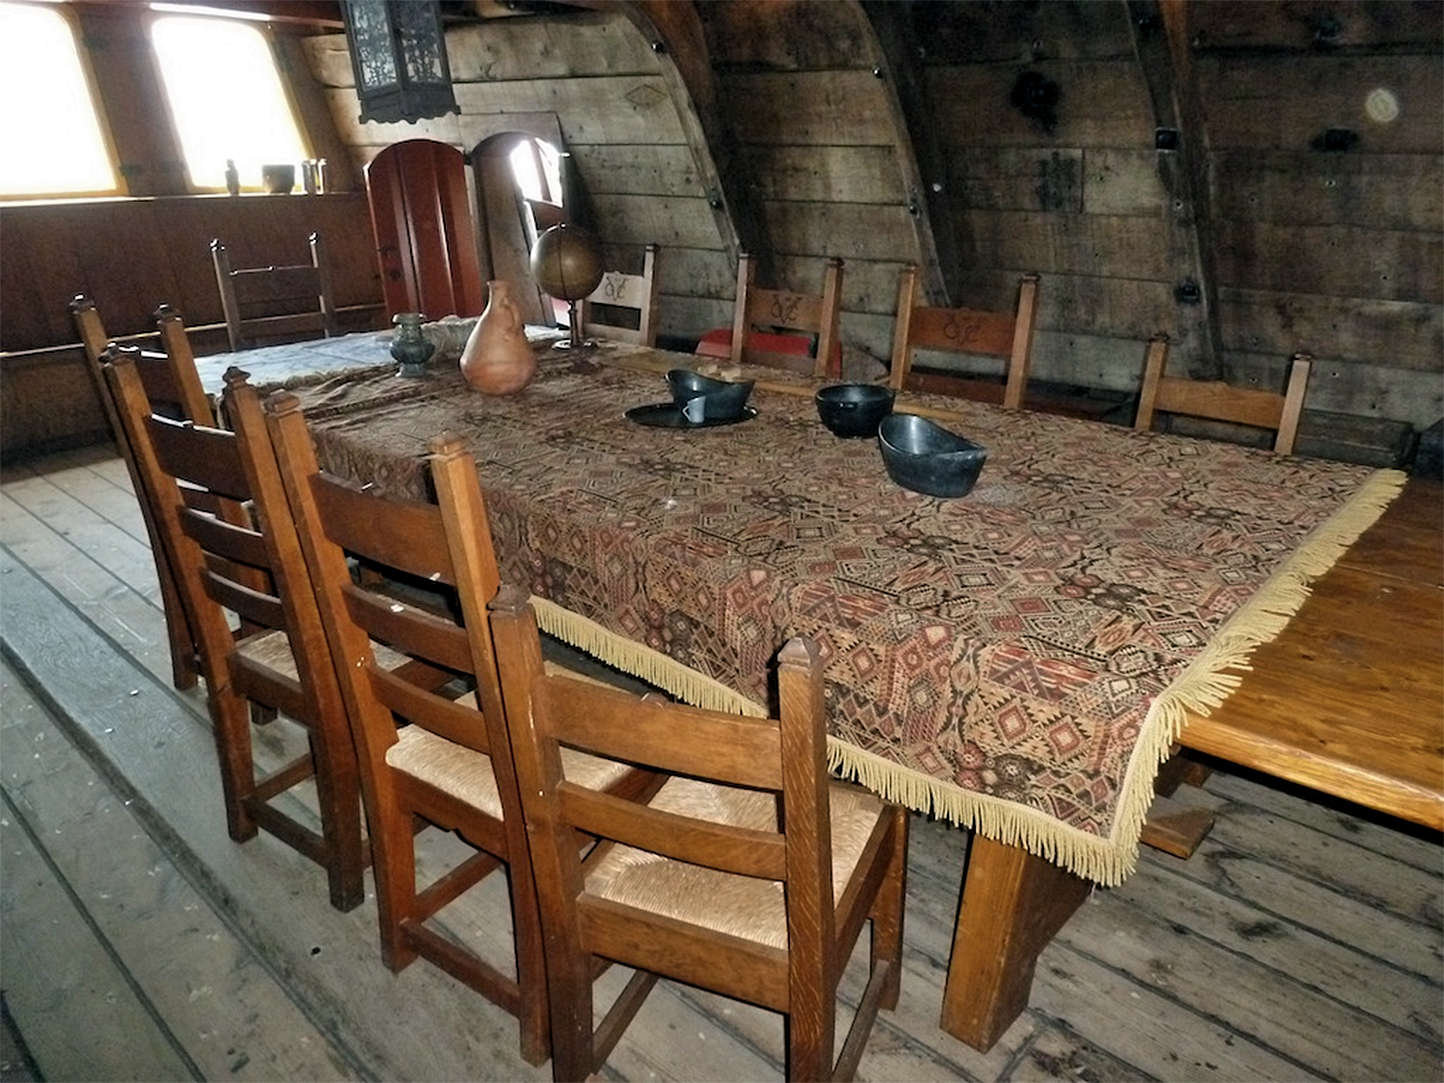
The Great Cabin shown was the nerve centre of the ship. Here the Skipper and his colleagues met and decided on important matters. The Skipper lived and slept here, Pelsaert had his own cabin as the highest official of the VOC on board.
Photo: http://addiator.blogspot.com.au/2012/06/batavia-shipyard.html
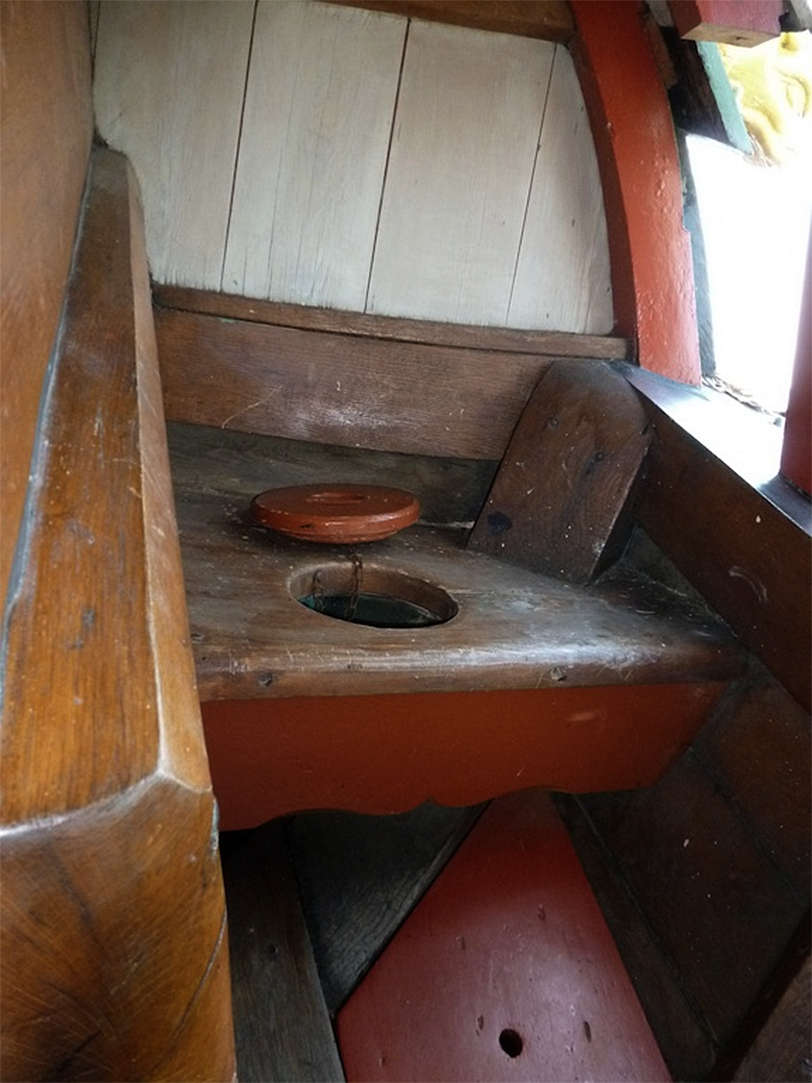
The Skipper's toilet aboard the Batavia replica.
It is important to realise the different roles played by Pelsaert, who was in overall control of the voyage, and the Skipper, who was in charge of making sure that the ship got where it was supposed to, in good order and condition, and in the fastest time possible.
Photo: http://addiator.blogspot.com.au/2012/06/batavia-shipyard.html
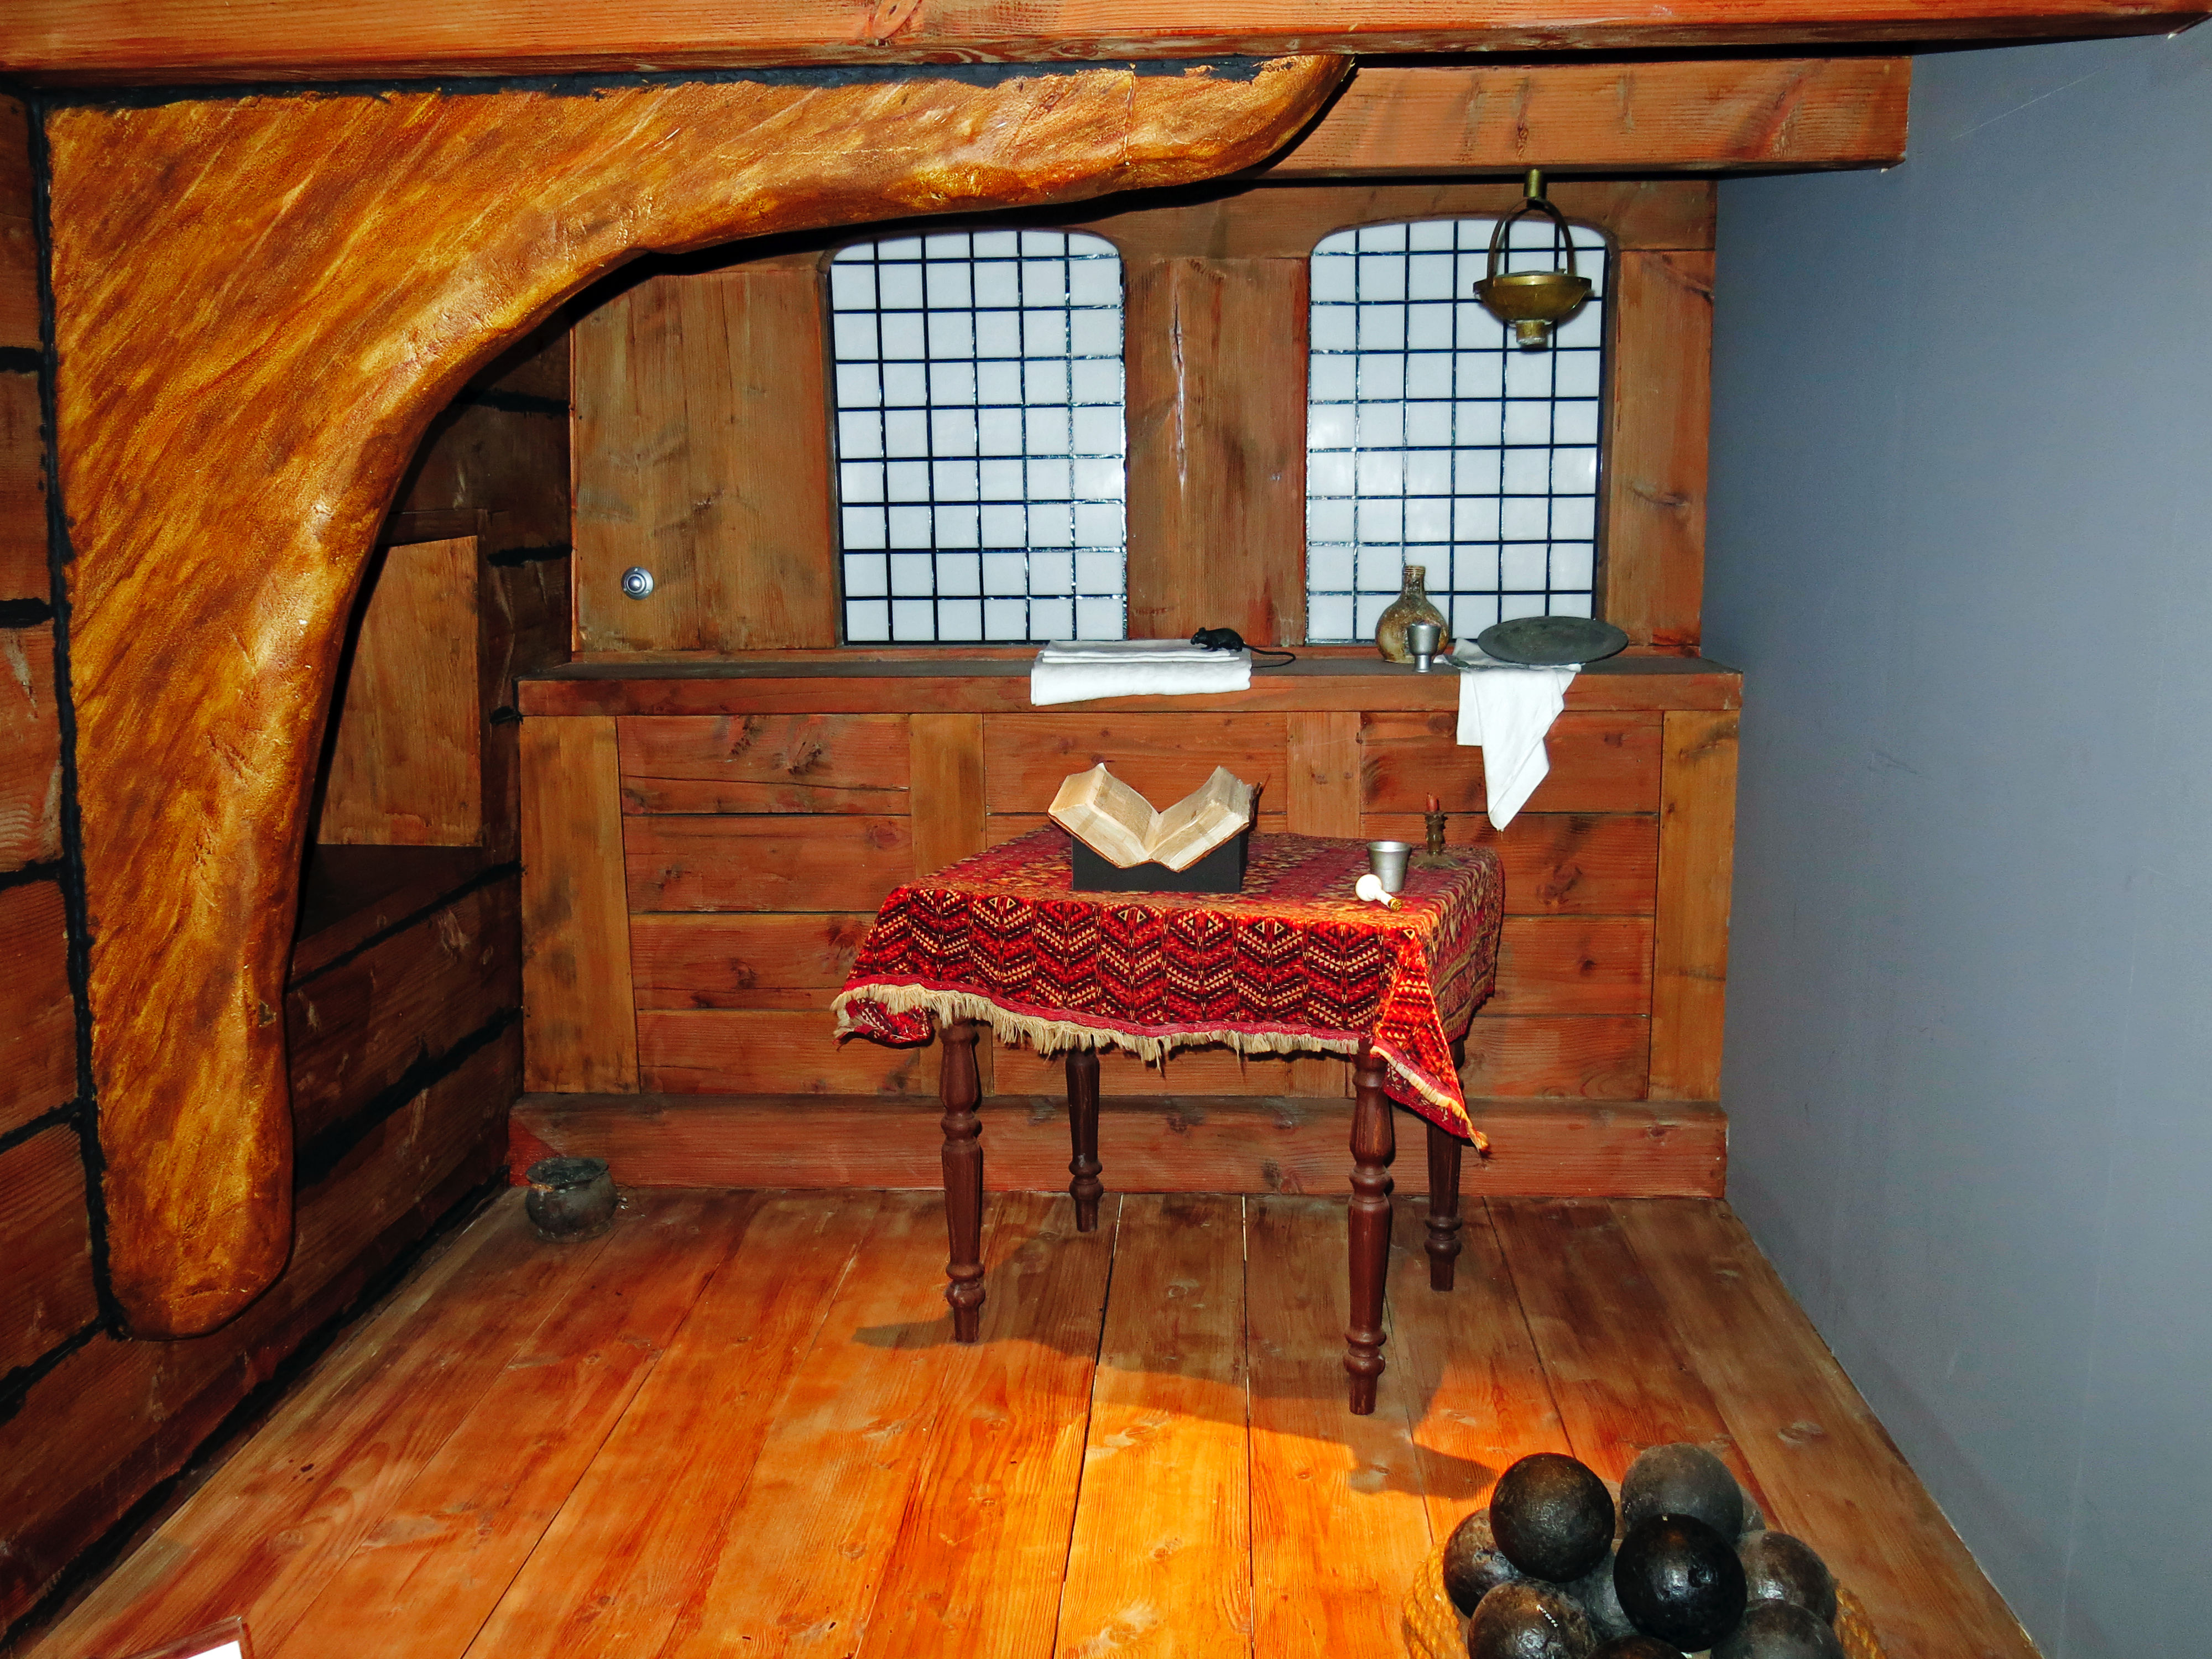
This is an officer's or passenger's cabin. Accommodation on board VOC ships was far from comfortable, especially for the ordinary seaman. Whereas officers and passengers had separate cabins and a shared cabin for meals and social gatherings, the men had to find shelter in the so-called orlop of the ship where there was very little space per person. The hammocks of sometimes 300 or more men hung right against each other.
Many of the cabin fittings, writing equipment, eating and drinking utensils, and personal items have survived from the wreck. Other furnishings are representations based on contemporary ship models, paintings and other illustrative material.
Photo: Don Hitchcock October 2014
Source and text: The Shipwreck Galleries, Western Australia Museum, Fremantle, Western Australia
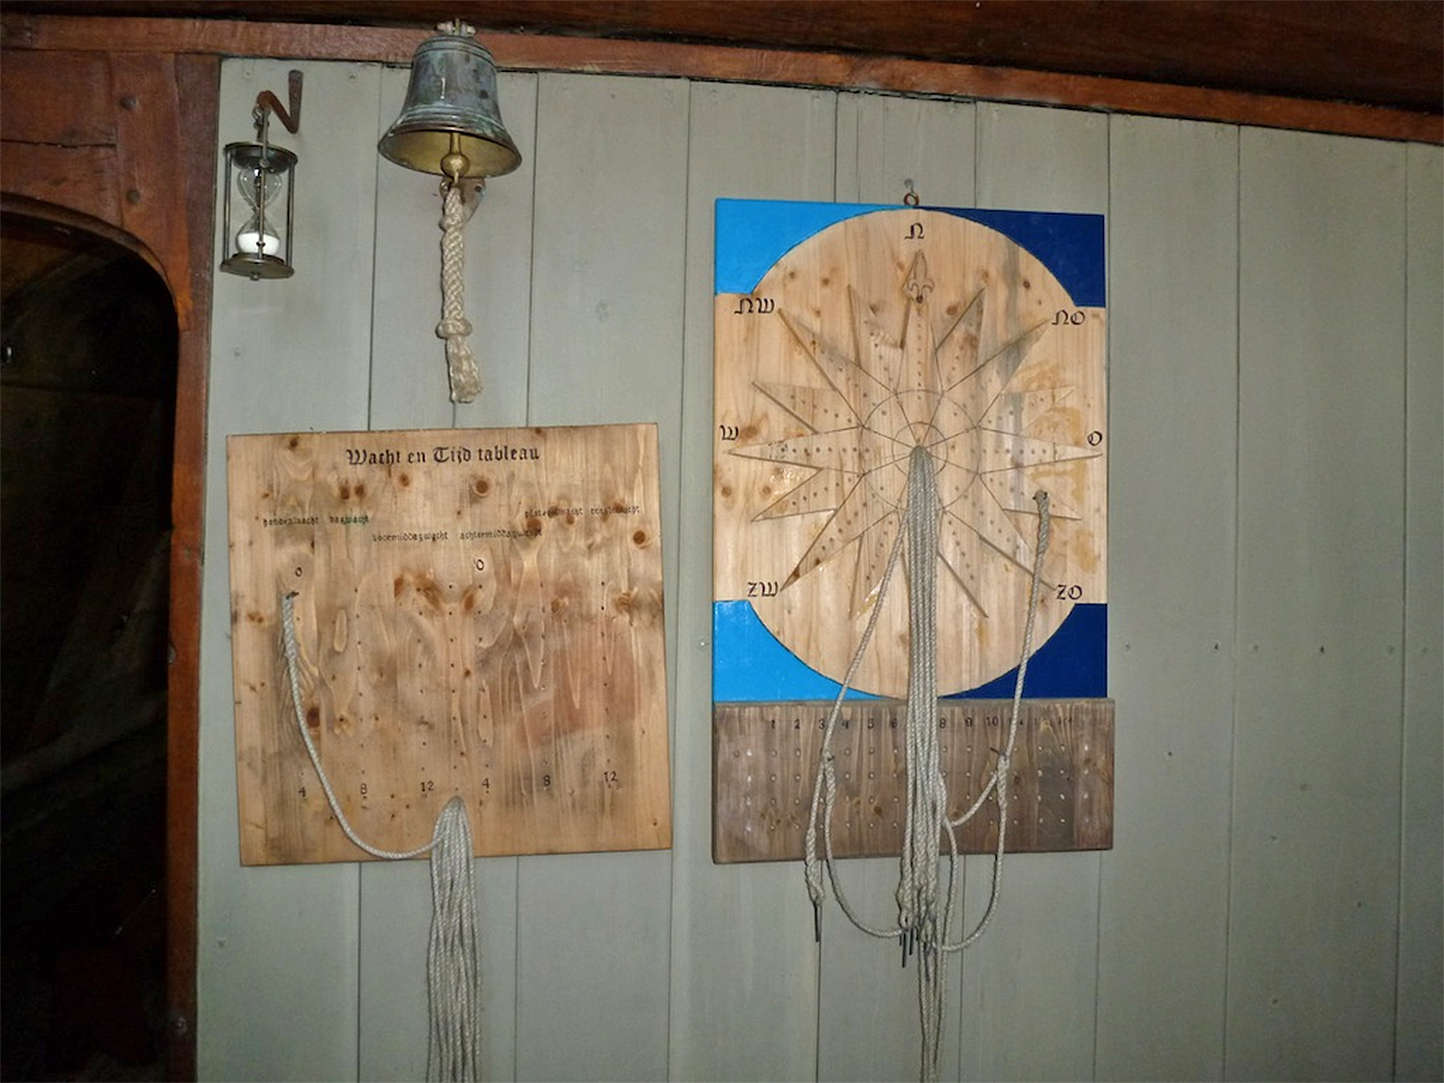
Navigational aids aboard the Batavia replica.
Photo: http://addiator.blogspot.com.au/2012/06/batavia-shipyard.html
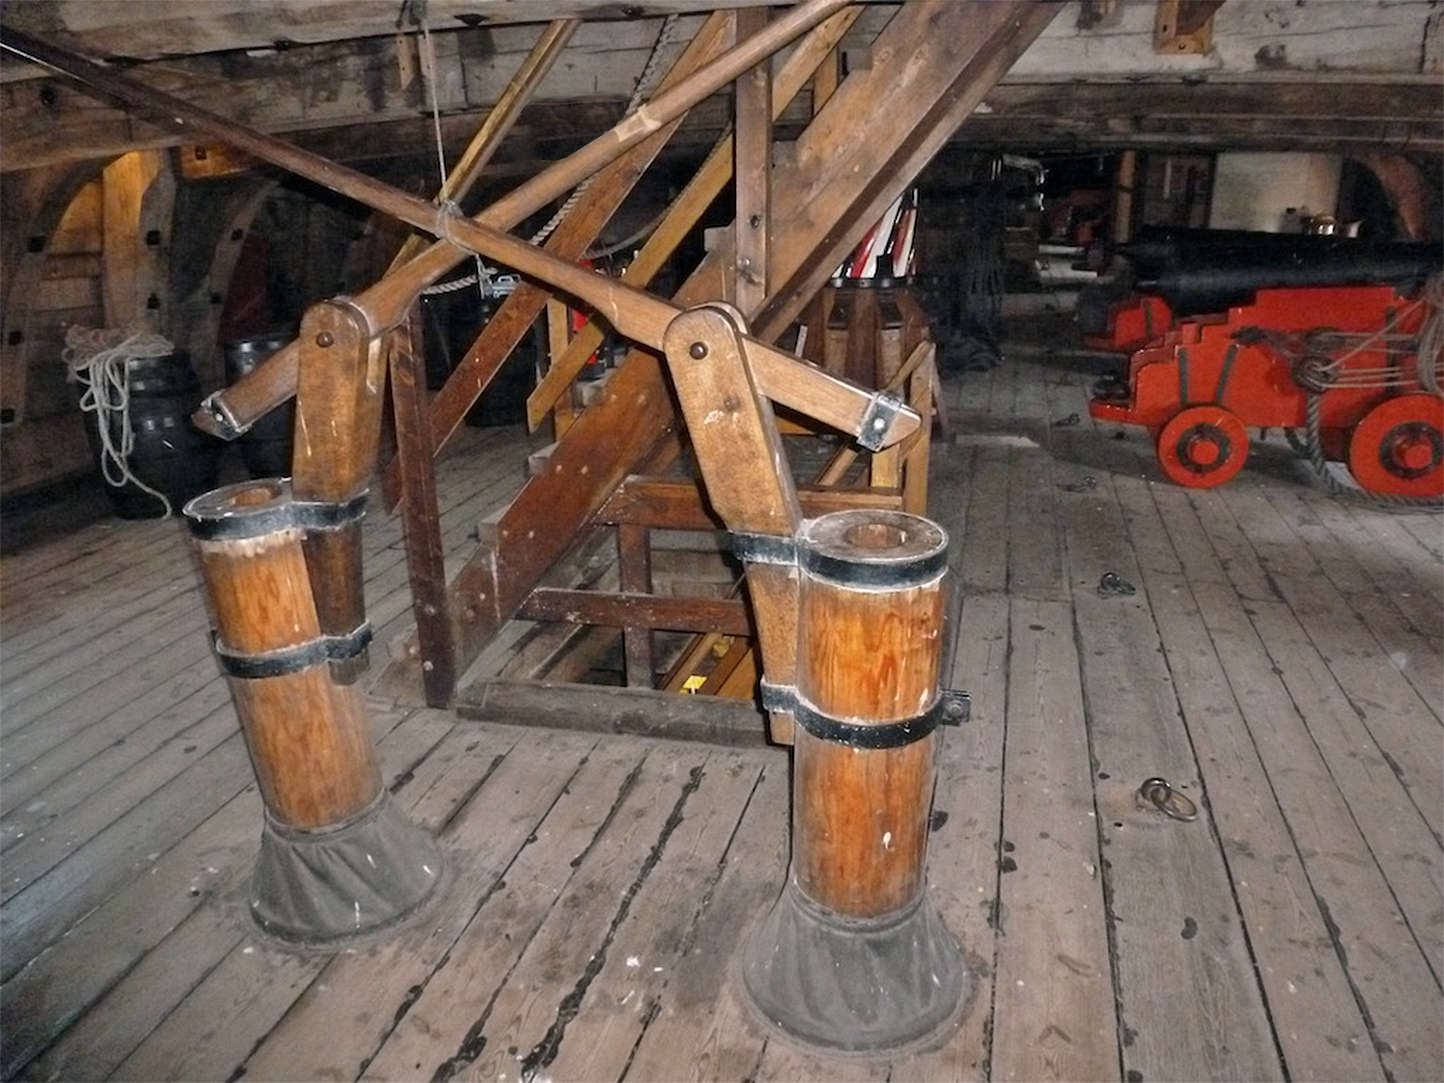
Pumps aboard the Batavia replica. The handles were not connected to the pistons in this photo, taken during the fitting out of the replica.
Photo: http://addiator.blogspot.com.au/2012/06/batavia-shipyard.html
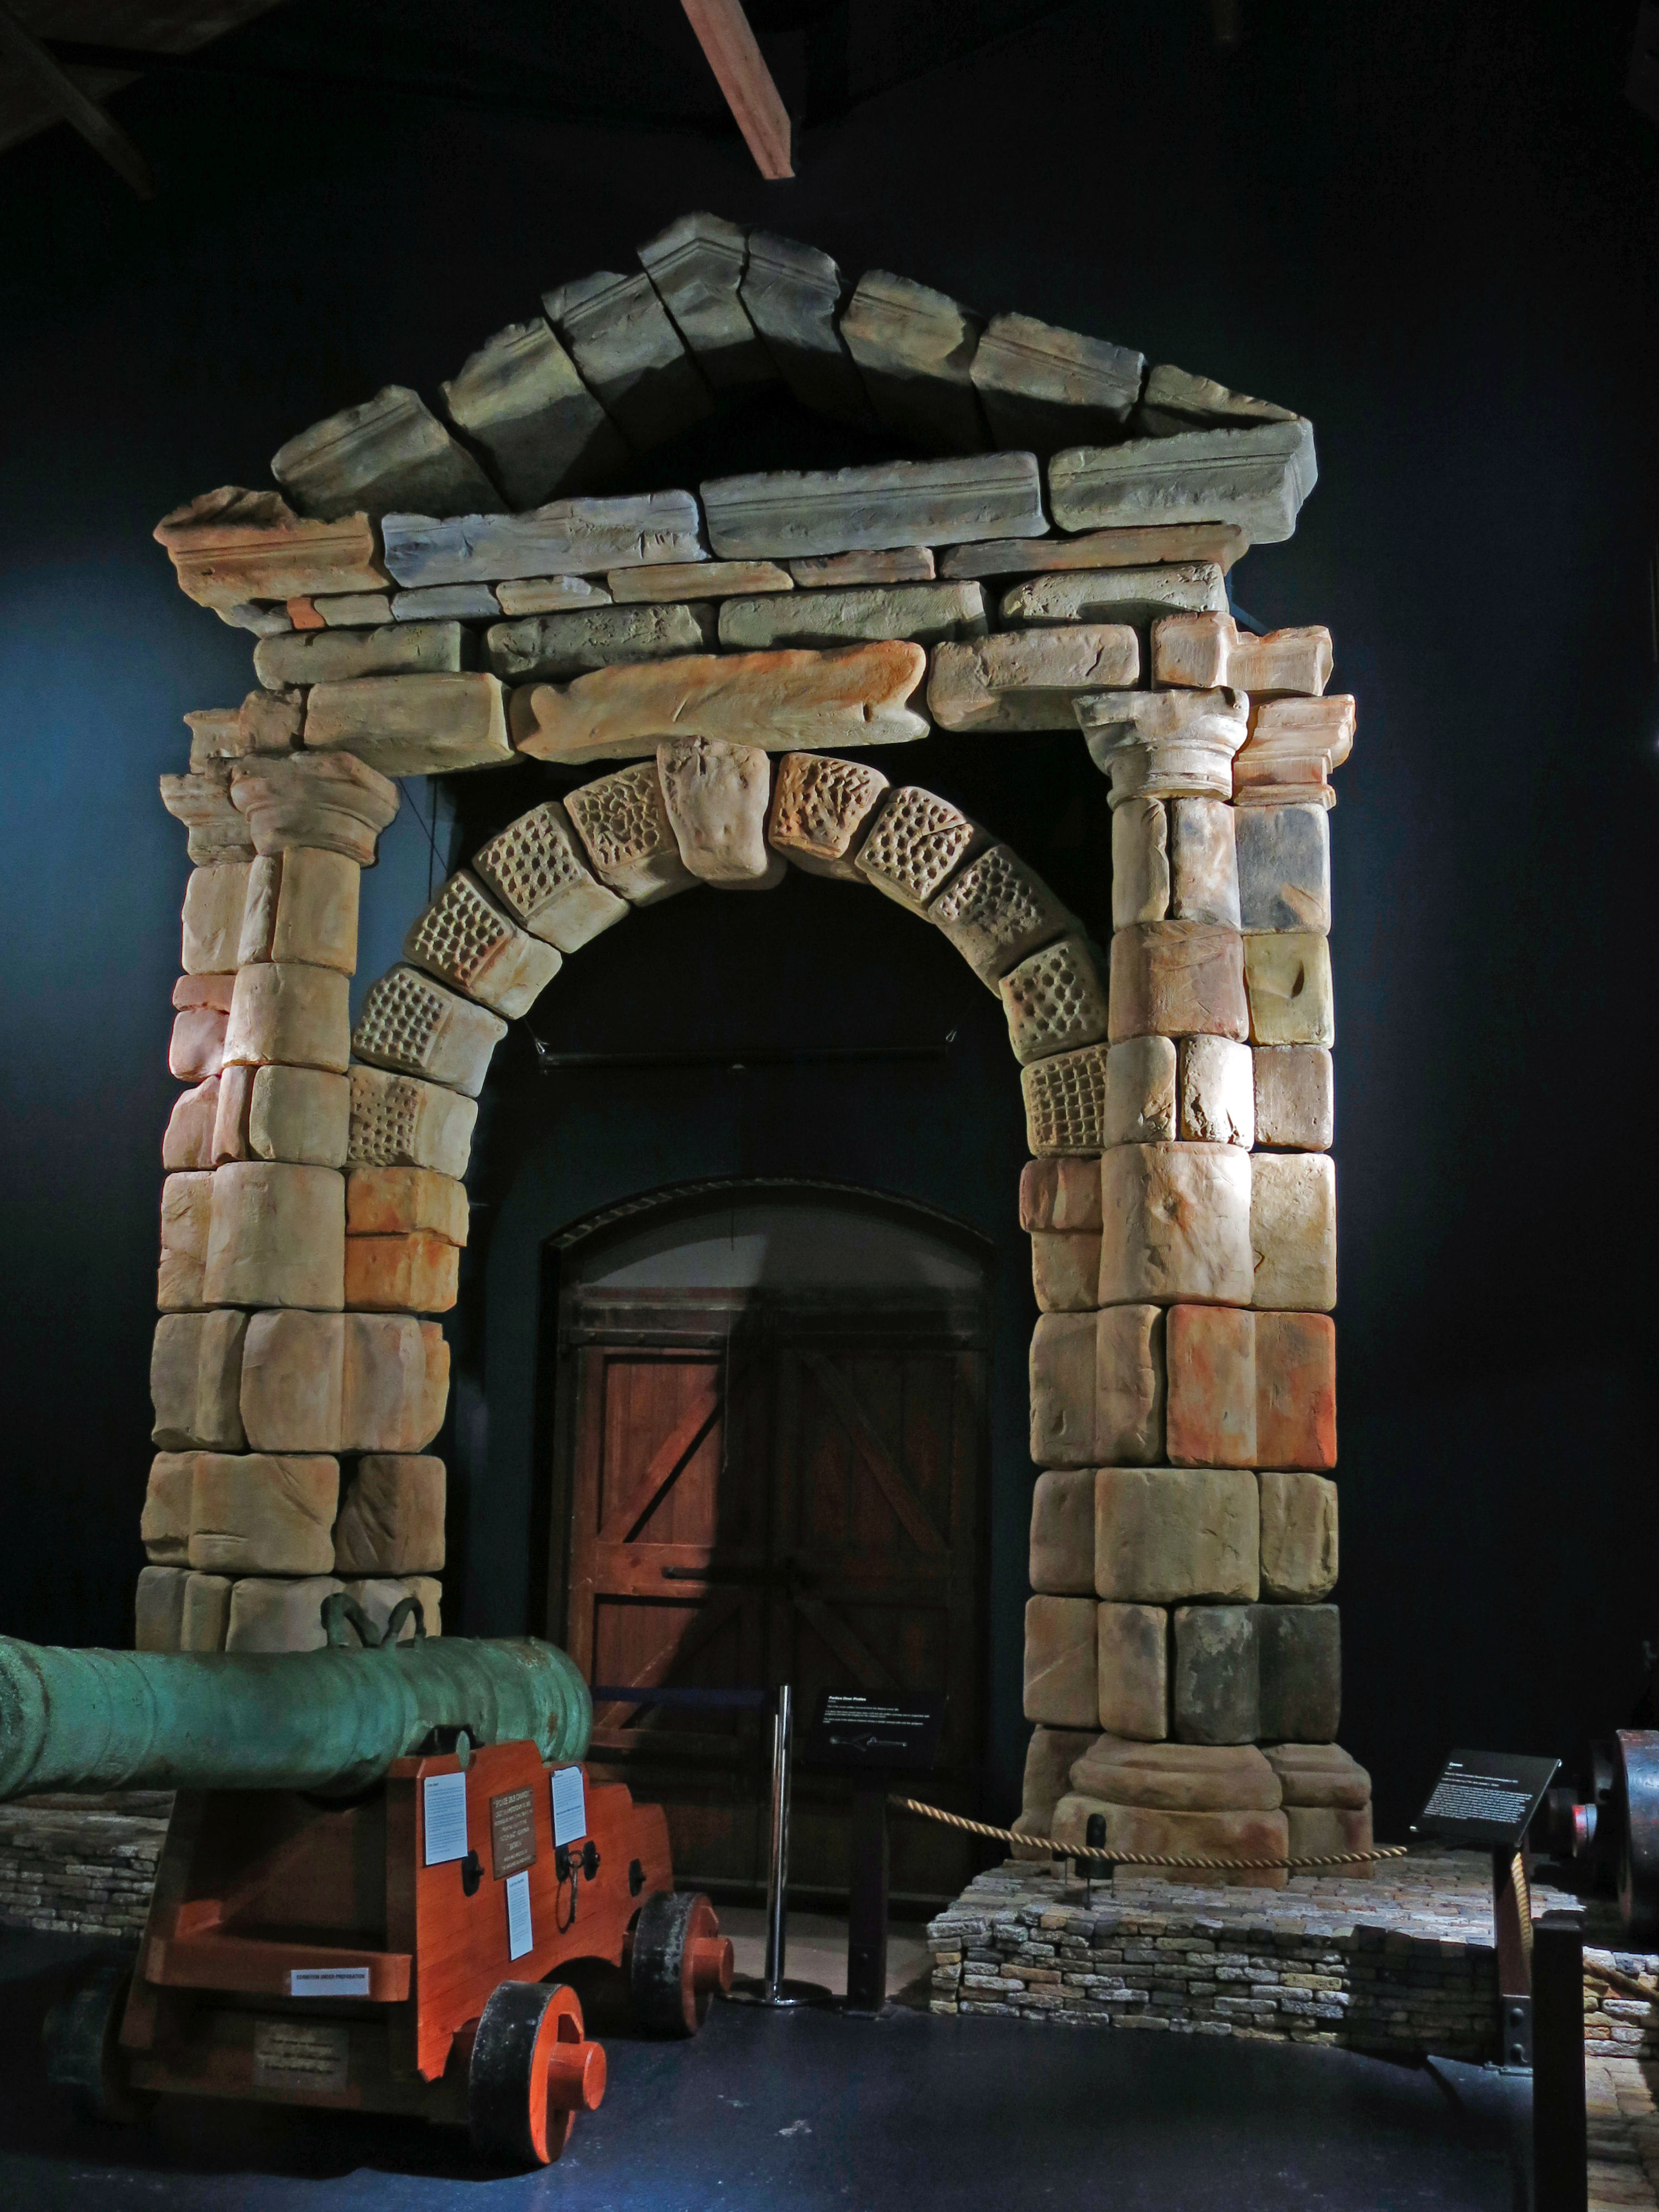
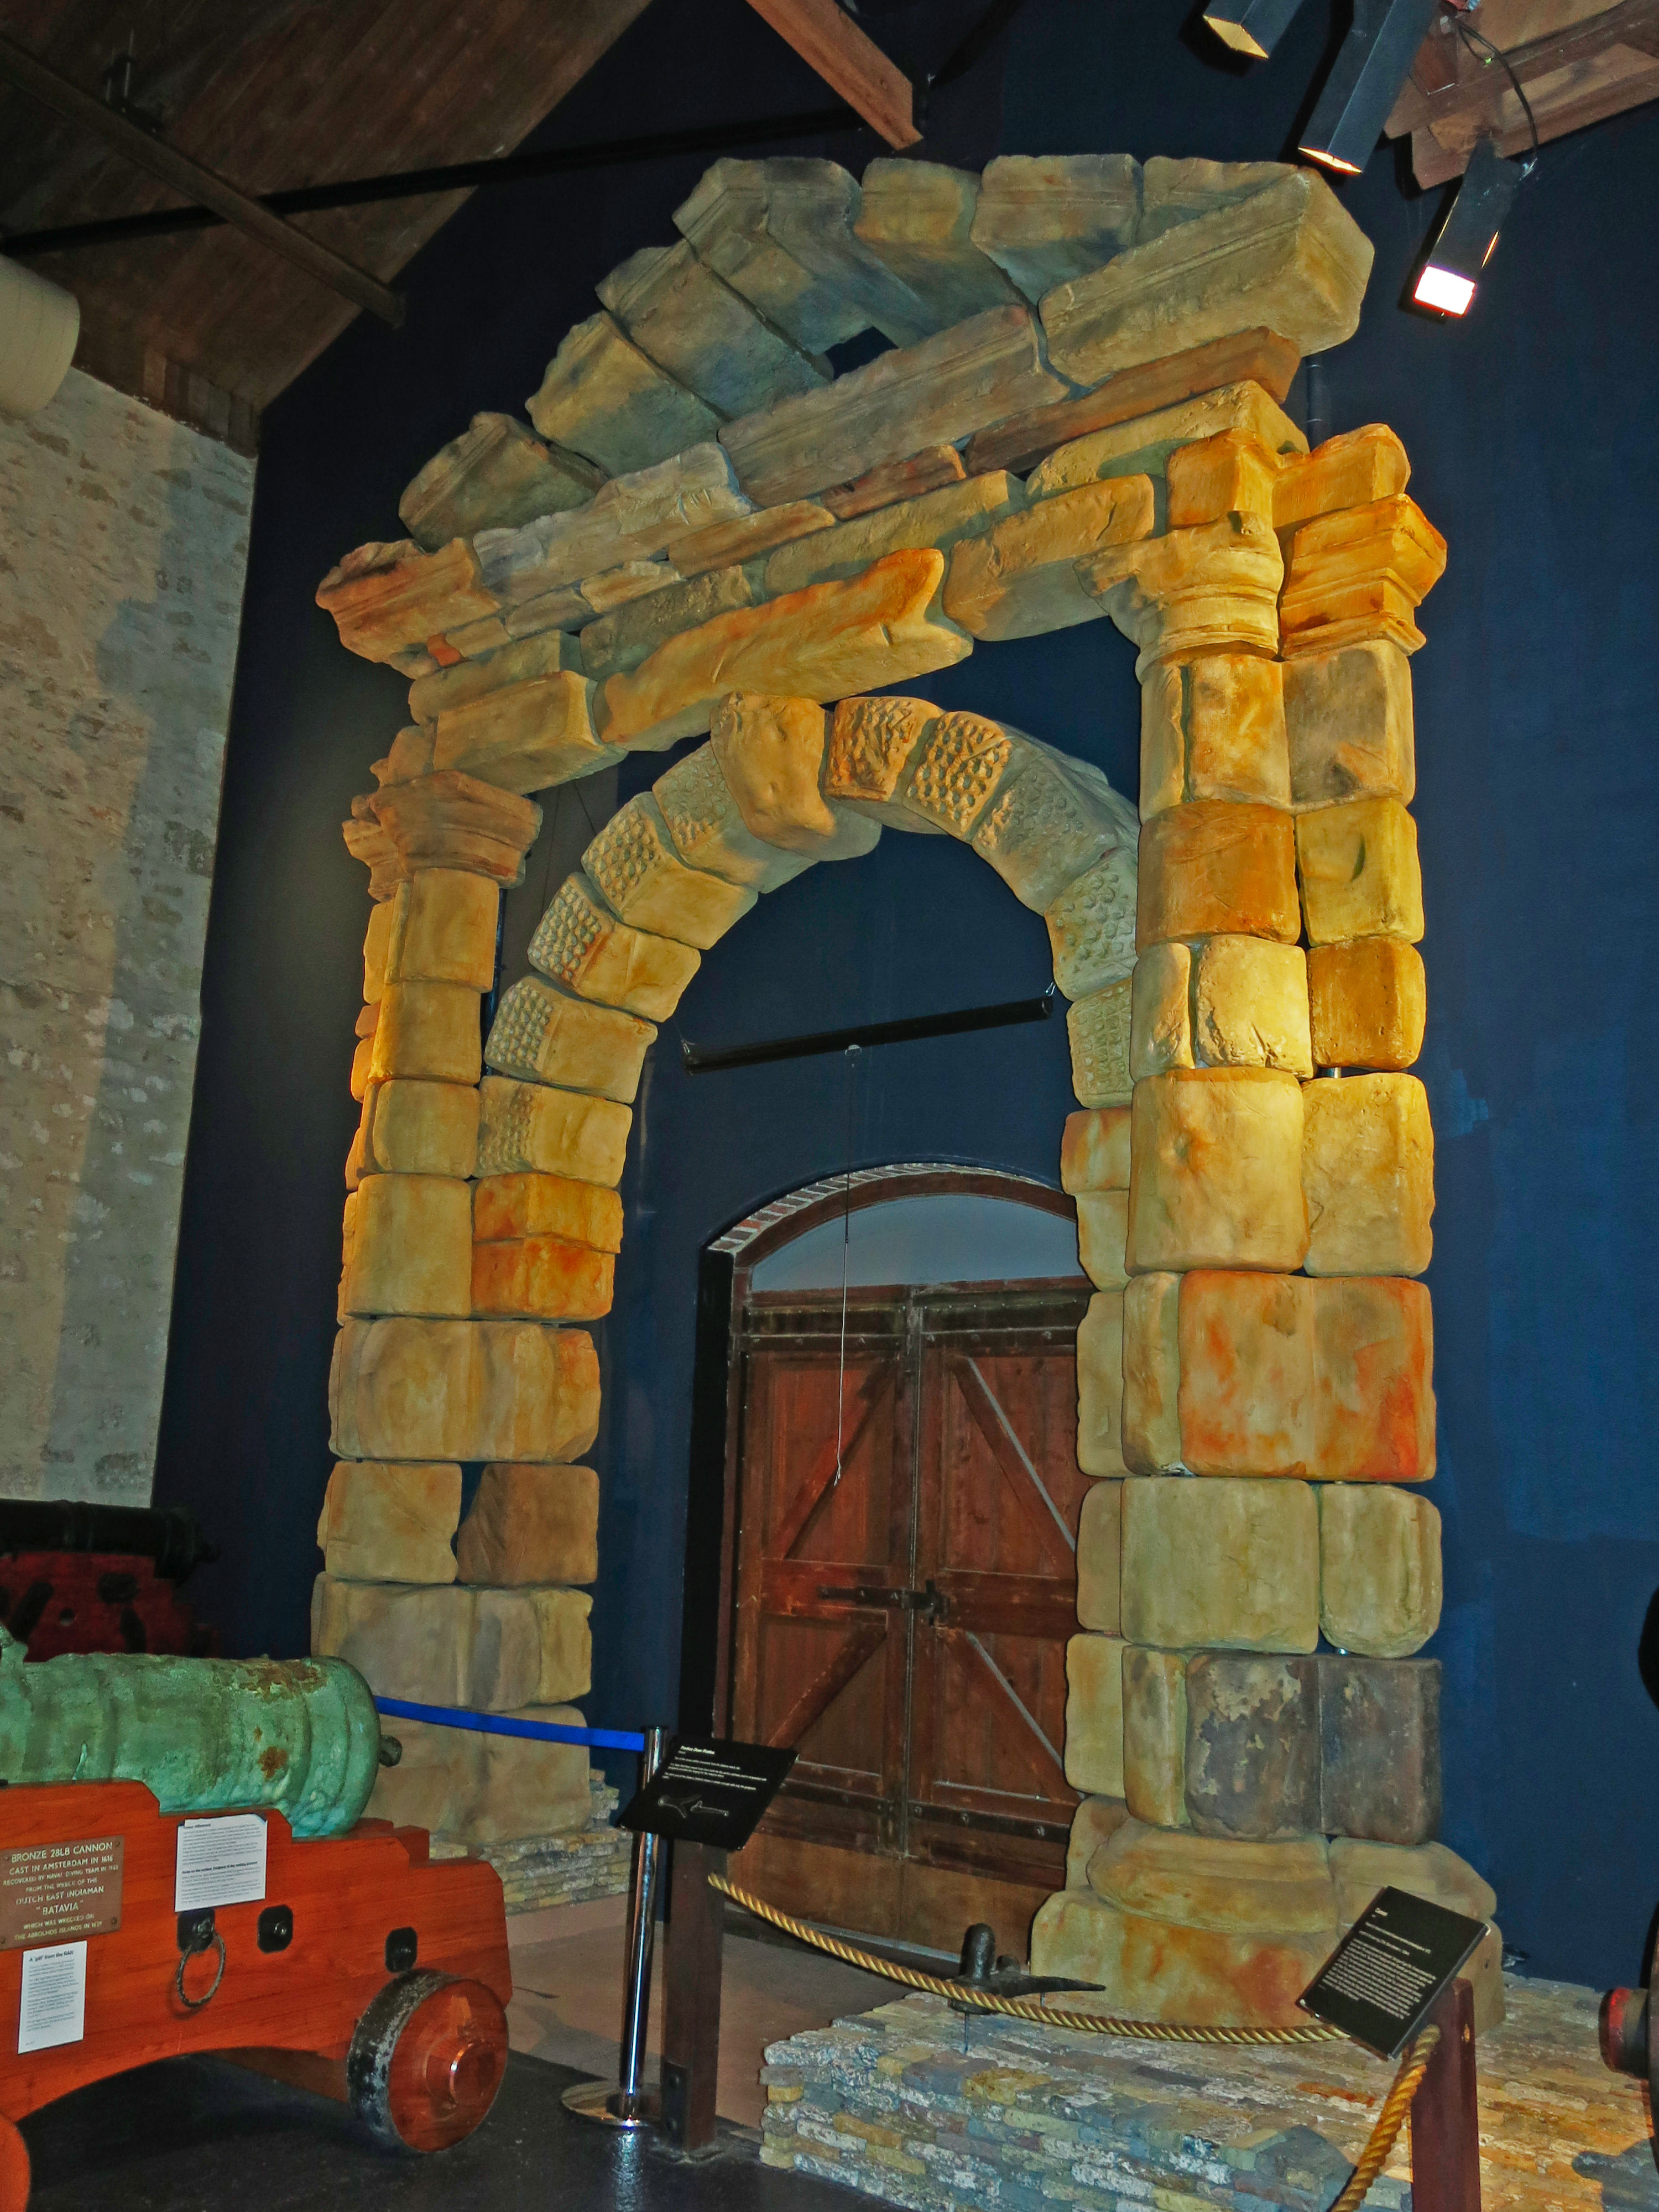
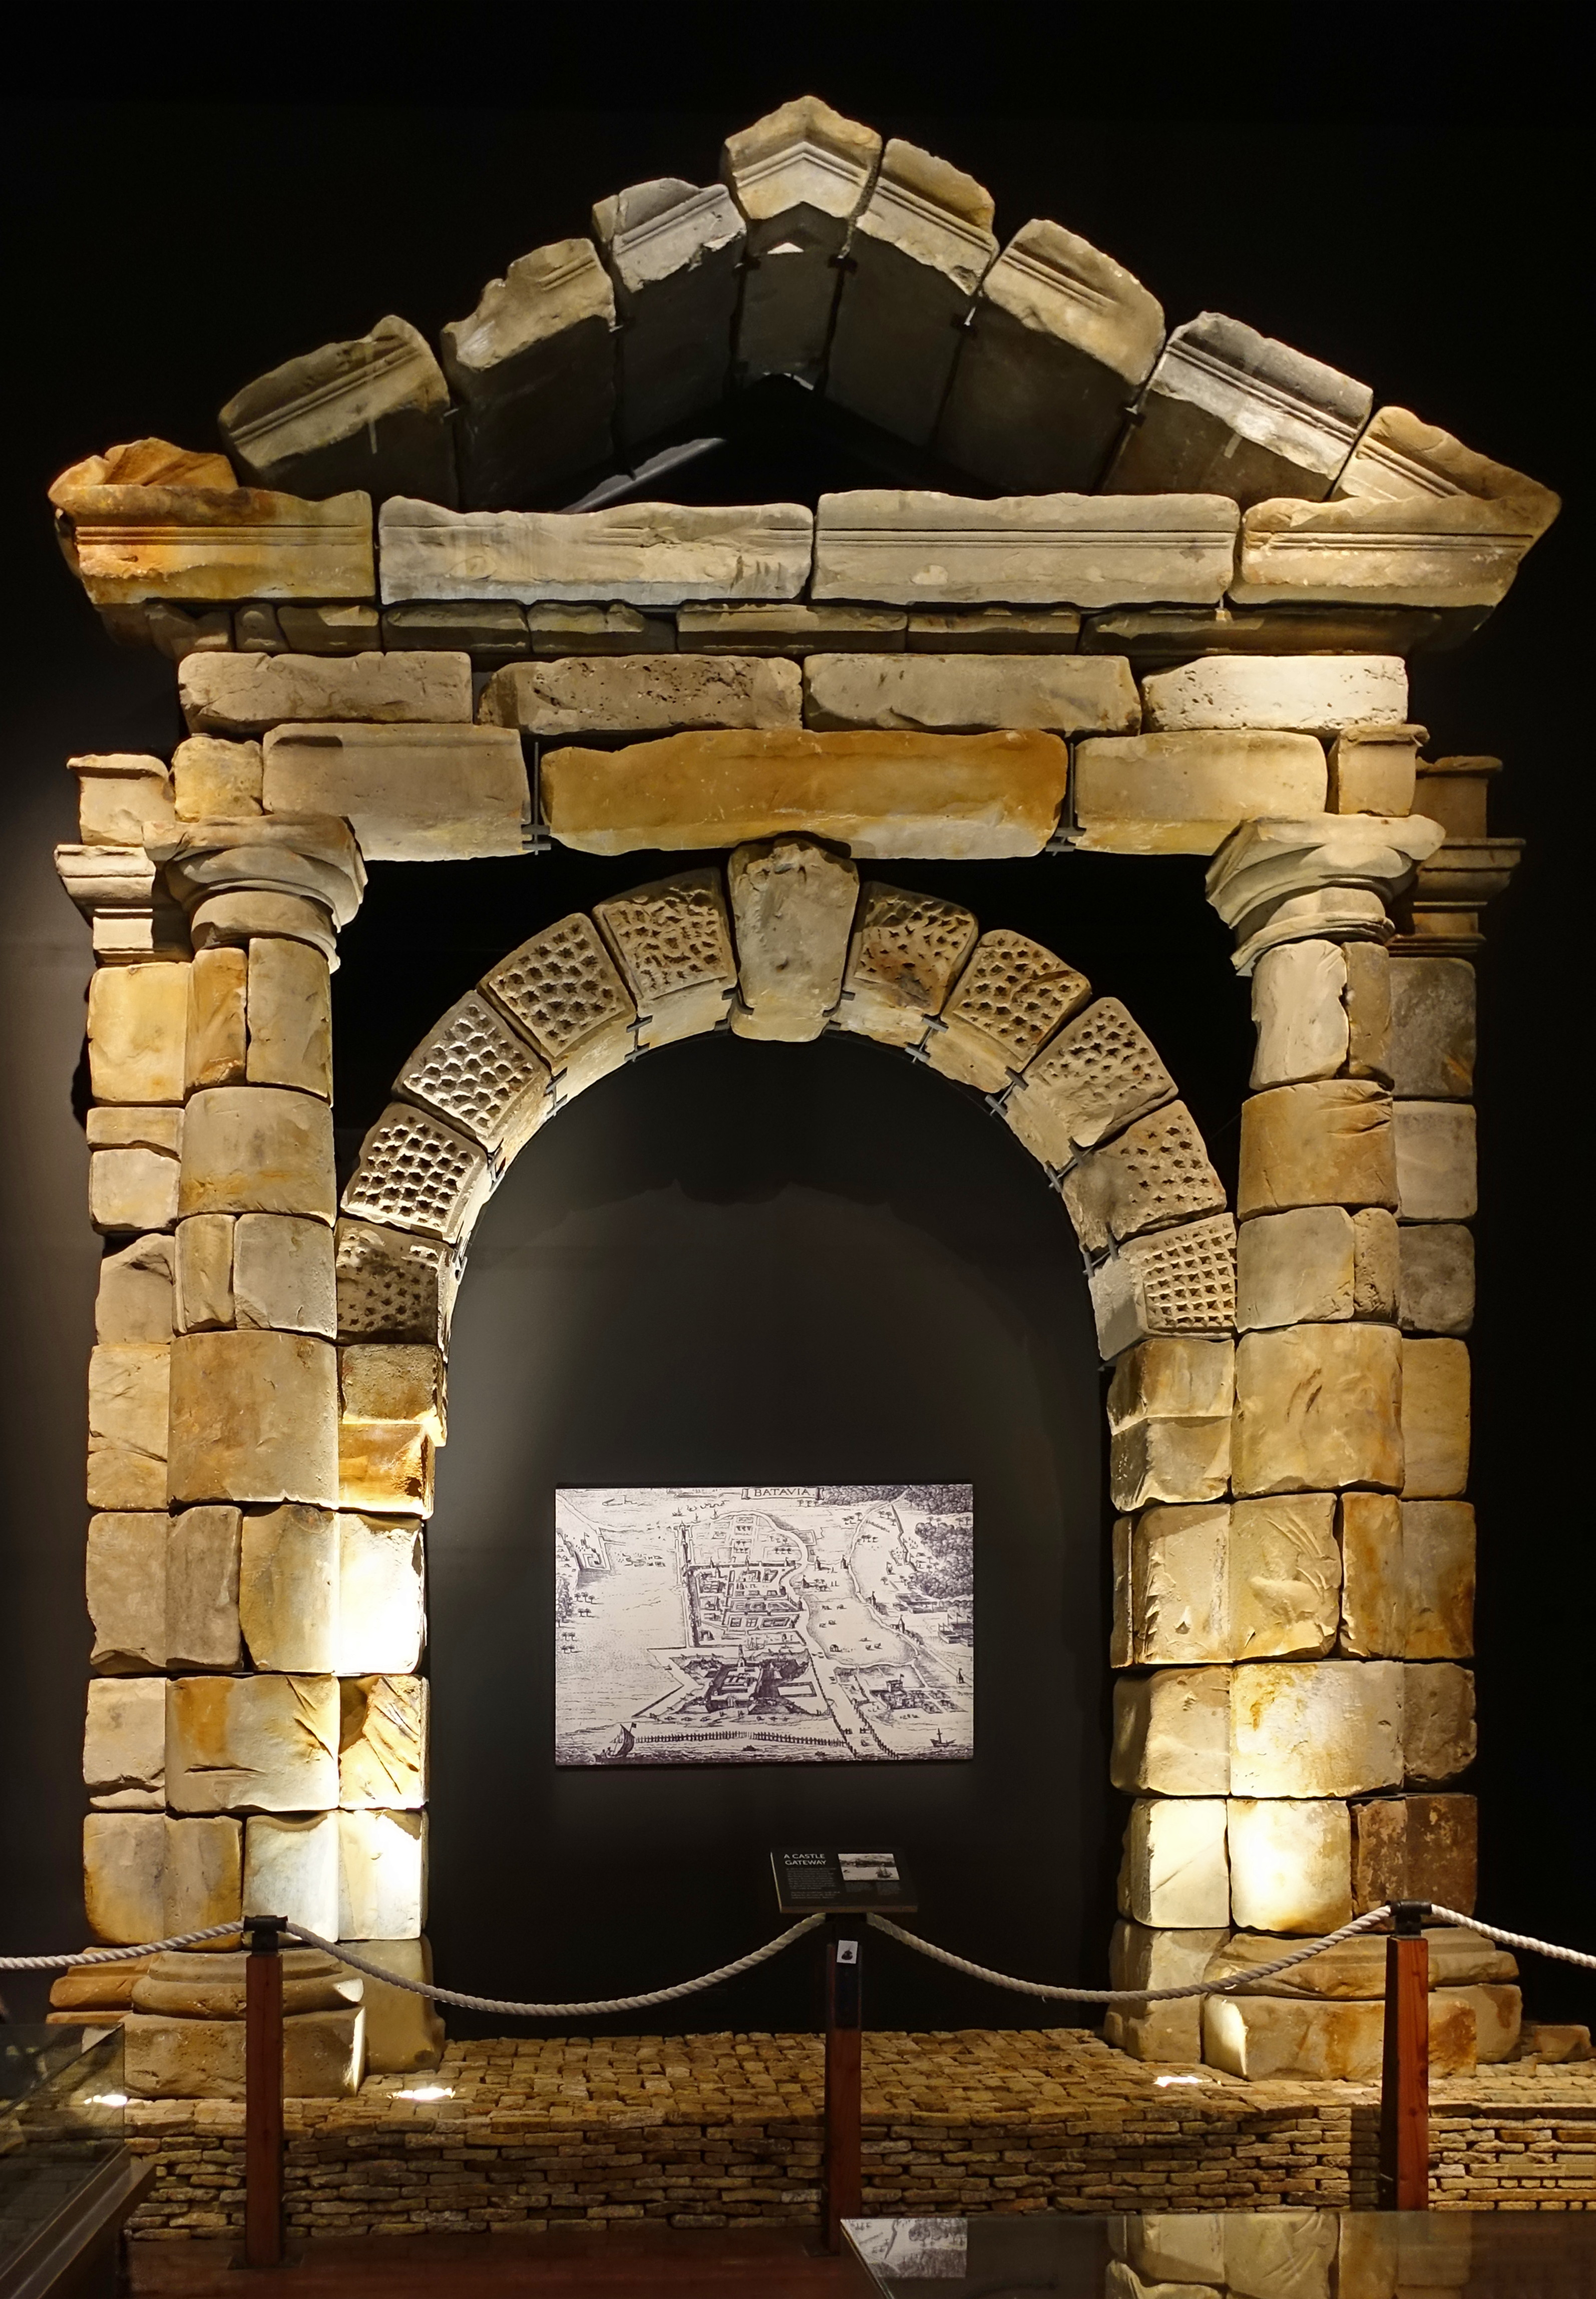
Replica of arch and doorway recovered from the Batavia wreck in the Shipwreck Galleries West Australian Maritime Museum Fremantle WA.
The Batavia was carrying this sandstone arch for the entrance to the heavily fortified Citadel of the Head Office at Batavia. It was recovered from the wreck, and the original is on display in the West Australian Maritime Museum Geraldton WA.
The cannon are originals from the wreck, with wooden and other parts replaced as necessary. The bronze cannon were necessary when cannon had to be placed near the binnacle. Bronze does not disturb the compass reading as iron does.
Photo: Don Hitchcock October 2014
Source: The Shipwreck Galleries, Western Australia Museum, Fremantle, Western Australia
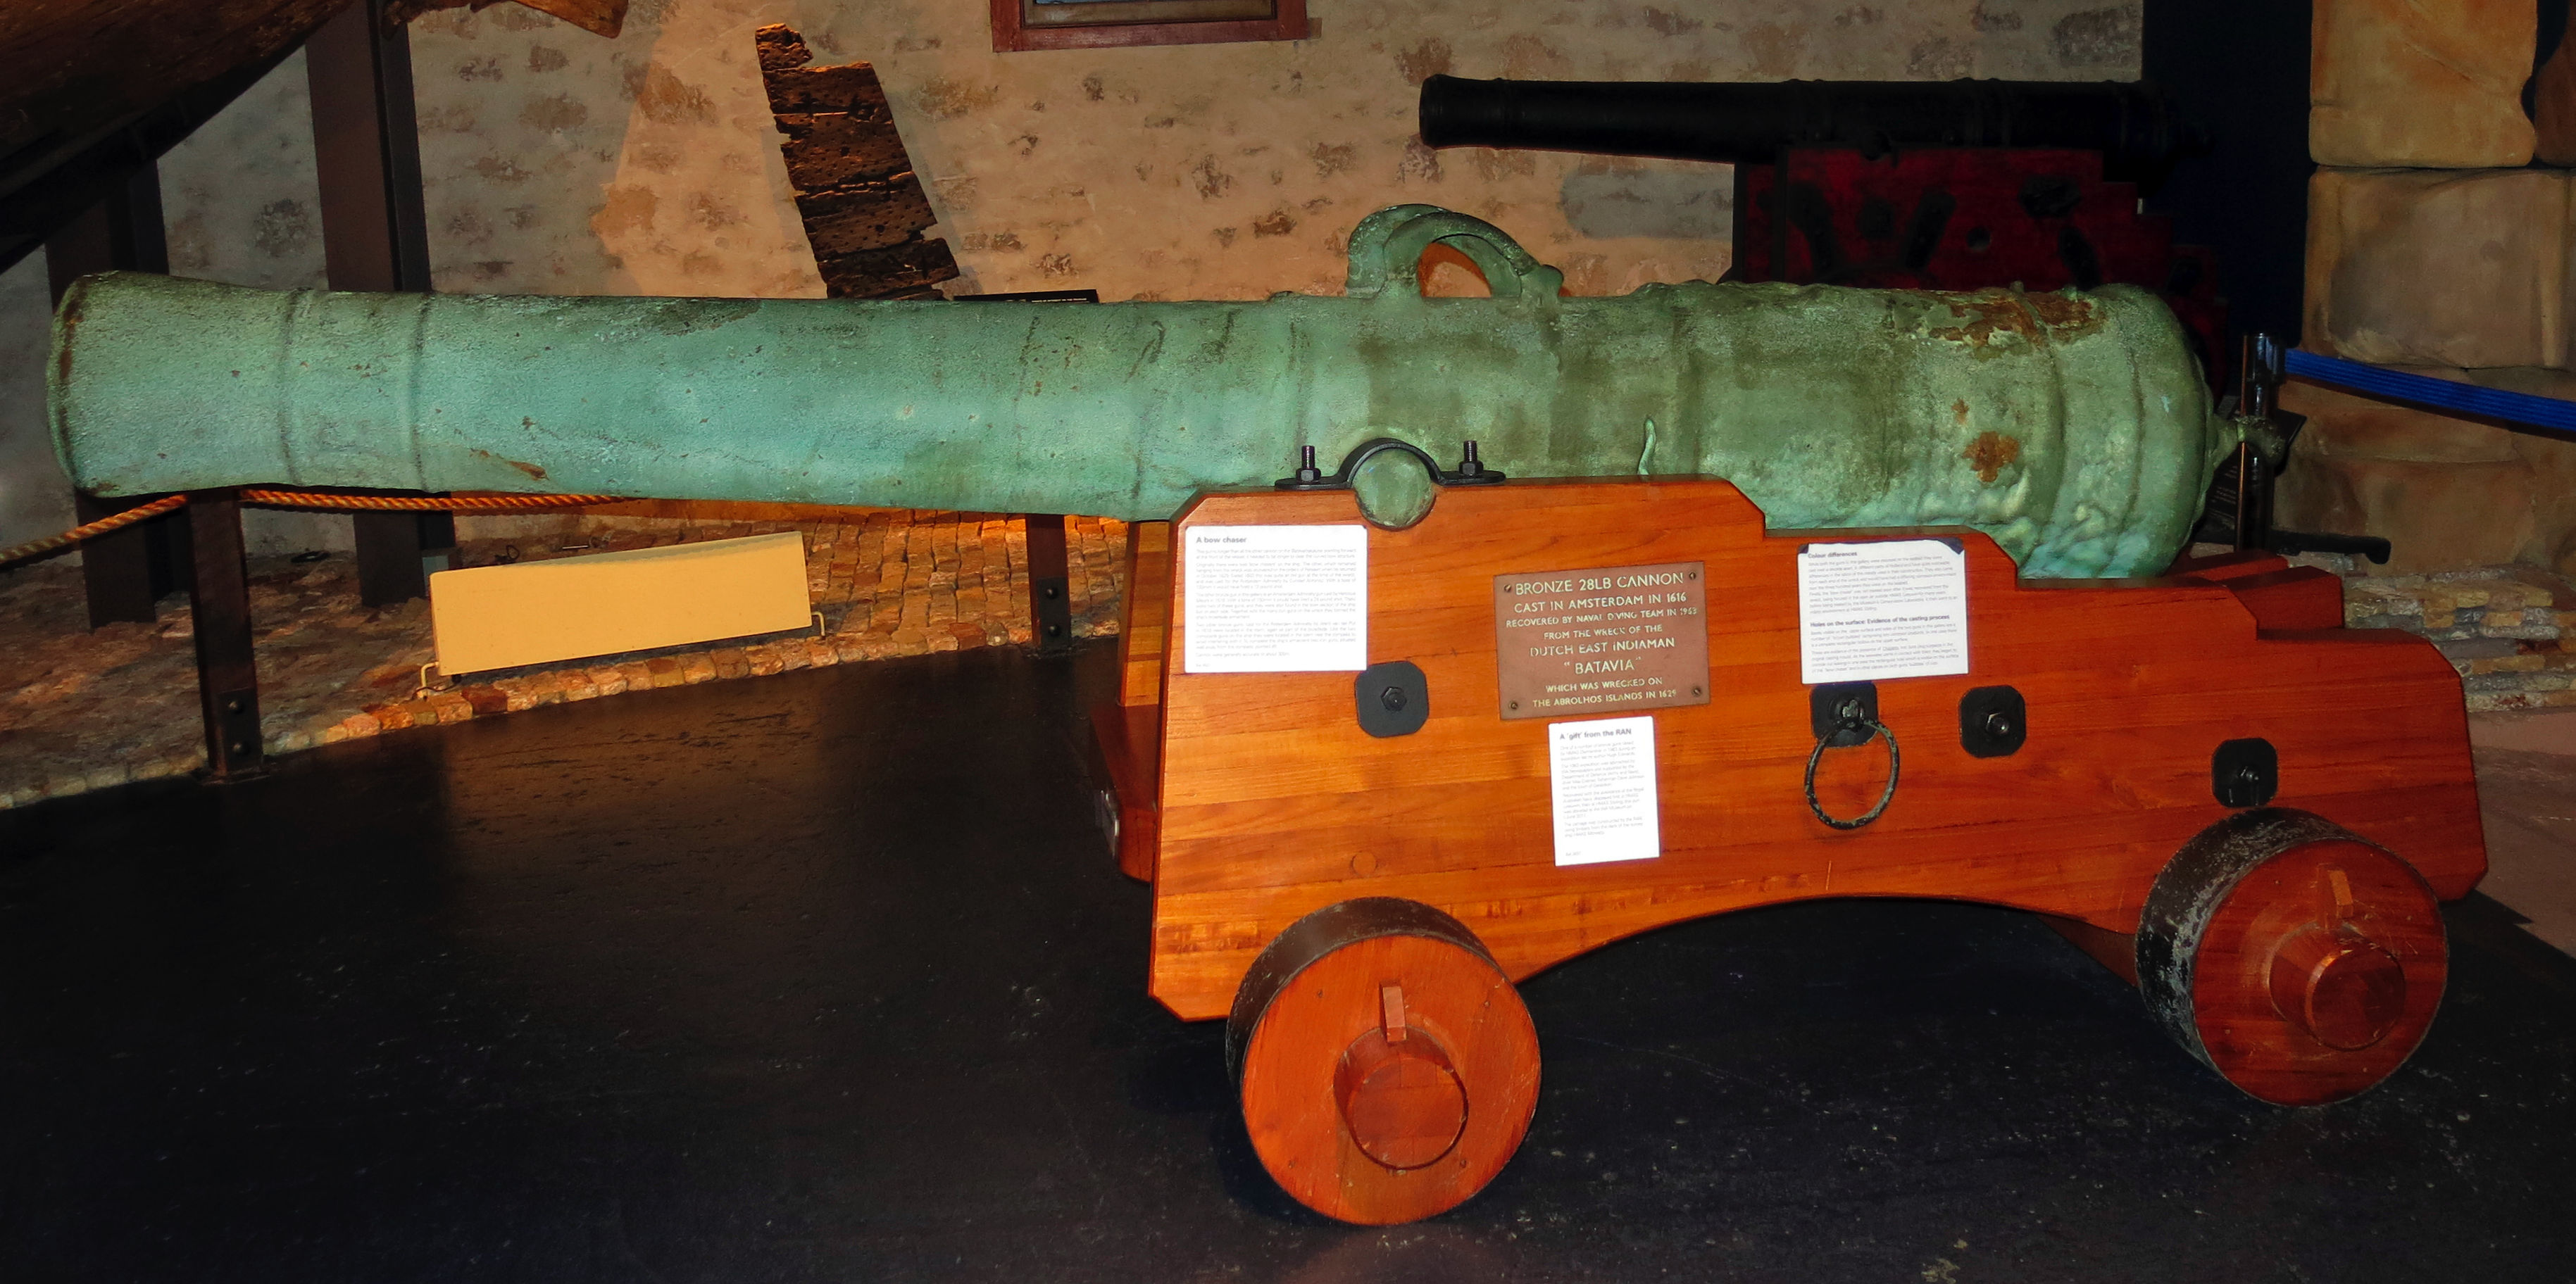
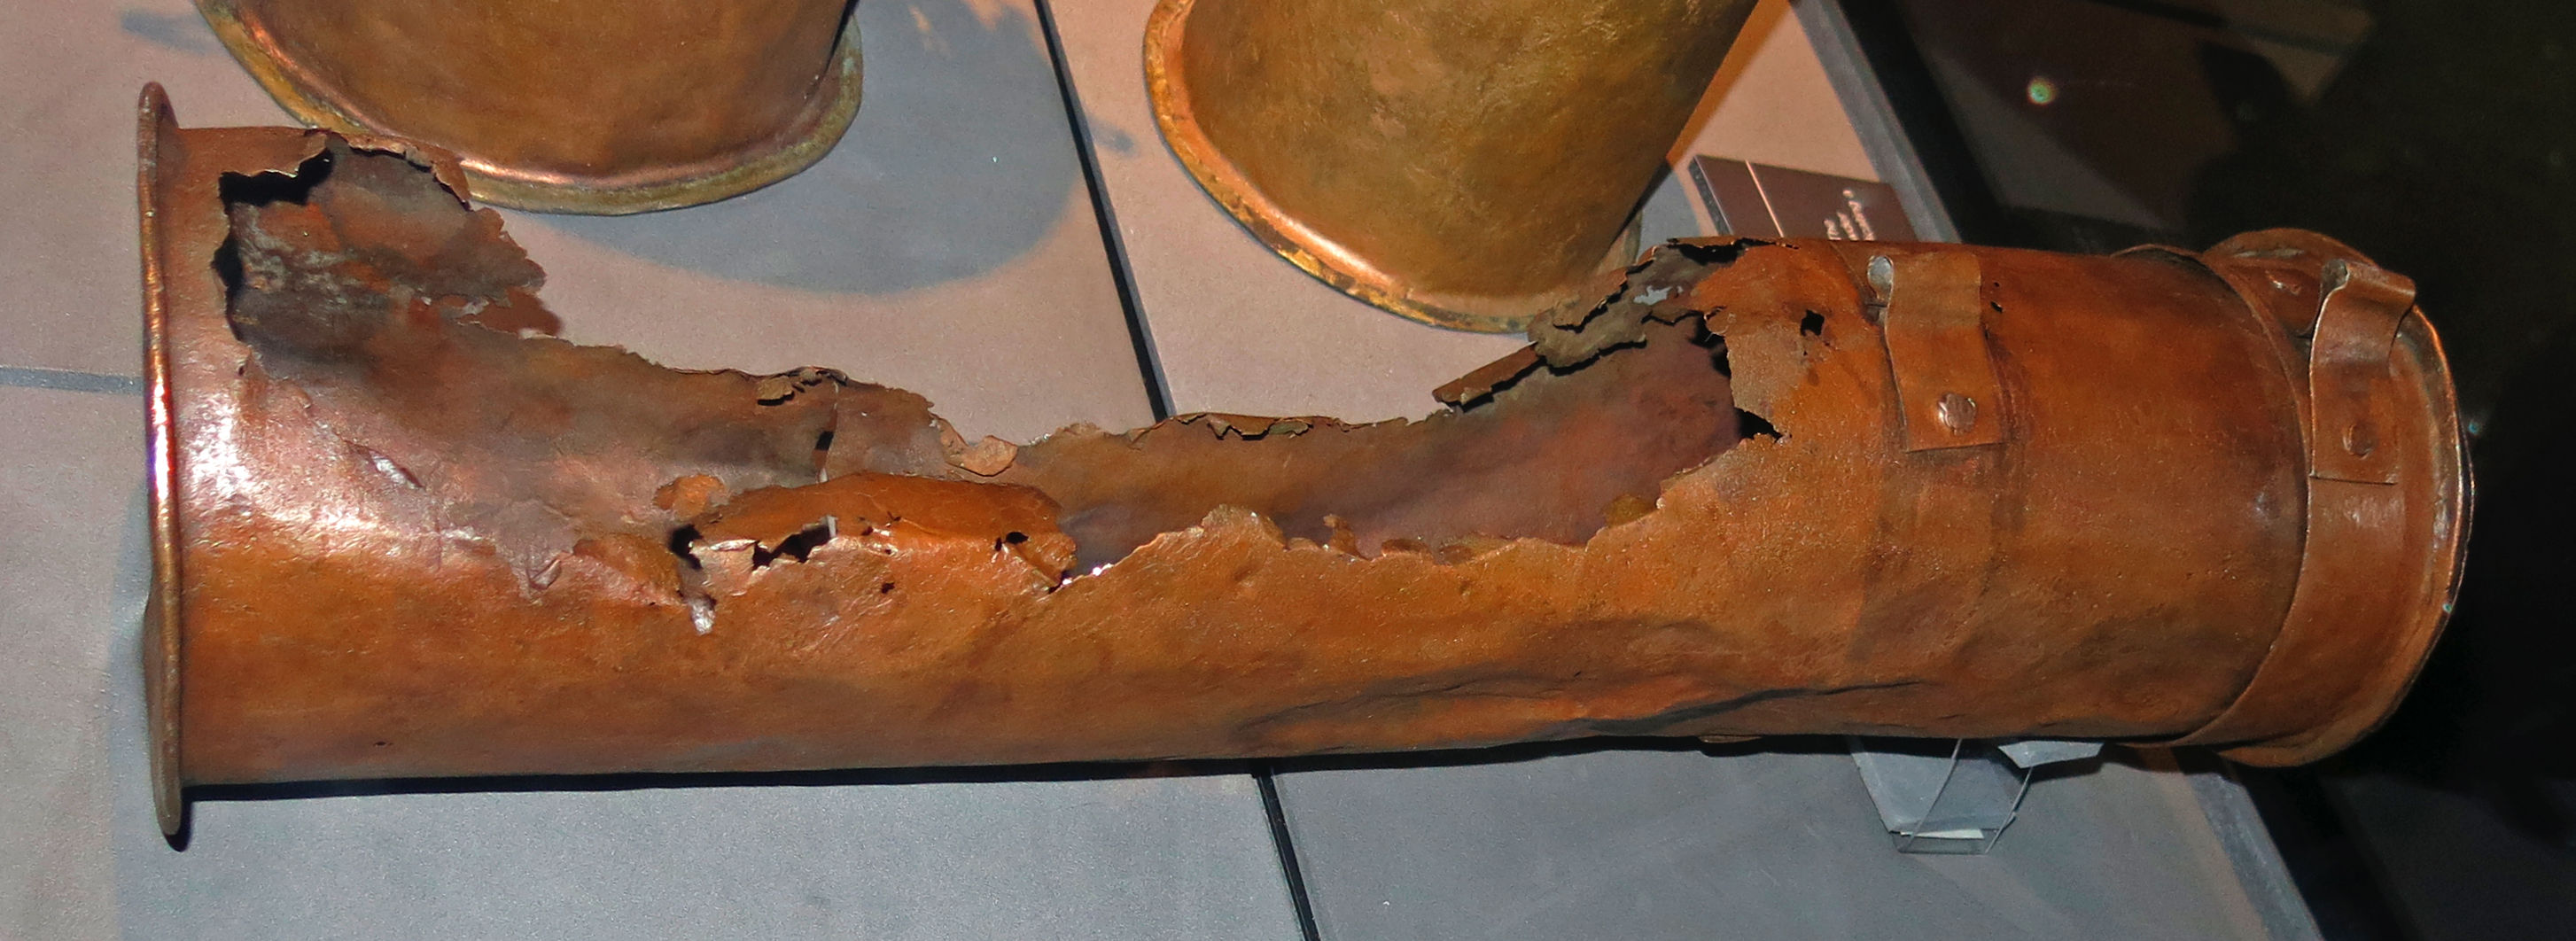
The bow chaser.
This gun is longer than many of the other cannon on the Batavia because, pointing forward at the front of the vessel, it needed to be longer to clear the curved bow structure.
Originally there were two 'bow chasers' on the ship. The other, which remained hanging from the wreck was recovered on the orders of Pelsaert when he returned in October 1629. Dated 1603 this was quite an old gun at the time of the wreck, and was cast for the Rotterdam Admiralty by Conraet Antonisz. With a bore of 120 mm it would have fired a 12 pound shot.
Photo: Don Hitchcock October 2014
Source and text: The Shipwreck Galleries, Western Australia Museum, Fremantle, Western Australia
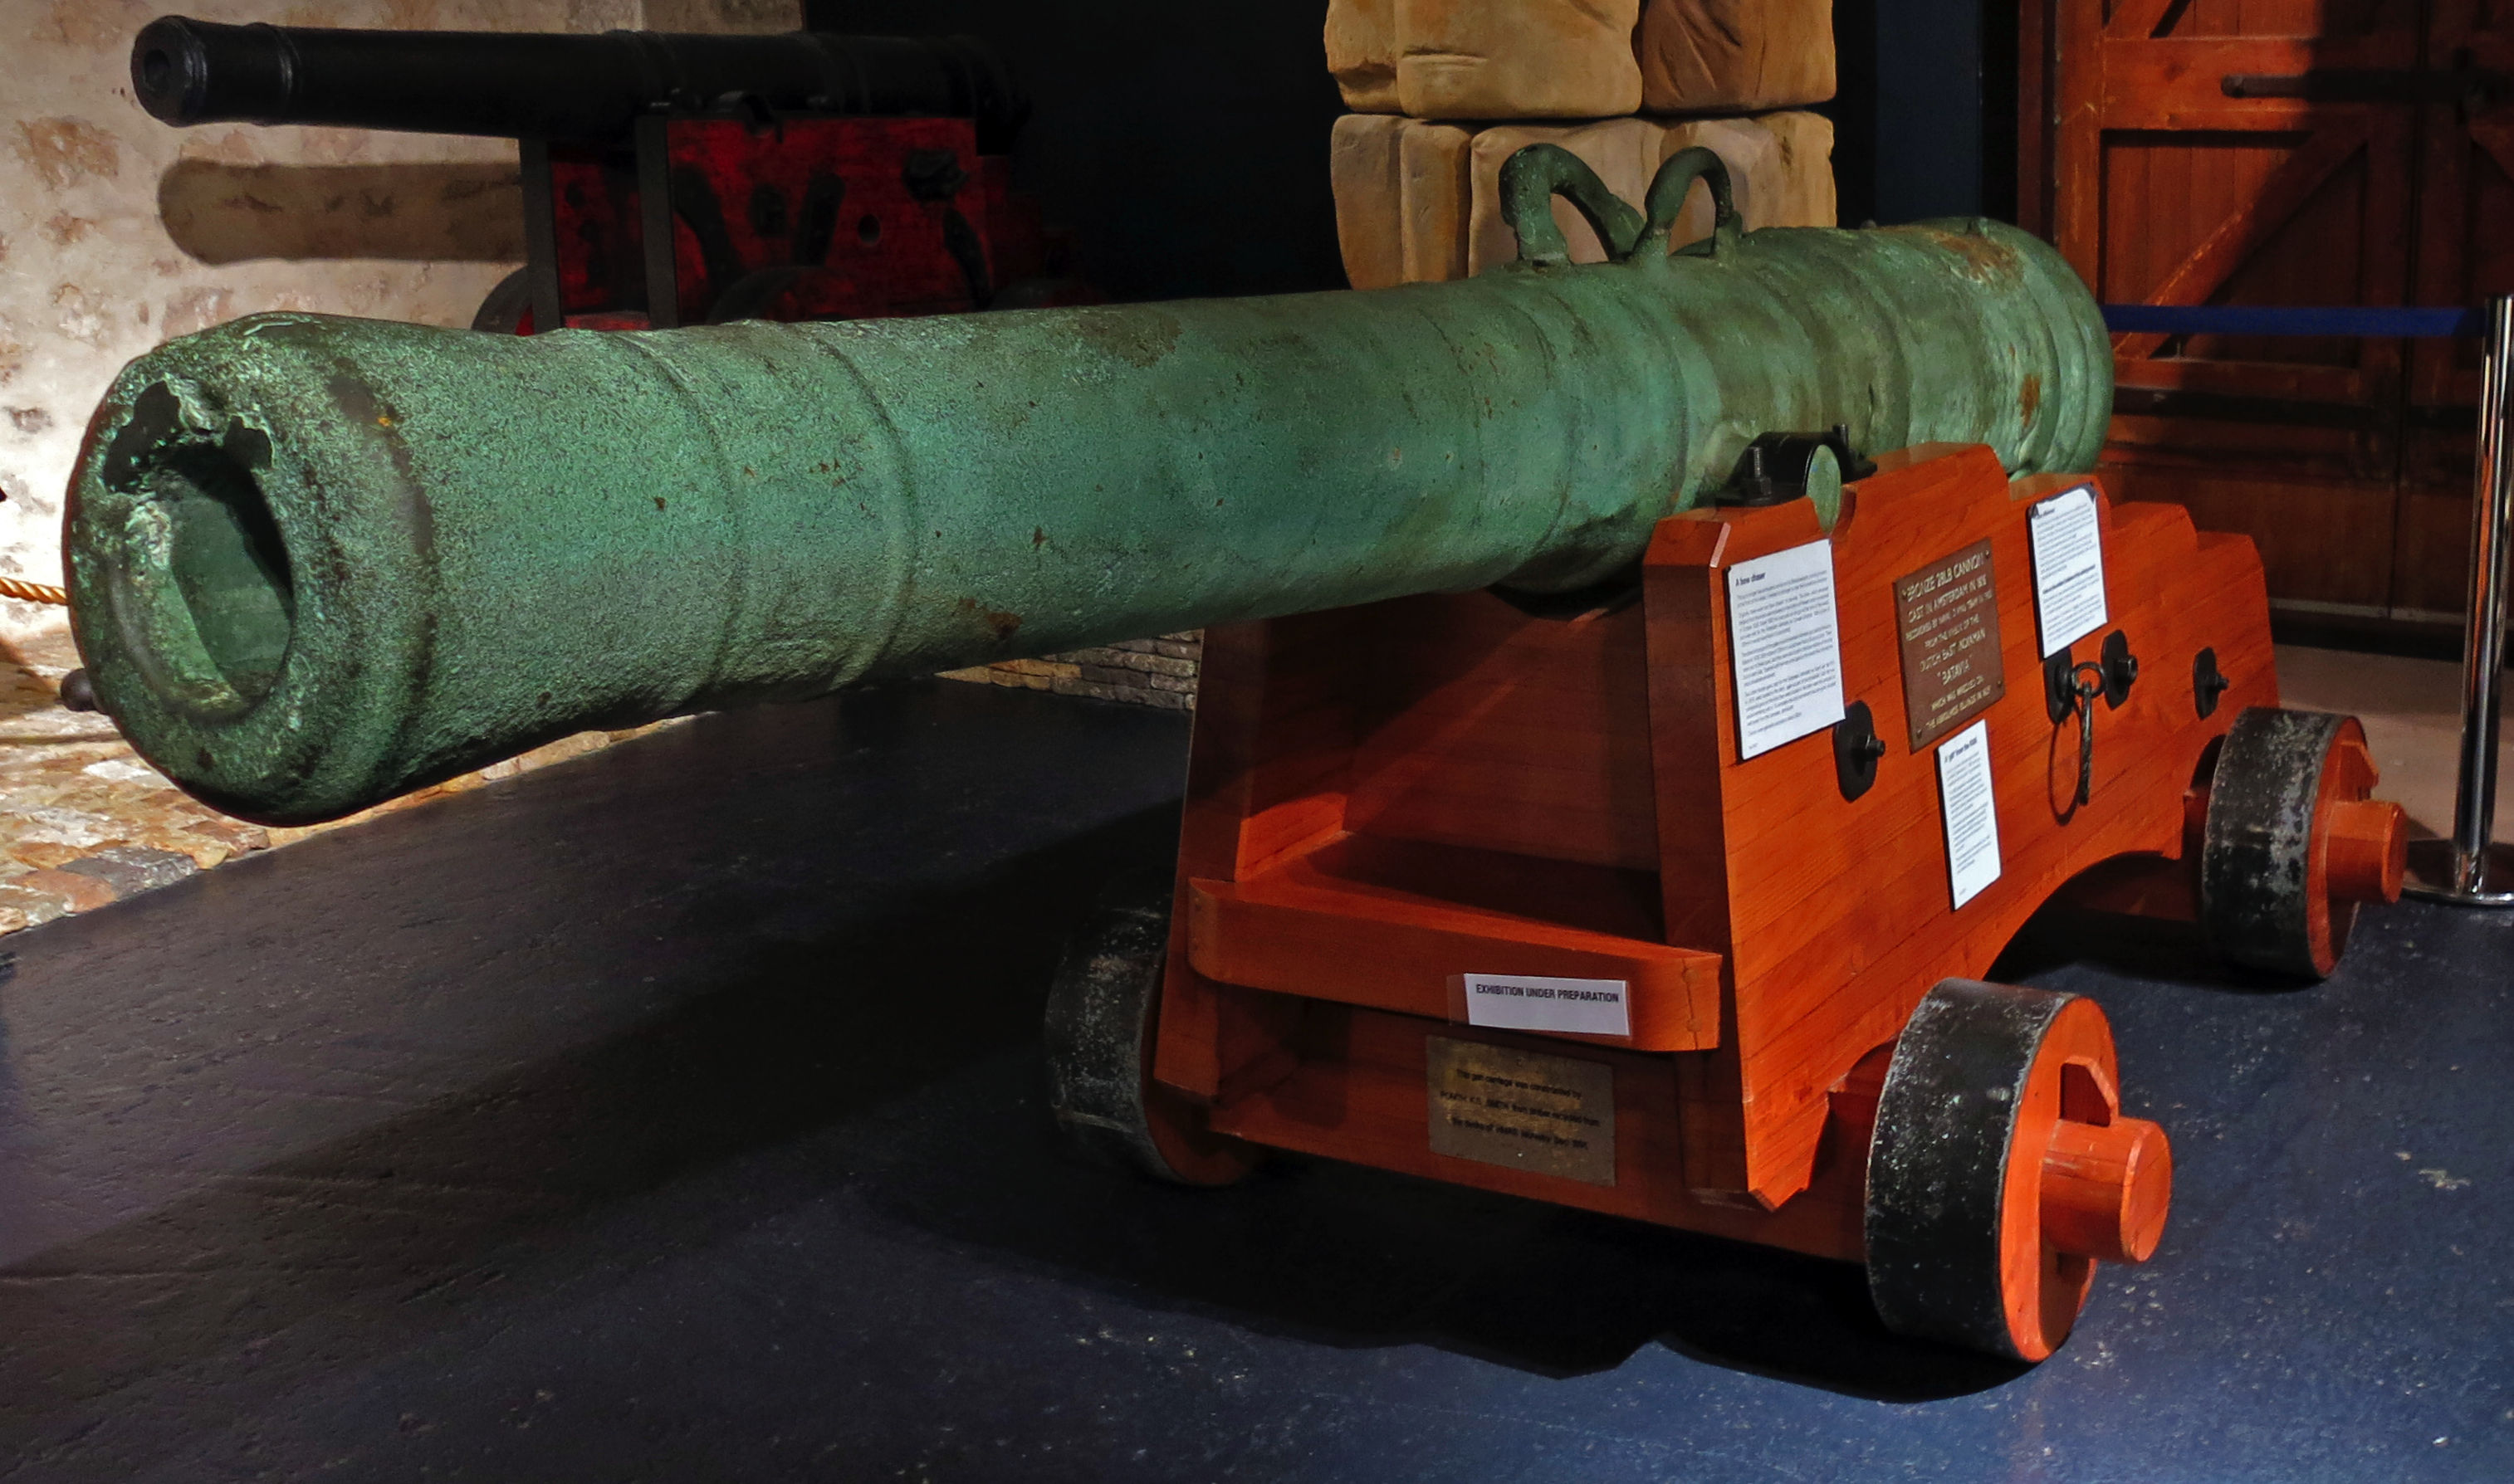
The bow chaser, shown looking at the muzzle.
The other bronze gun in this gallery is an Amsterdam Admiralty gun cast by Henricus Meurs in 1616. With a bore of 150 mm it would have fired a 24 pound shot. There were two of these guns, and they were also found in the bow section of the ship but on each side. Together with the many iron guns on the wreck they formed the ship's broadside armament.
Photo: Don Hitchcock October 2014
Source: The Shipwreck Galleries, Western Australia Museum, Fremantle, Western Australia
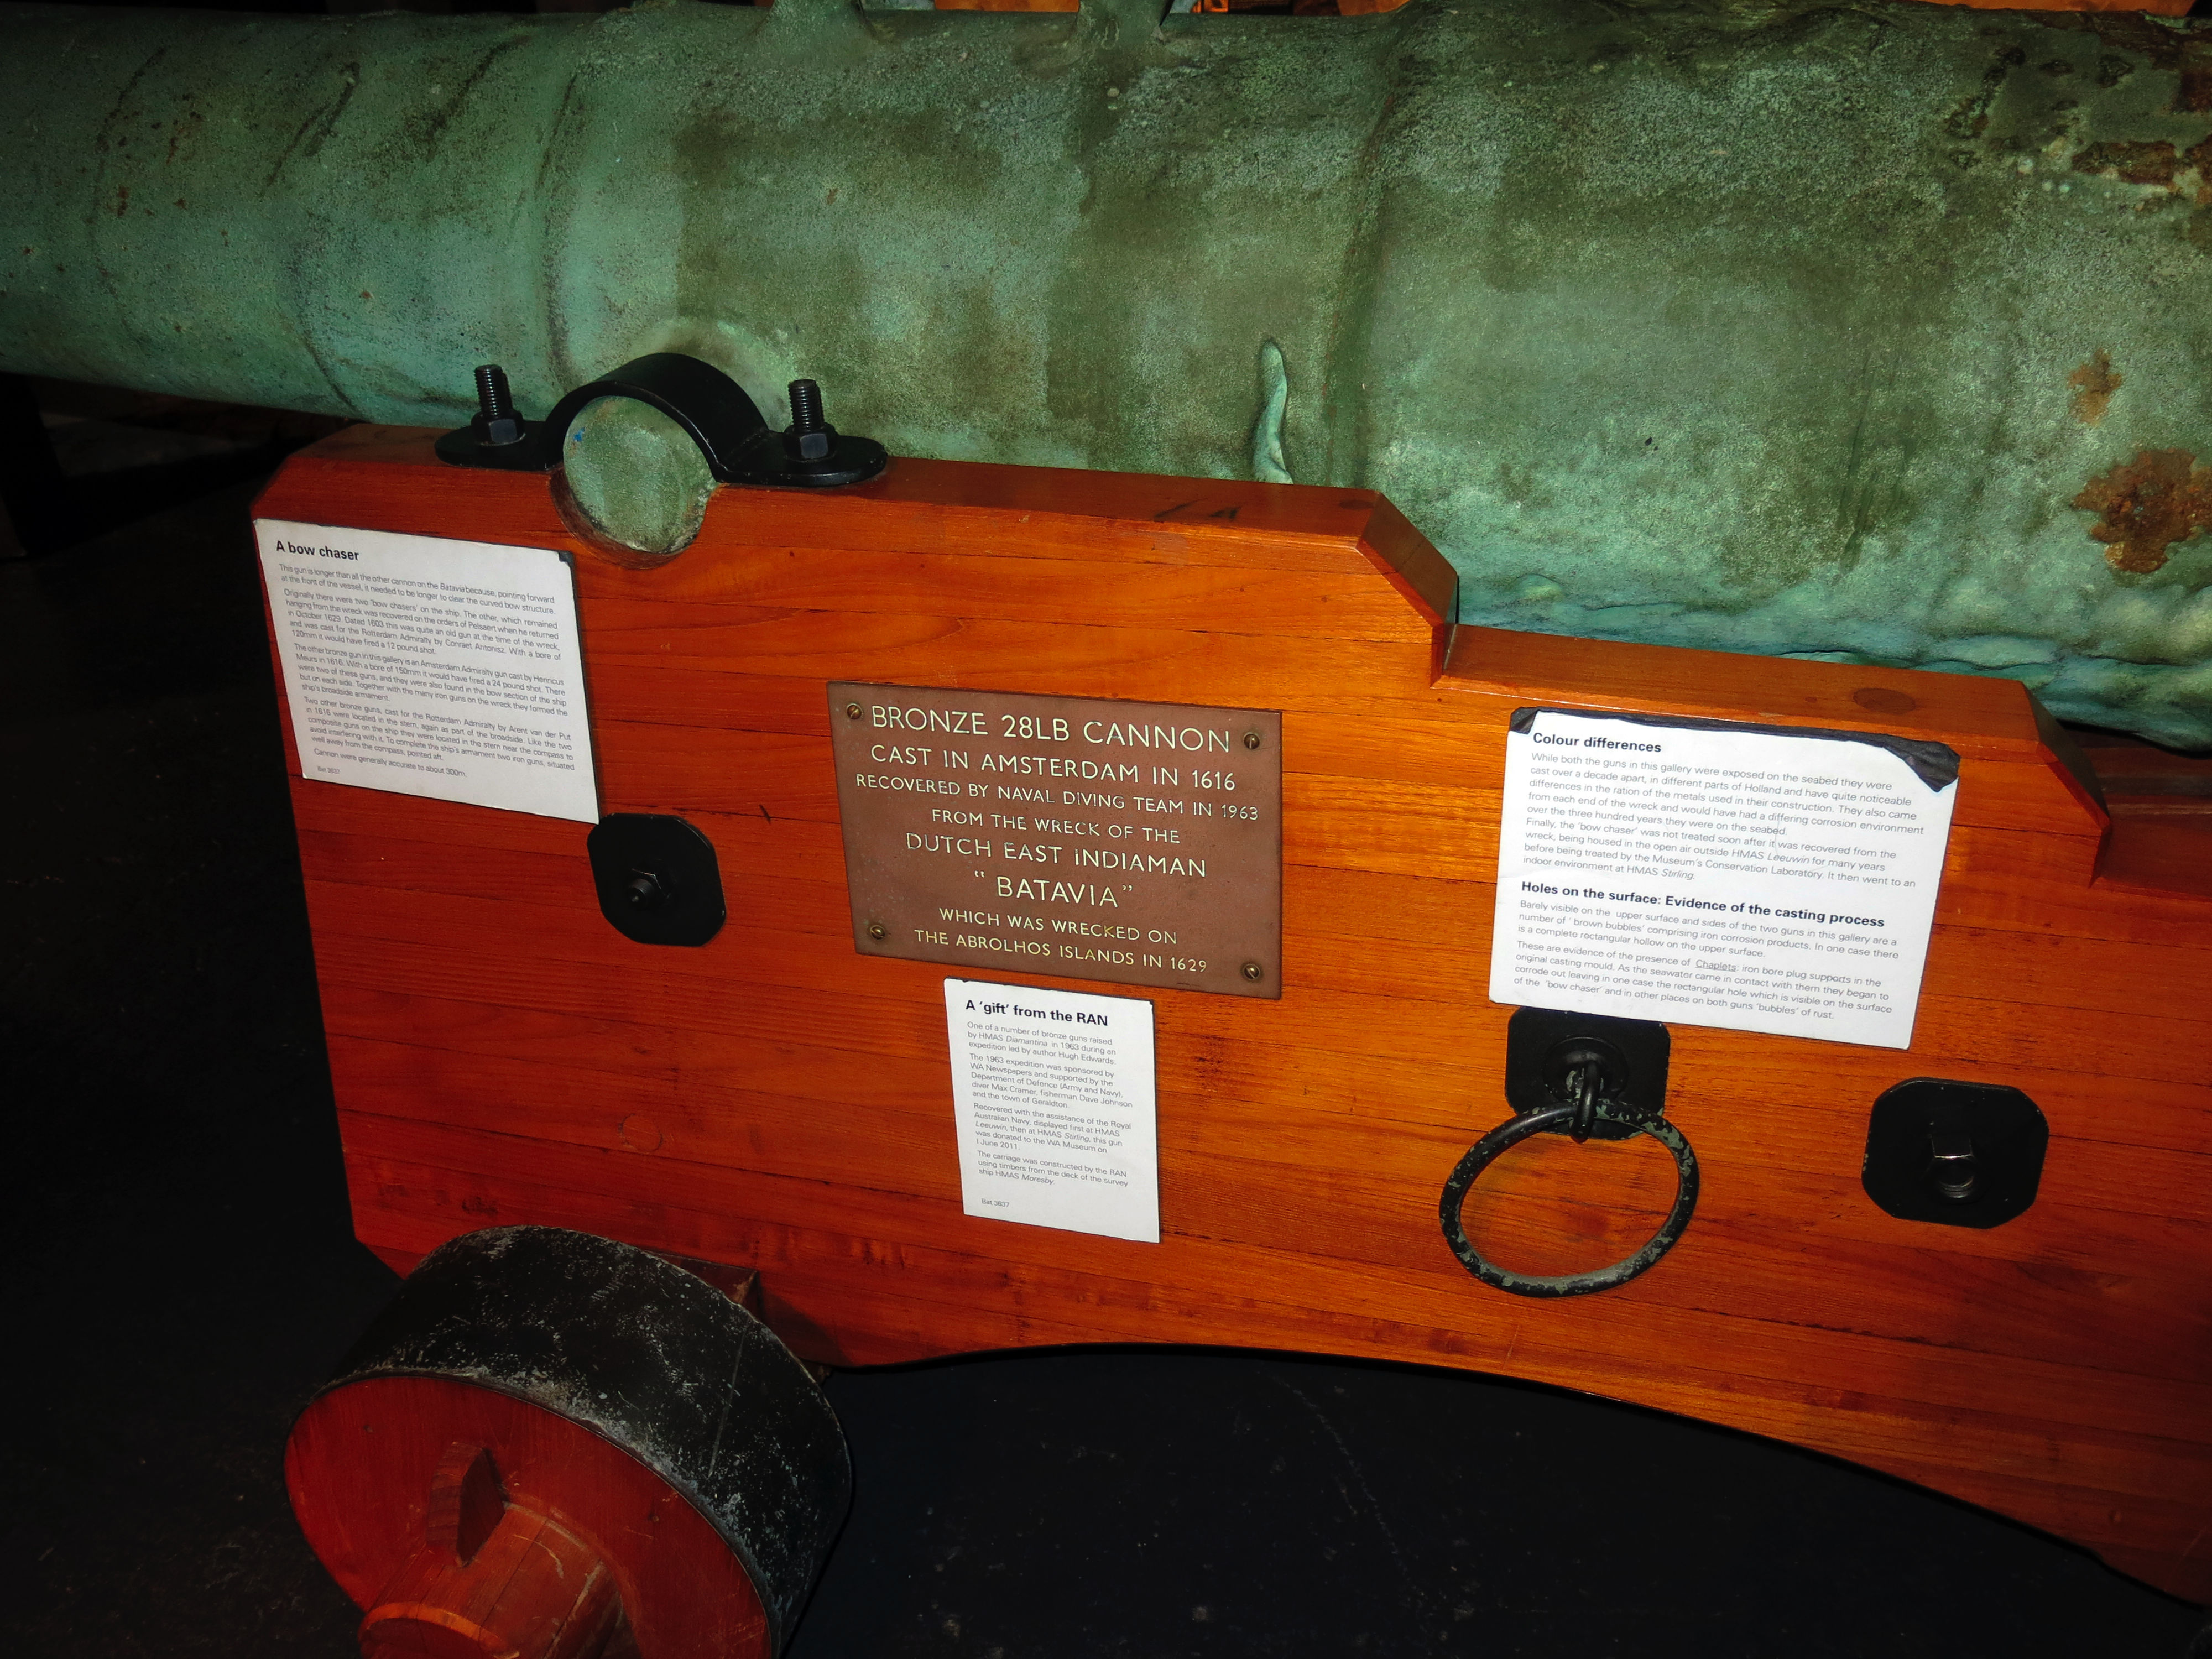
The reconstructed wooden gun carriage of the bow chaser above.
Two other bronze guns, cast for the Rotterdam Admiralty by Arent van der Put in 1616 were located in the stern, again as part of the broadside. Like the two composite guns on the ship they were located in the stern near the compass to avoid interfering with it. To complete the ship's armament two iron guns, situated well away from the compass, pointed aft.
Cannon were generally accurate to about 300 metres.
Photo: Don Hitchcock October 2014
Source: The Shipwreck Galleries, Western Australia Museum, Fremantle, Western Australia

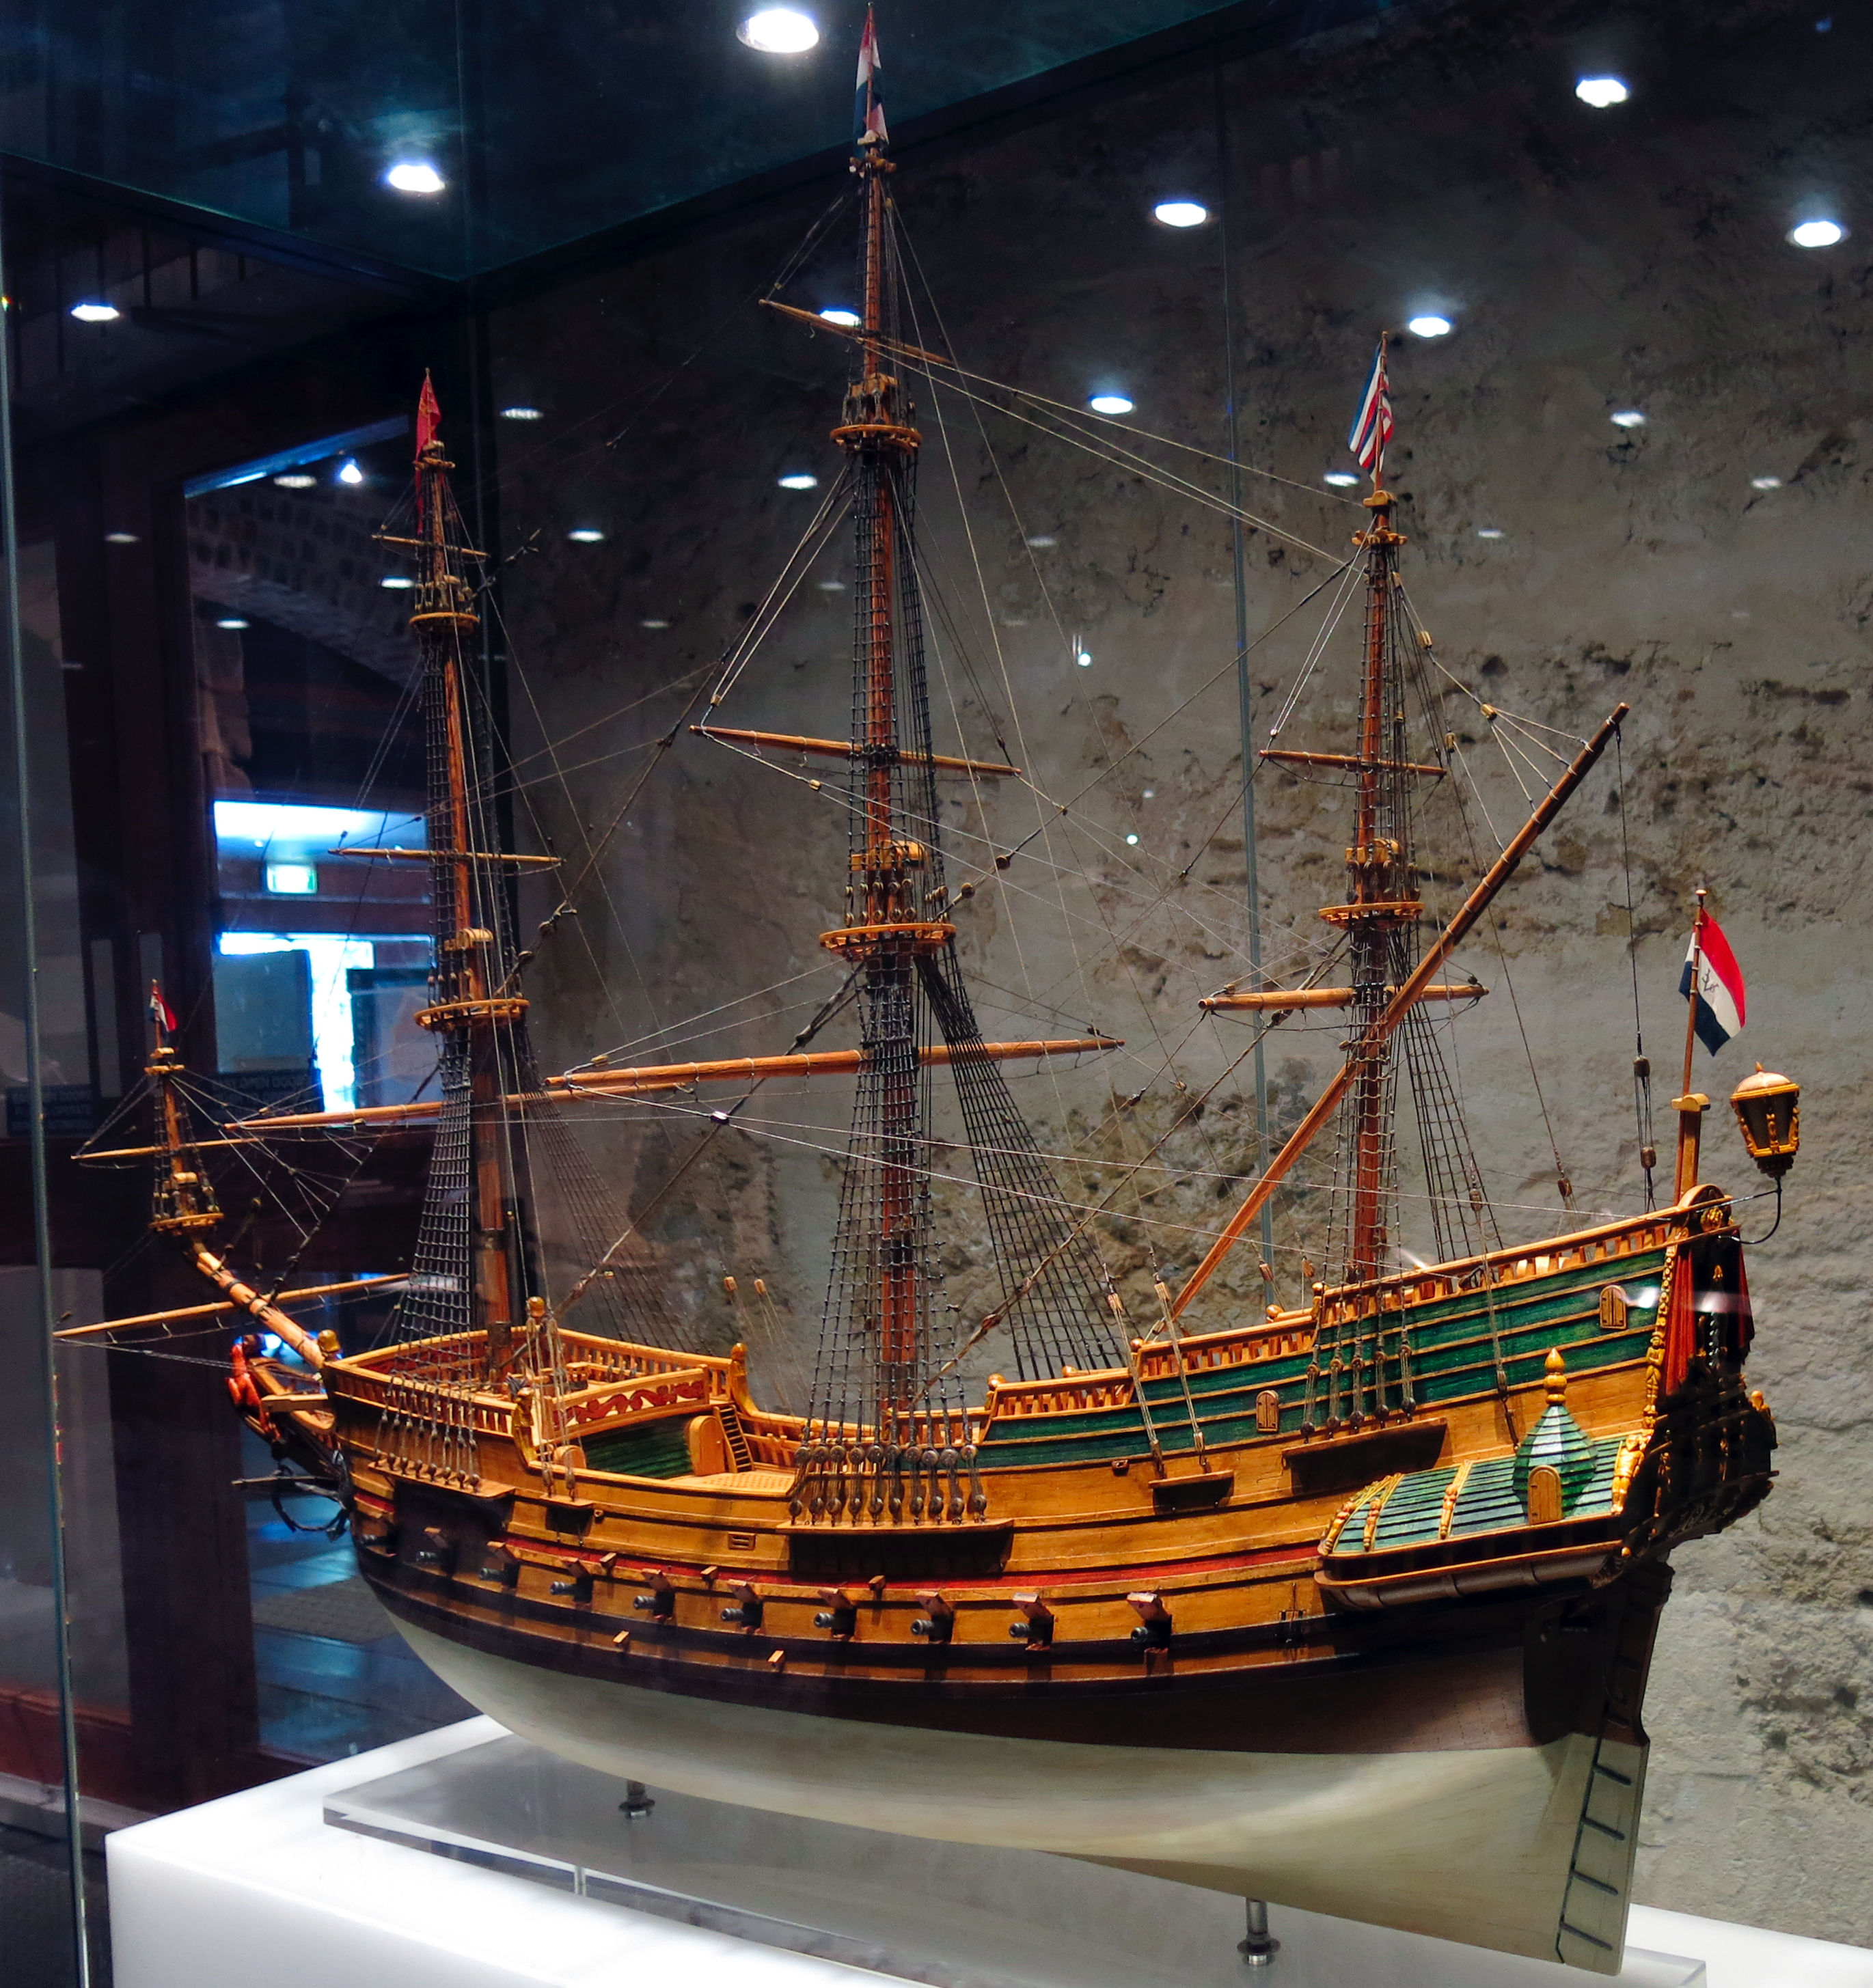
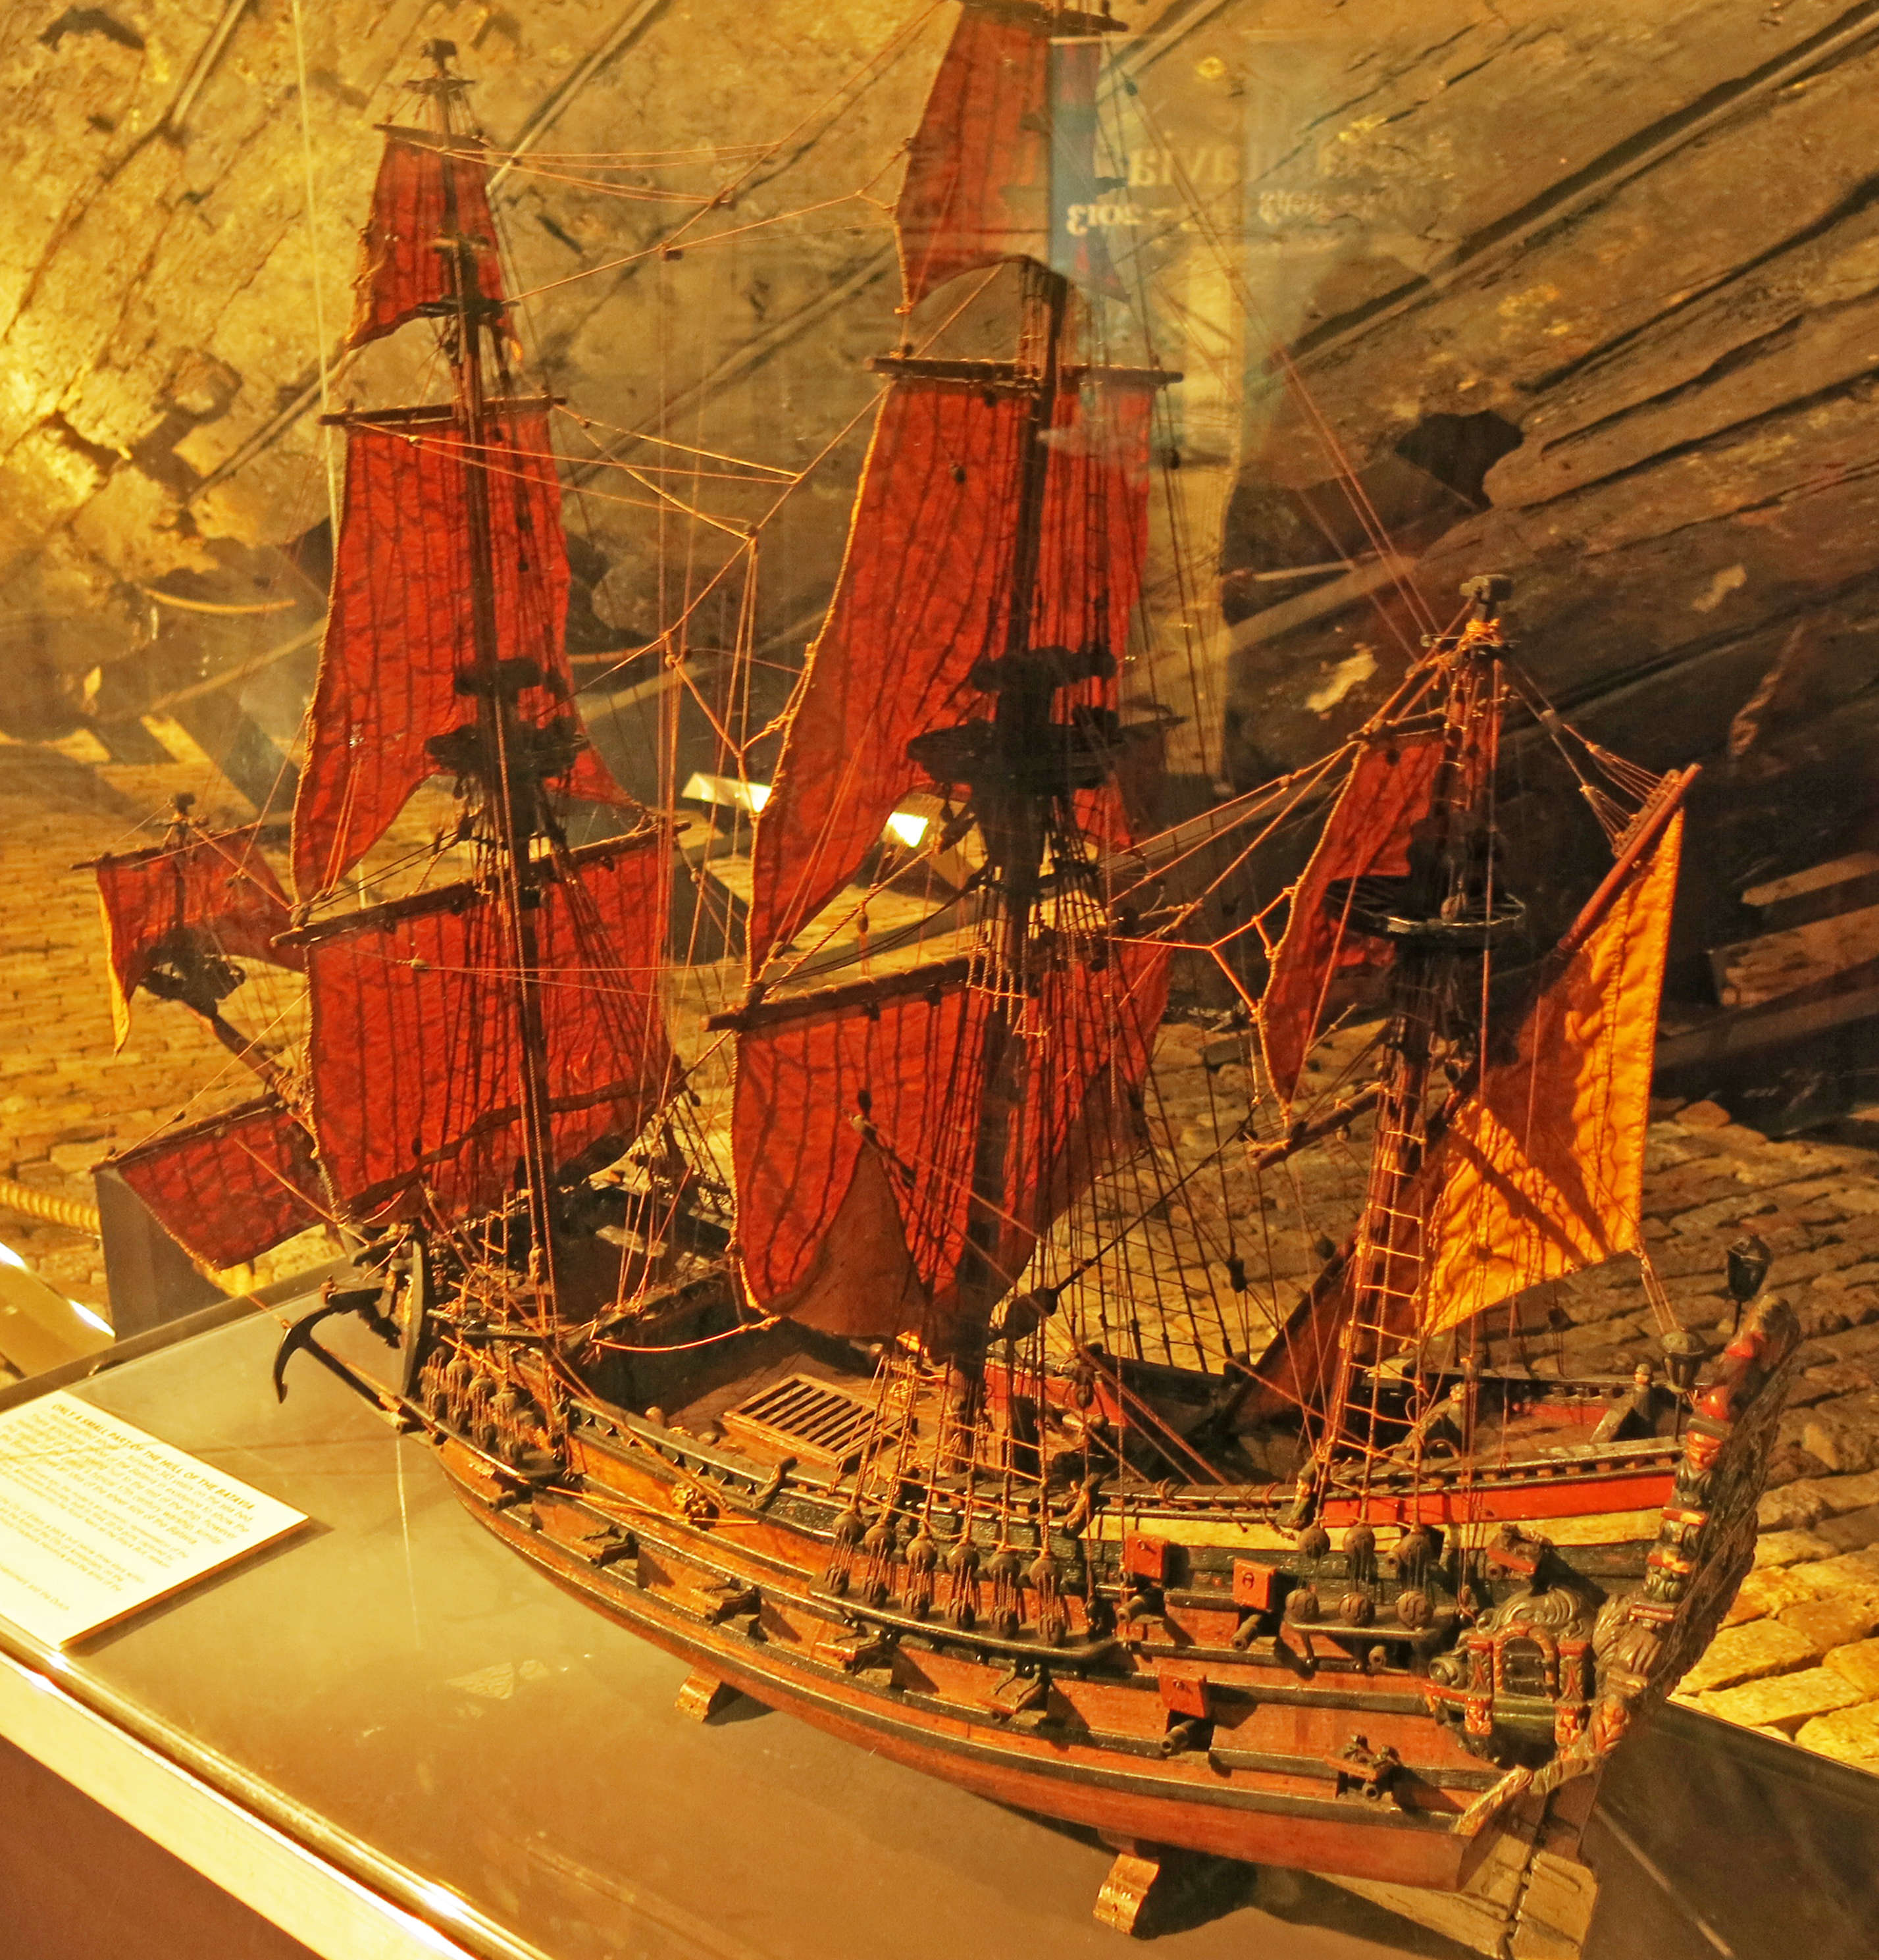
Model of the Batavia.
Photo: Don Hitchcock October 2014
Source and text: The Shipwreck Galleries, Western Australia Museum, Fremantle, Western Australia
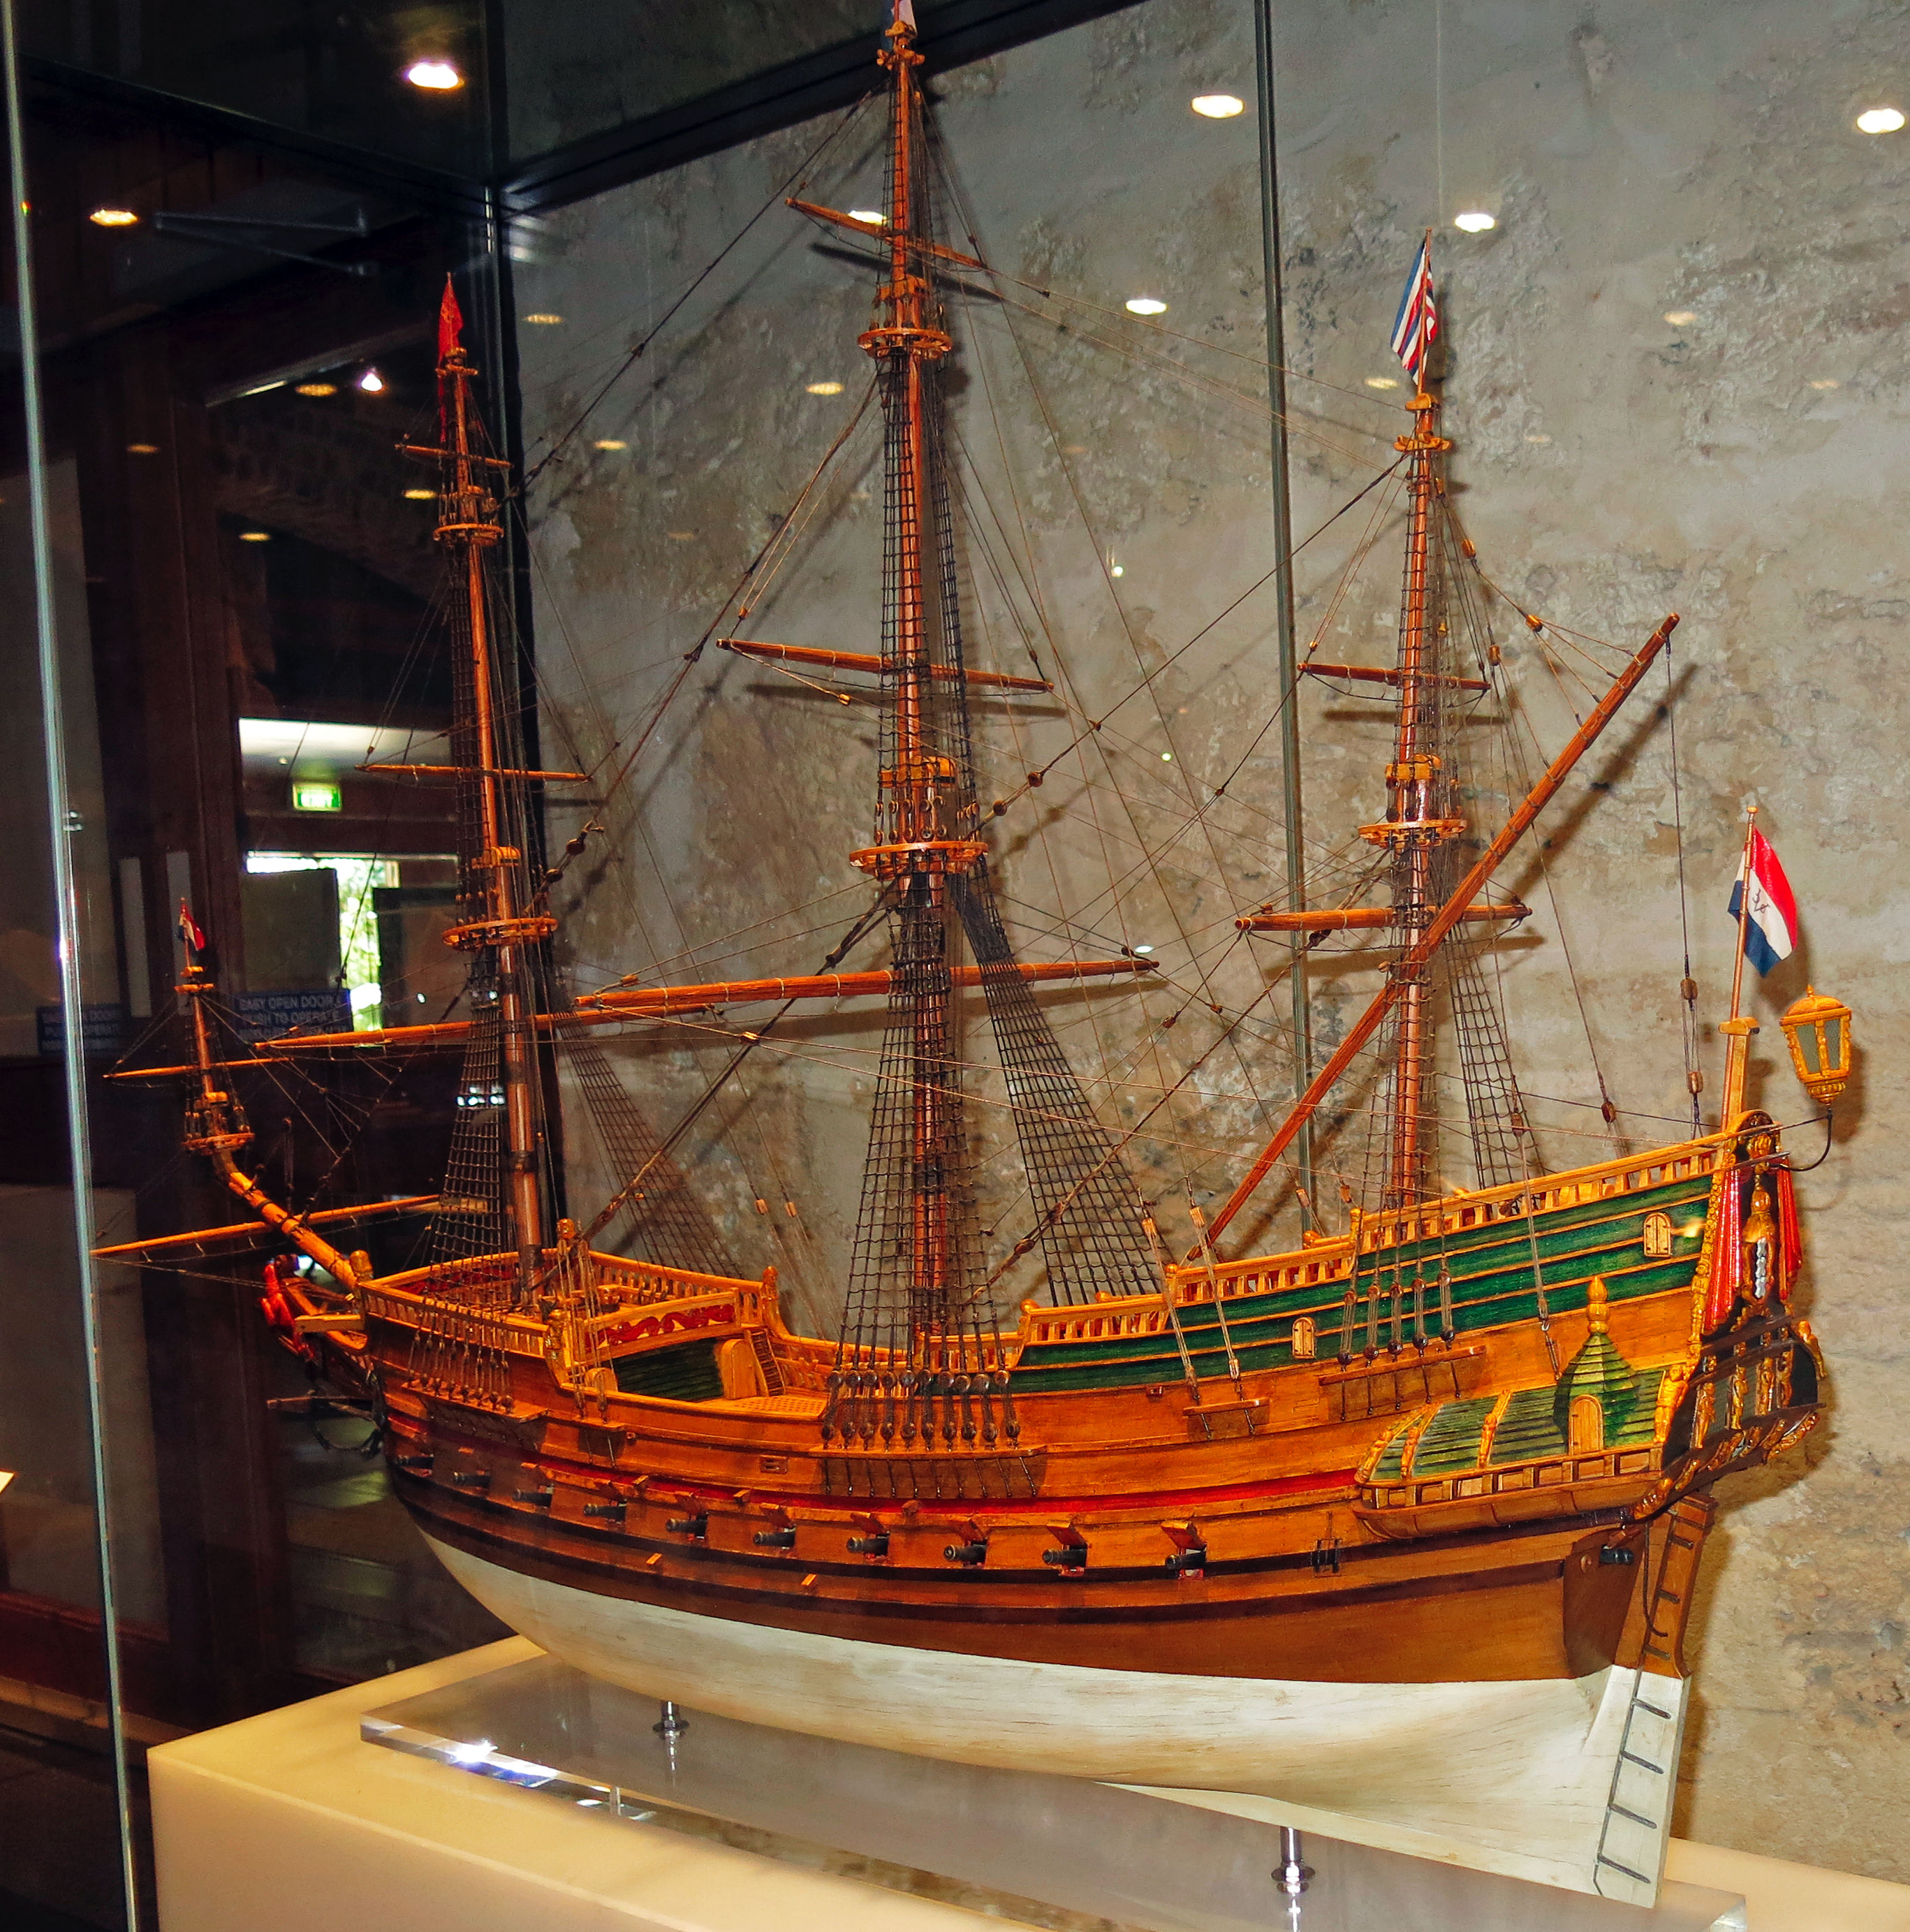
Model of the Batavia.
Photo: Don Hitchcock October 2014
Source and text: The Shipwreck Galleries, Western Australia Museum, Fremantle, Western Australia


Model of the Batavia.
Photo: Don Hitchcock October 2014
Source and text: The Shipwreck Galleries, Western Australia Museum, Fremantle, Western Australia
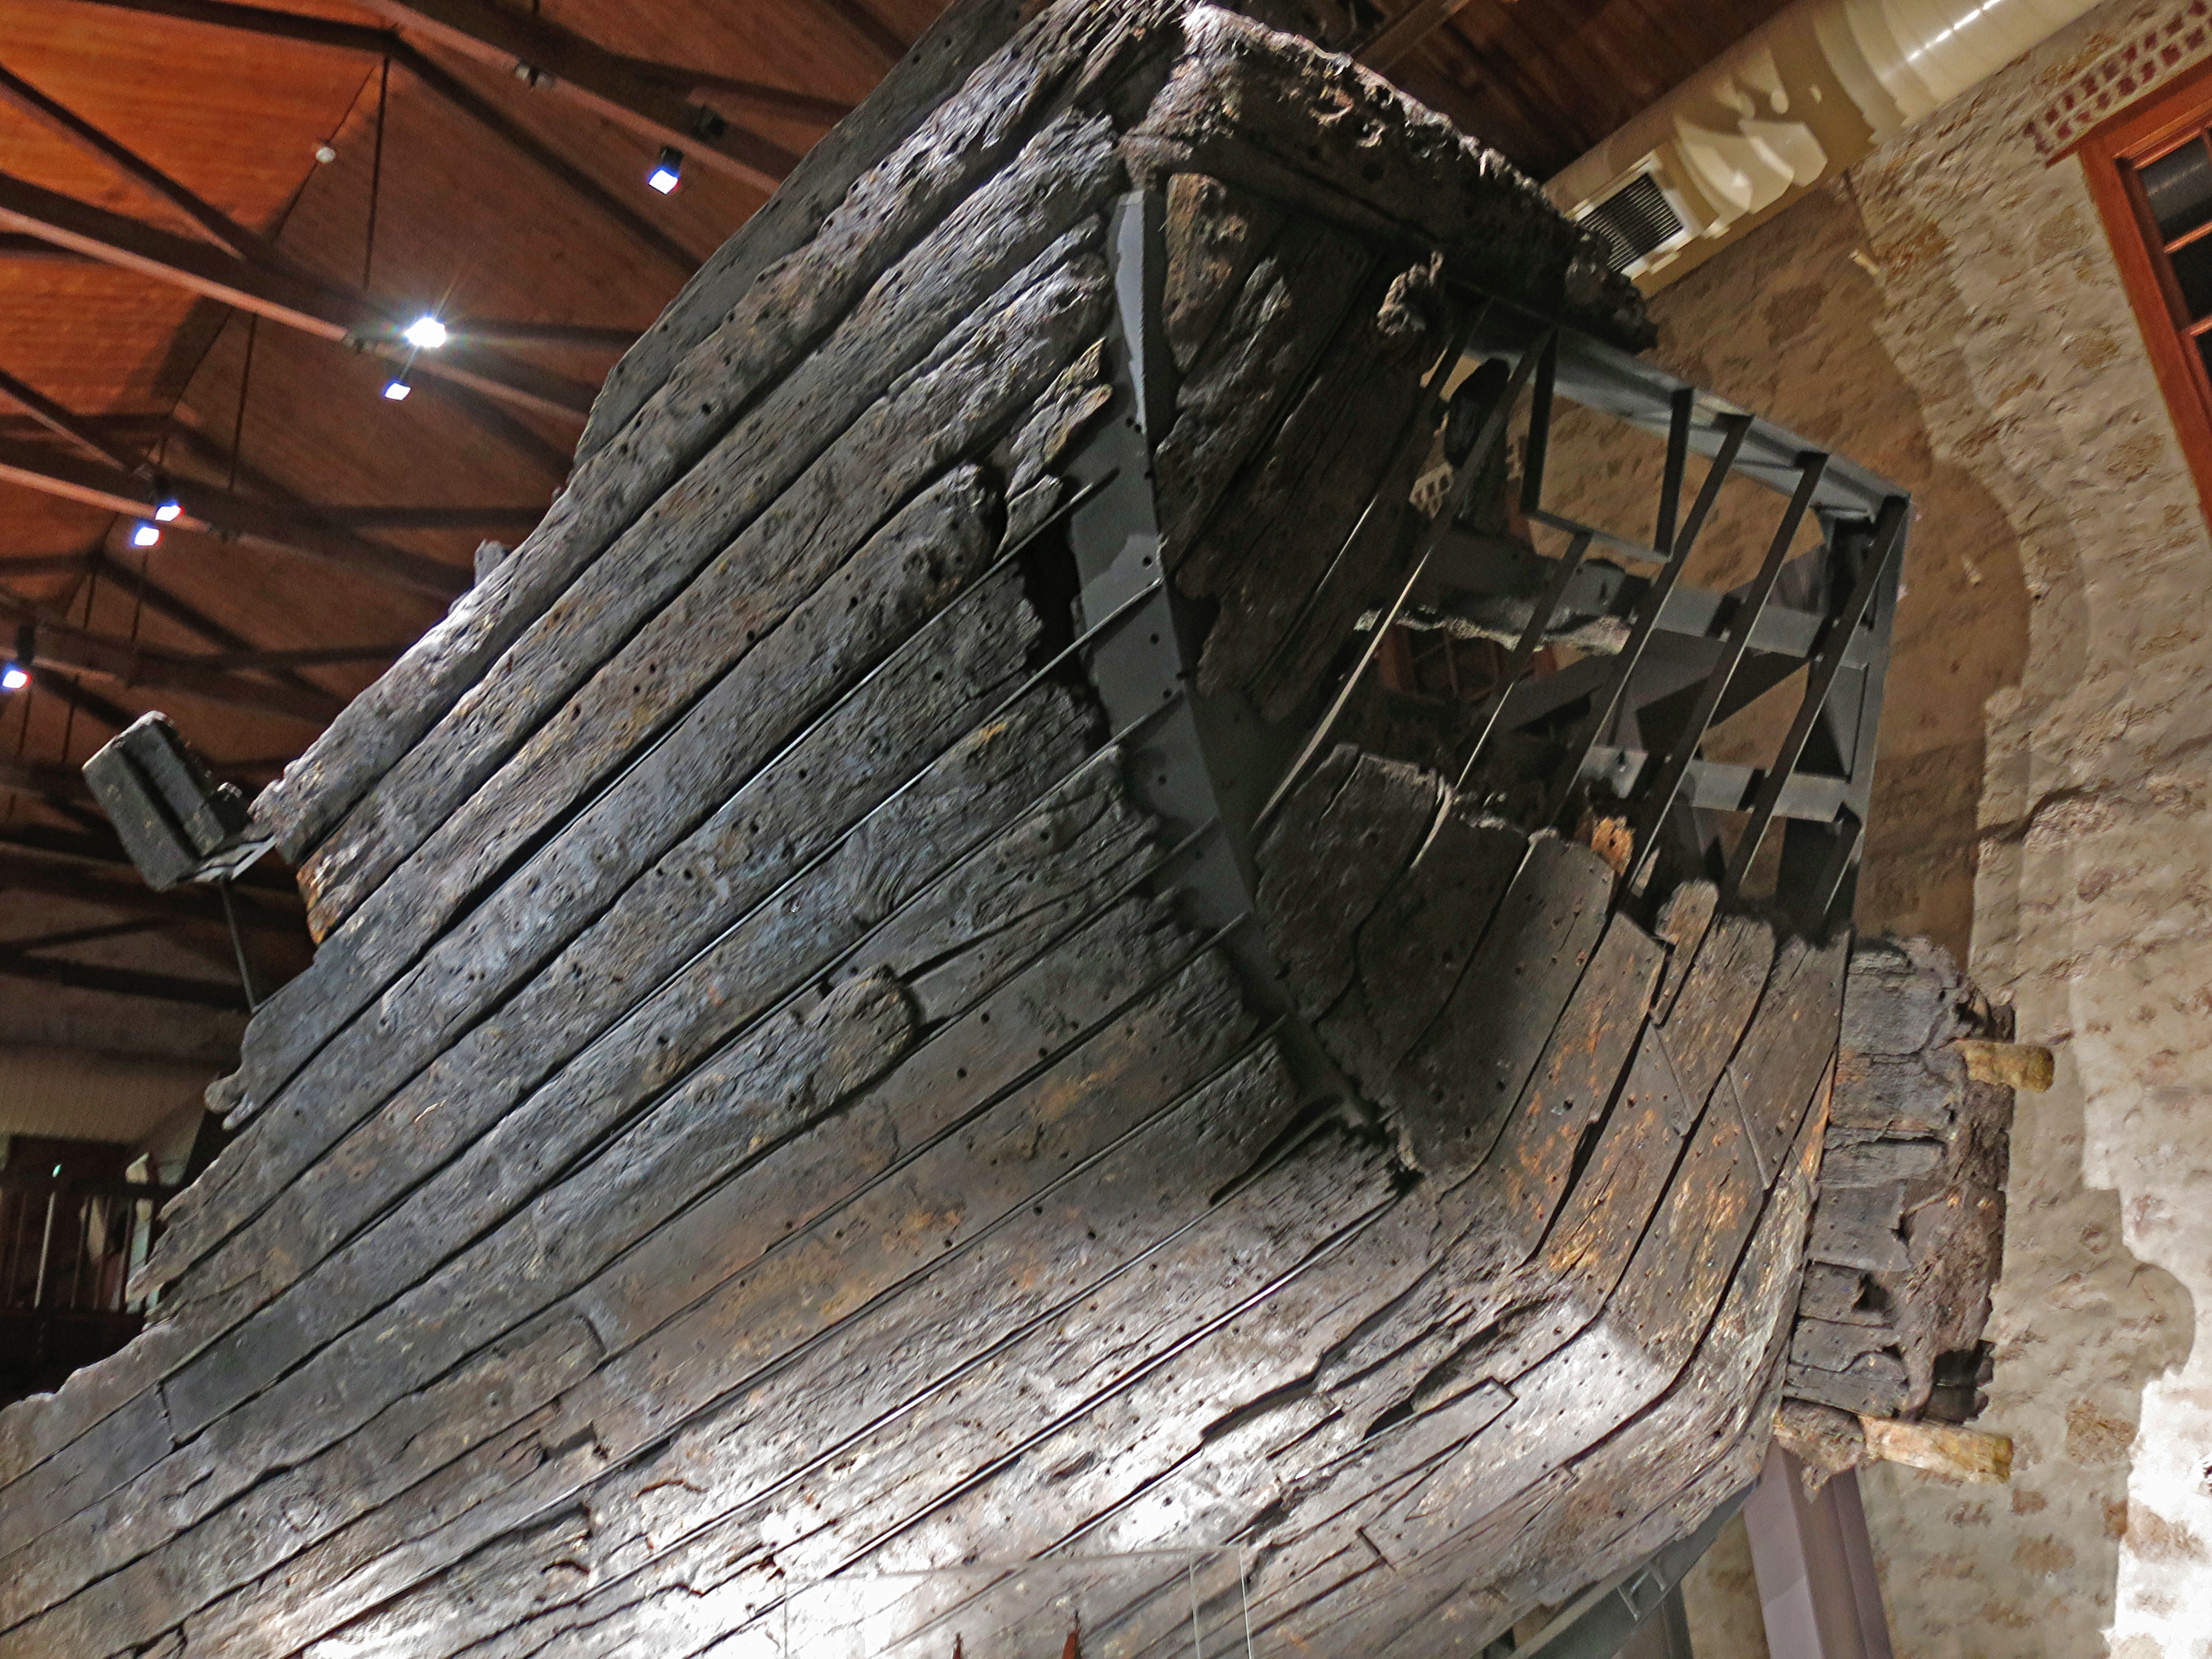
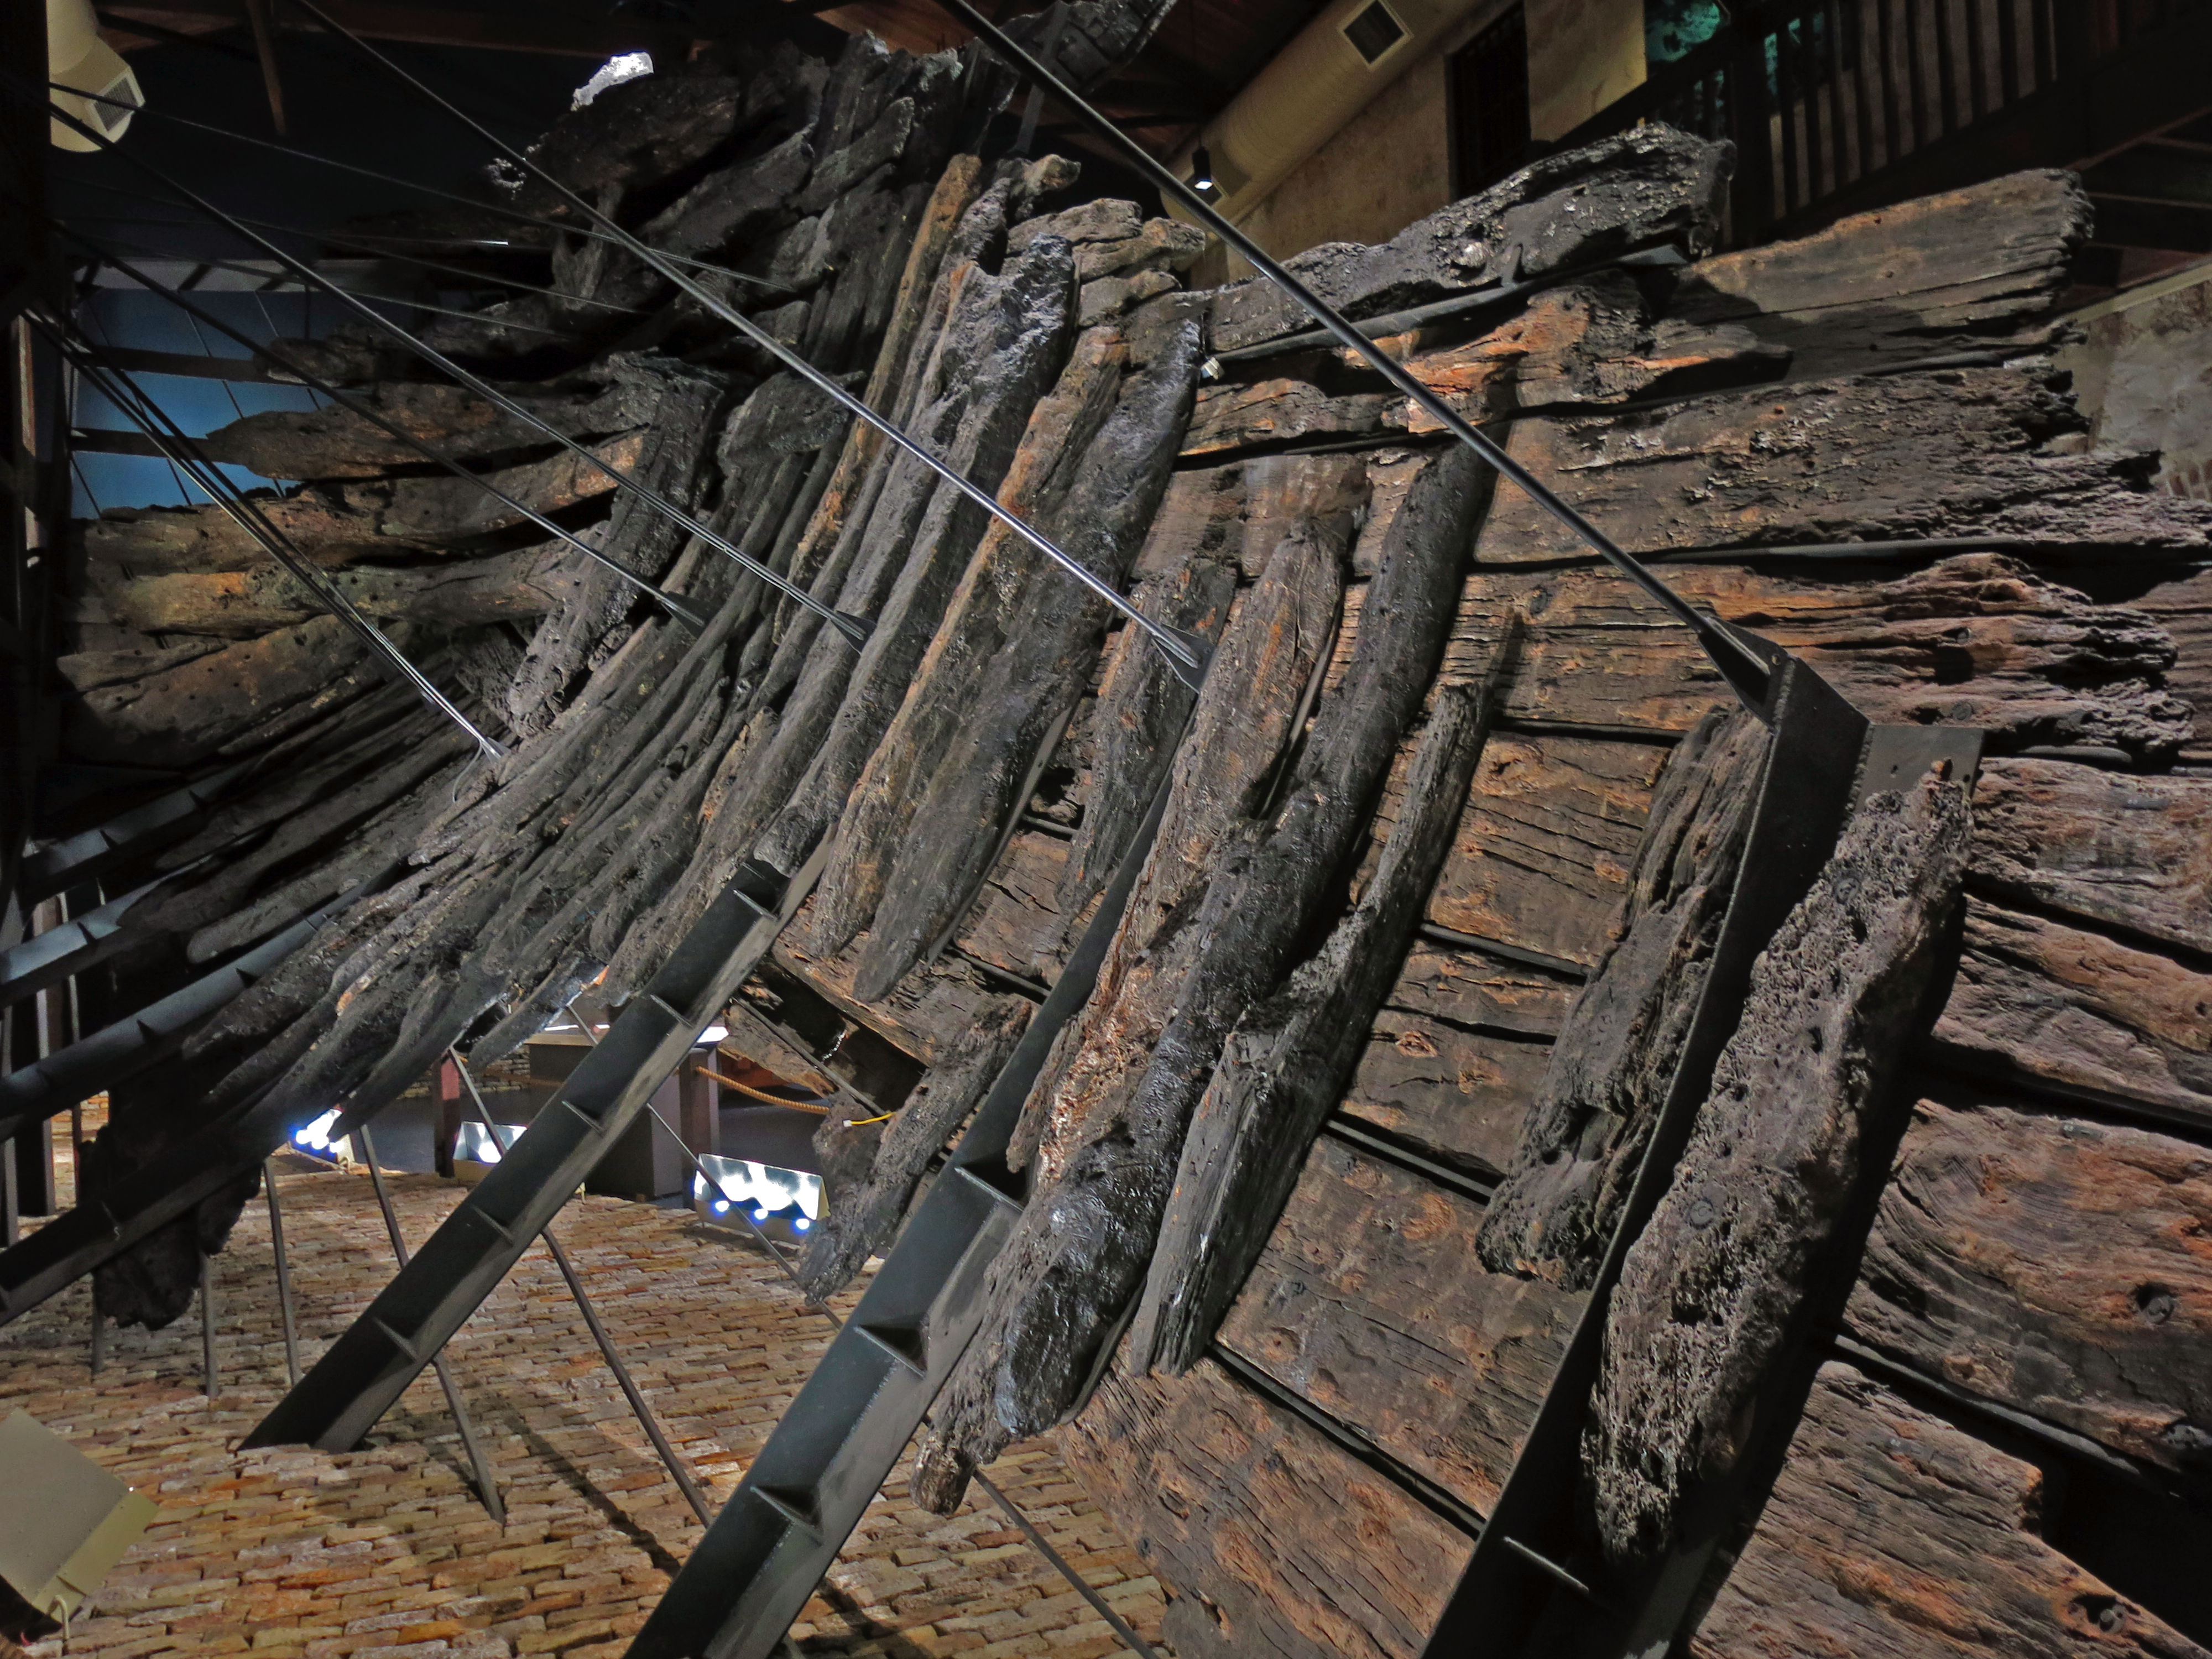
The original timbers of the Batavia, salvaged from the Abrolhos Reef.
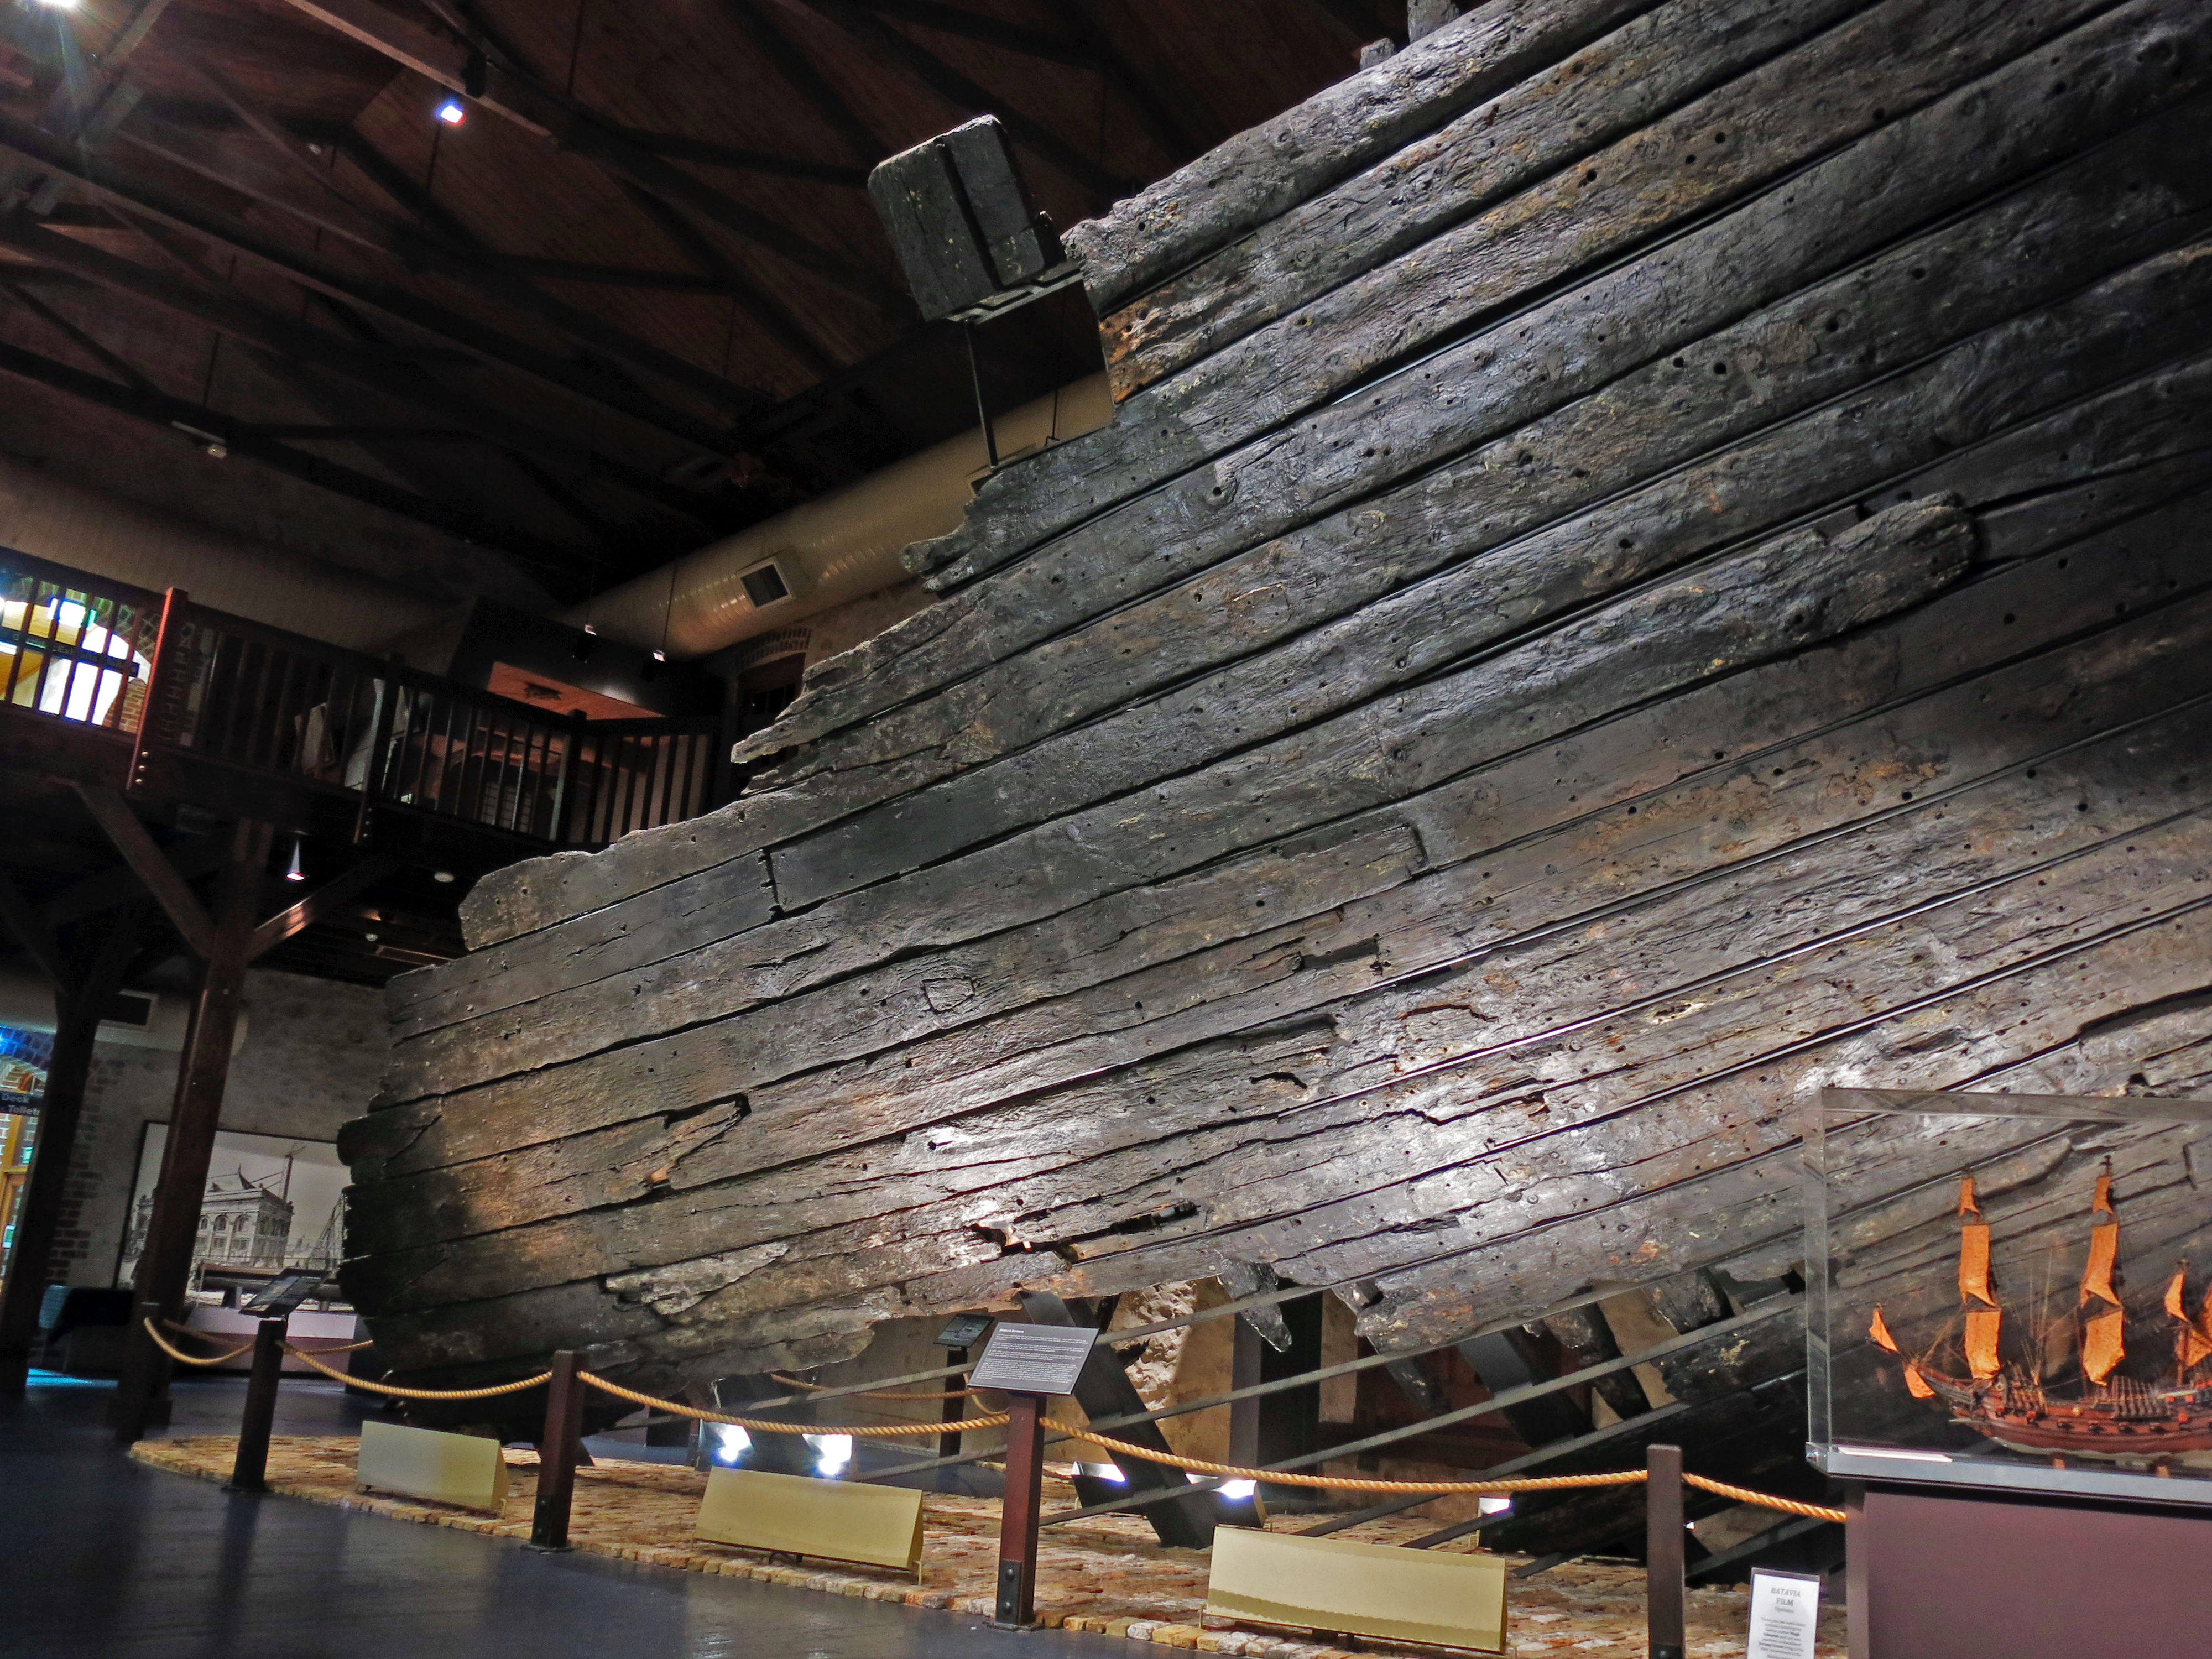
Only a small part of the hull of the Batavia survived 343 years on the sea bed.
This shows the stern of the ship, with the transom (the flat part at the rear) fully visible, with parts of the rudder or stern post still attached.
Photo: Don Hitchcock October 2014
Source and text: The Shipwreck Galleries, Western Australia Museum, Fremantle, Western Australia
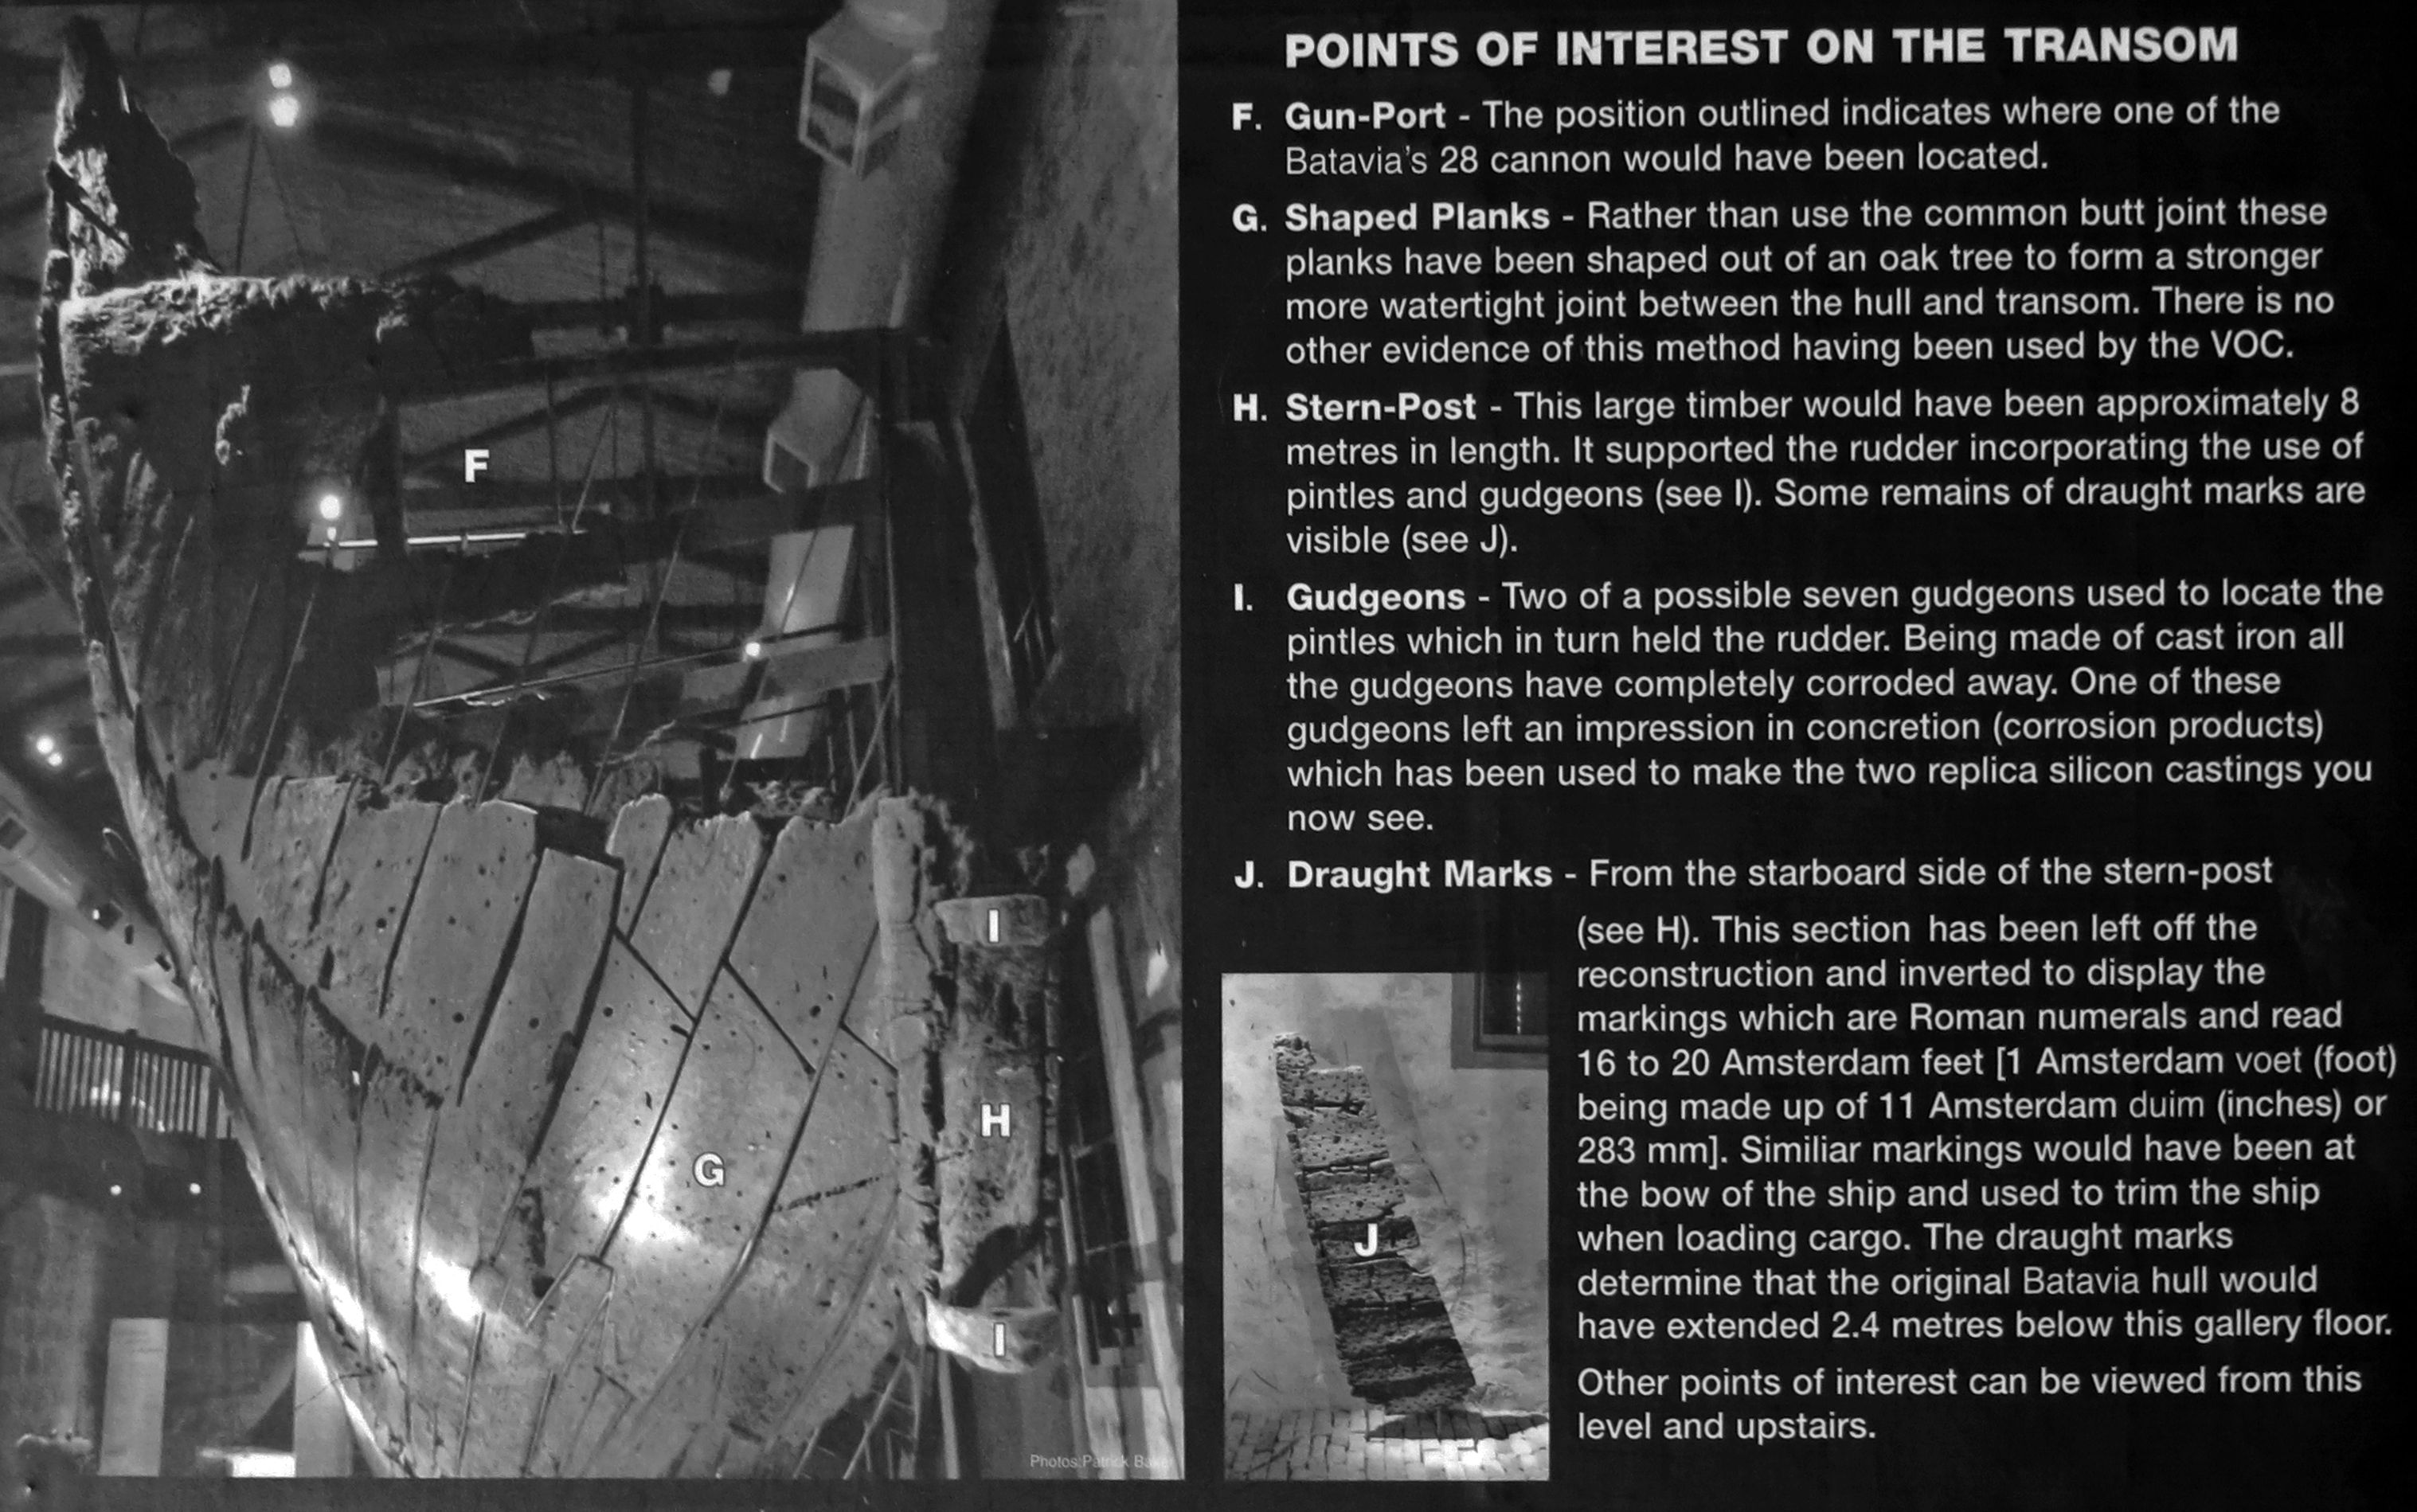
This is a very useful display showing points of interest on the transom, the flat back panel of the stern of the vessel.
Photo: Don Hitchcock October 2014
Source: The Shipwreck Galleries, Western Australia Museum, Fremantle, Western Australia
These timbers are part of the Dutch East Indiamean Batavia, wrecked in the Houtman Abrolhos in 1629. These stern, port side timbers were the only ones to survive 343 years of immersion in salt water. The ship heeled over onto its port side when it was wrecked and the weight of the cargo helped trap this stern section in the underlying coral. We know from accounts of the survivors that the vessel broke up within weeks of the wreck, but this section was preserved because of its position.
In 1972, when maritime archaeologists began excavating the site, the timbers were discovered buried in sand and coral. Following a painstaking archaeological recording and recovery of the hull, the timbers were shipped to Fremantly, where conservation treatment began. If unconserved waterlogged wood is allowed to dry out, it cracks, shrinks, warps, and in some cases, crumbles to a mass of splintery fibres.
Photo: Don Hitchcock October 2014
Source and text: The Shipwreck Galleries, Western Australia Museum, Fremantle, Western Australia
To prevent the disintegration of the Batavia timbers, most of the water in the wood was progressively replaced with polyethylene glycol, PEG, a water-soluble wax. The process, which took many years to complete, was carried out in large, heated, impregnation tanks. Following impregnation, the timbers were slowly dried out over a period of 10 - 12 months.
The treated timbers were reconstructed in this gallery on a specially designed steel support structure. The temperature and humidity has to be carefully controlled to ensure that the conserved timbers remain stable. Each timber is held in place using stainless steel bolts driven into the original bolt holes. No new holes have been drilled into the wood, and at any time individual timbers can be removed for further treatment.
Photo: Don Hitchcock October 2014
Source and text: The Shipwreck Galleries, Western Australia Museum, Fremantle, Western Australia
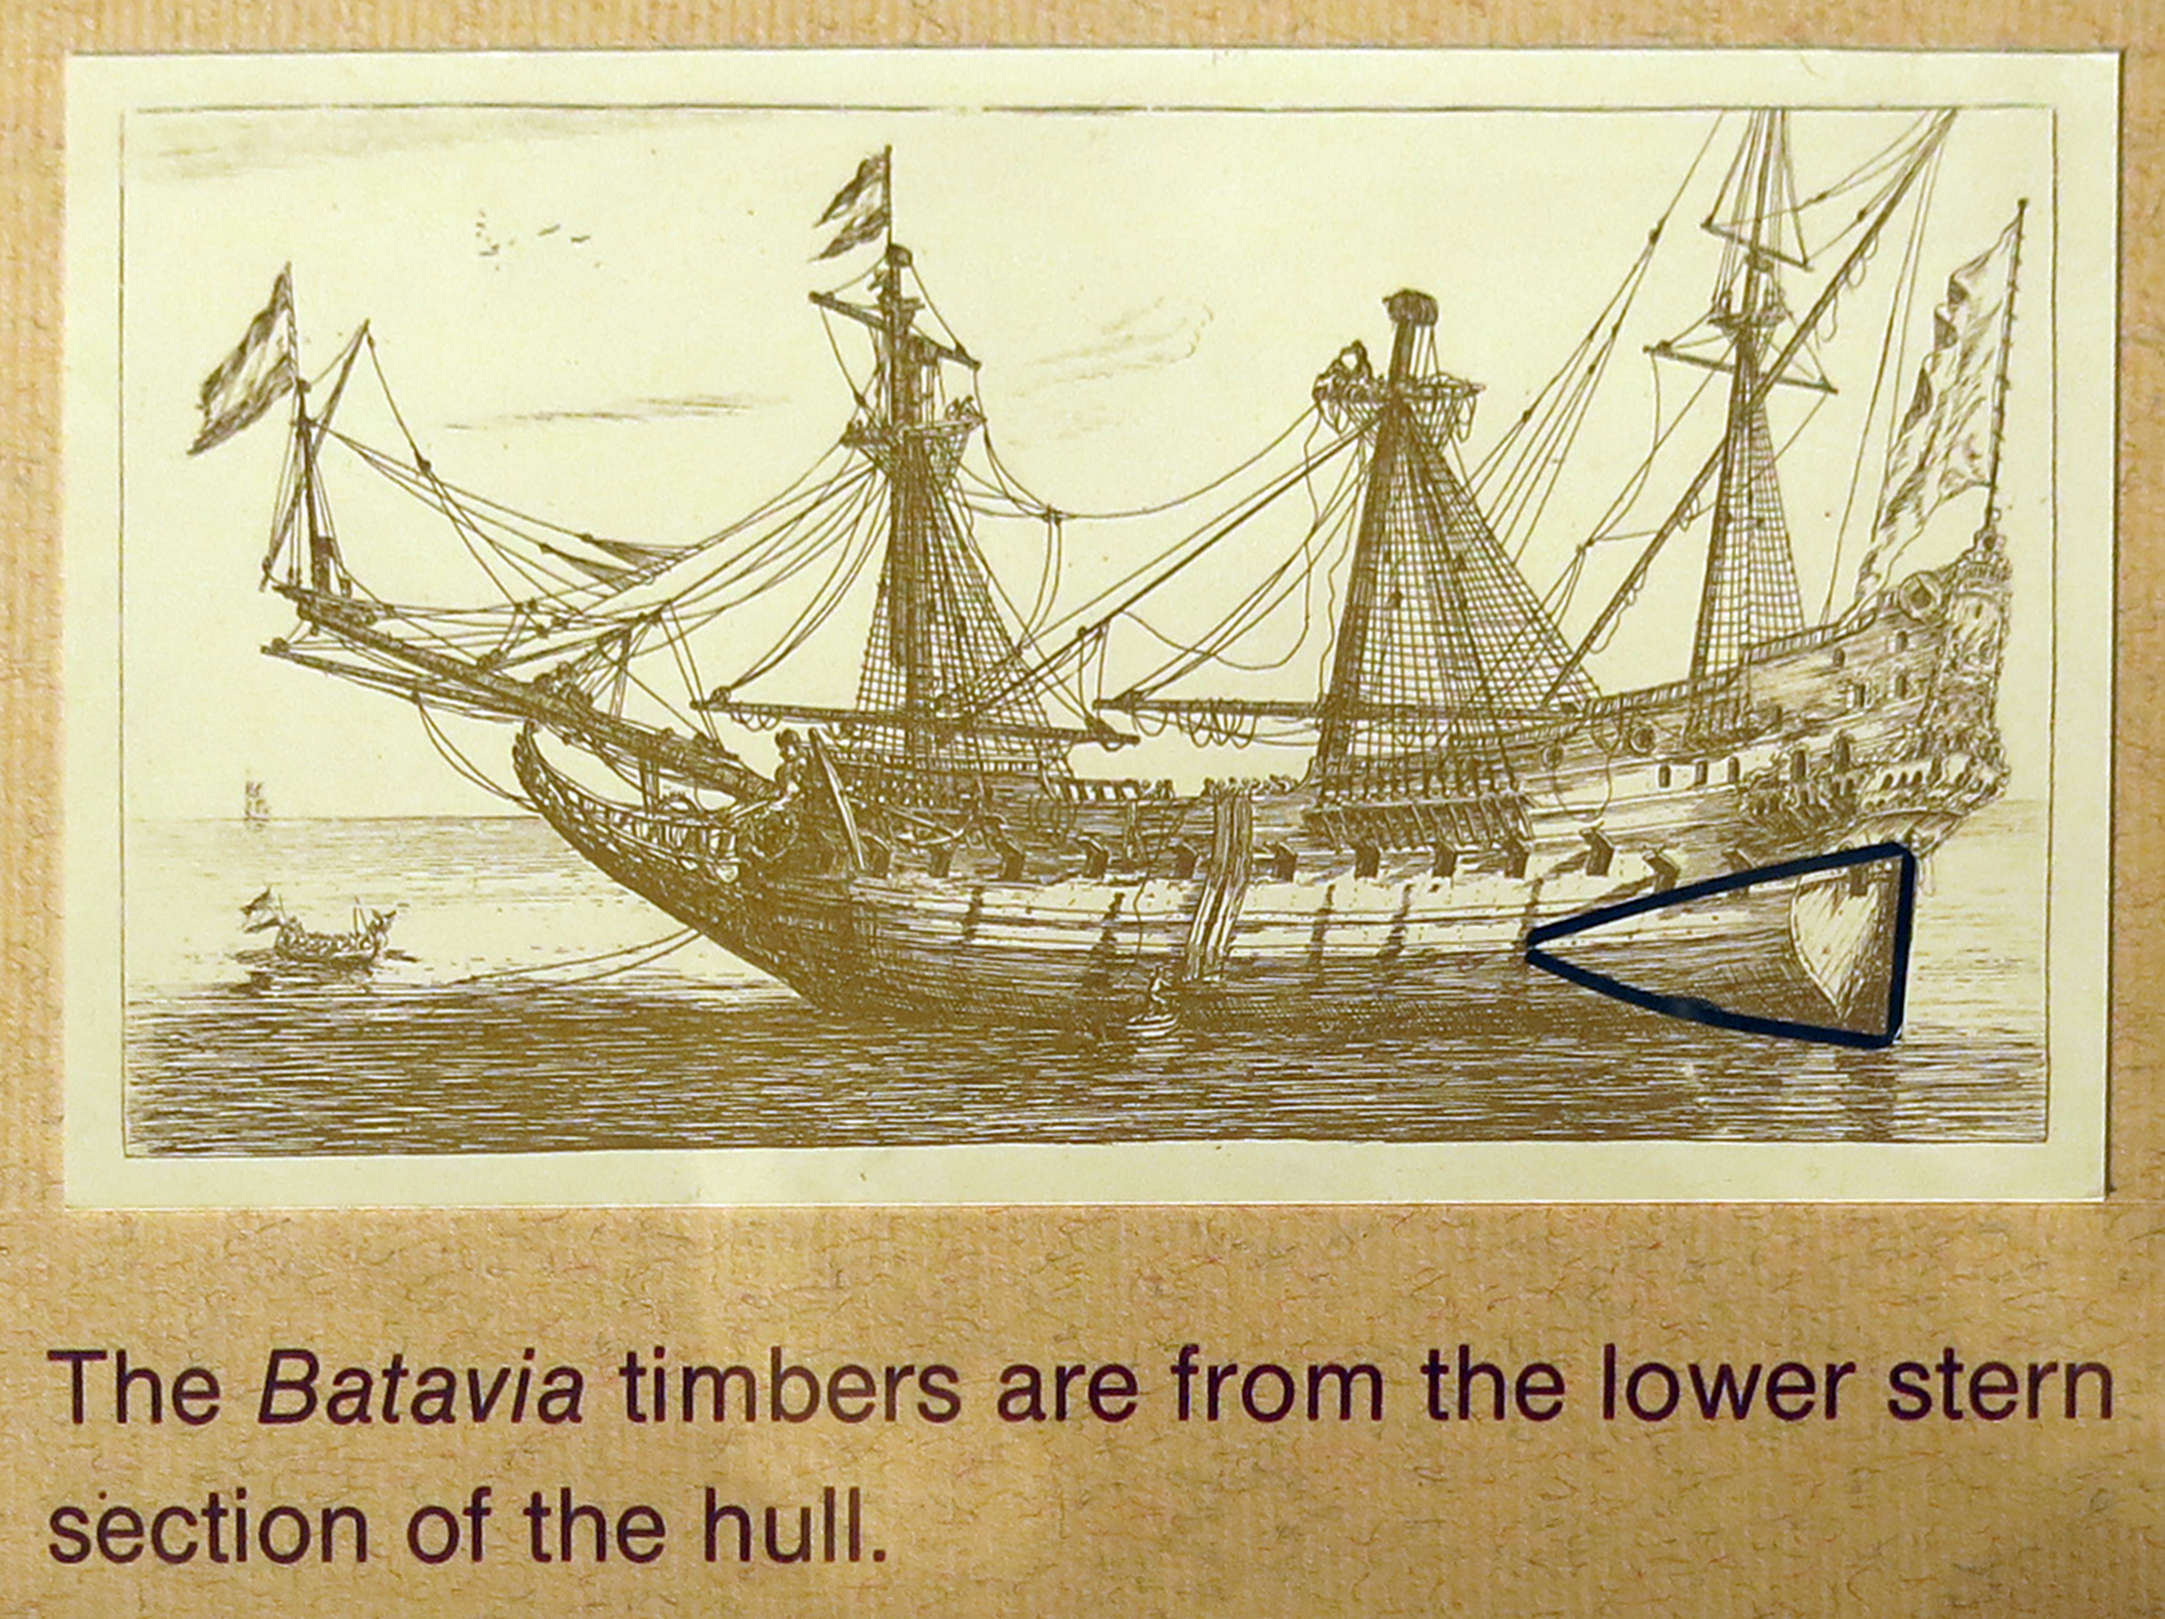
The Batavia timbers are from the lower stern section of the hull, as shown here.
Photo: Don Hitchcock April 2014
Source and text: The Shipwreck Galleries, Western Australia Museum, Fremantle, Western Australia
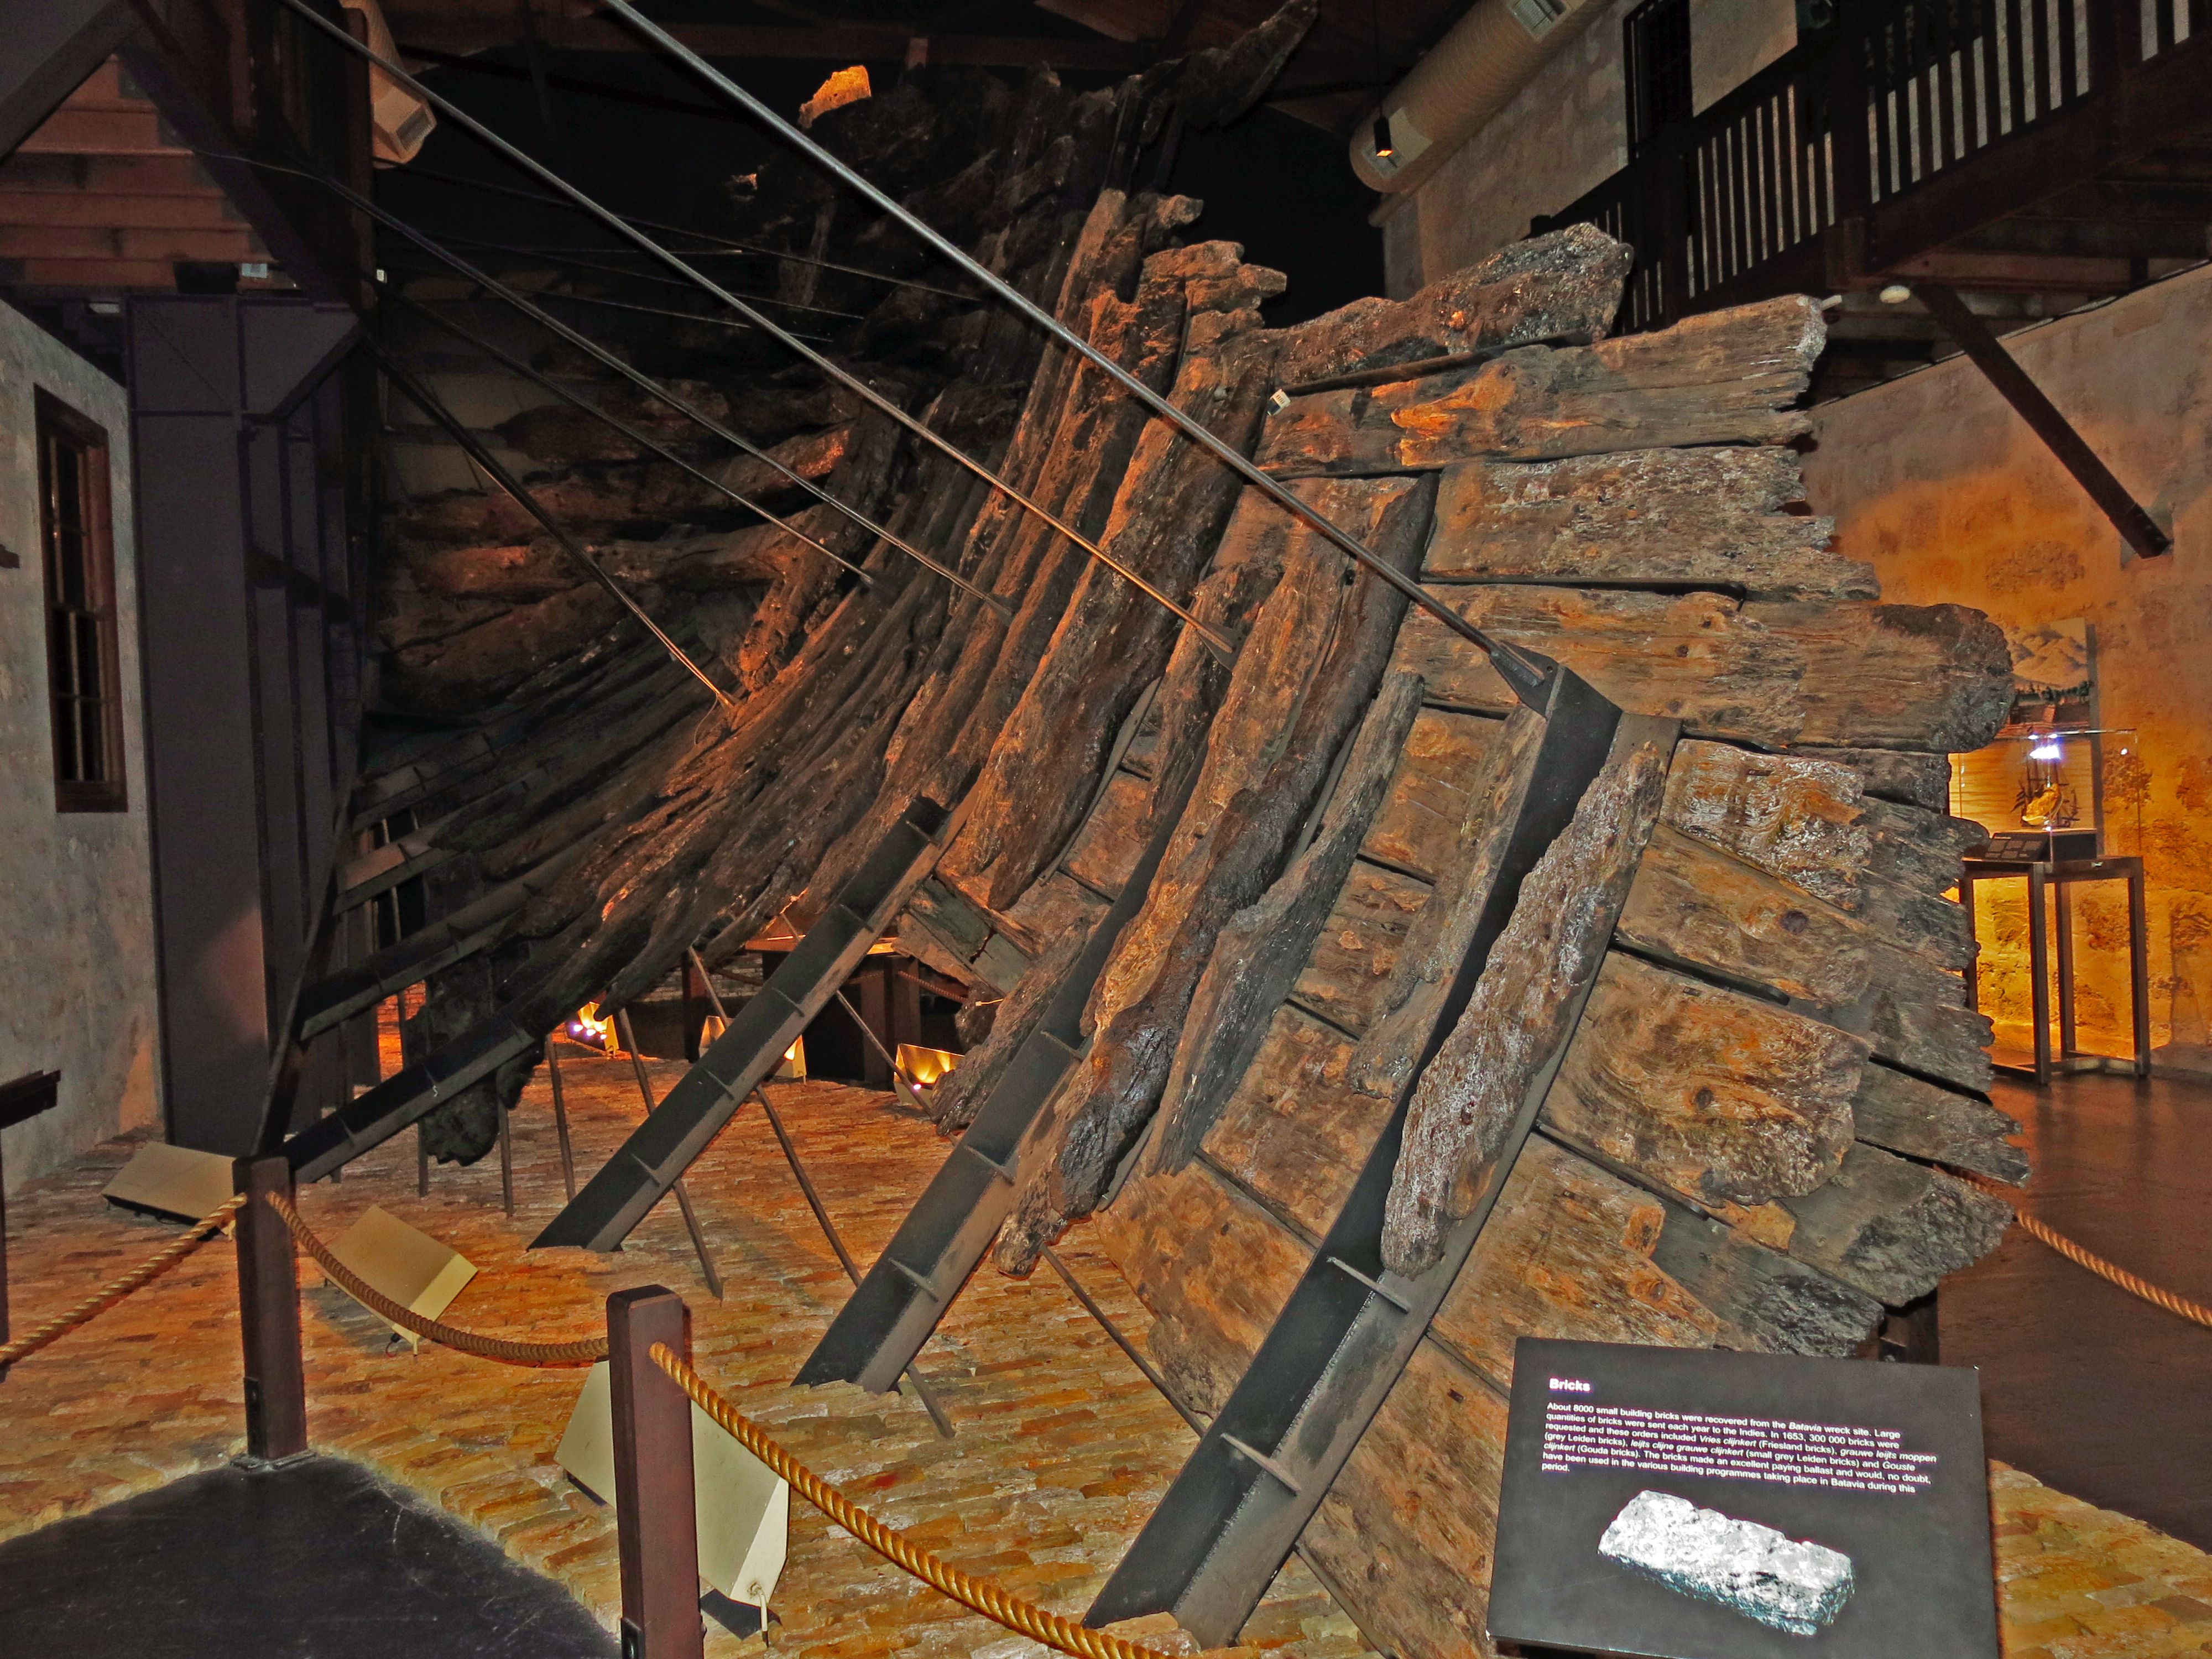
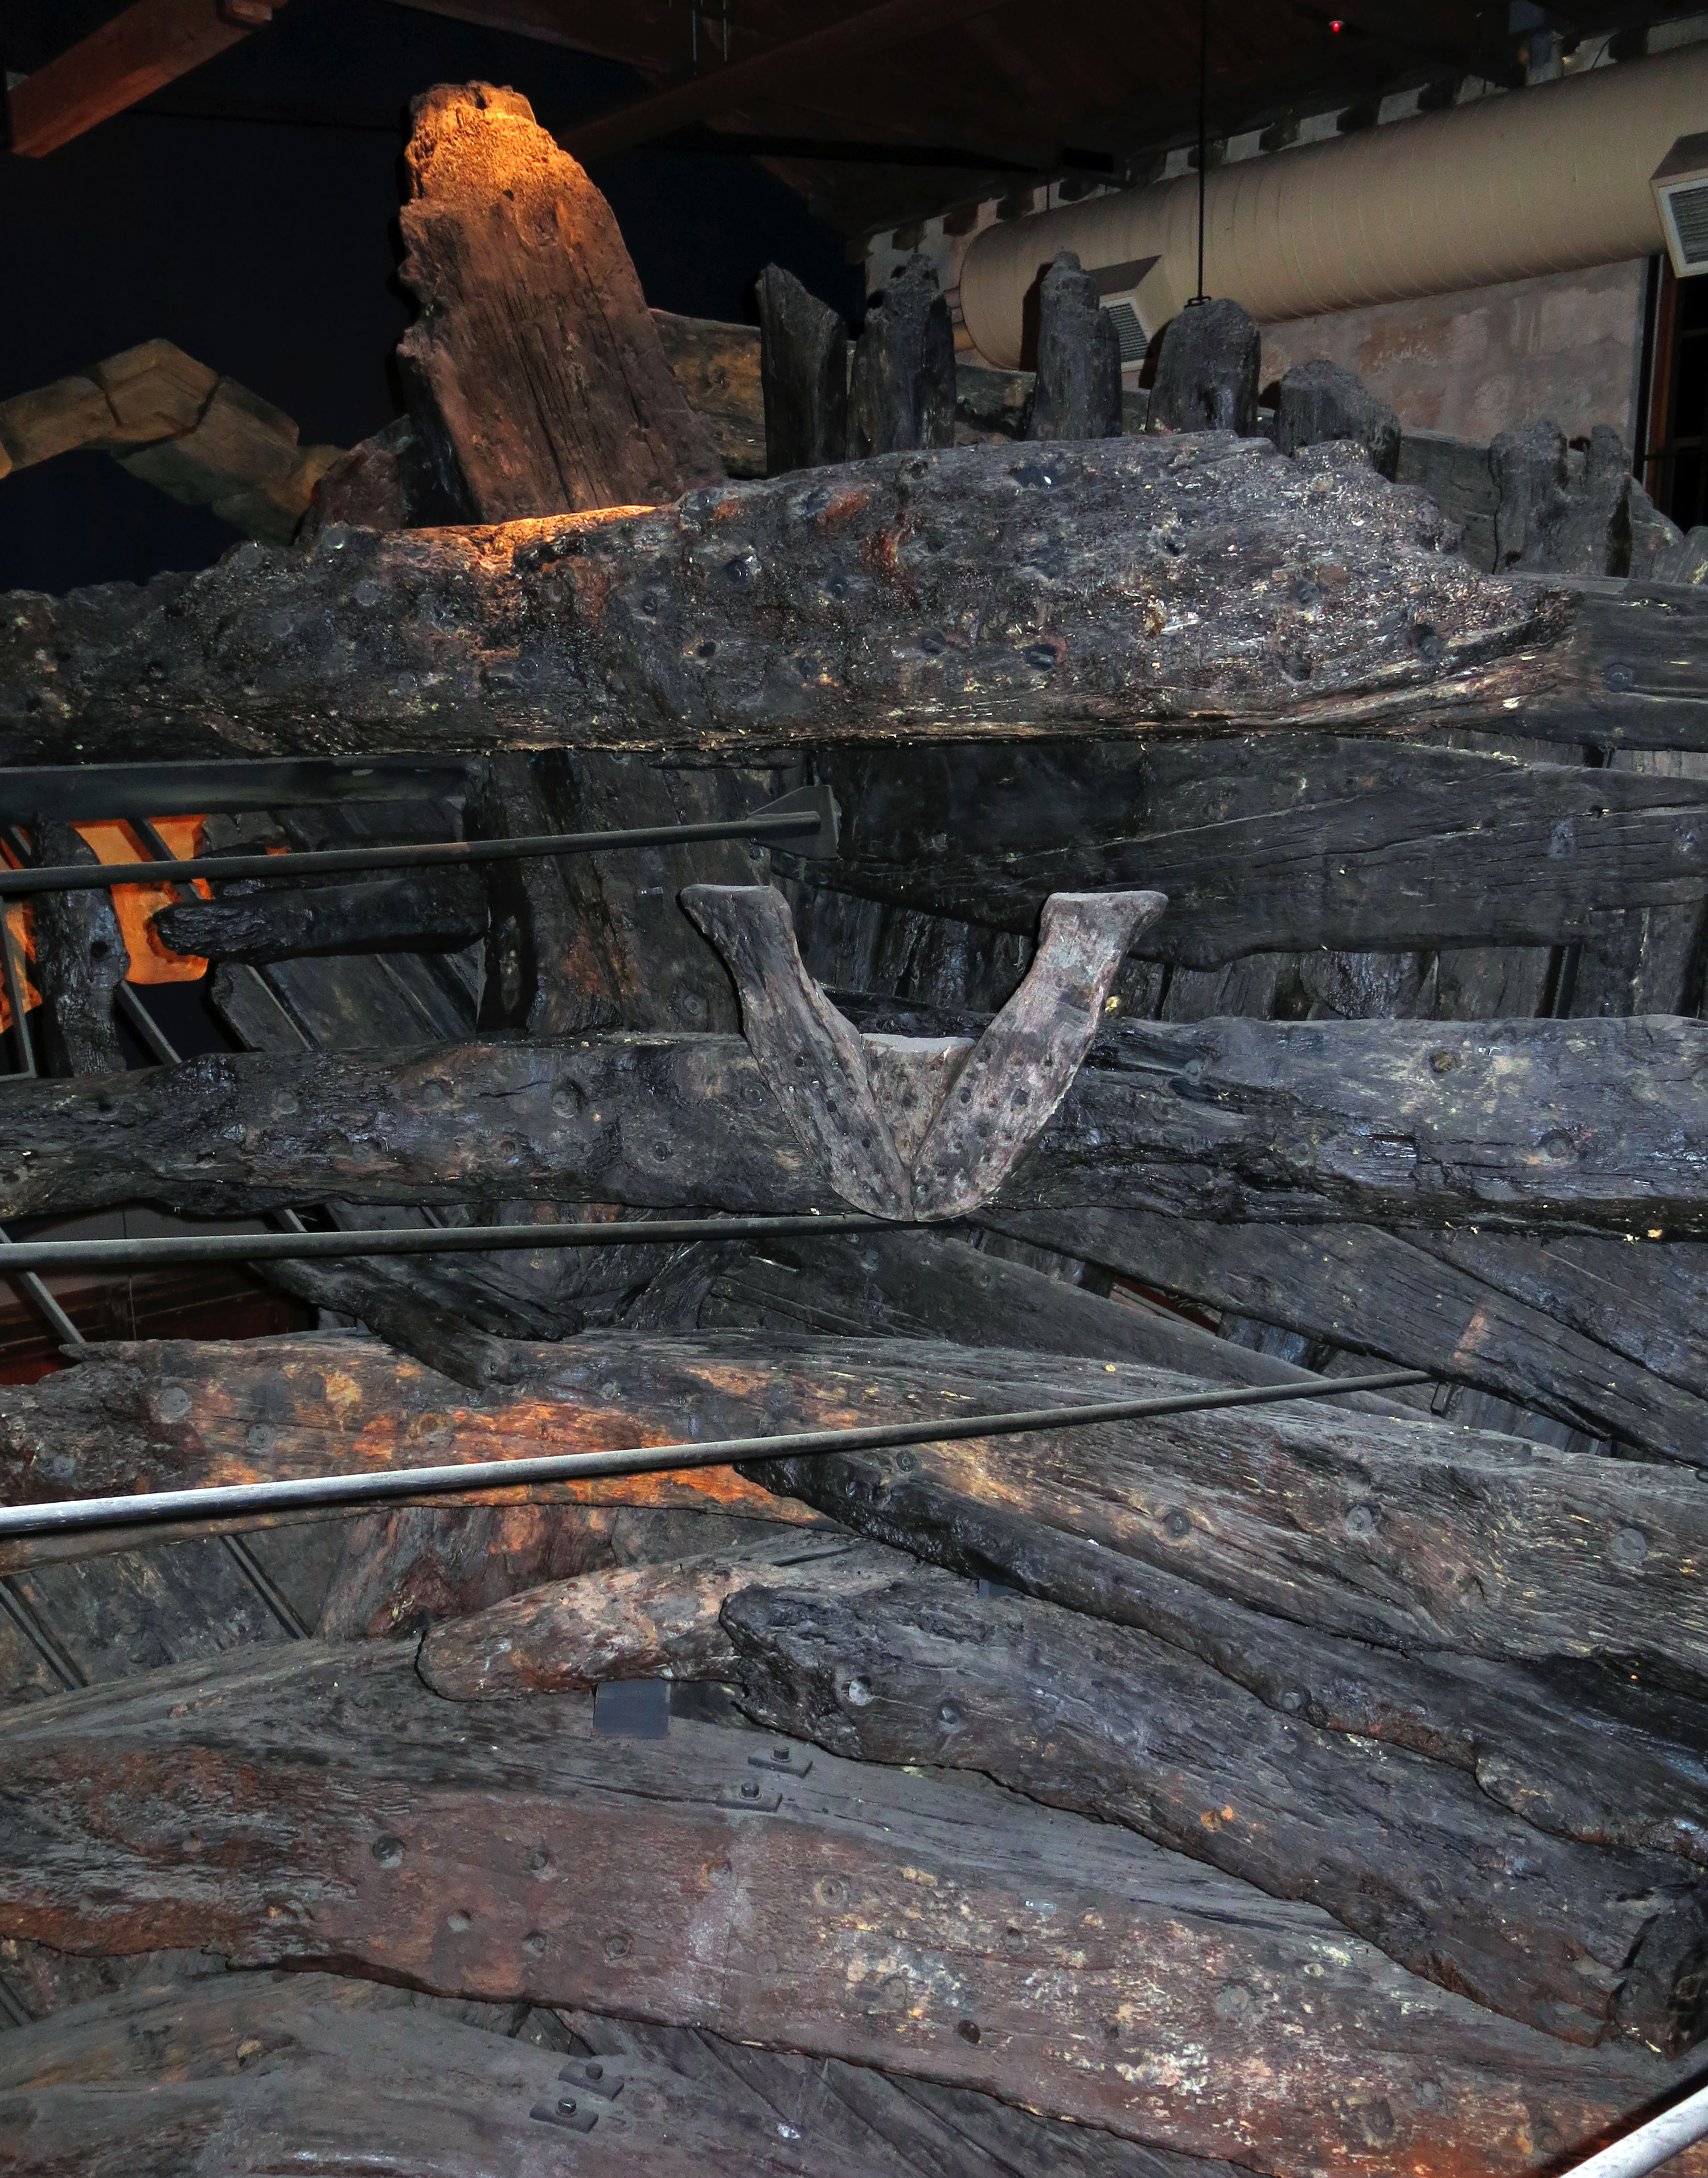
The port side of the wreck.
Photo: Don Hitchcock October 2014
Source and text: The Shipwreck Galleries, Western Australia Museum, Fremantle, Western Australia
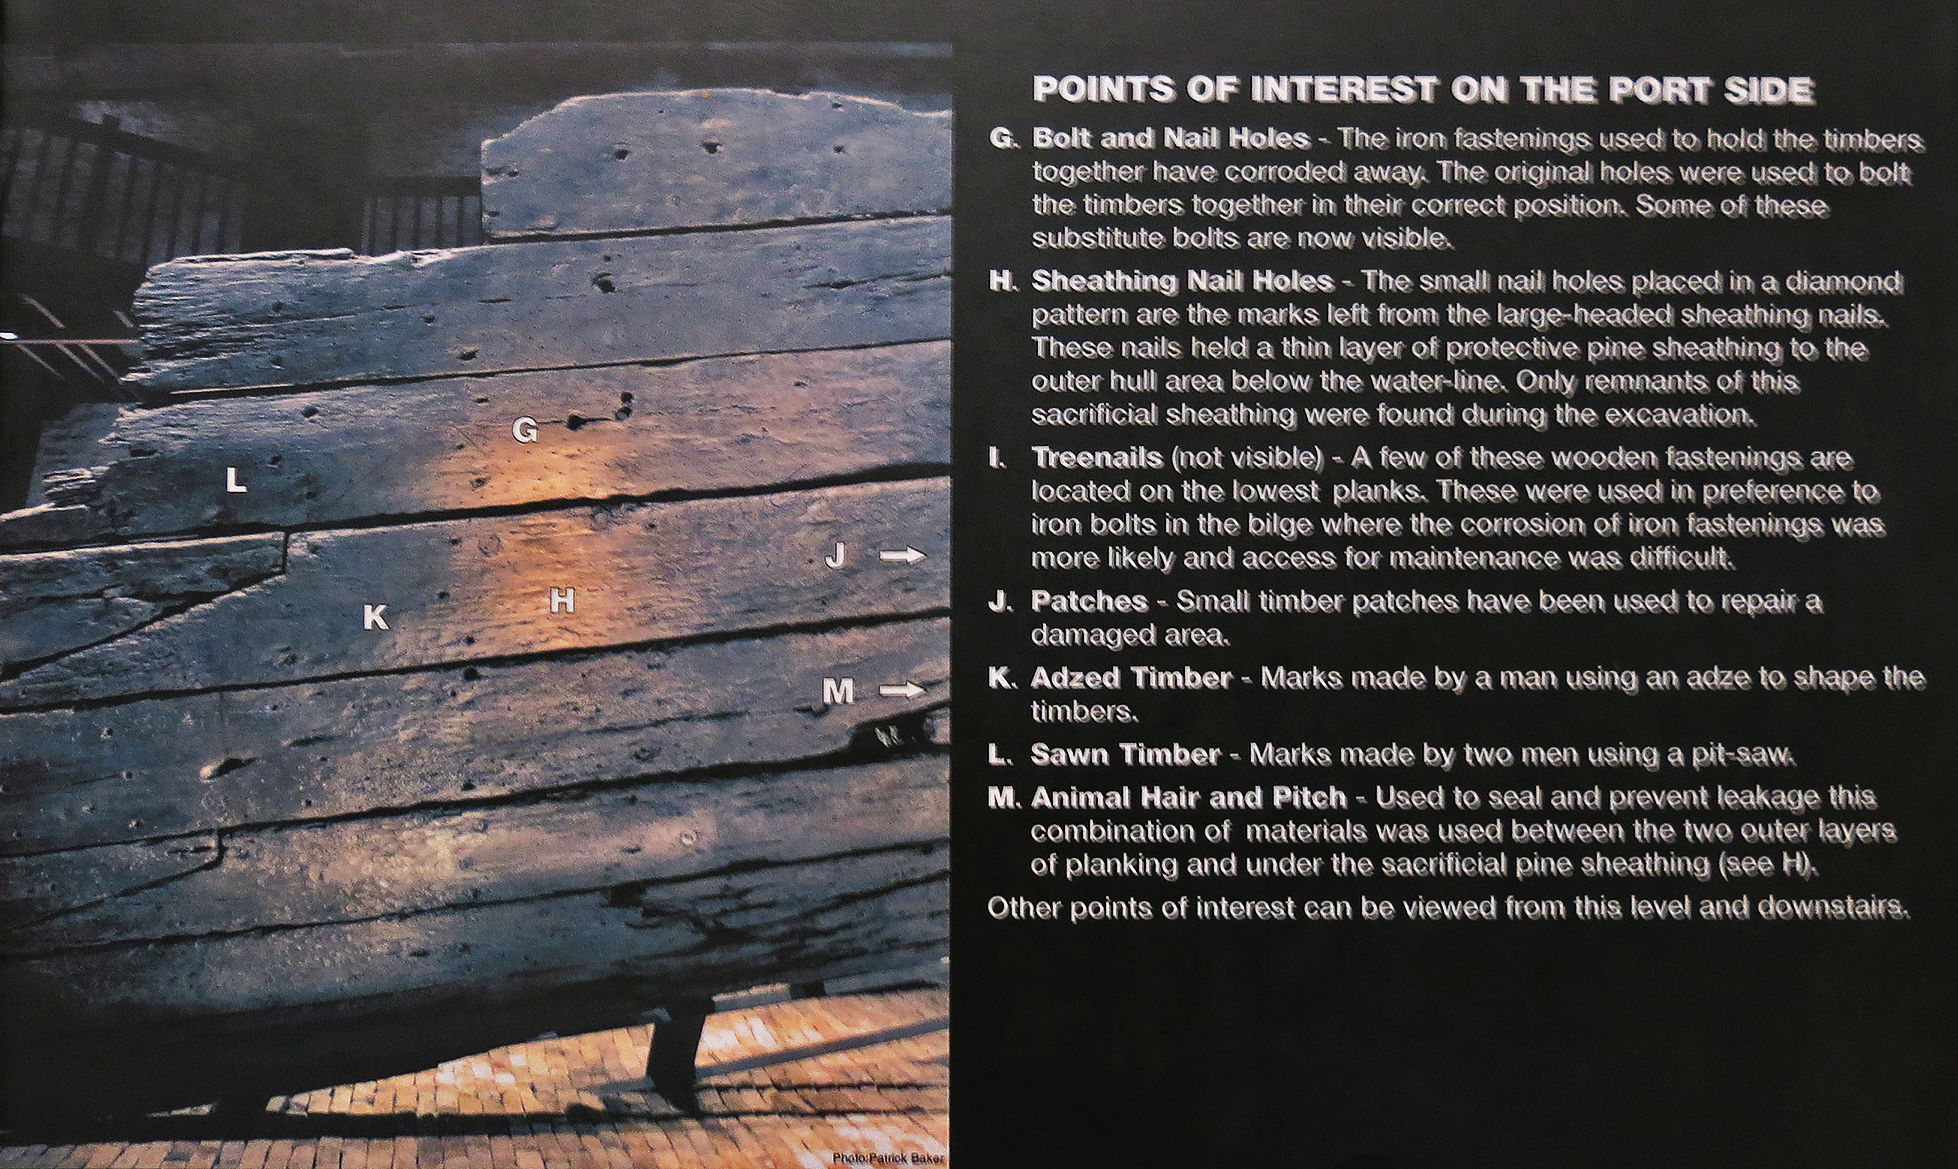
Points of interest on the port side. Note that this photo is of the very end of the port side, on the far left of the photo above this one.
Original Photo: Patrick Baker
Photo: Don Hitchcock October 2014
Source and text: The Shipwreck Galleries, Western Australia Museum, Fremantle, Western Australia
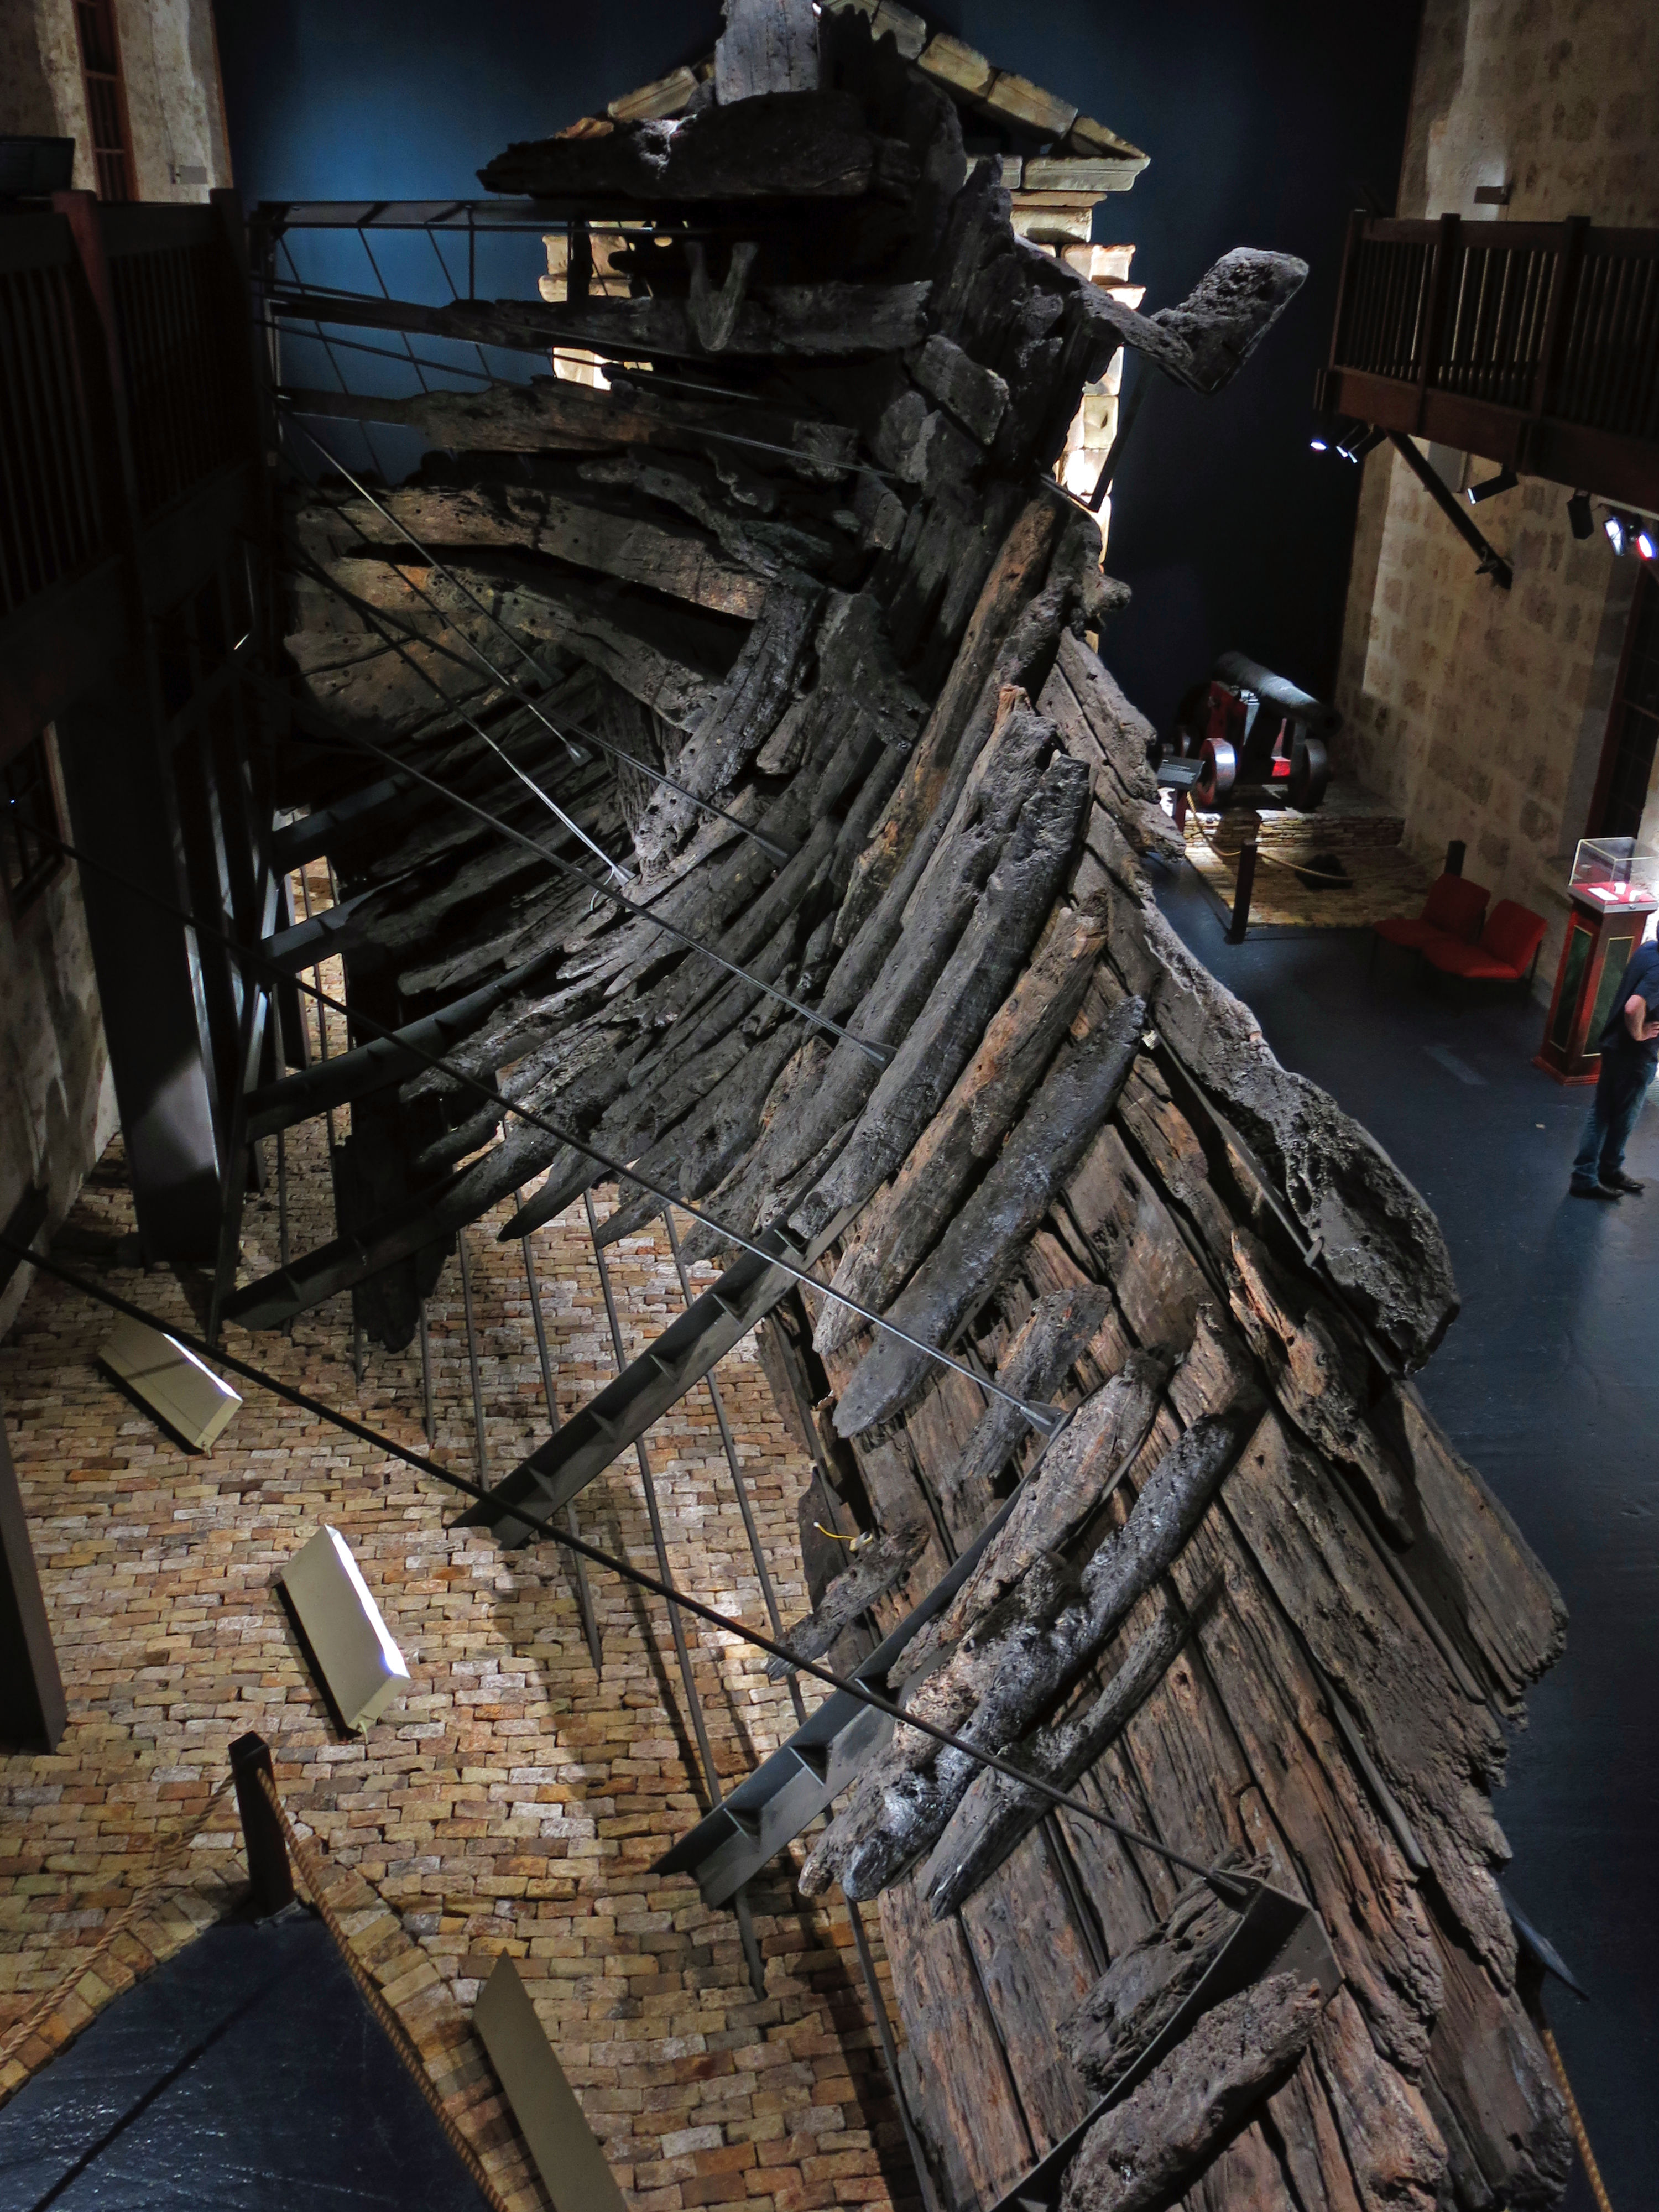
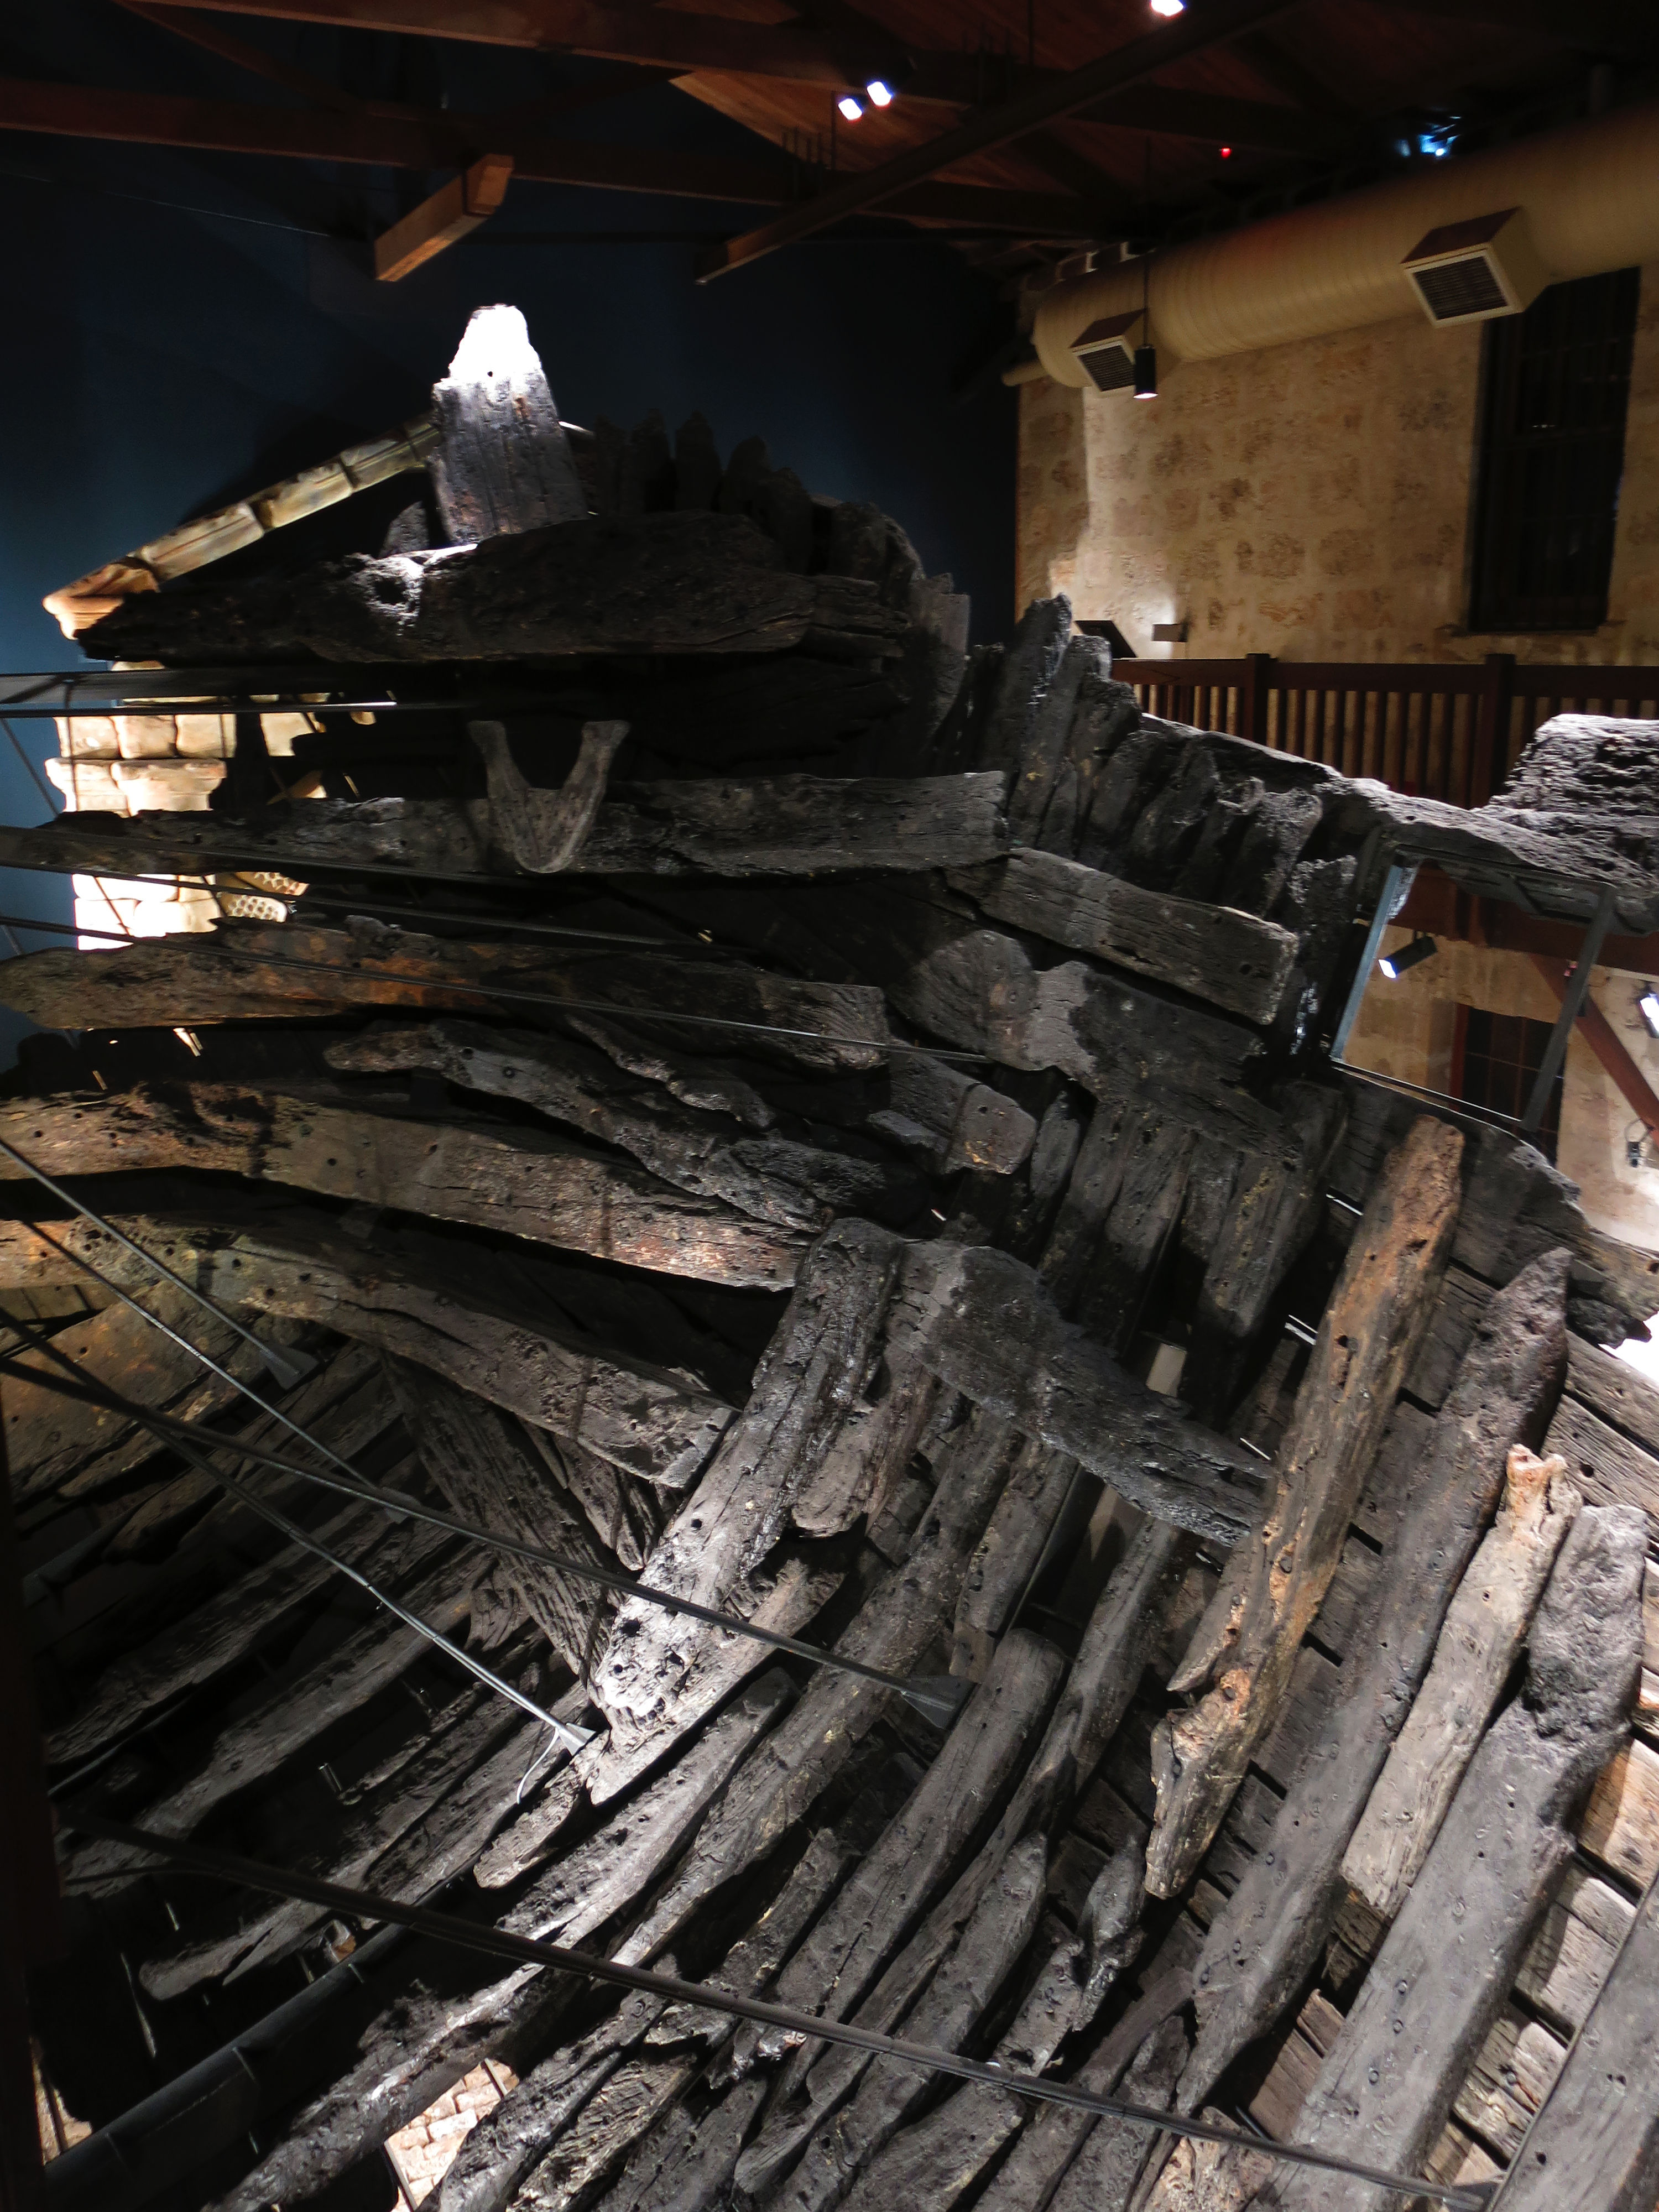
The timbers of the Batavia seen from above and inside the wreck, looking towards the stern.
Photo: Don Hitchcock October 2014
Source and text: The Shipwreck Galleries, Western Australia Museum, Fremantle, Western Australia
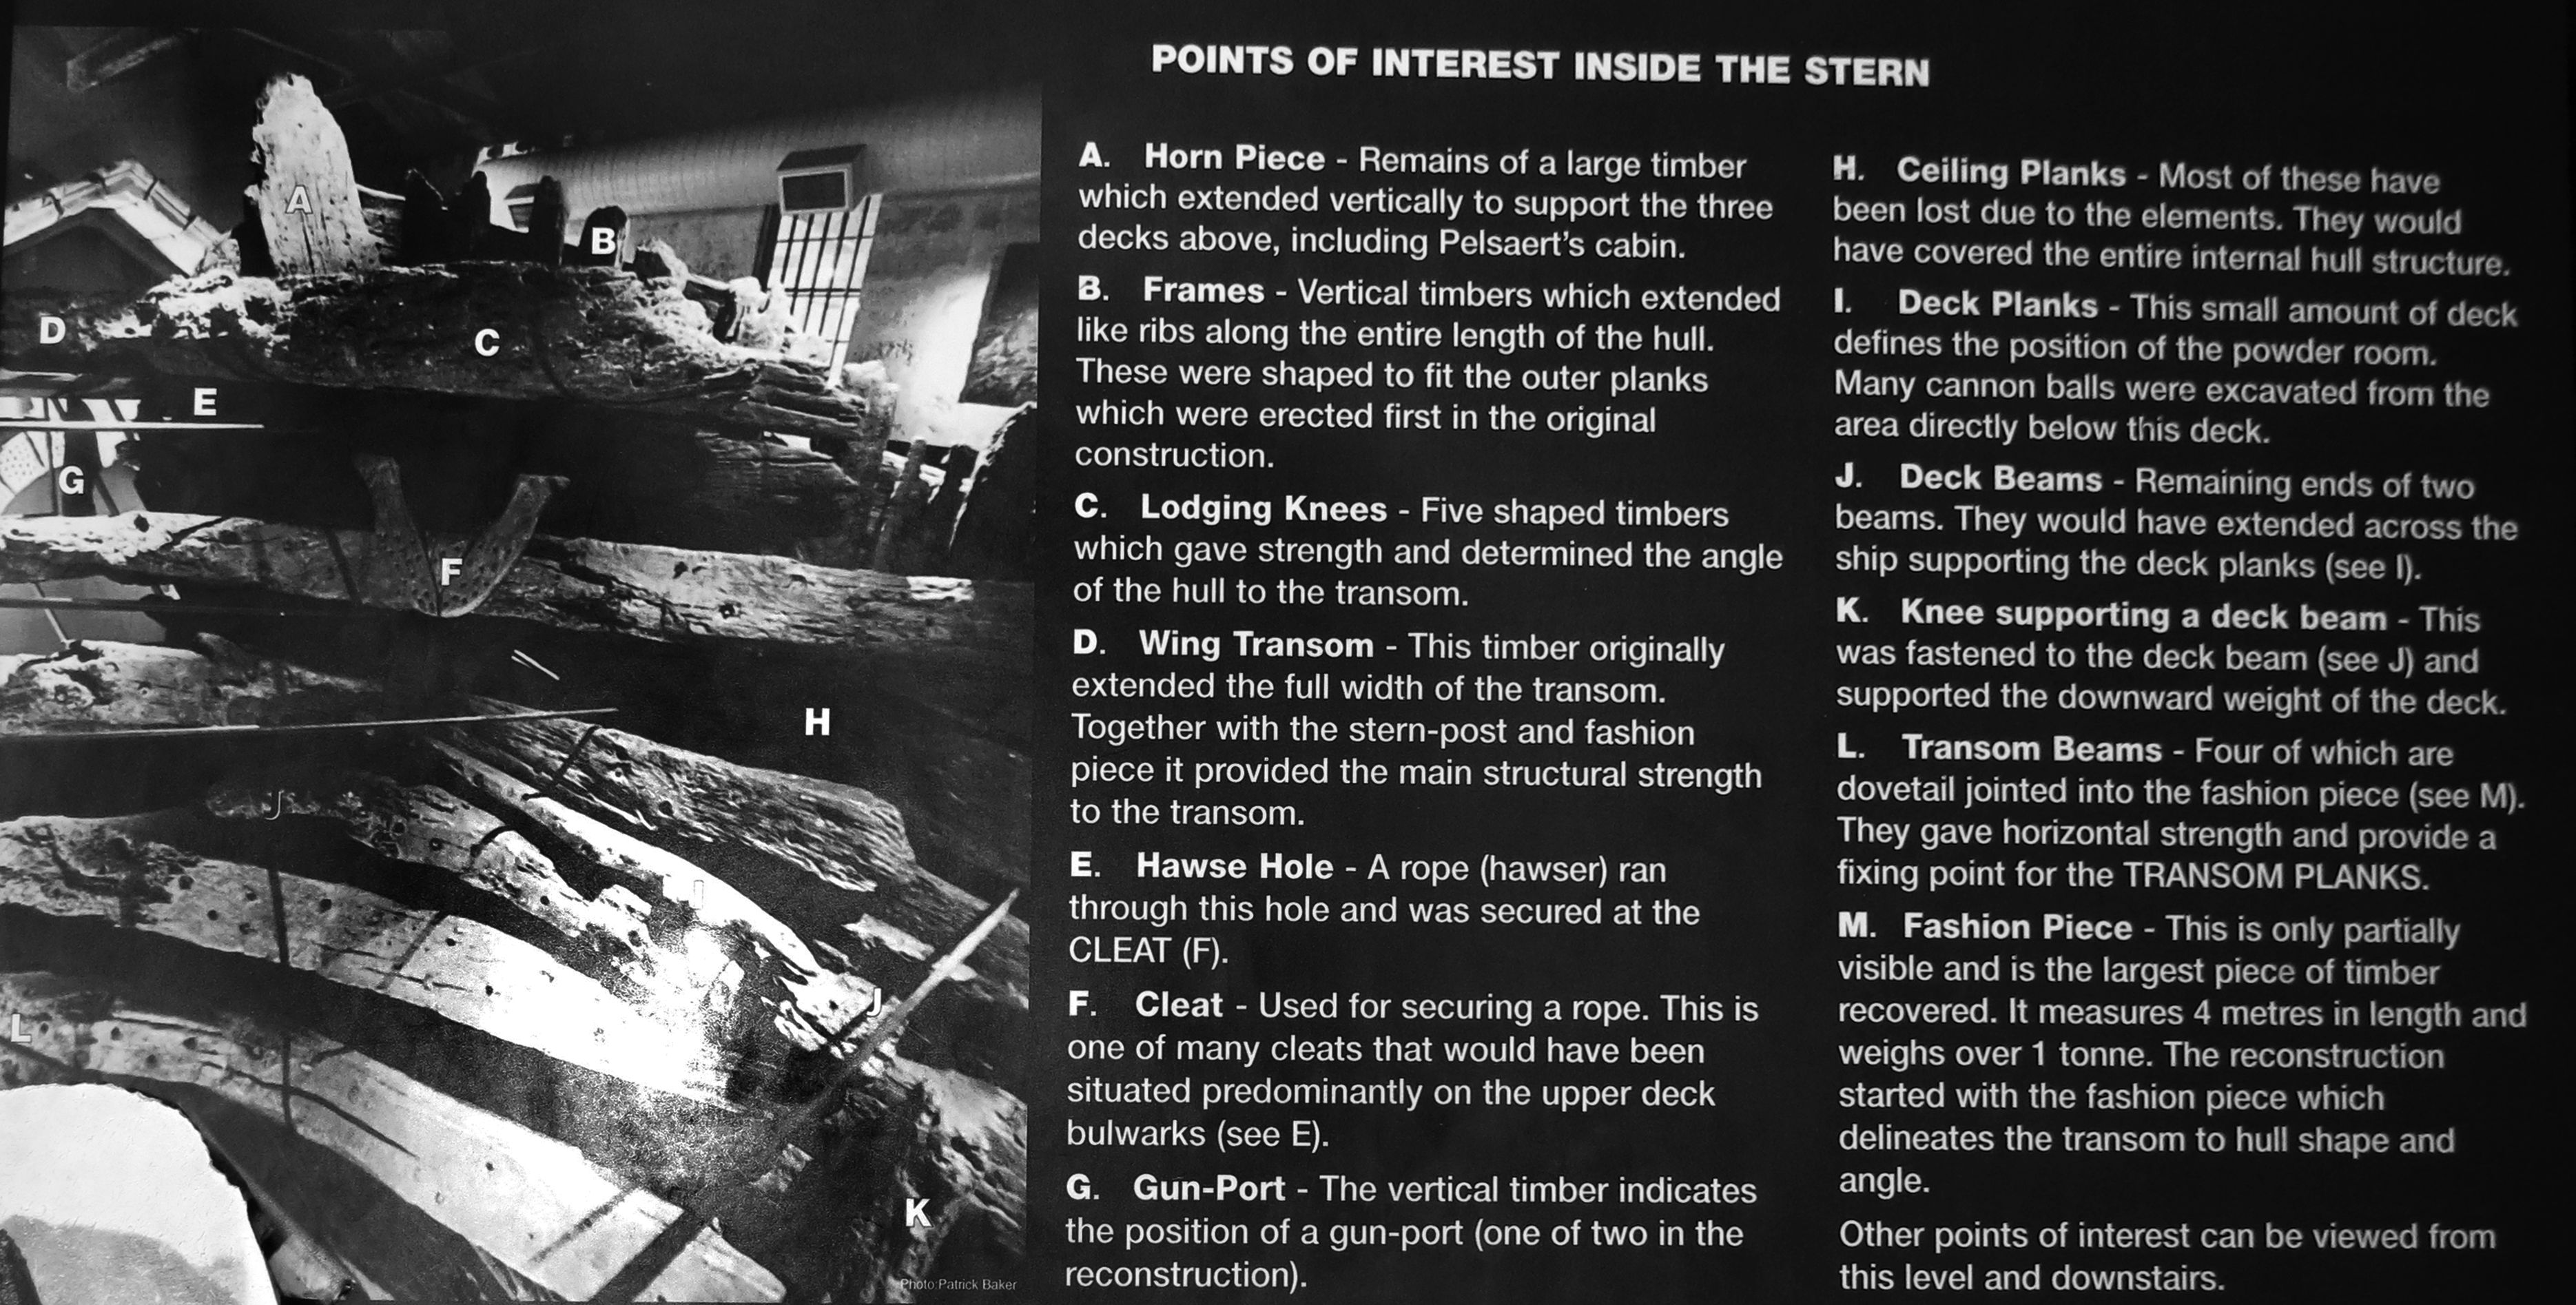
Points of interest inside the stern.
Photo: Don Hitchcock October 2014
Source and text: The Shipwreck Galleries, Western Australia Museum, Fremantle, Western Australia
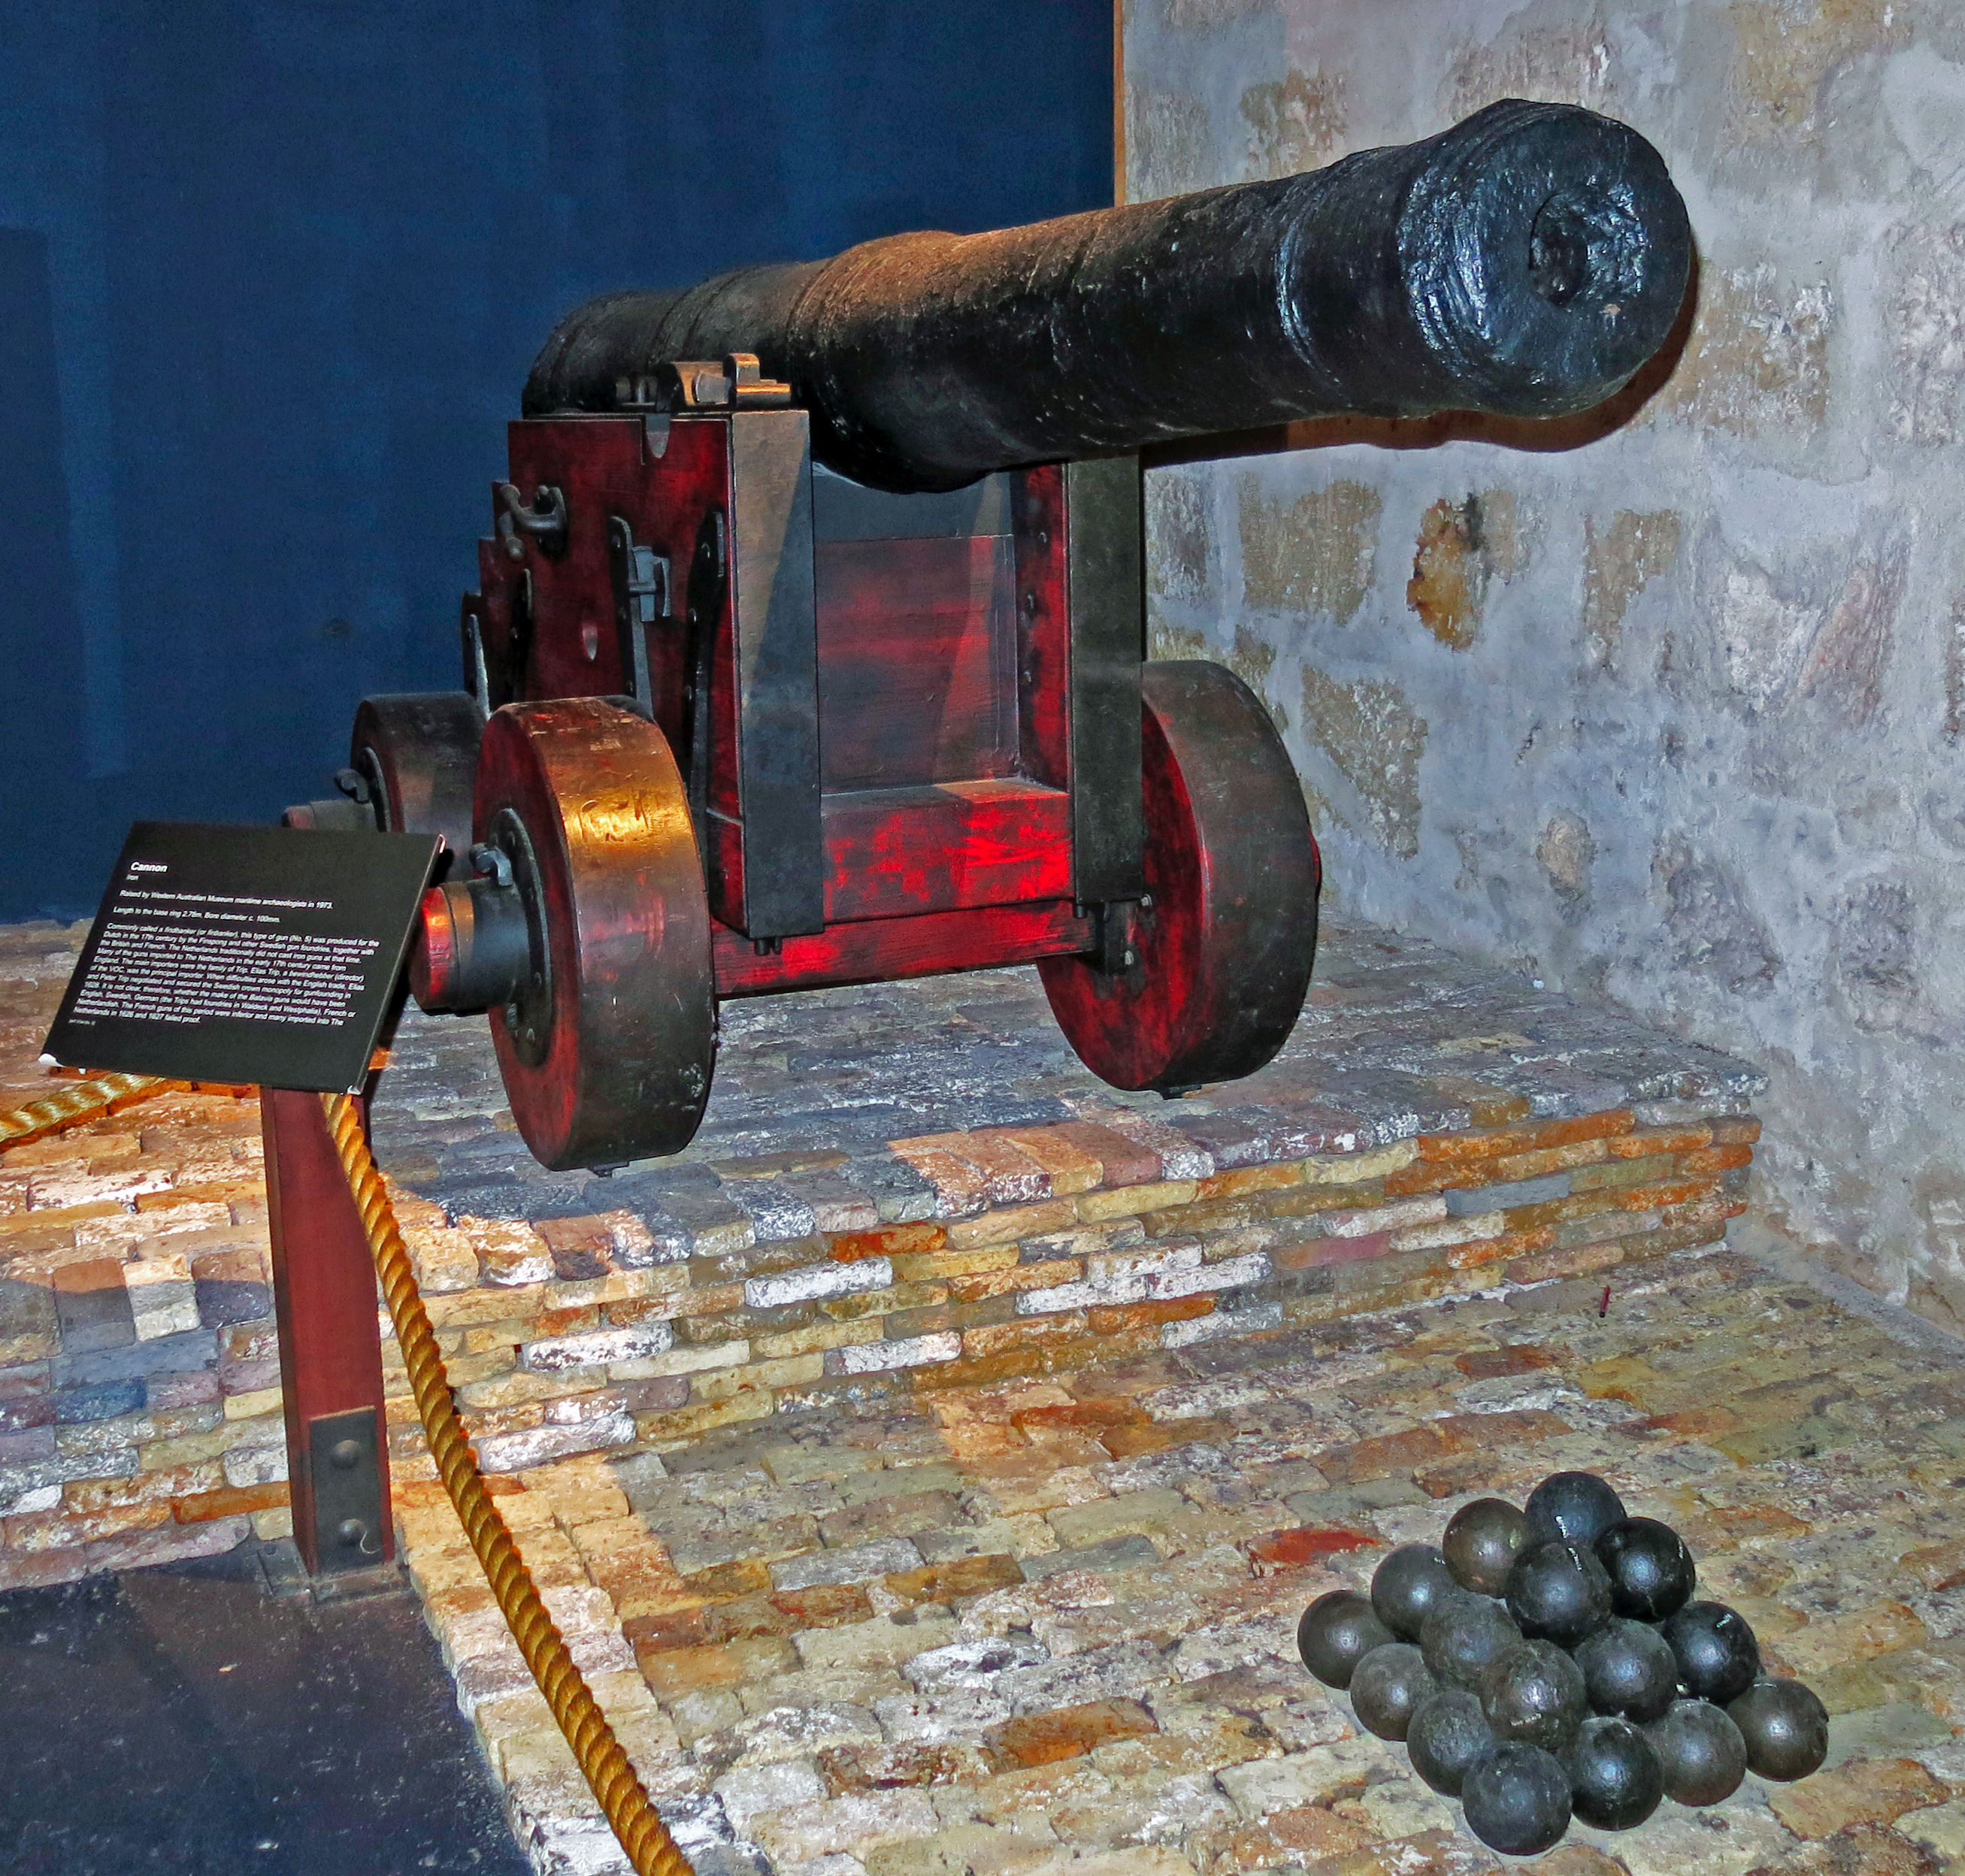
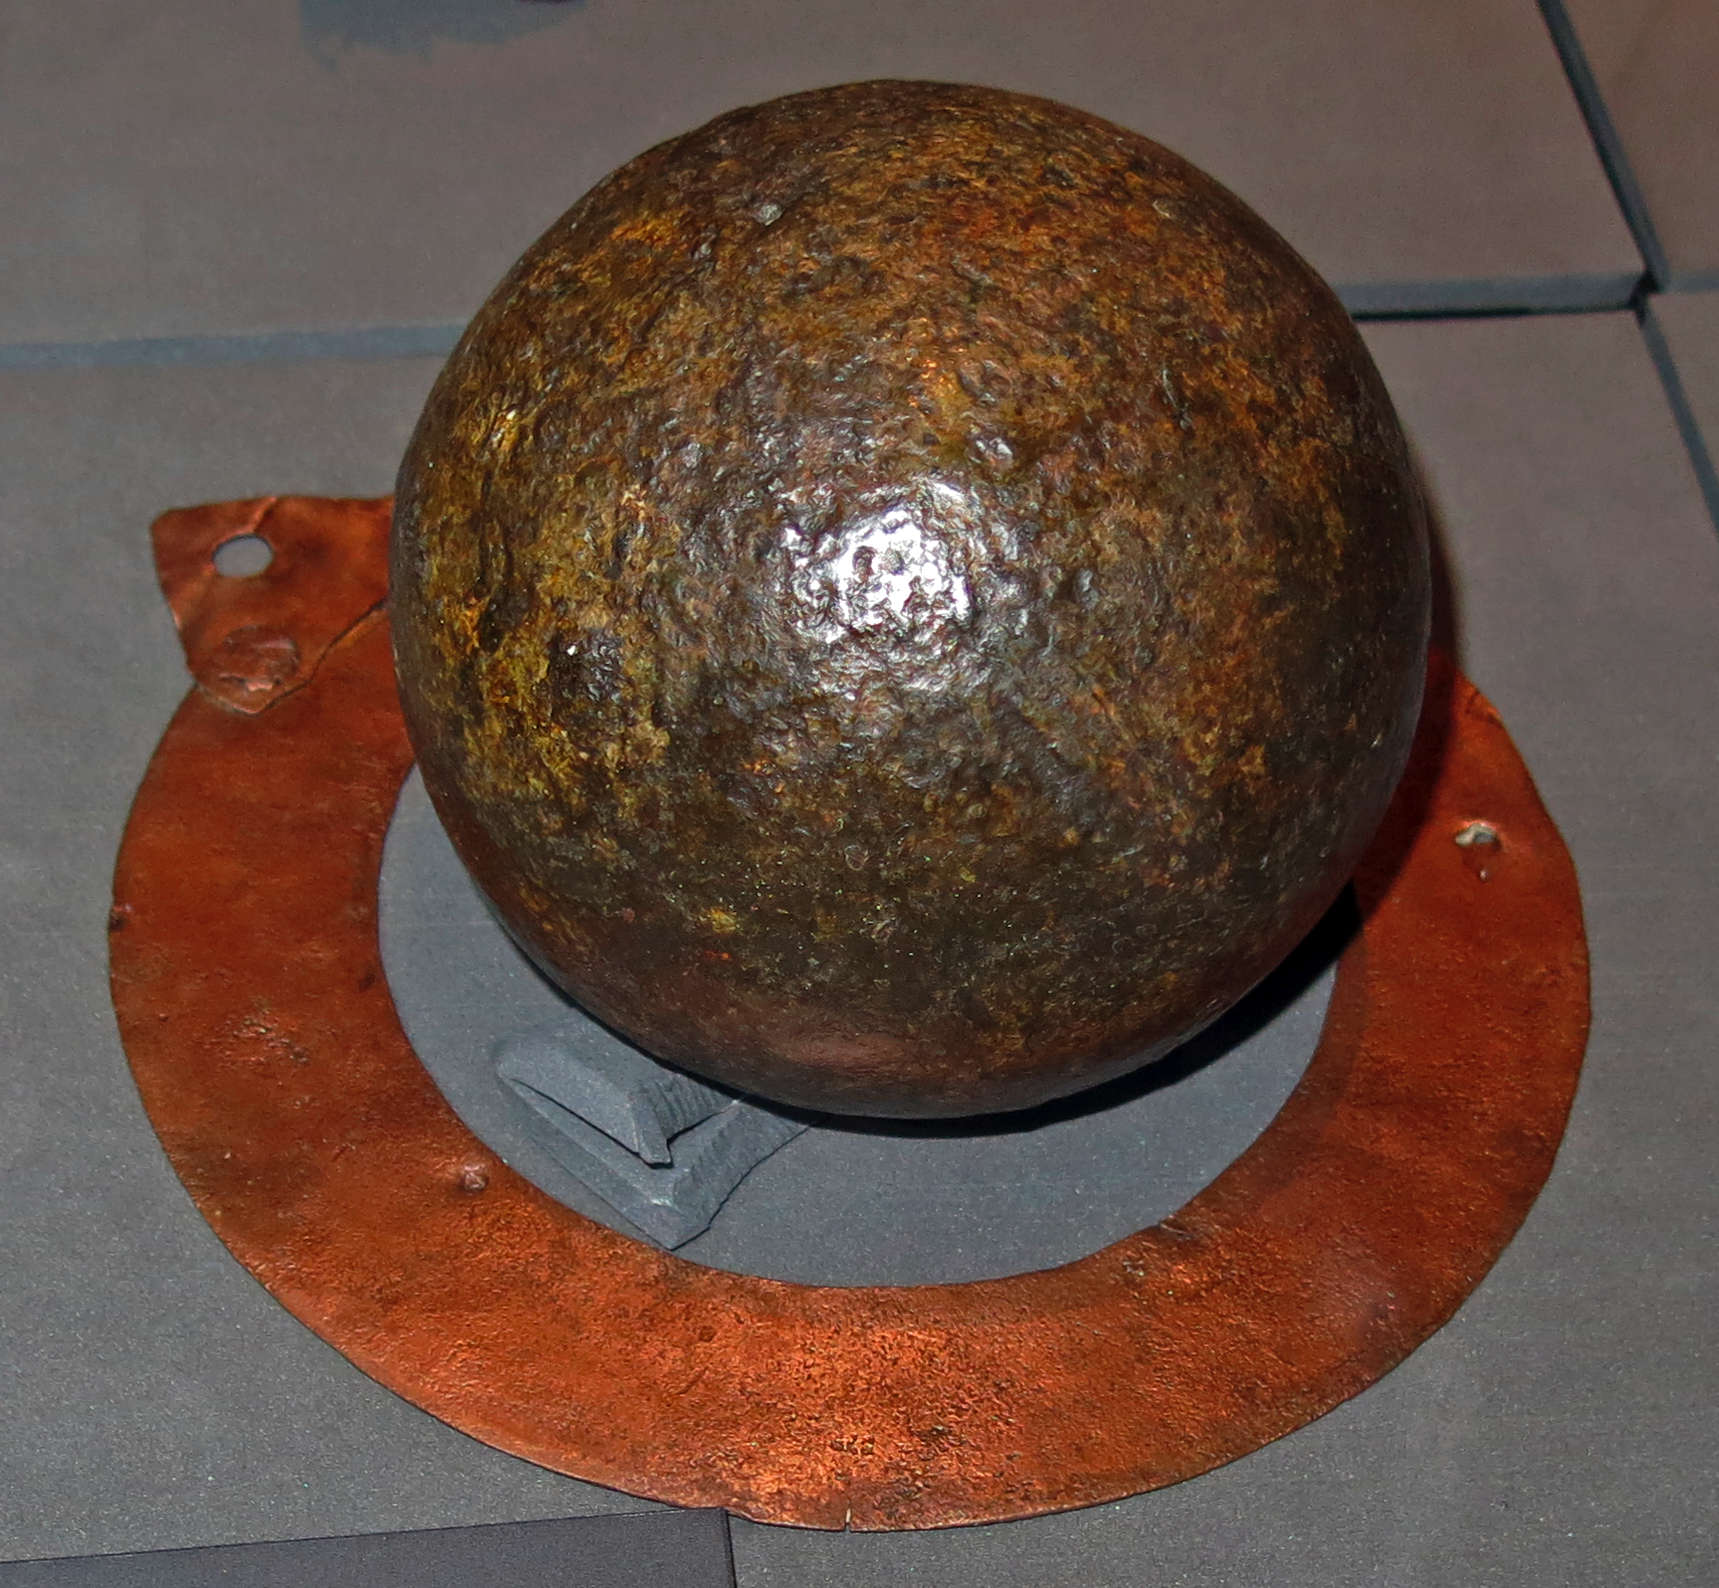
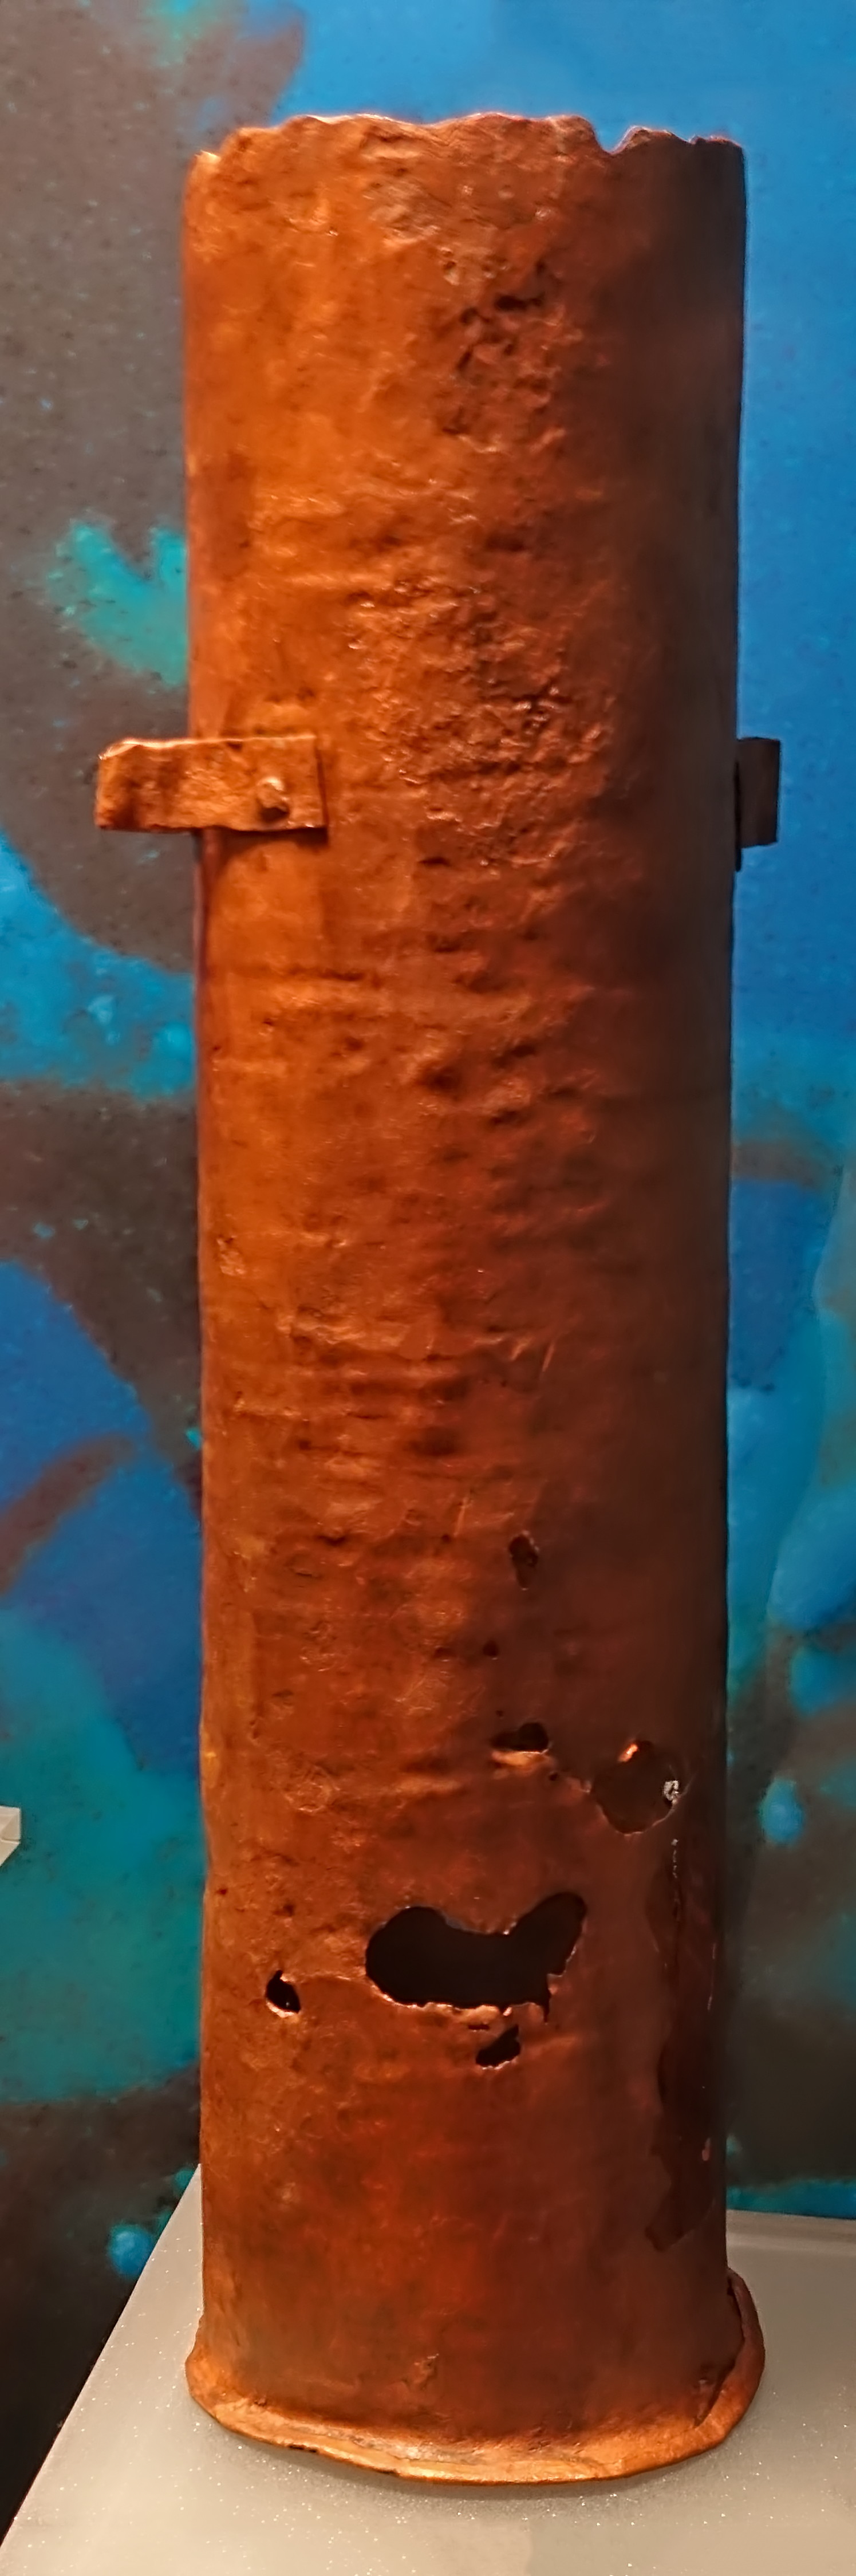
This No. 5 type iron cannon was raised by the Western Australian Museum maritime archaeologists in1973.
Length to the base ring 2.78m. Bore diameter ca 100 mm.
Commonly called a findbanker (or finbanker), this type of gun (No. 5) was produced for the Dutch in the 17th Century by the Finspong and other Swedish gun foundries, together with the British and the French. The Netherlands traditionally did not cast iron guns at that time.
Many of the guns imported to the Netherlands in the early 17th century came from England. The main importers were the family of Trip. Elias Trip, a bewindhebber (director) of the VOC, was the principal importer. When difficulties arose with the English trade, Elias and Peter Trip negotiated and secured the Swedish crown monopoly for gunfounding in 1628. It is not clear, therefore, whether the make of the Batavia guns would have been English, Swedish, German (the Trips had foundries in Waldeck and Westphalia), French or Dutch. The French guns of this period were inferior and many imported into the Netherlands in 1626 and 1627 failed when tested.
Photo: Don Hitchcock October 2014
Source and text: The Shipwreck Galleries, Western Australia Museum, Fremantle, Western Australia
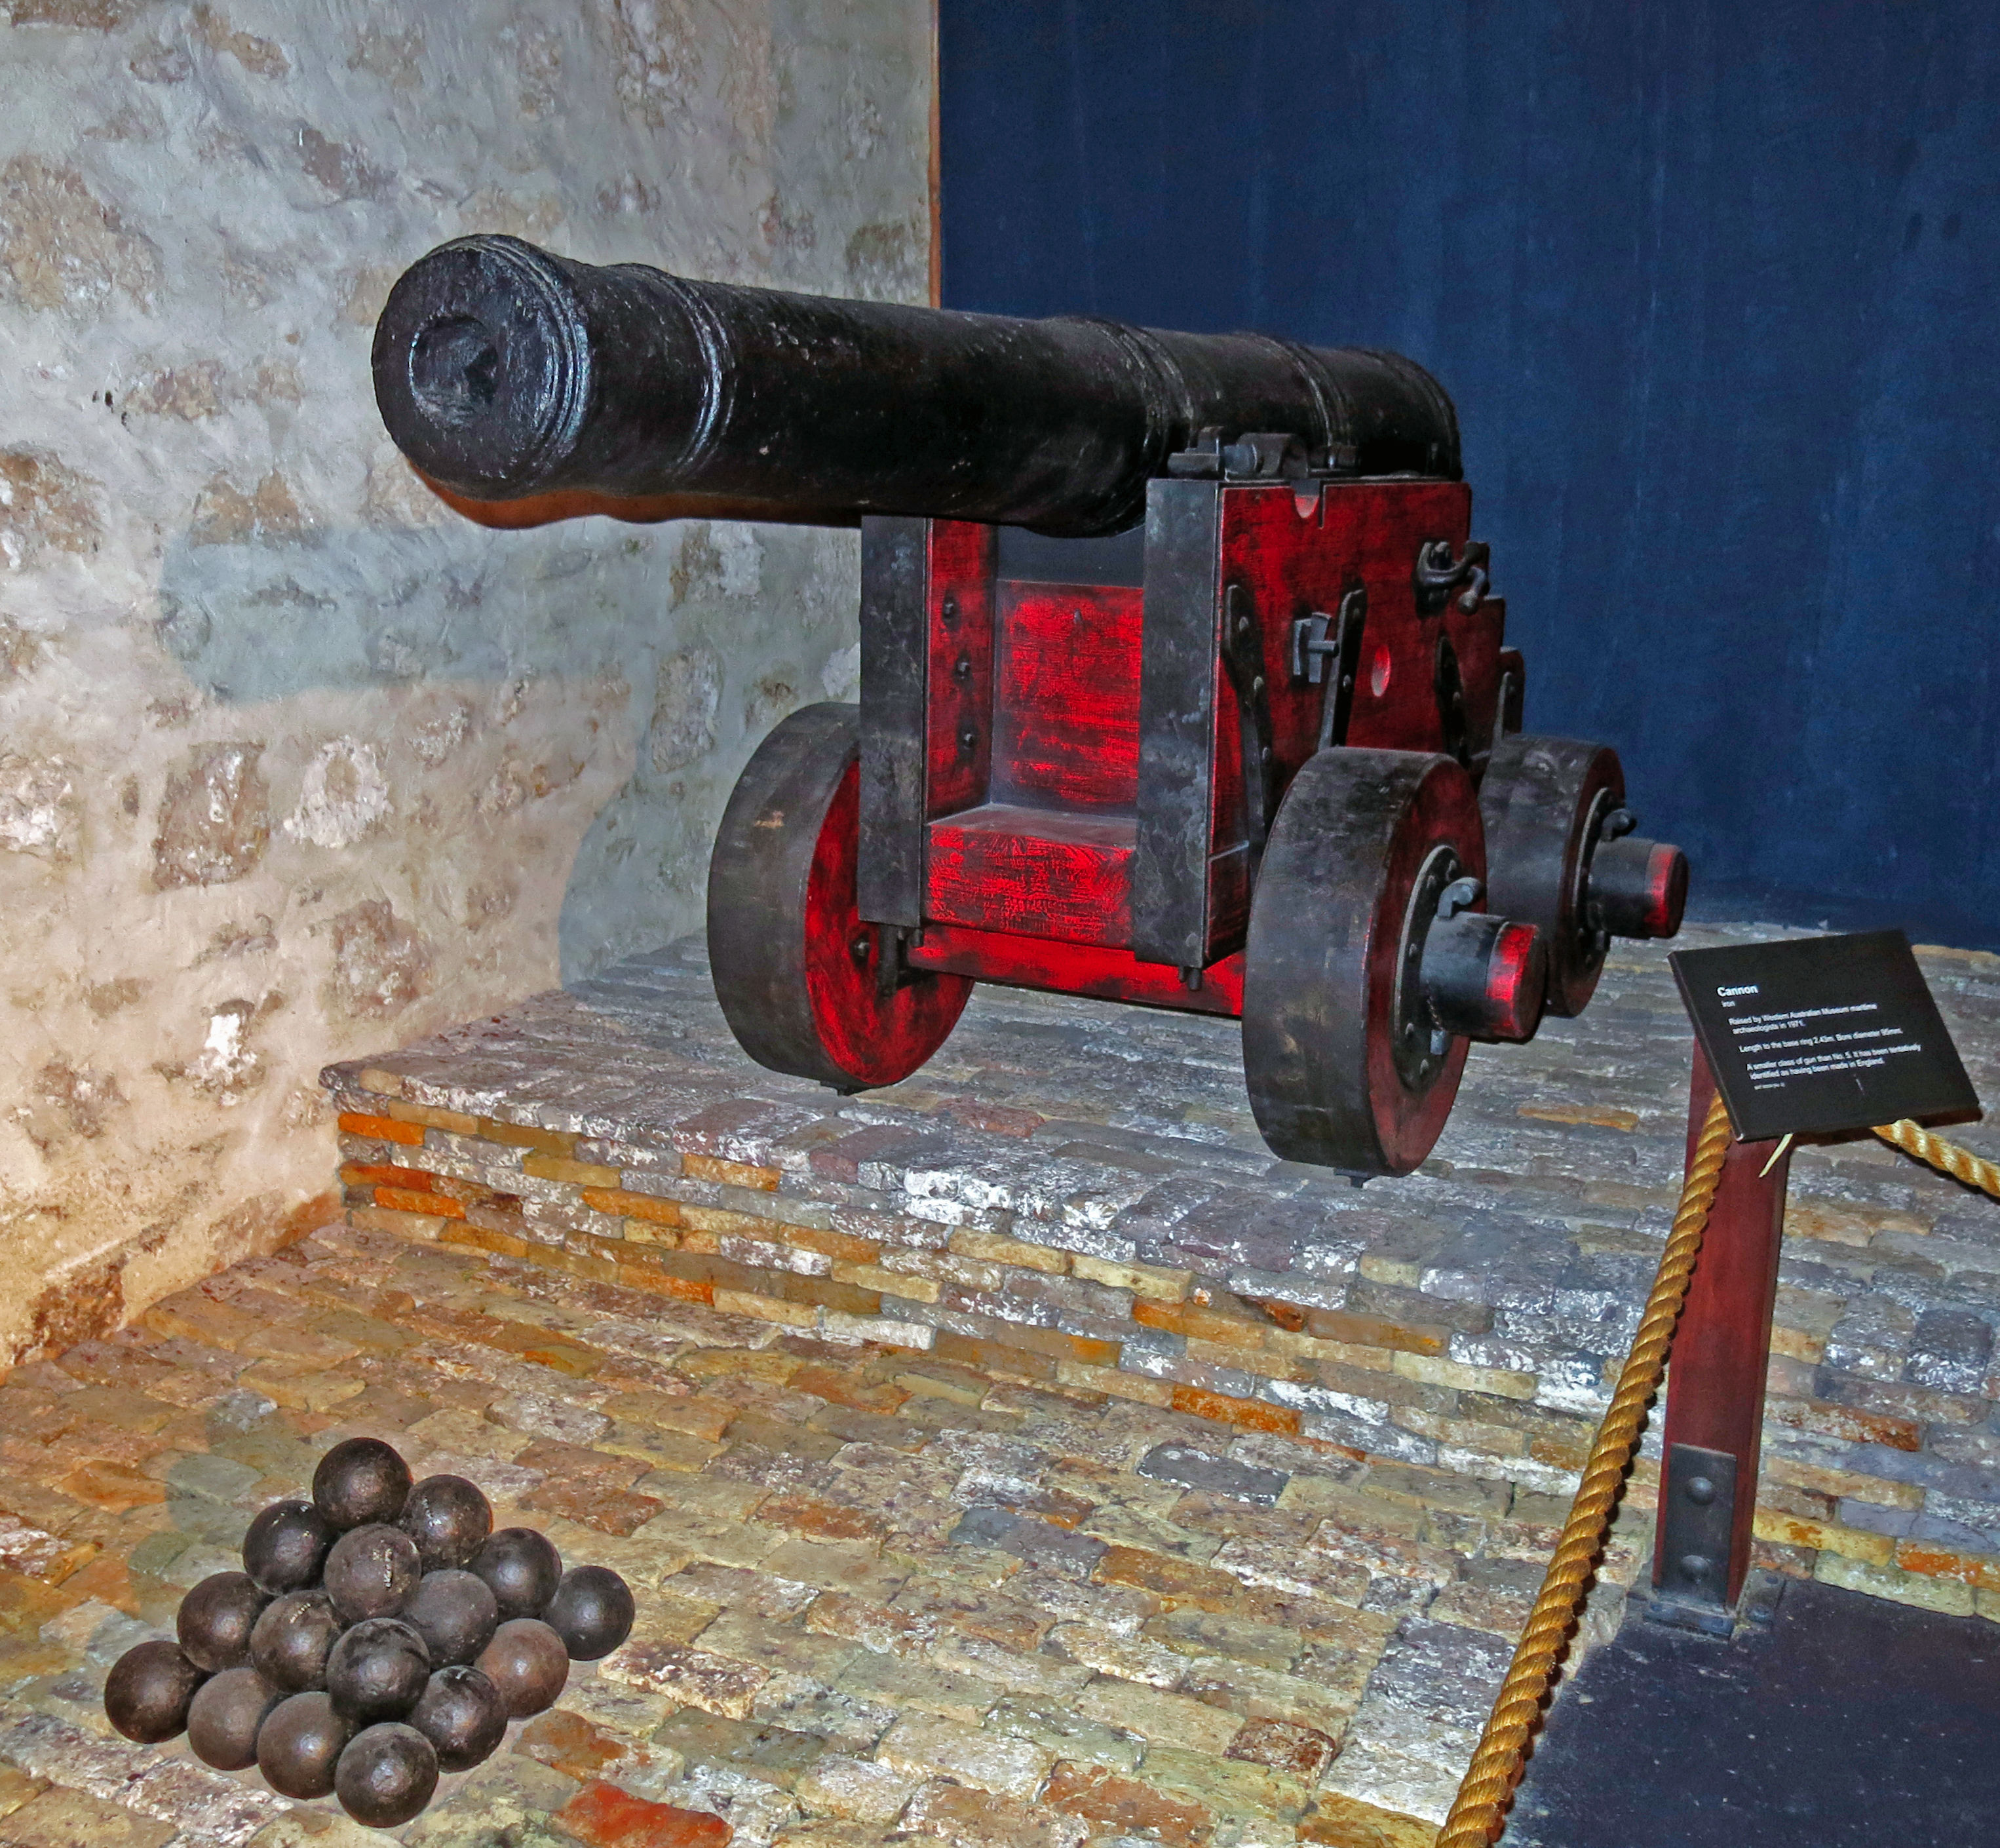
This iron cannon was raised by the Western Australian Museum maritime archaeologists in1971.
Length to the base ring 2.43m. Bore diameter 95 mm.
A smaller class of gun than No 5. It has been tentatively identified as having been made in England.
Photo: Don Hitchcock October 2014
Source and text: The Shipwreck Galleries, Western Australia Museum, Fremantle, Western Australia
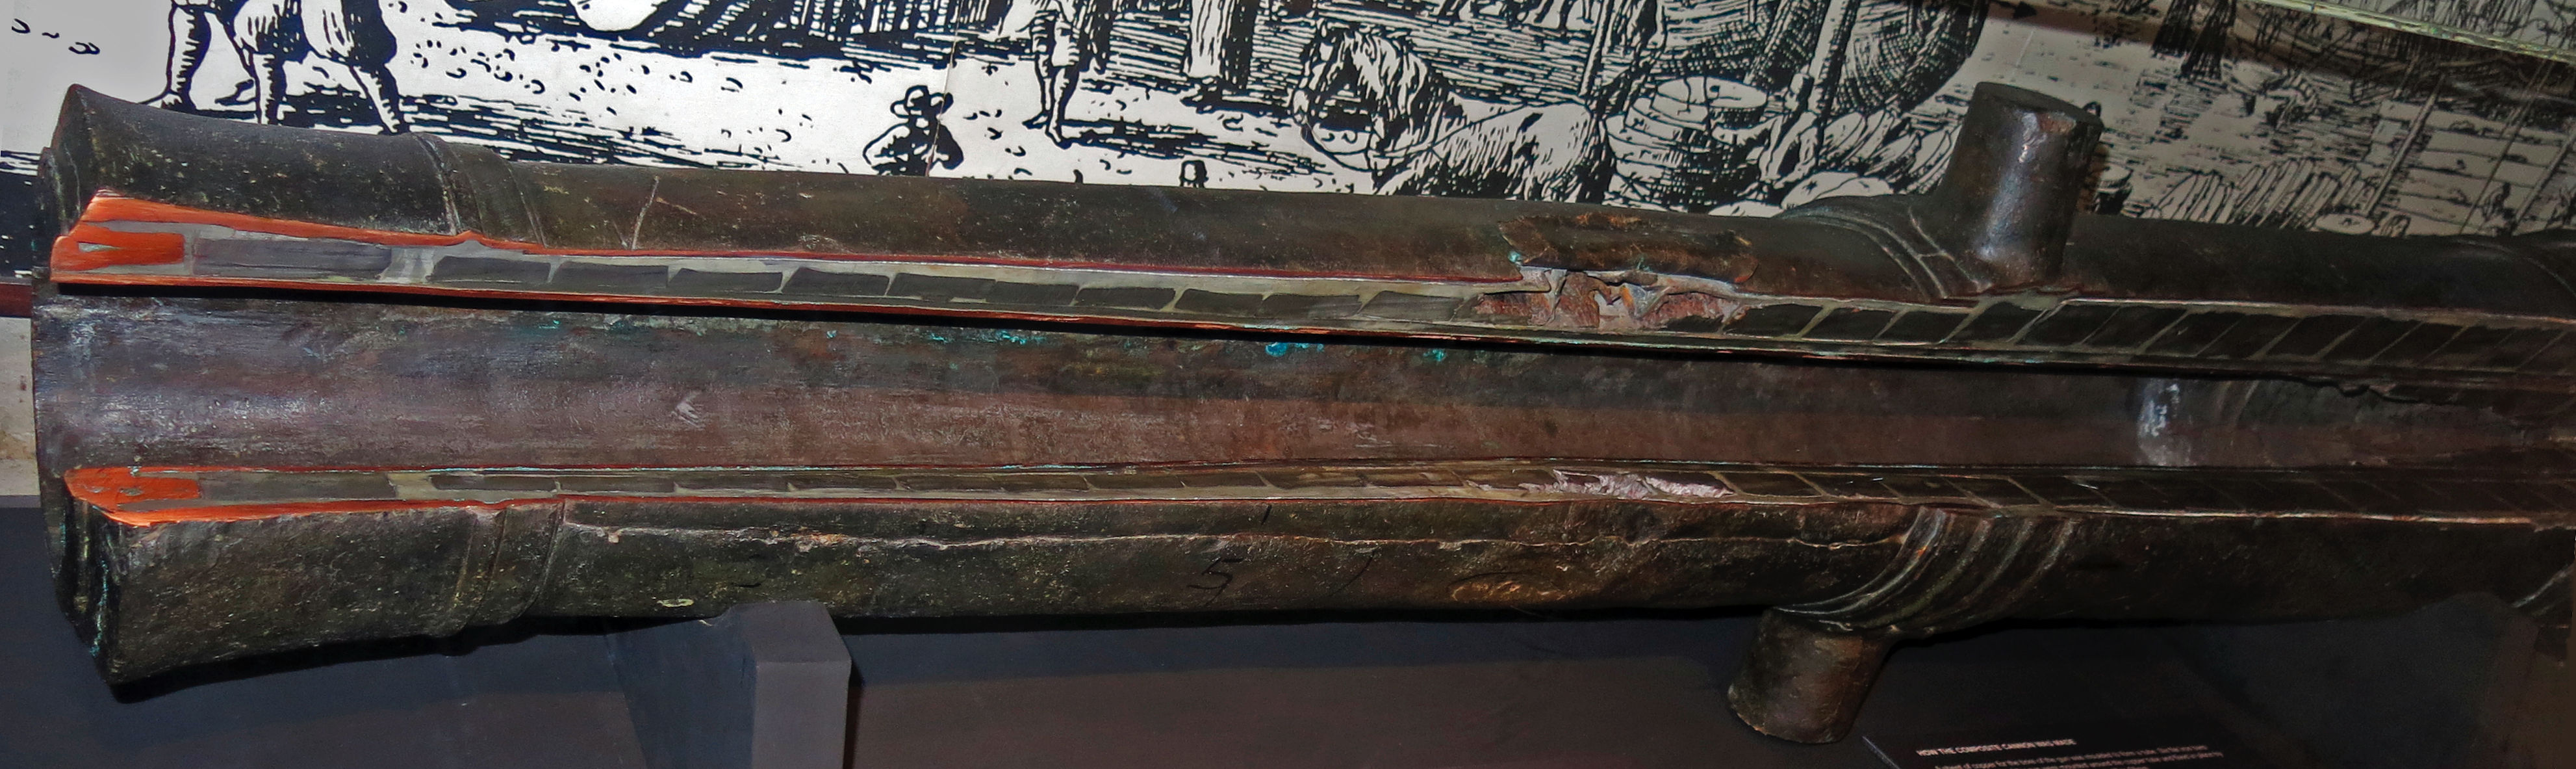
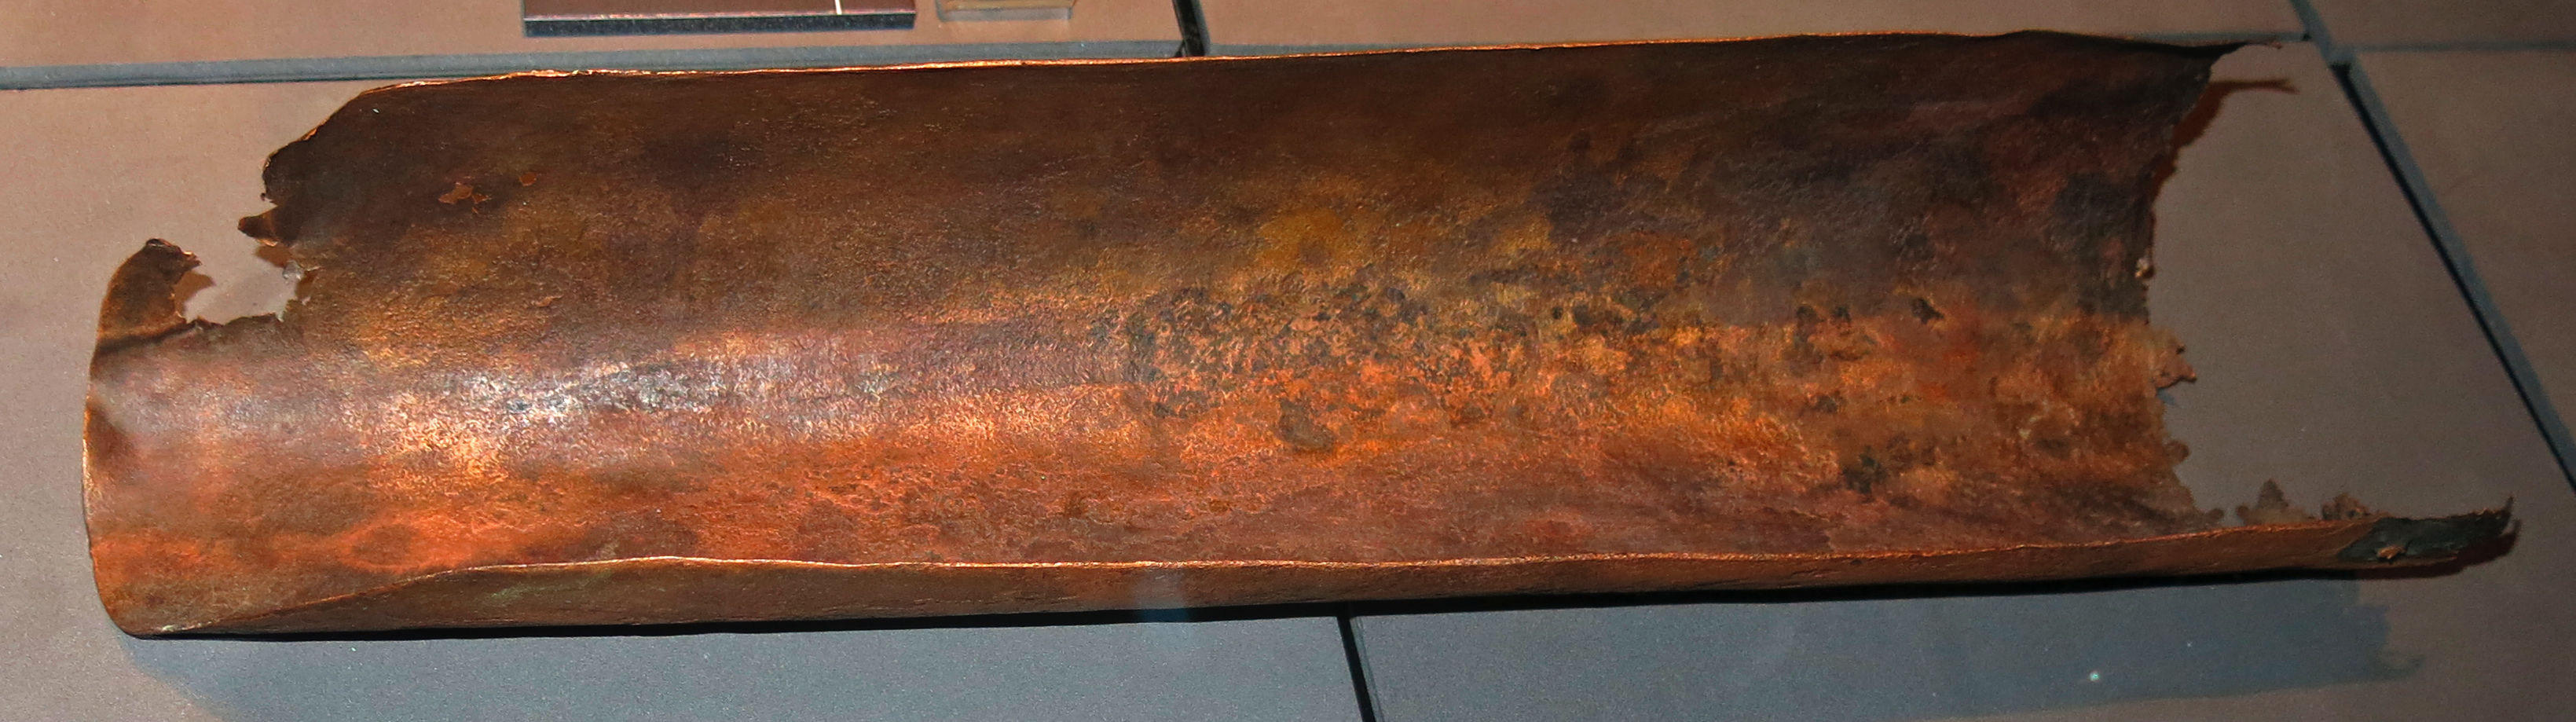
An experiment in gun founding - a composite cannon from the Batavia, 1629
Photo: Don Hitchcock October 2014
Source and text: The Shipwreck Galleries, Western Australia Museum, Fremantle, Western Australia

The Batavia carried 30 cannon: 22 of iron, six of bronze and two of composite construction, one of which is shown here. Composite guns were experimental. They attempted to combine the reliability of bronze with the cheapness of iron to give a much lighter gun. These guns were only one third the weight of a bronze gun of the same calibre. However, composite guns were not strong enough to fire cannon balls and were therefore used for firing anti-personnel shot such as wired musket balls, nails and stones.
Photo: Don Hitchcock October 2014
Source and text: The Shipwreck Galleries, Western Australia Museum, Fremantle, Western Australia
Markings on the cannon show that it was owned by the Amsterdam Chamber of the VOC and weighed 1715 Amsterdam pounds, about 850 kg. It was raised from the wreck of the Batavia by the Western Australian Museum in 1973. The cannon was damaged when the ship foundered. A small hole revealed an unusual internal structure. It was decided to cut out a long section which could be studied then replaced.
How the composite cannon was made
A sheet of copper for the bore of the gun was moulded to form a tube. Six flat iron bars running the length of the gun were mounted around the copper tube and fixed in place by 30 wrought iron bands ranging in thickness from 16 to 56 mm.
The gunpowder chamber in the breech was formed separately, strengthened with additional iron bands and held in place by hammering over the ends of the long iron bars. The trunnions (projections on each side which supported the gun on its wooden carriage) were then attached and iron pins mounted around them. Copper sheathing was then fitted to the outside of the whole gun forming an ornamental casing.
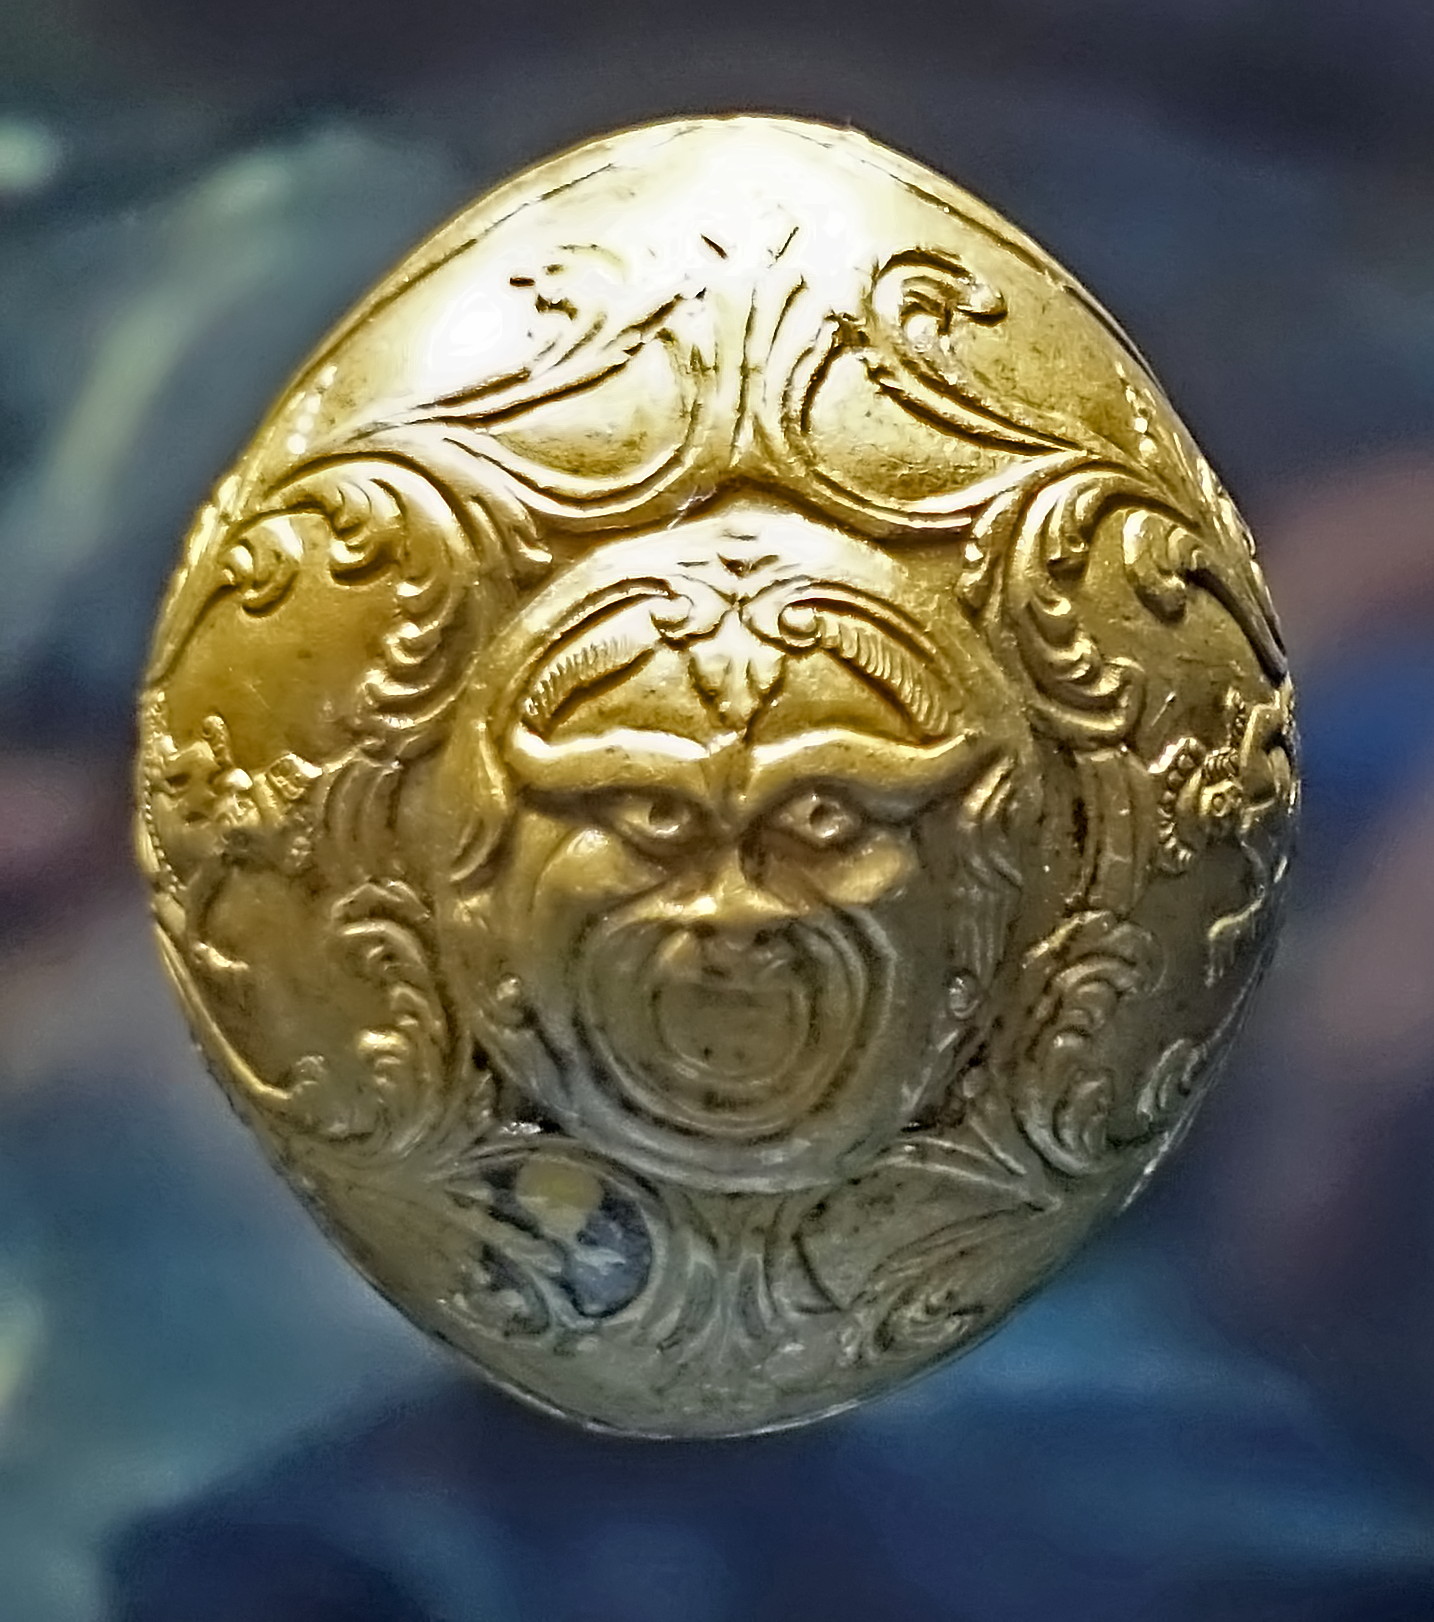
At this stage, the gun was covered in clay, upended and heated. Molten lead solder was then poured into the top until all the spaces between the different metals were filled. A copper disc was then soldered onto the end and the bronze cascabel (the knob at the end) screwed into place with an iron screw. This has since corroded away on the example shown here.
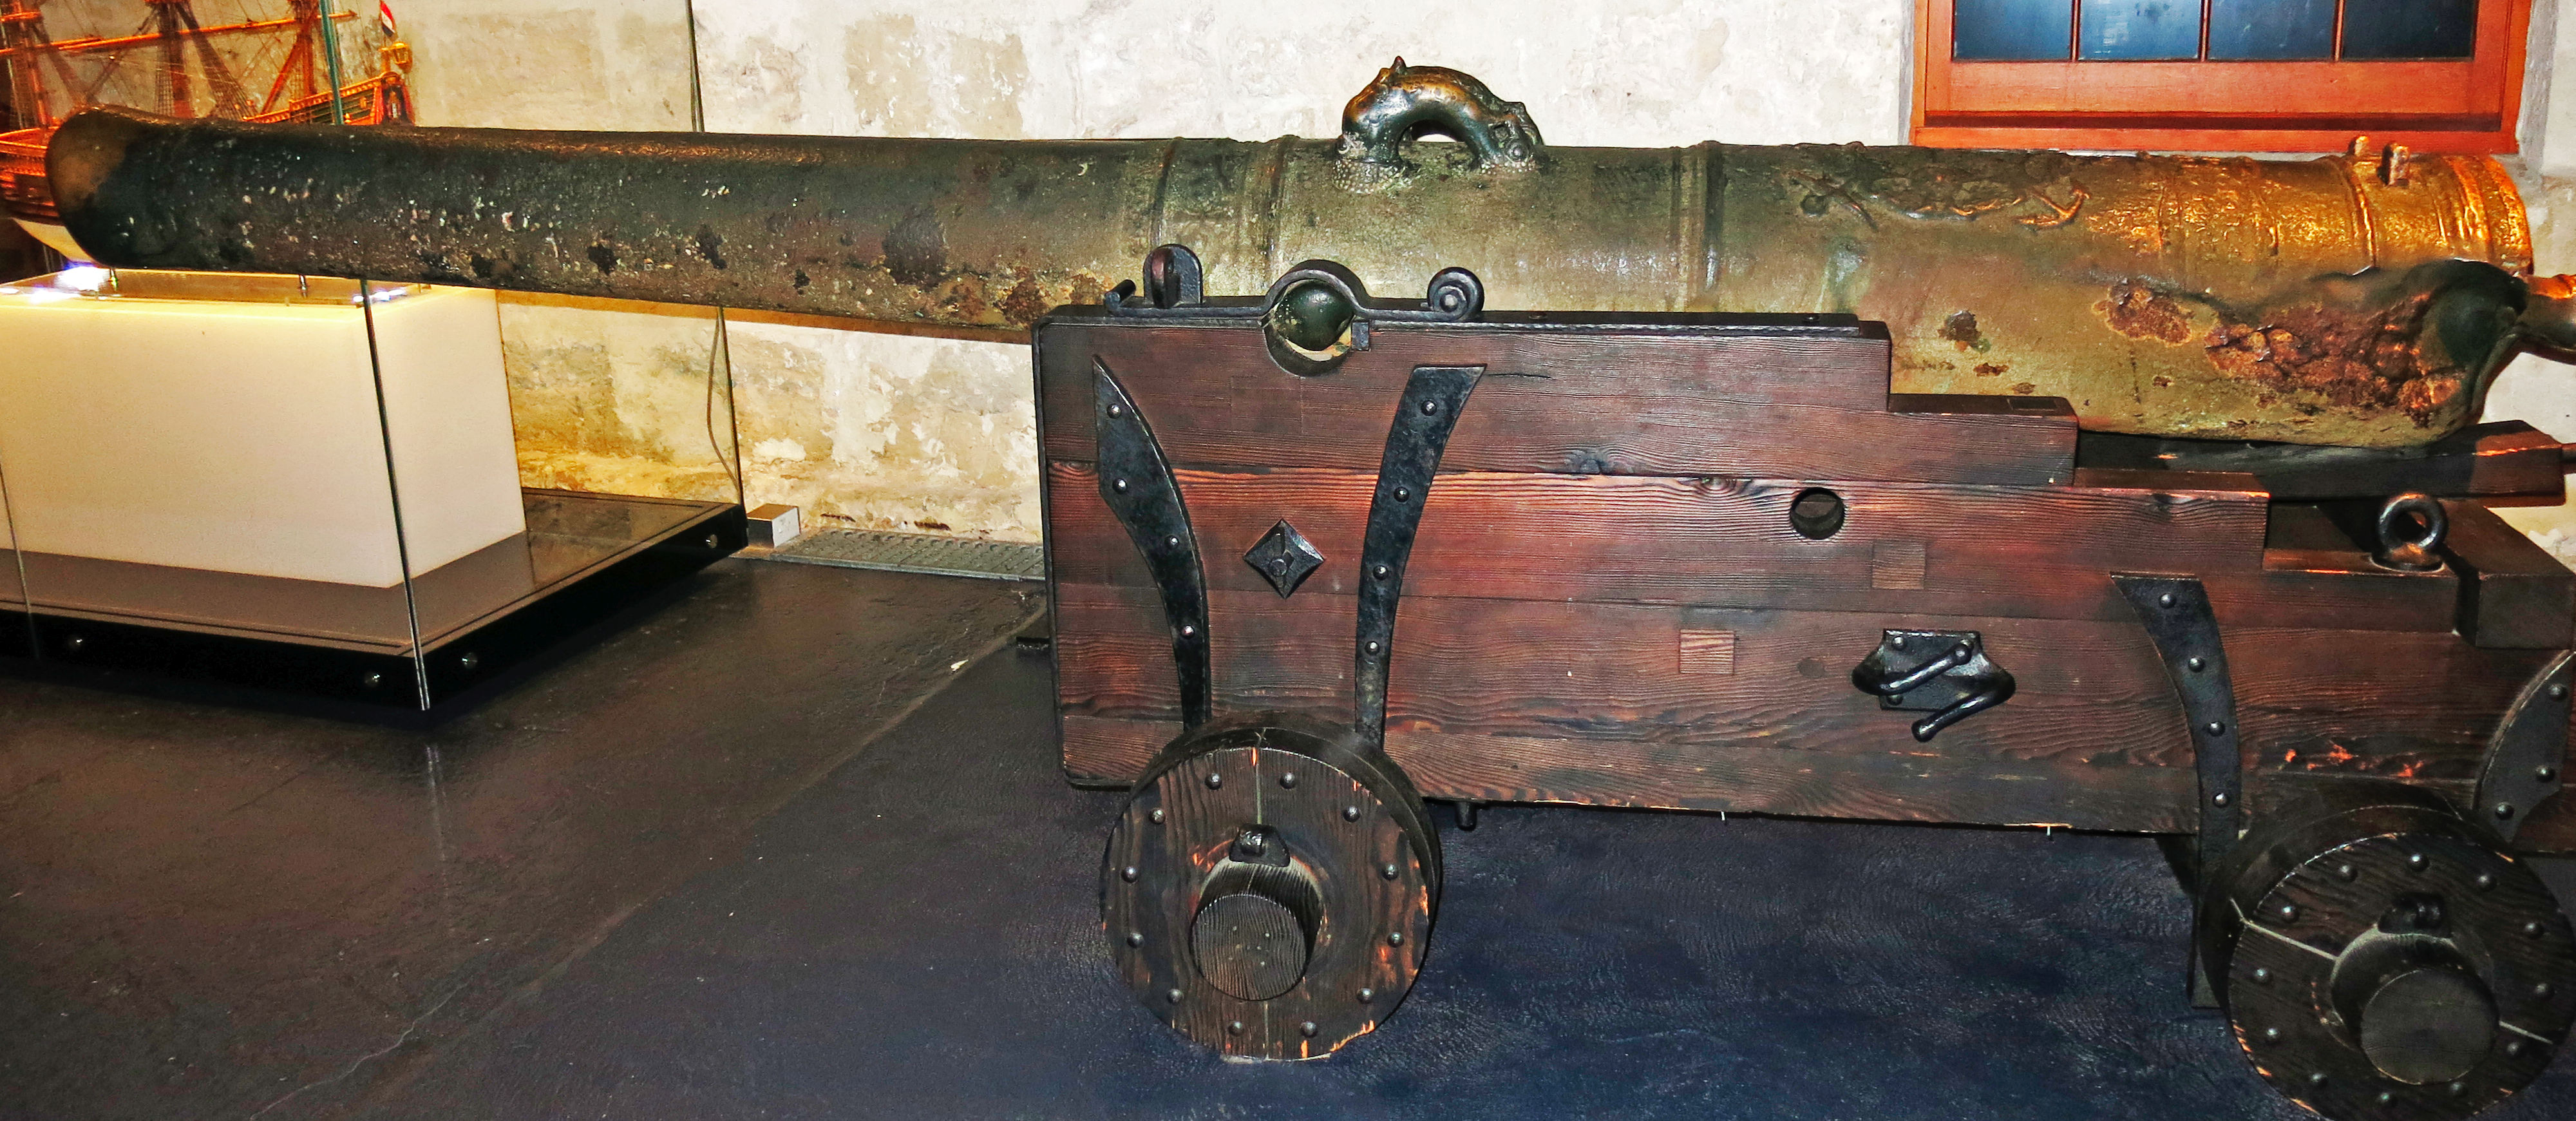
Bronze cannon, length 3525 mm, bore 120 mm
Dutch East Indiamen were armed in order to defend and maintain the power of the VOC on Indian Ocean trade routes.
Photo: Don Hitchcock October 2014
Source and text: The Shipwreck Galleries, Western Australia Museum, Fremantle, Western Australia
This is the longest of five bronze guns recovered from the wreck, raised by the Royal Australian Navy in 1963. Three guns are located at Geraldton and one at the HMAS Stirling naval base, Garden Island, Western Australia. The coat of arms of the Admiralty of Rotterdam, and the date of casting, 1603 or 1605, are visible at the breech end. The gun was constructed by Conraet Antonisz. There is no evidence of a VOC stamp or the weight although the latter may have been worn away.
Source and text: The Shipwreck Galleries, Western Australia Museum, Fremantle, Western Australia
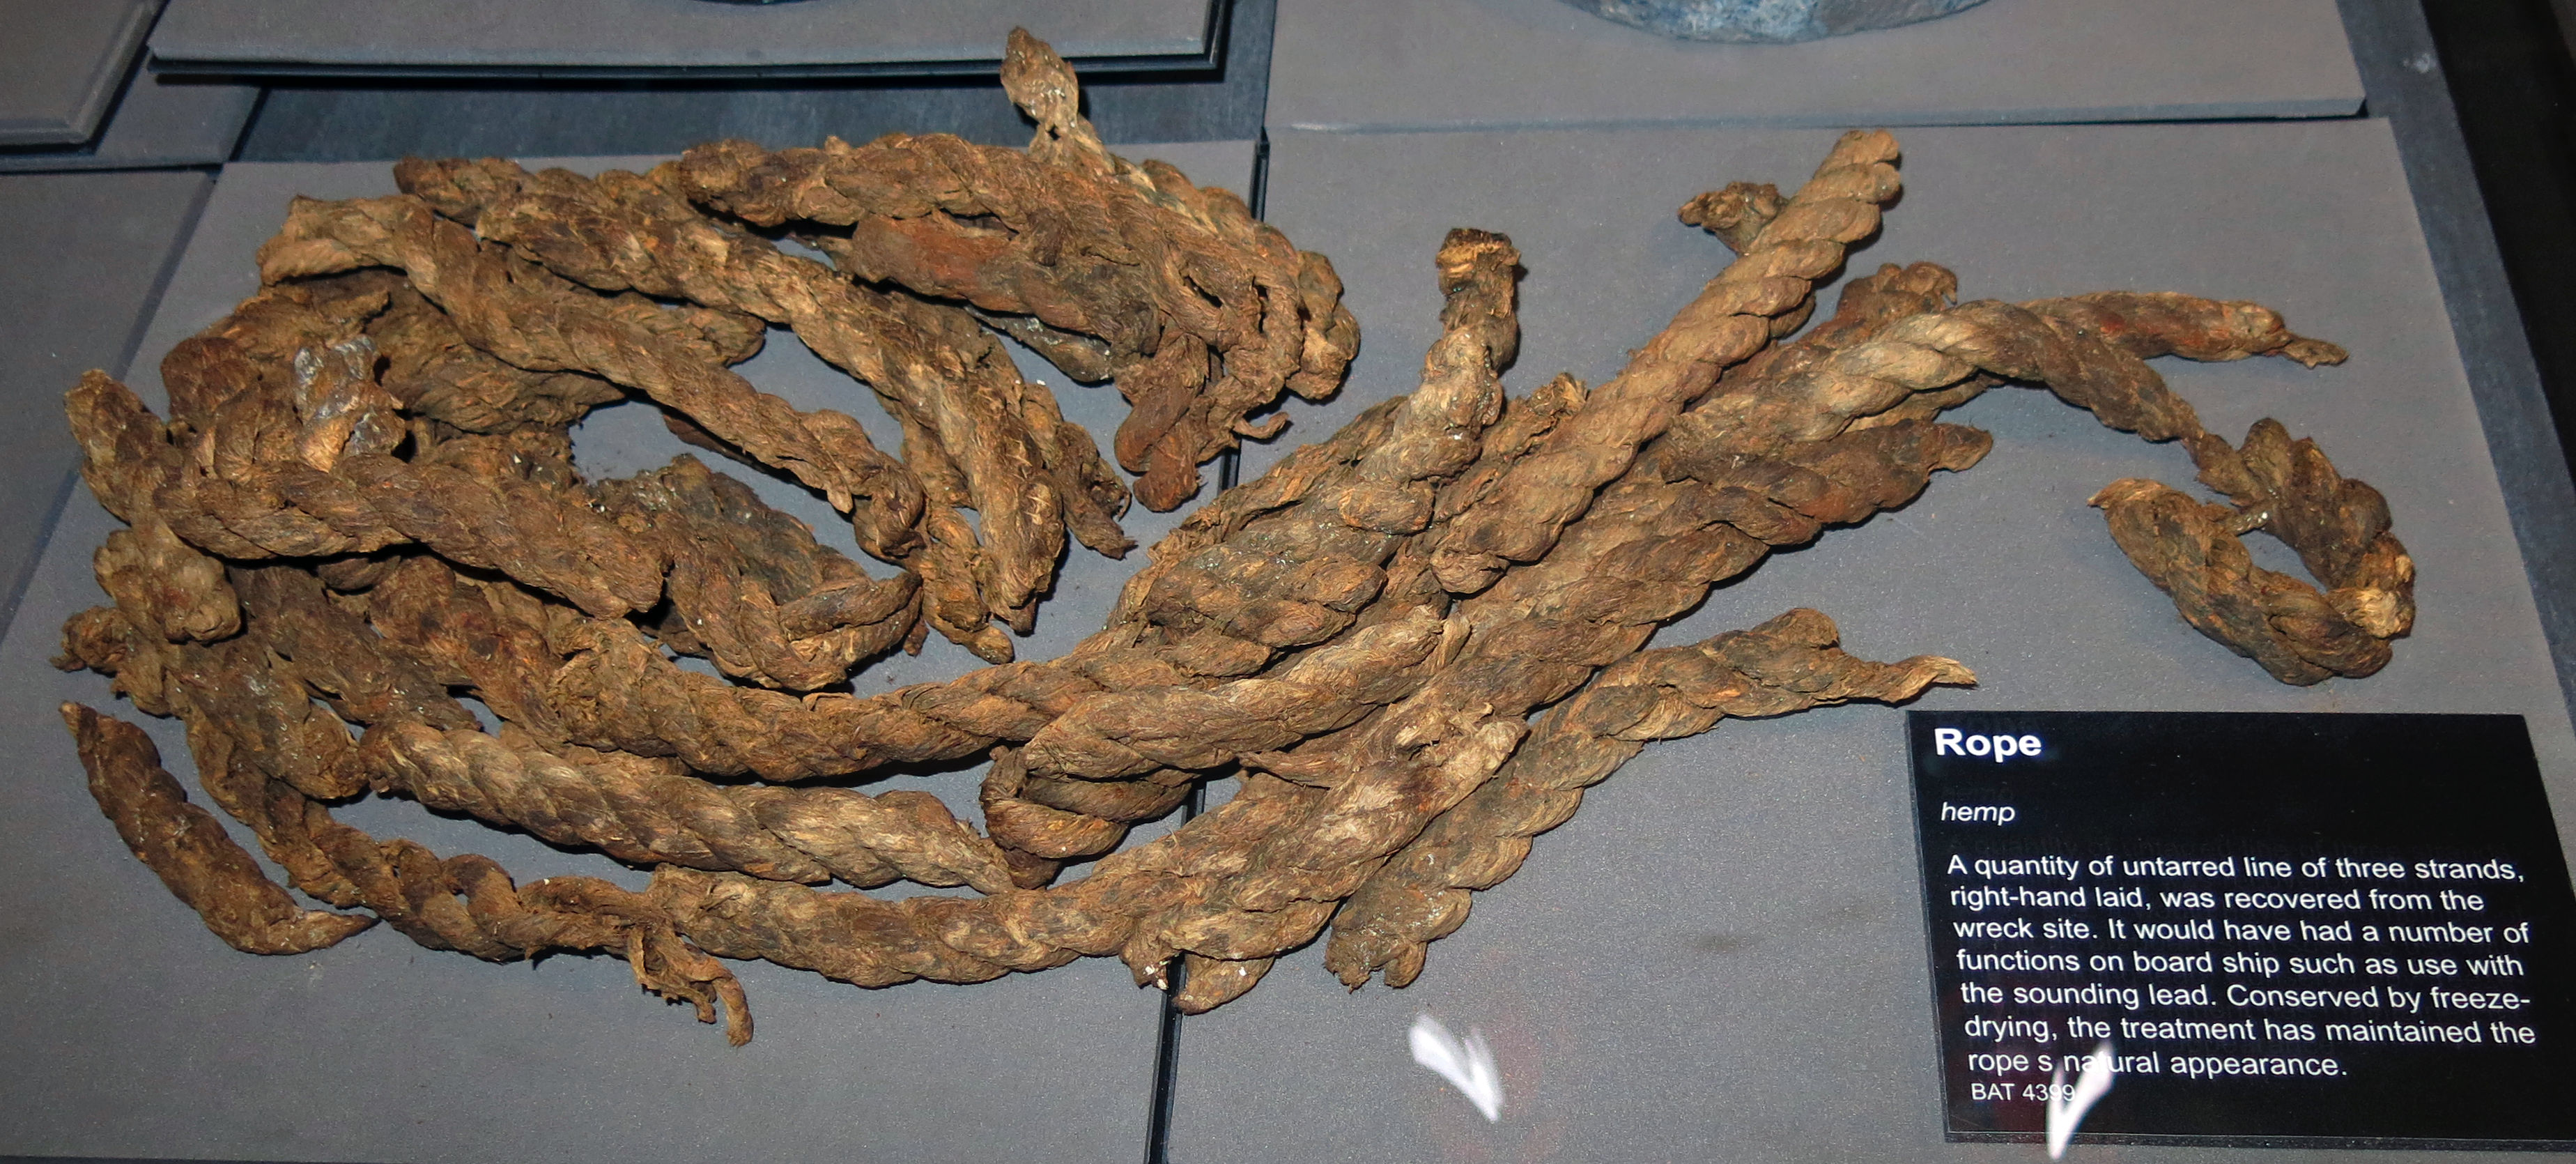
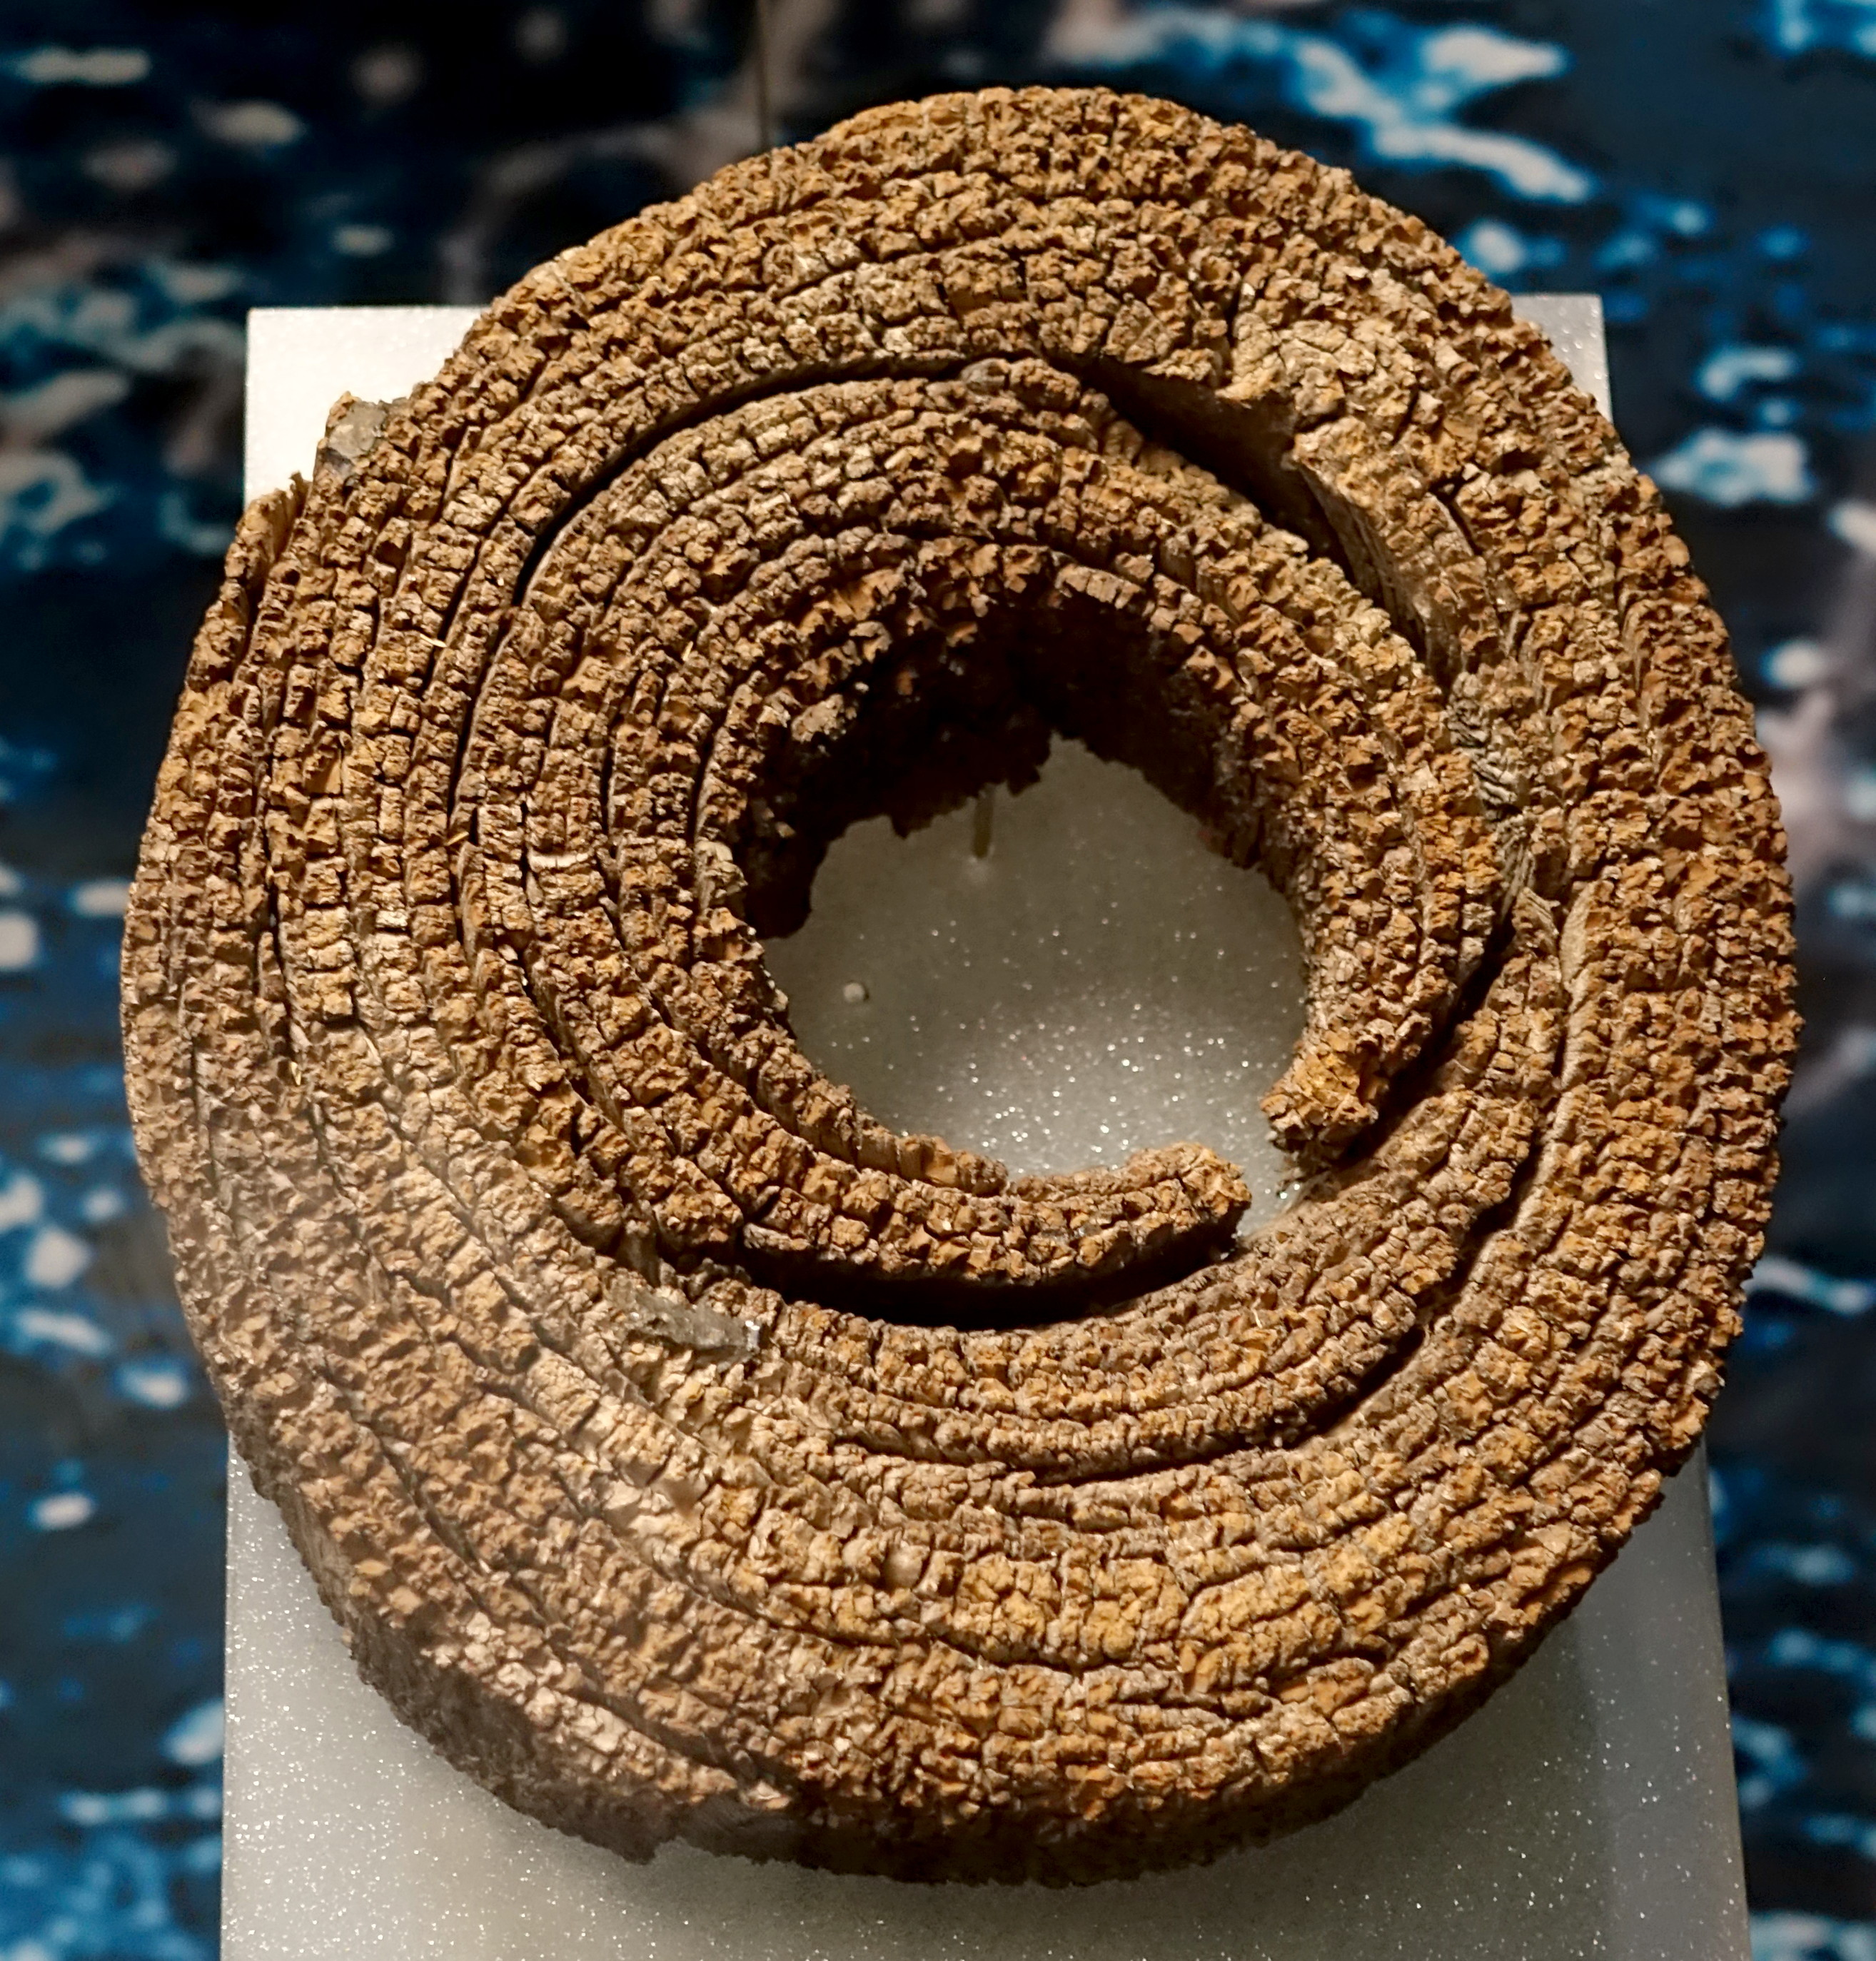
This hemp rope is an untarred line of three strands, right hand laid, and was recovered from the wreck site. It would have had a number of functions on board ship, such as use with the sounding lead.
Conserved by freeze-drying, the treatment has maintained the rope's natural appearance.
Photo: Don Hitchcock October 2014
Source and text: The Shipwreck Galleries, Western Australia Museum, Fremantle, Western Australia
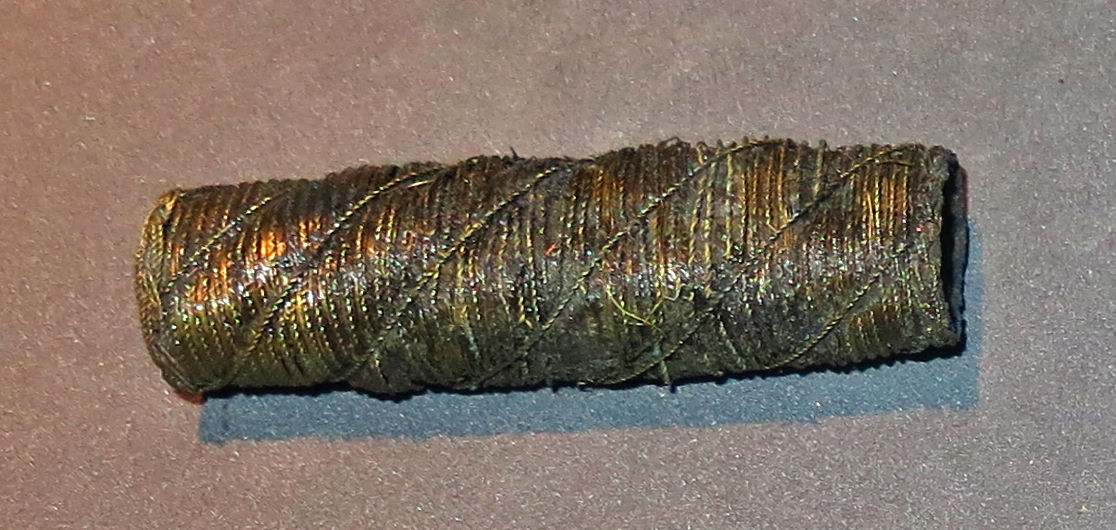
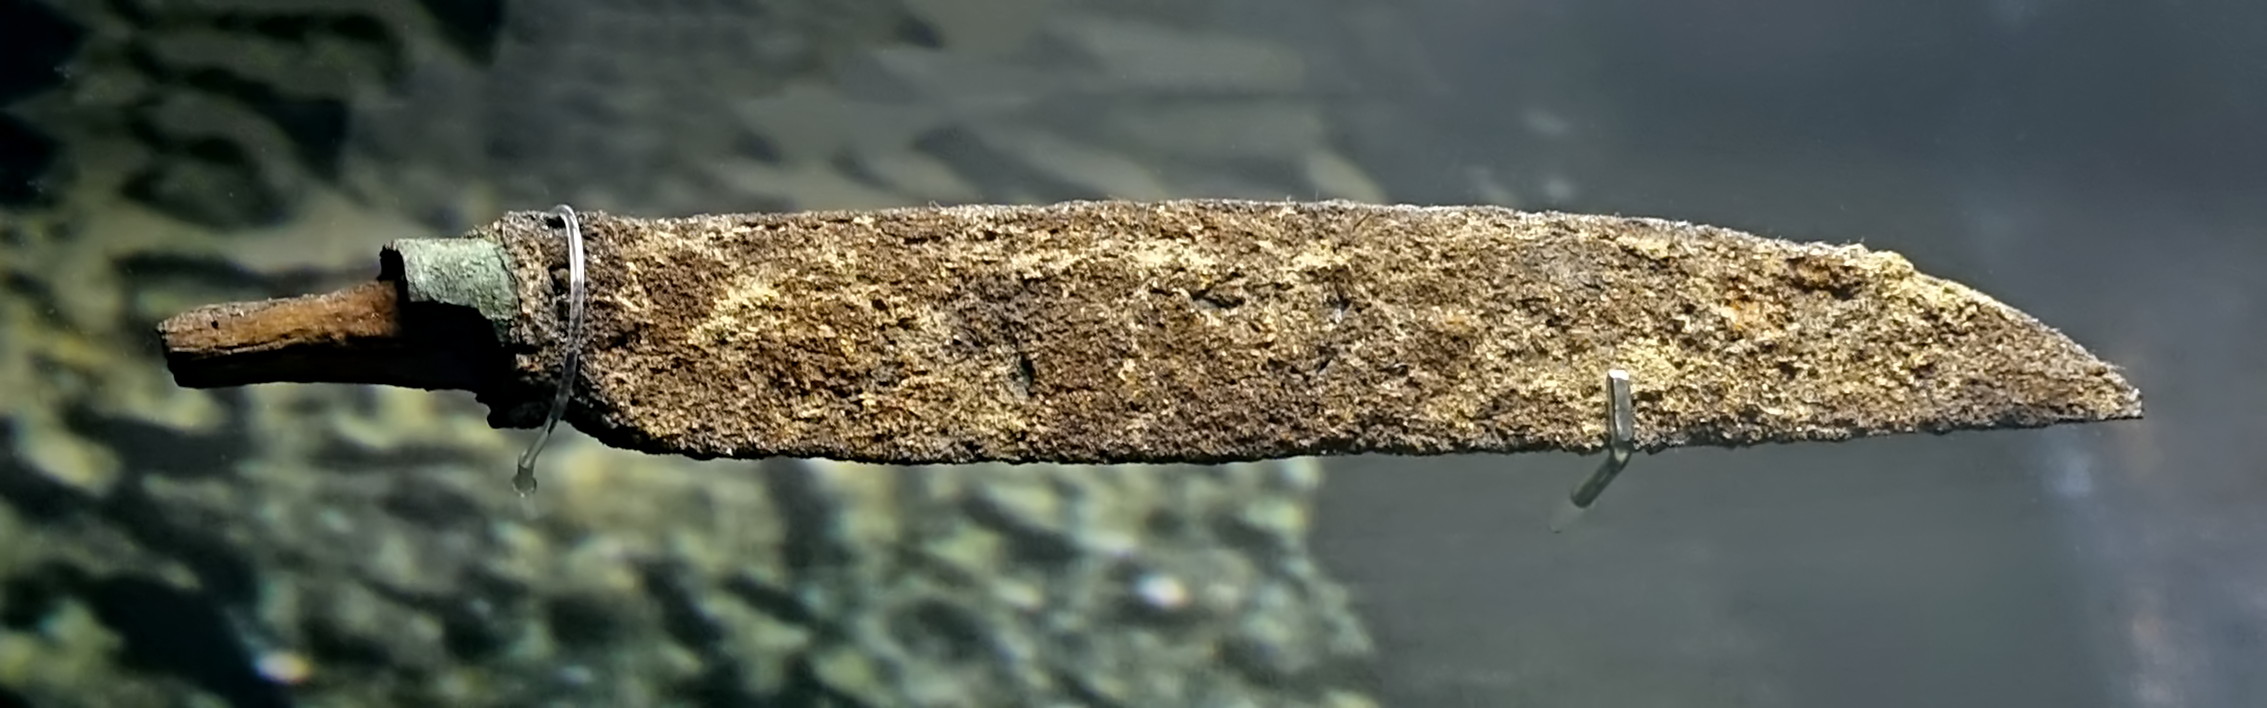
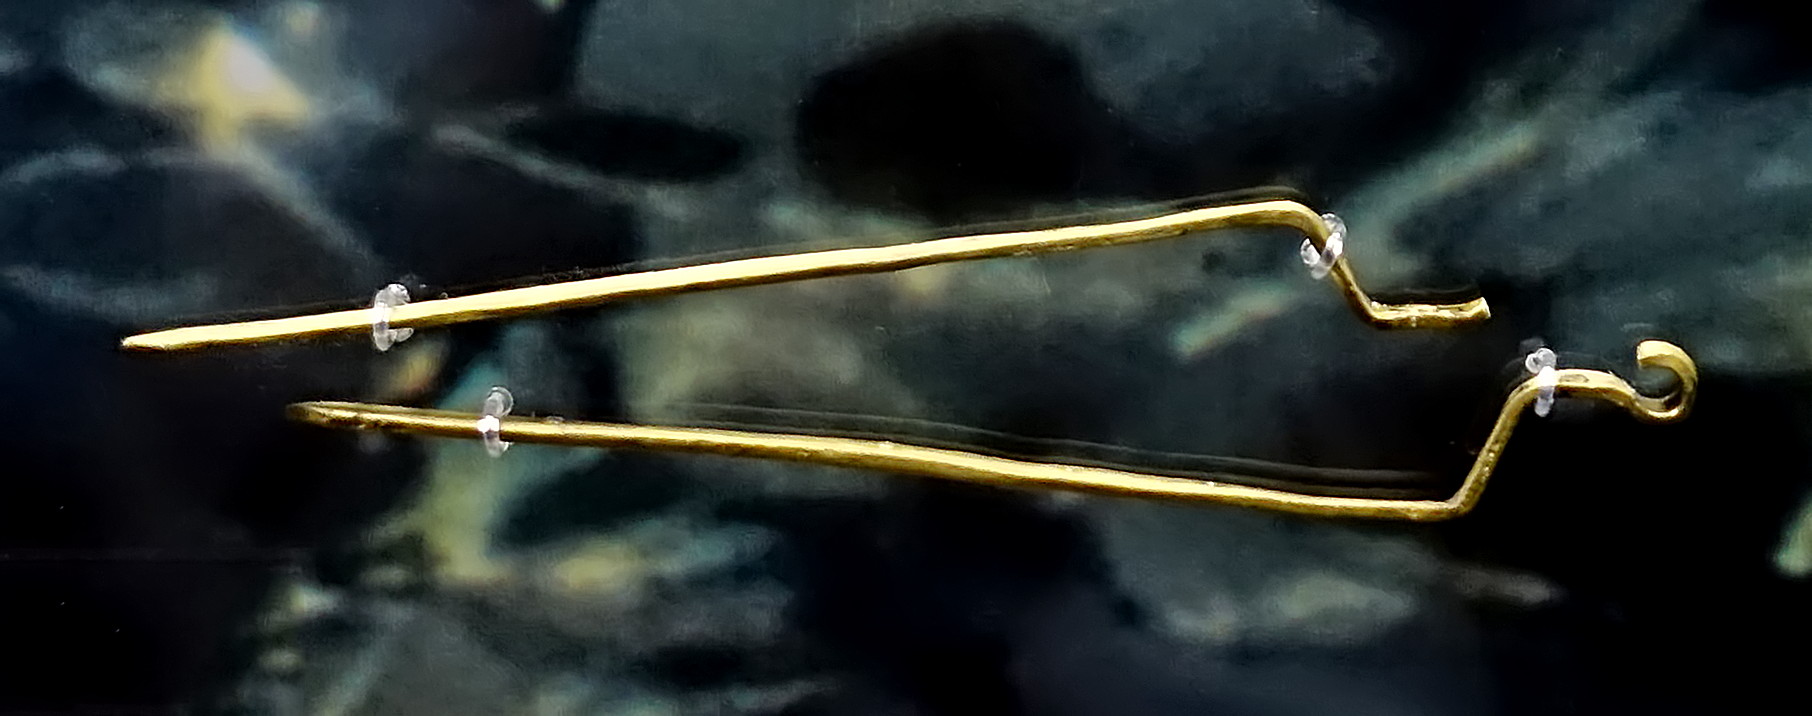
Handle of a Sword or Sabre.
Made of brass wire whipped on a wooden handle, this is possibly from a backsword - a thrusting weapon with a long, straight blade, or a sabre - a curved sword with one cutting edge. This is one of the few items found on the wreck site that can be associated with cutting weapons.
Photo: Don Hitchcock October 2014
Source and text: The Shipwreck Galleries, Western Australia Museum, Fremantle, Western Australia
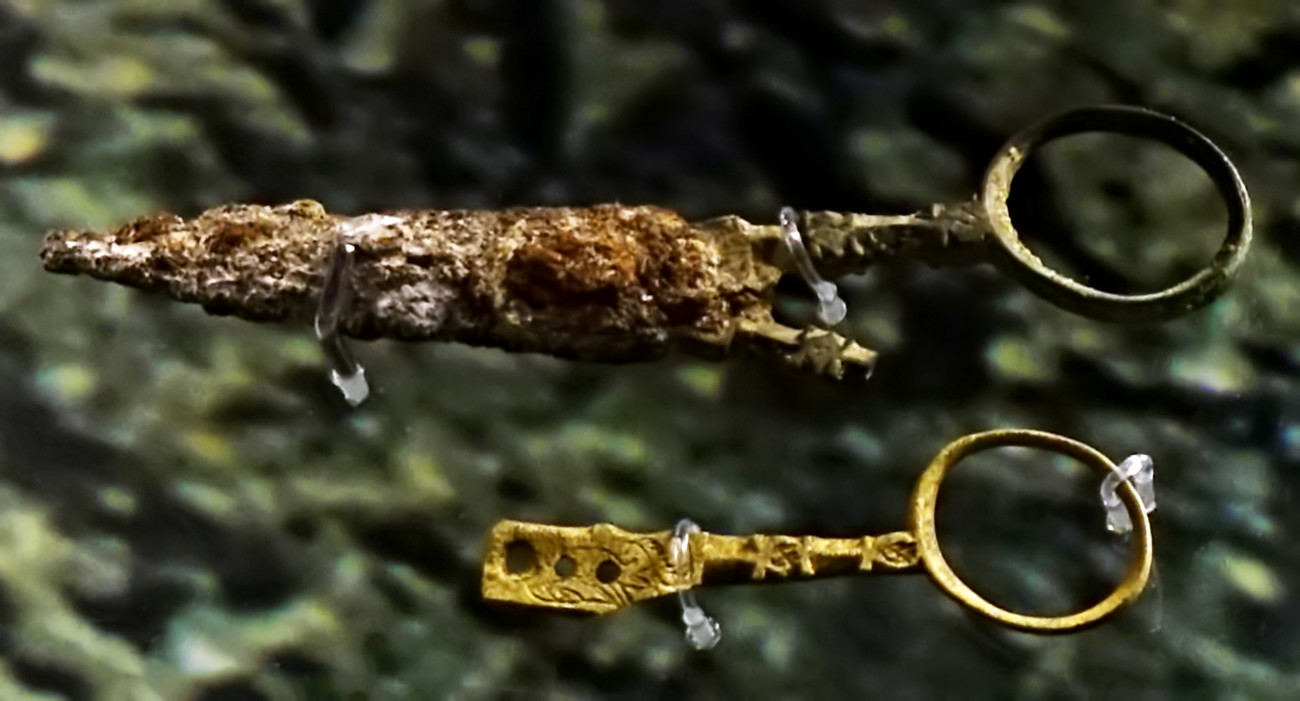
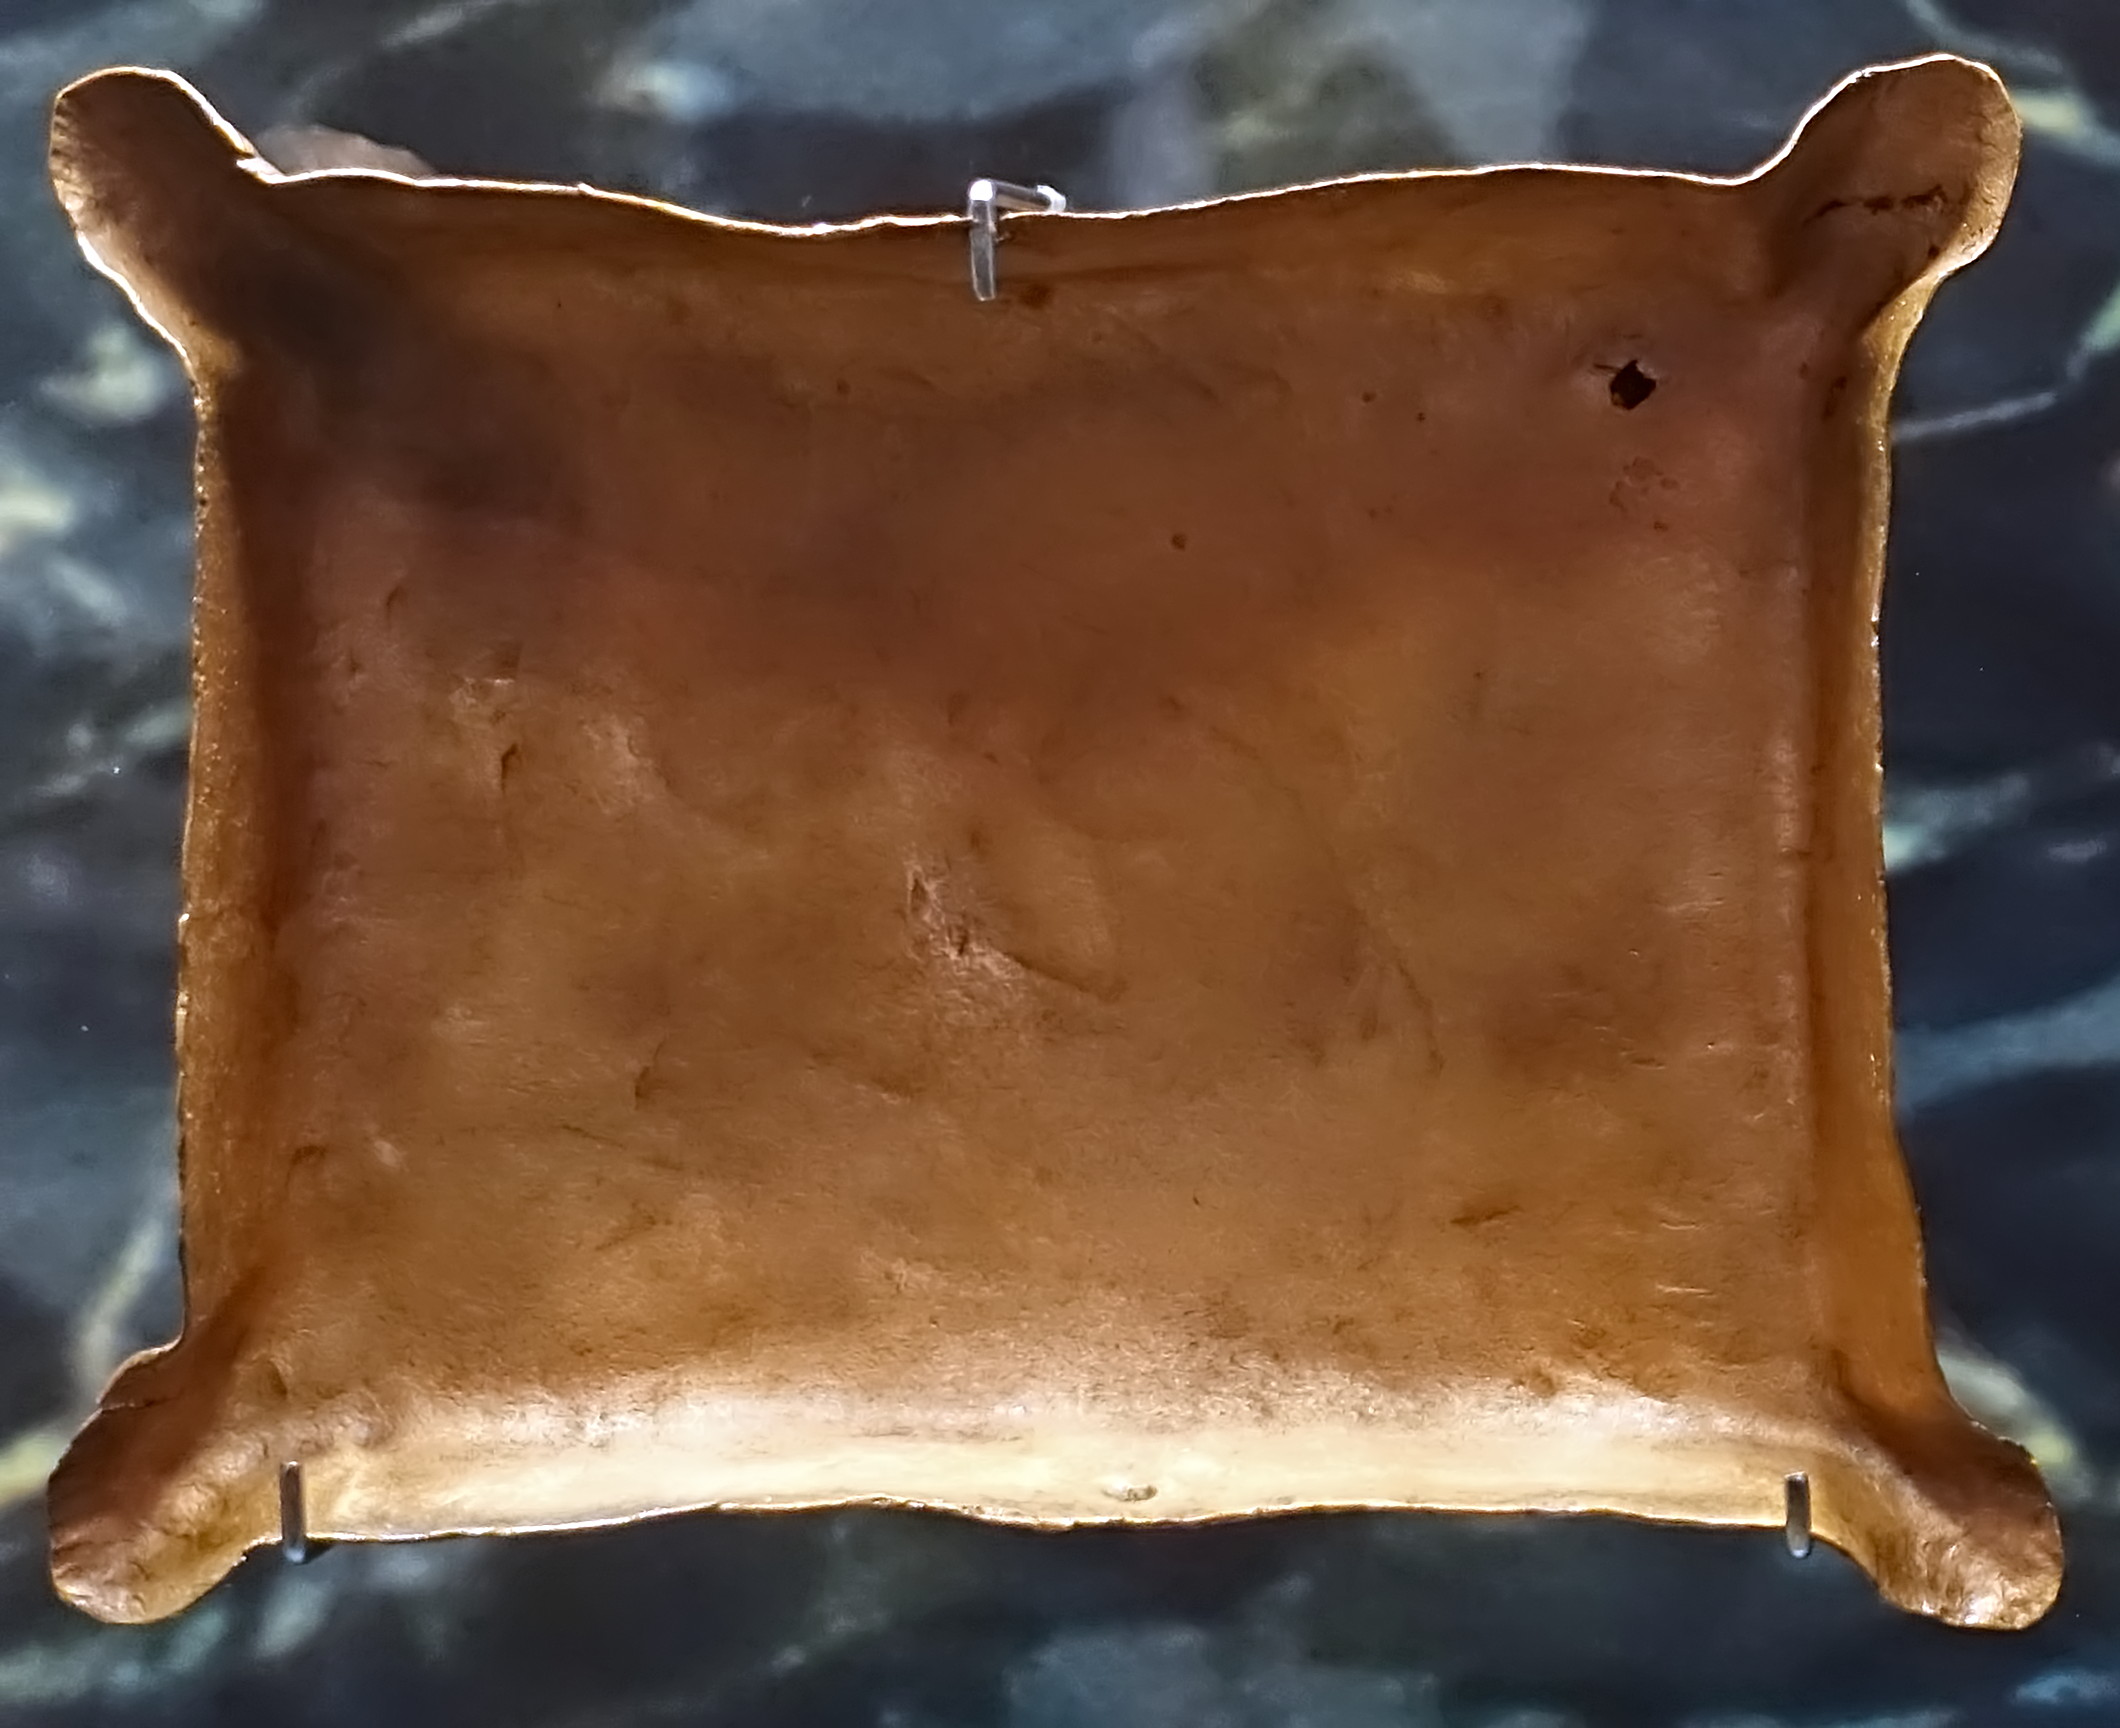
End of a sword scabbard - made of wood wrapped with leather. Only fragments of the leather remain.
Photo: Don Hitchcock October 2014
Source and text: The Shipwreck Galleries, Western Australia Museum, Fremantle, Western Australia
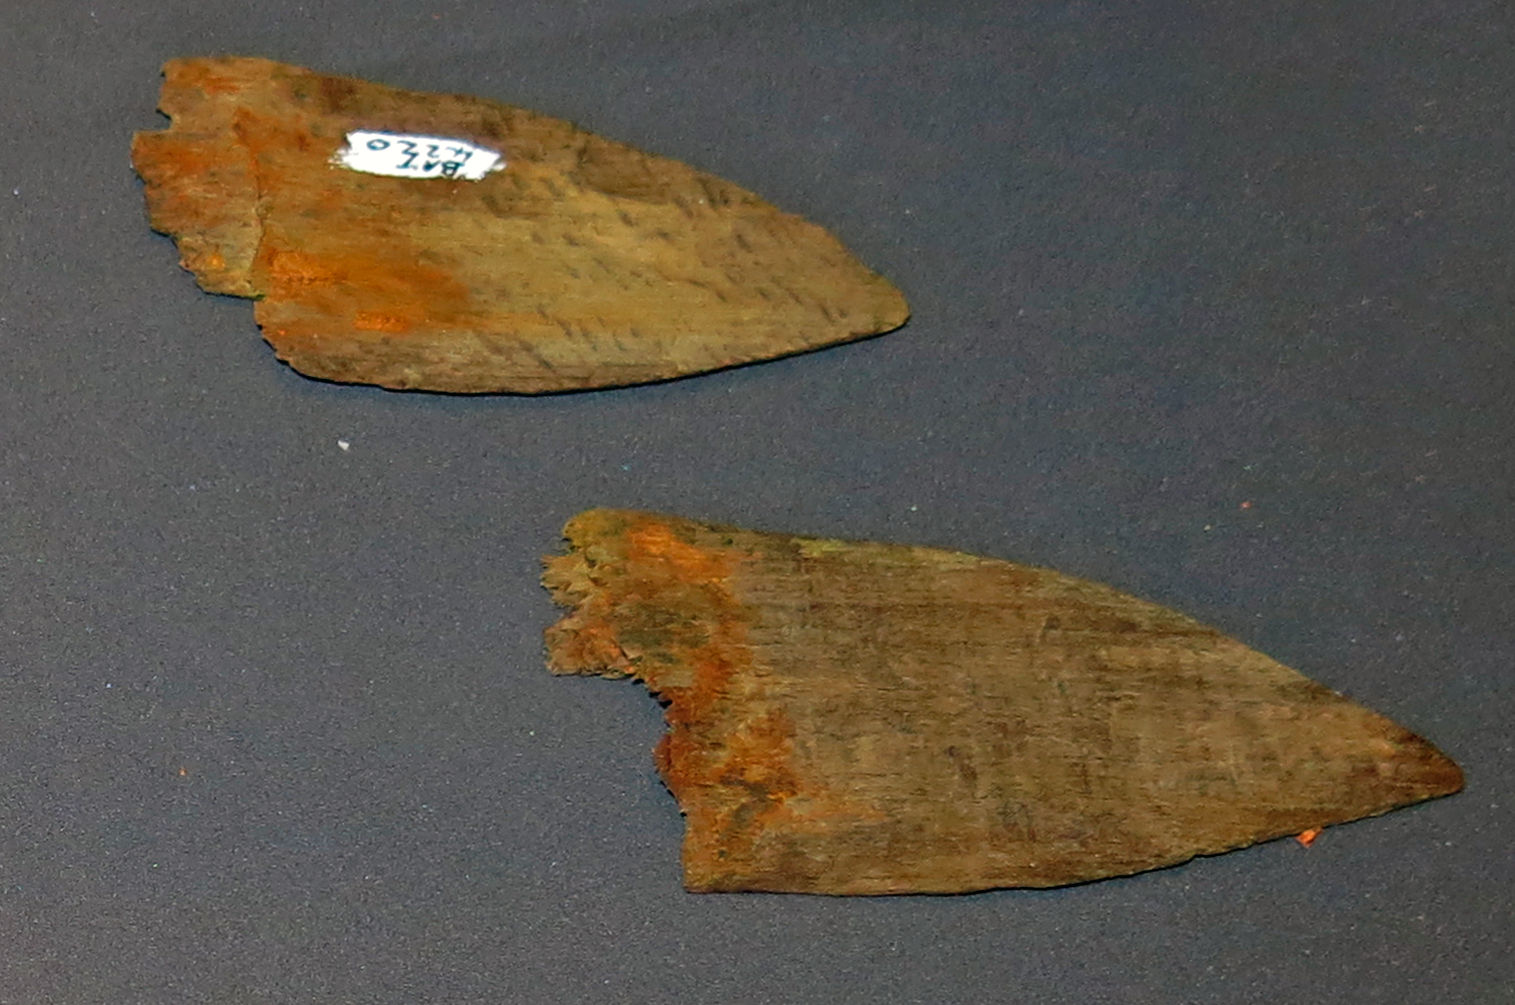
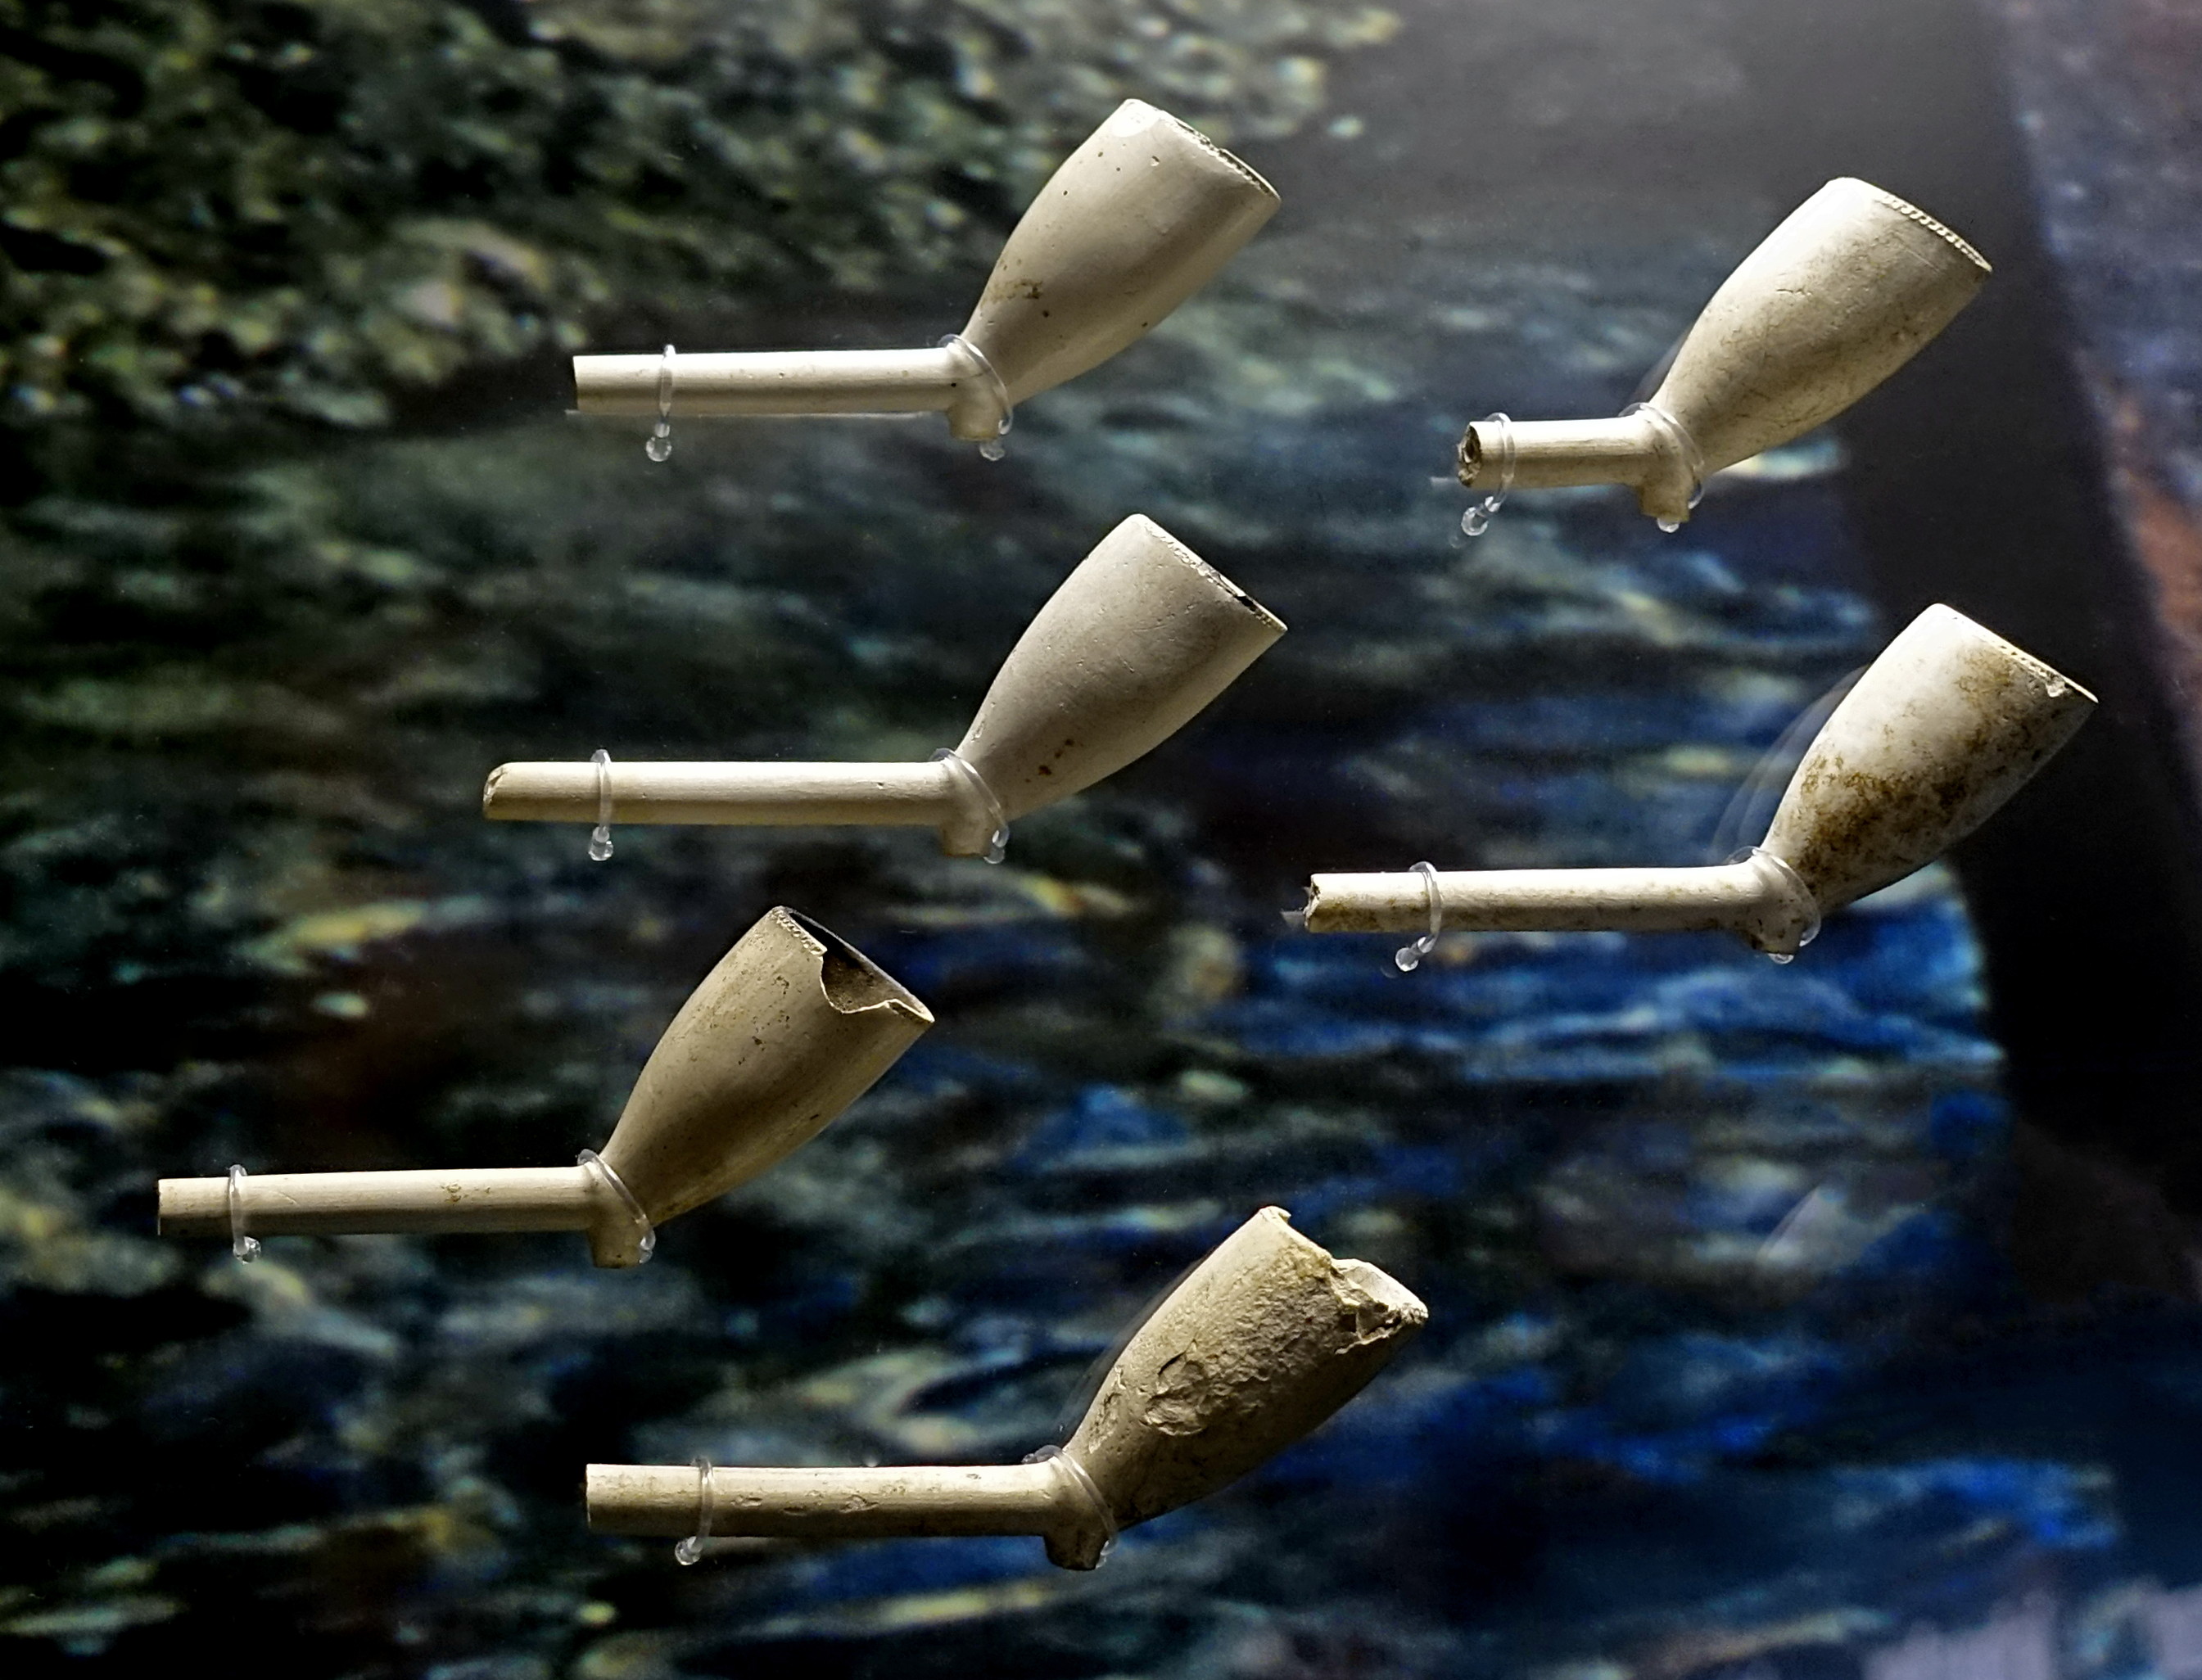
Expanding Bar Shot
Two shot halves attached together by bars that slide apart, thus increasing their length and causing dire consequences on impact.
There are a number of these sort of designs, which were rounds designed to expand in some fashion upon leaving the barrel. Typically it was two cannon balls or two halves of a shot attached together either by iron bars or chains. When fired they would fly through the air in a somewhat erratic way.
However when they hit something solid they caused major damage, removing the rigging holding up masts, wrapping around masts and reducing them to splinters, or breaking through a deck only for one of the balls to get snagged thus forcing the other ball to violently whirl around causing even more damage, or taking out whole sails by simply ripping them to shreds.
Photo and text: http://pirates.hegewisch.net/arty_ammo.html
Expanding Bar Shot from the Batavia.
A number of these cannon projectiles were recovered, including one capable of expanding from 510 mm to 930 mm. These would have been used primarily to immobilise a ship by destroying the rigging.
This example has only one of the pair of half balls, with the other rusted off the remaining sliding bar.
Photo: Don Hitchcock October 2014
Source and text: The Shipwreck Galleries, Western Australia Museum, Fremantle, Western Australia
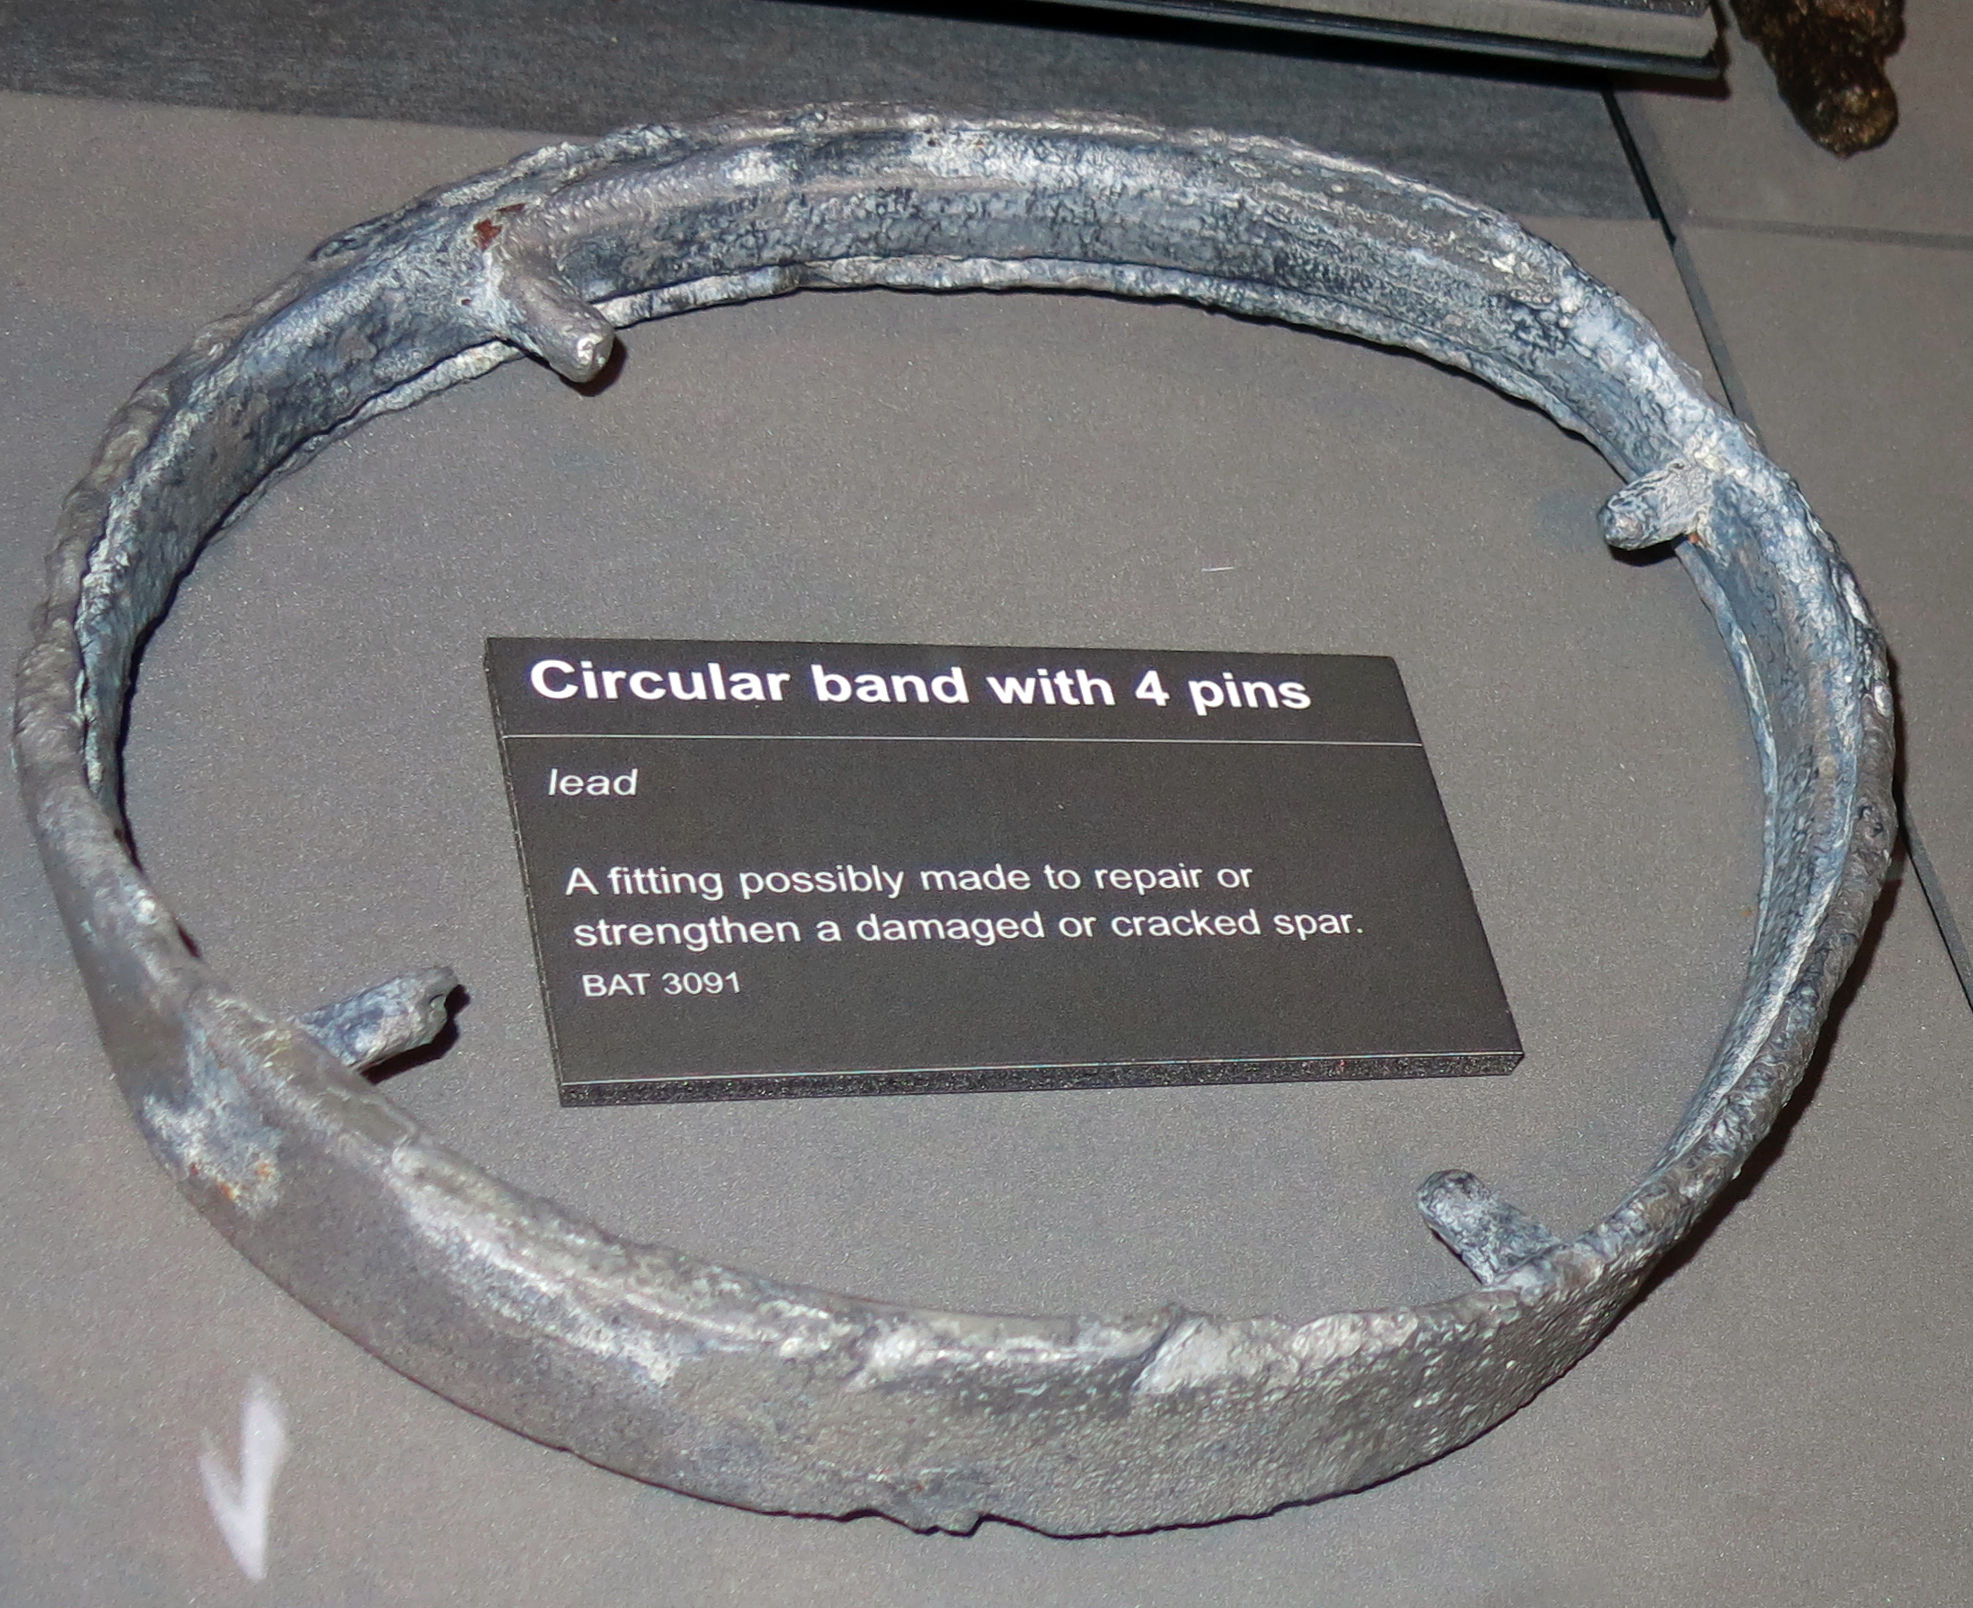
Circular lead band with four pins cast in place.
(note, the rest of the text for this piece in the museum reads:
'A fitting possibly made to repair or strengthen a damaged or cracked spar'
I find this very difficult to understand. I do not see how the band could be attached to the spar needing strengthening, because of the presence of the pins, and lead is not strong enough to be worth using to strengthen a spar. I would have thought that a piece of hoop iron riveted in place would be easier to fit and far stronger. I would be grateful if someone with a knowledge of old marine fittings would be able to clear this up for me - Don )
Photo: Don Hitchcock October 2014
Source and text: The Shipwreck Galleries, Western Australia Museum, Fremantle, Western Australia
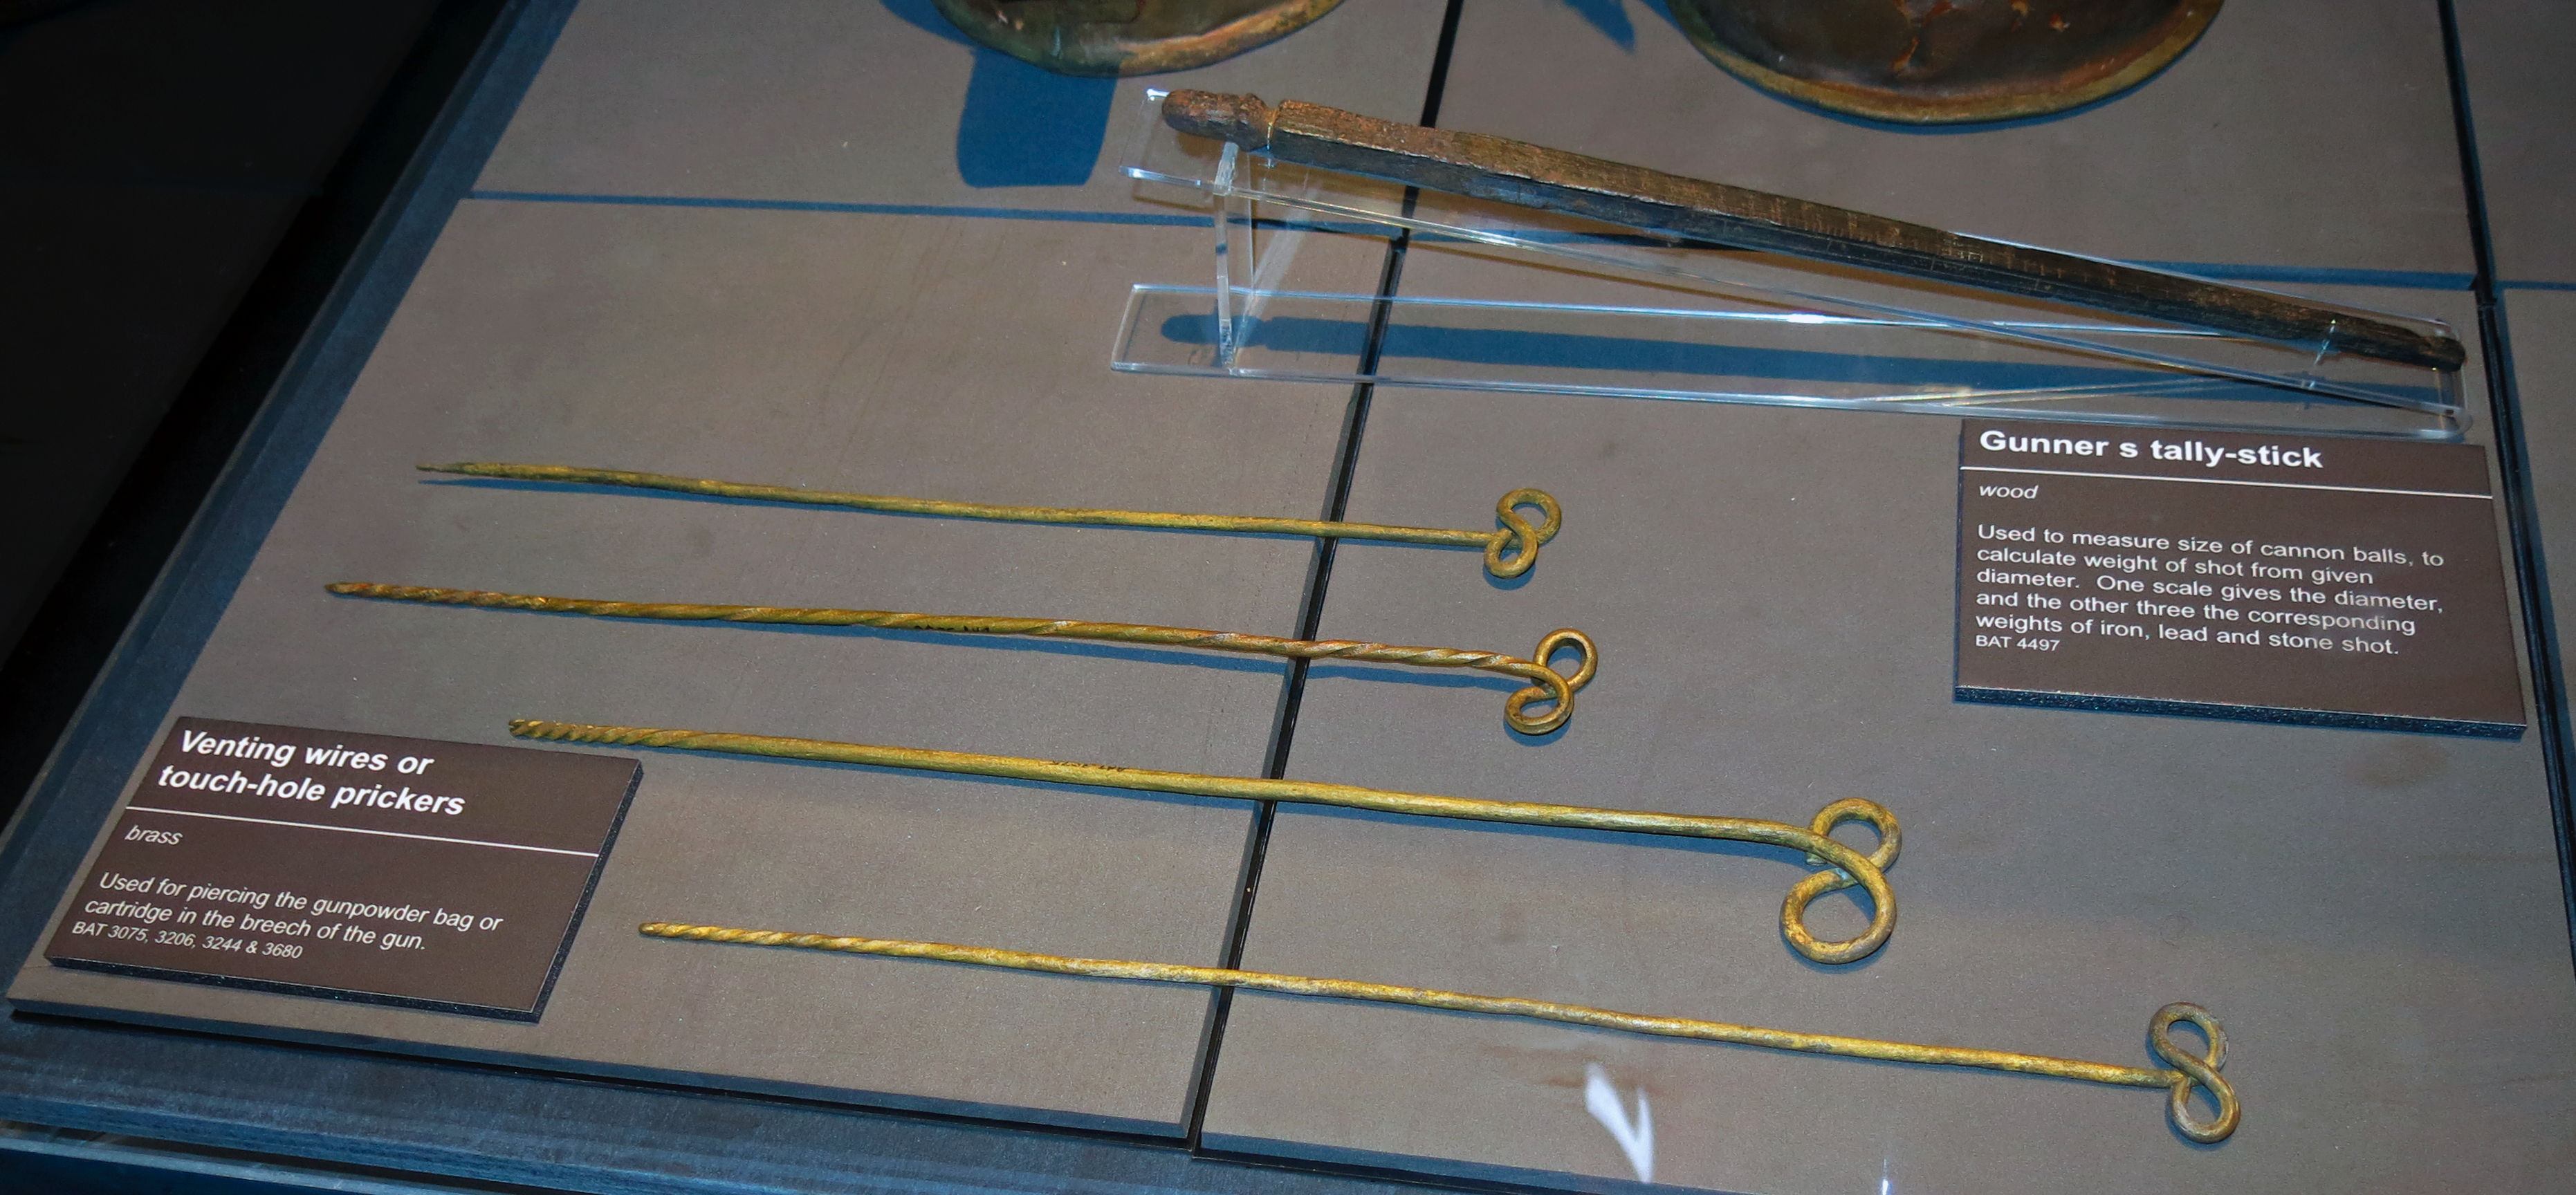
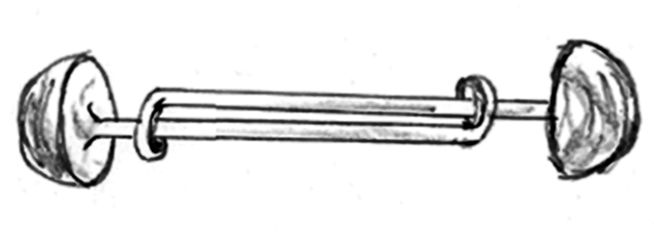
(top, right) Gunner's wooden tally-stick
Used to measure the size of cannon balls, and to calculate the weight of a shot of a given material and with a given diameter, necessary to decide how much powder to be used for that particular missile.
One scale gives the diameter, and the other three the corresponding weights of iron, lead and stone shot.
(bottom, left) Brass venting wires or touch-hole prickers.
These are of brass to avoid any possibility of sparks, and were used to pierce the gunpowder bag or cartridge in the breech of the gun.
Photo: Don Hitchcock October 2014
Source and text: The Shipwreck Galleries, Western Australia Museum, Fremantle, Western Australia
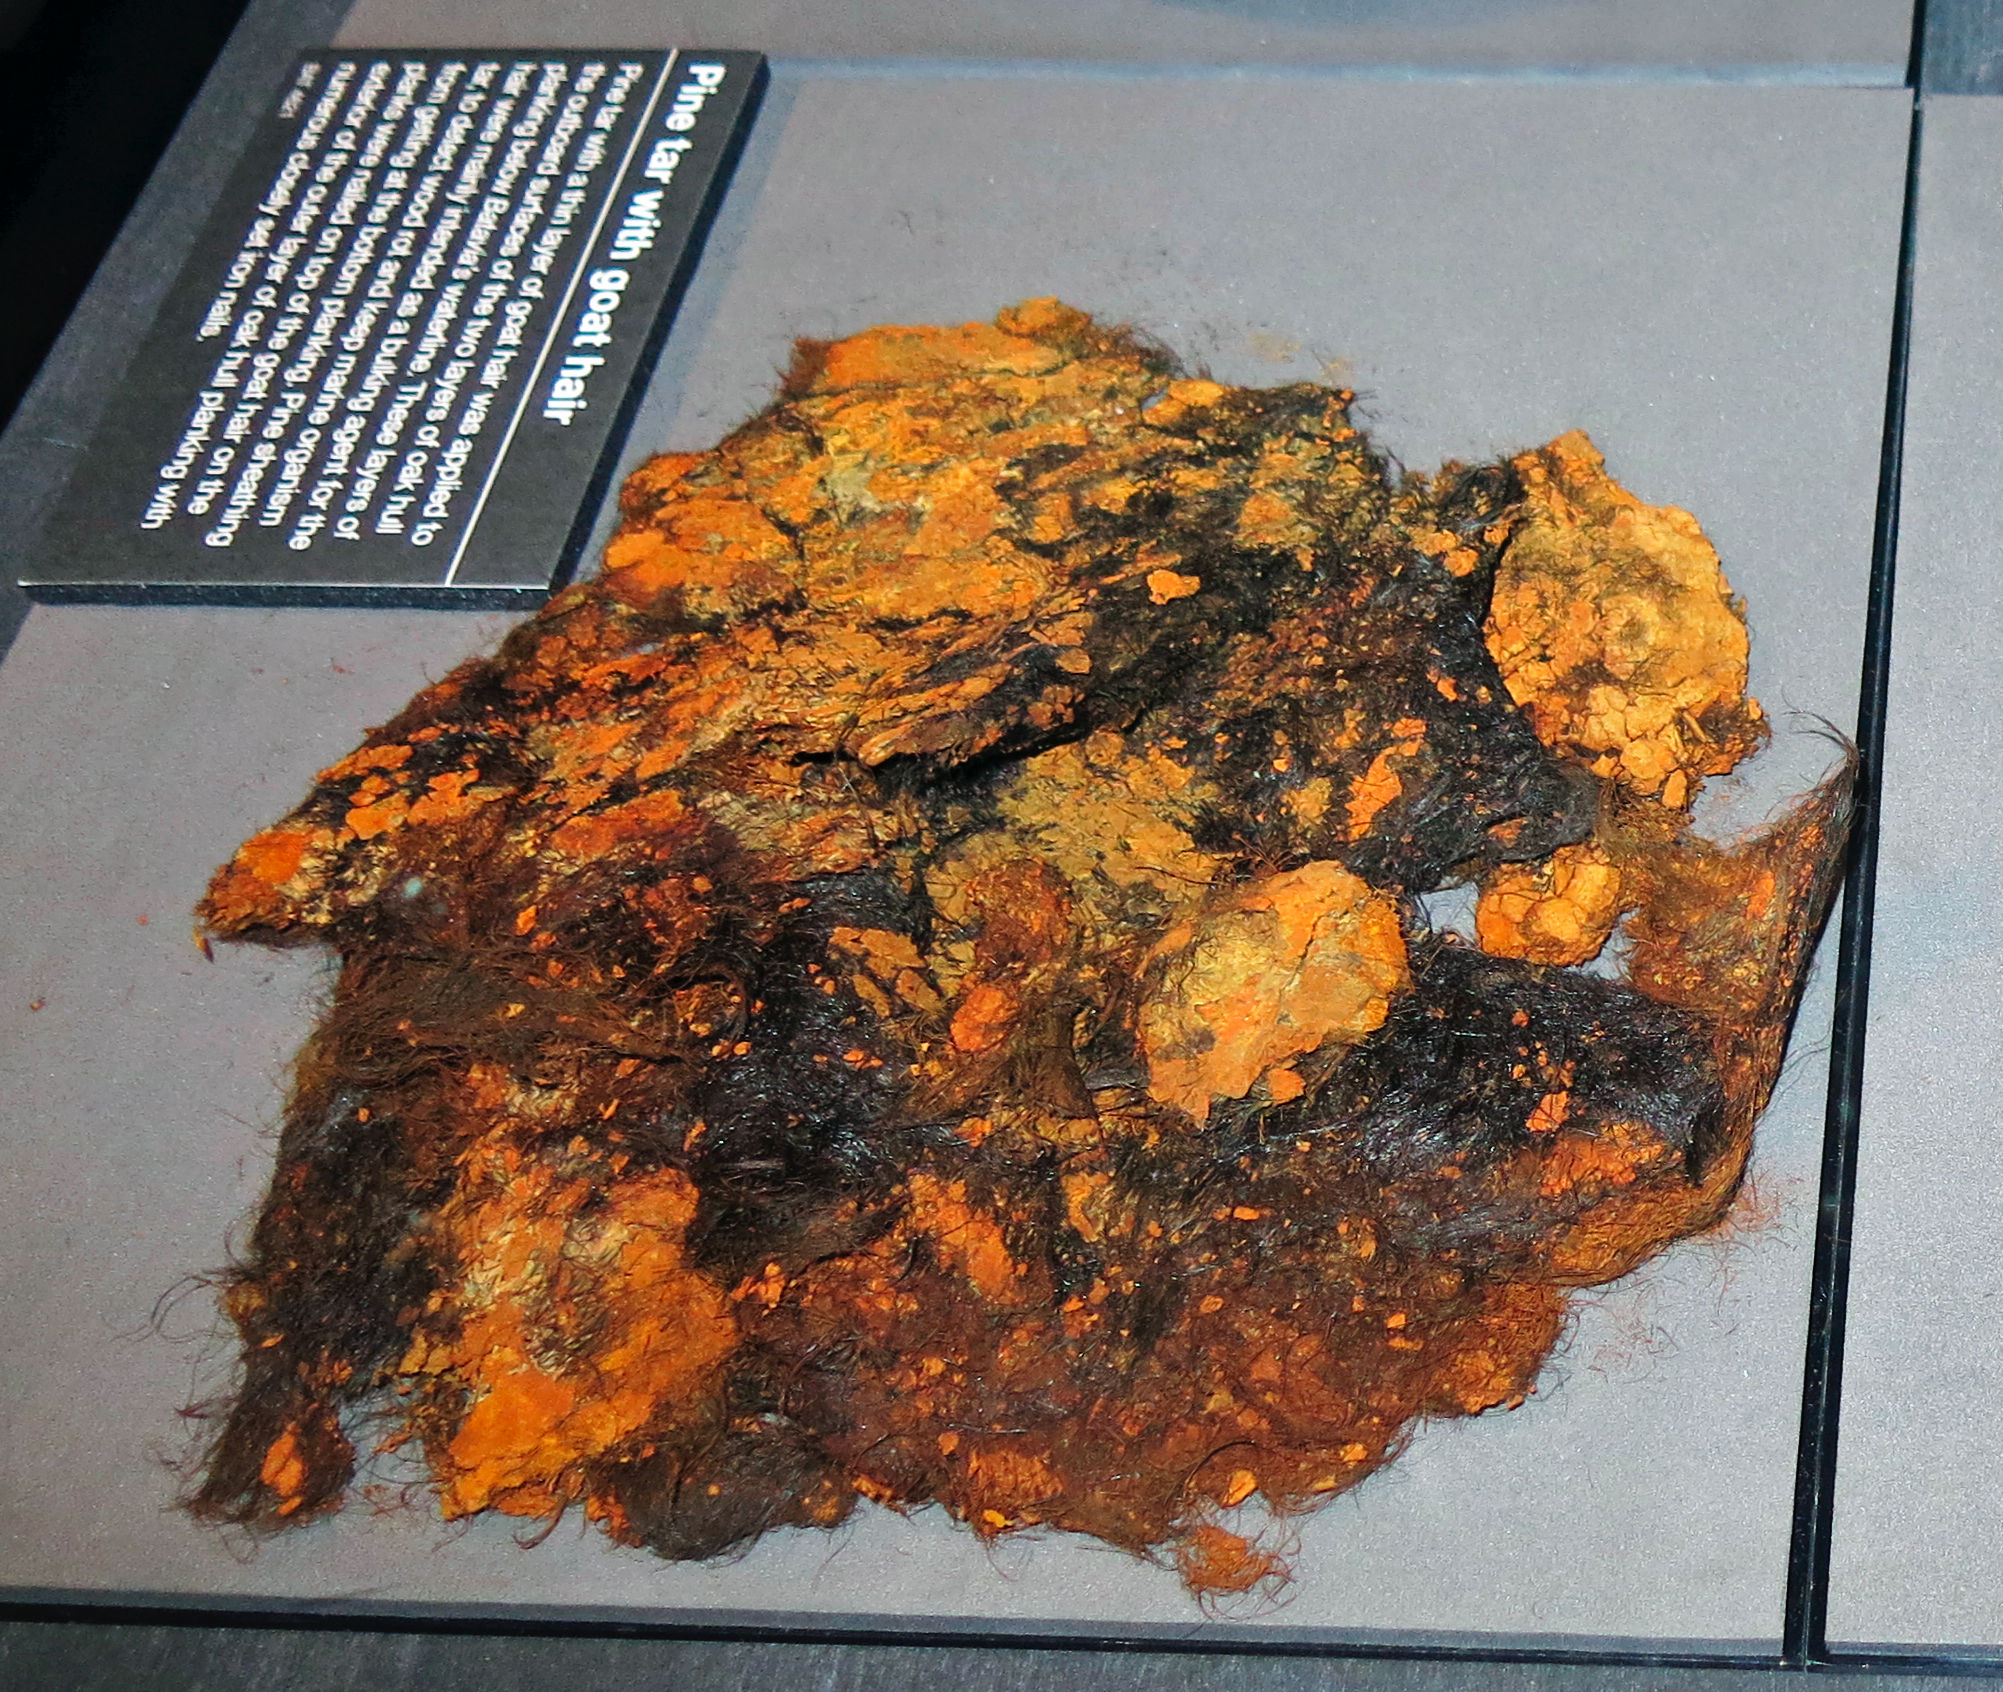
Pine tar with a thin layer of goat hair was applied to the outboard surfaces of the two layers of oak hull planking below Batavia's waterline.
These layers of hair were mainly intended as a bulking agent for the tar, to detect wood rot and to keep marine organisms from getting at the bottom planking. Pine sheathing planks were nailed on top of the goat hair on the exterior of the outer layer of oak hull planking with numerous closely set iron nails.
Photo: Don Hitchcock October 2014
Source and text: The Shipwreck Galleries, Western Australia Museum, Fremantle, Western Australia
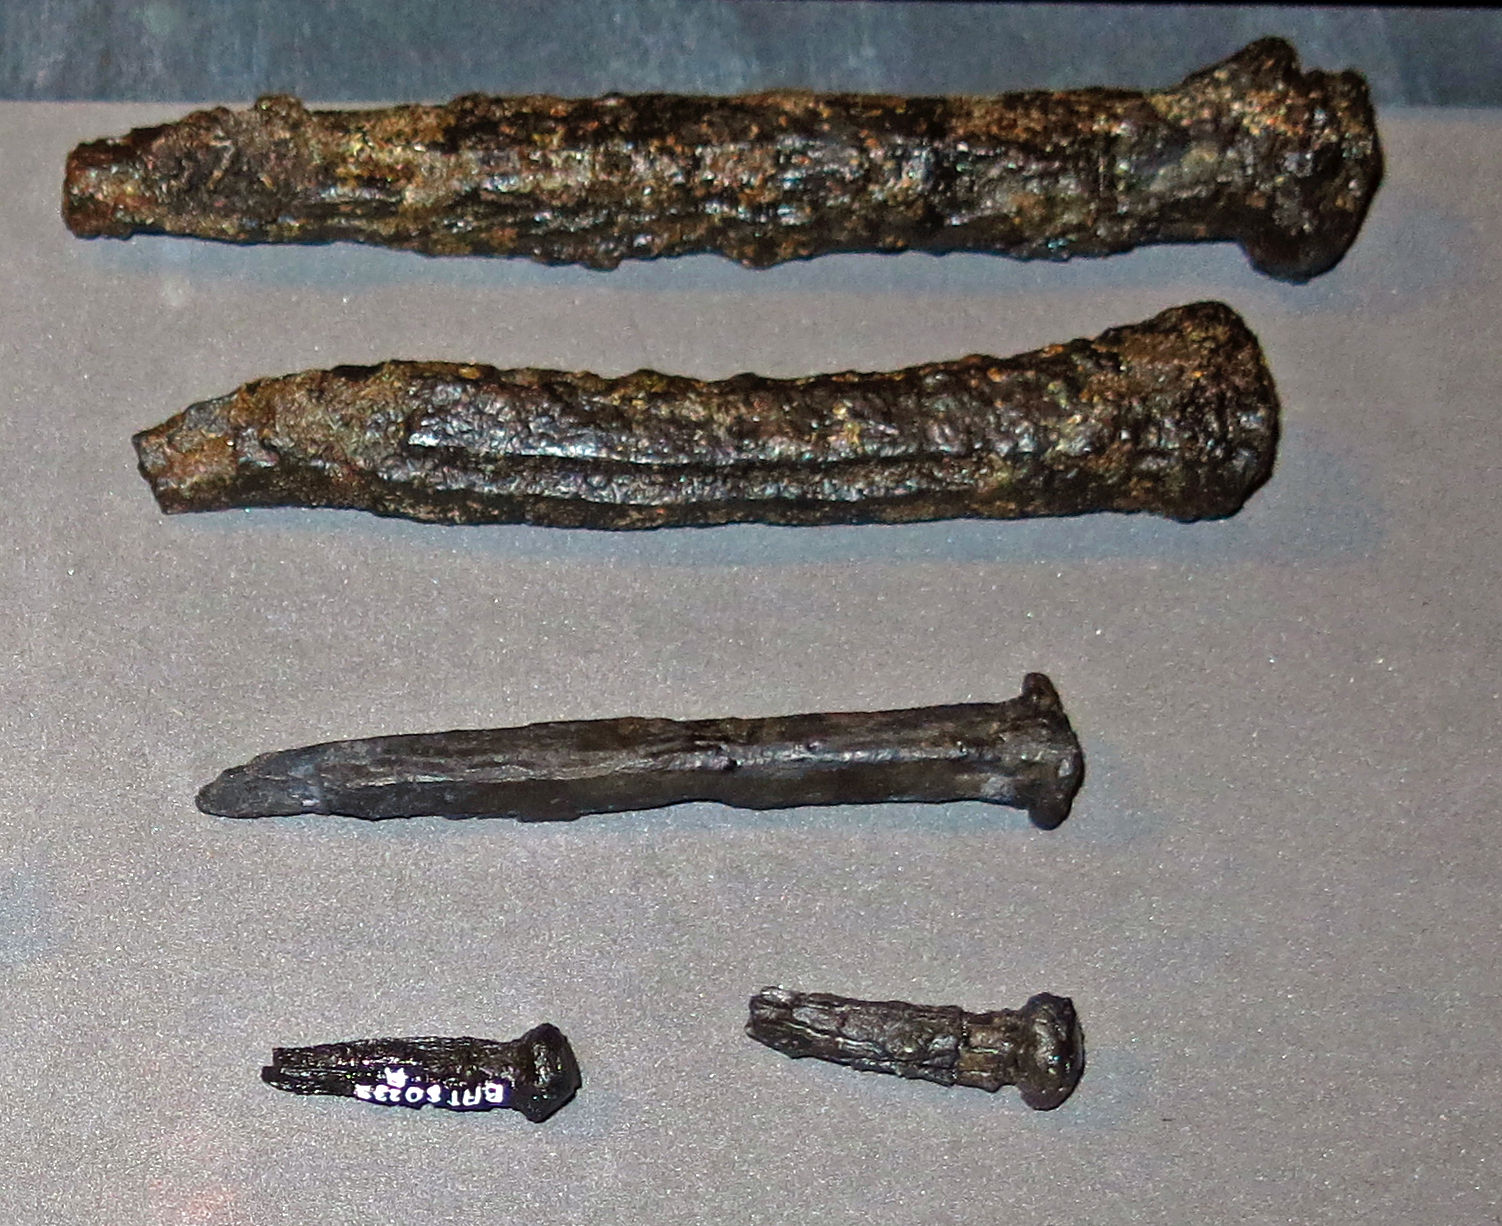
Iron nails from the Batavia.
Photo: Don Hitchcock October 2014
Source and text: The Shipwreck Galleries, Western Australia Museum, Fremantle, Western Australia
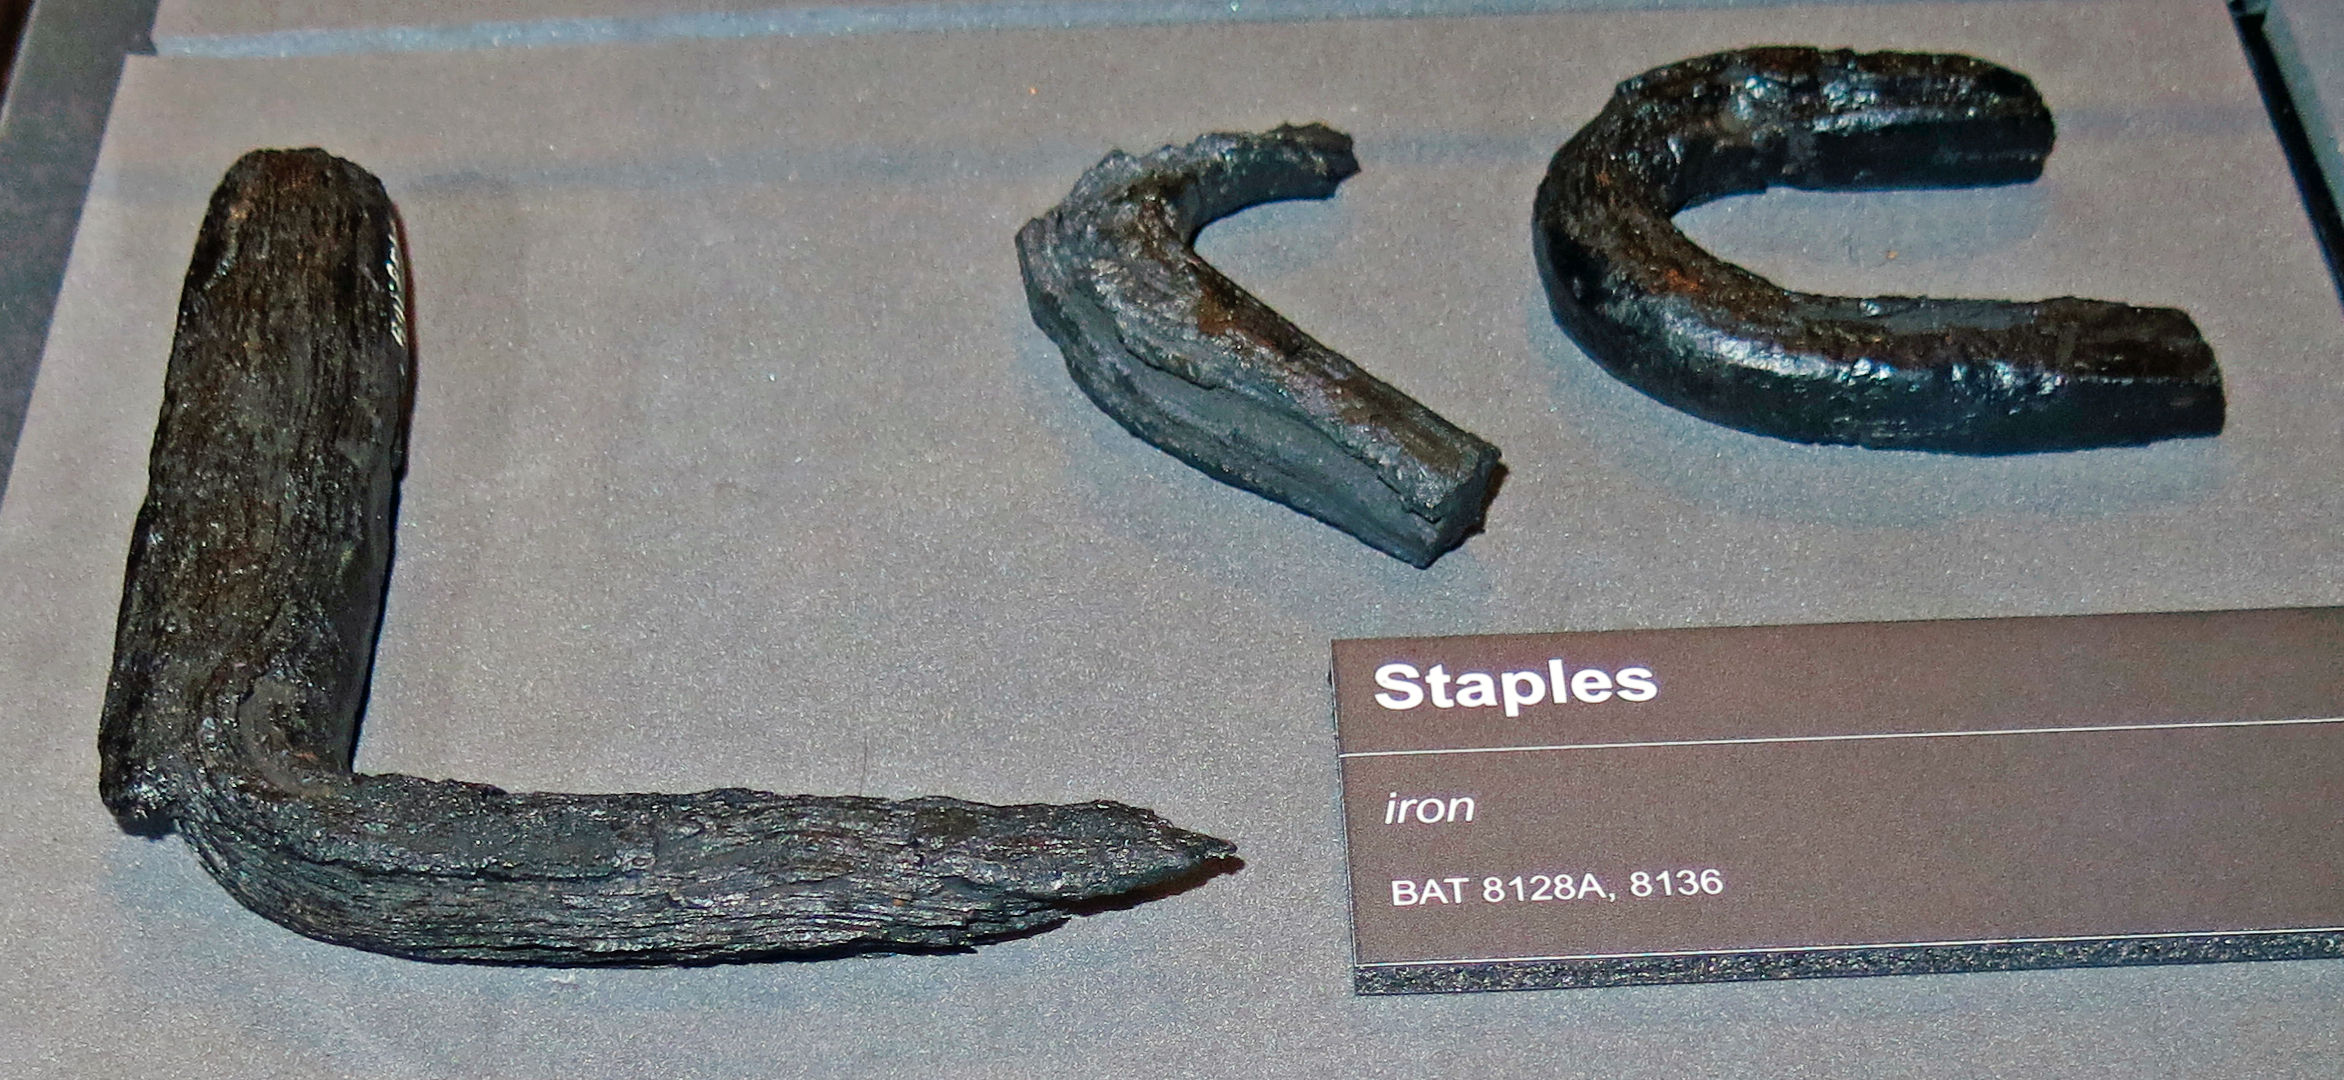
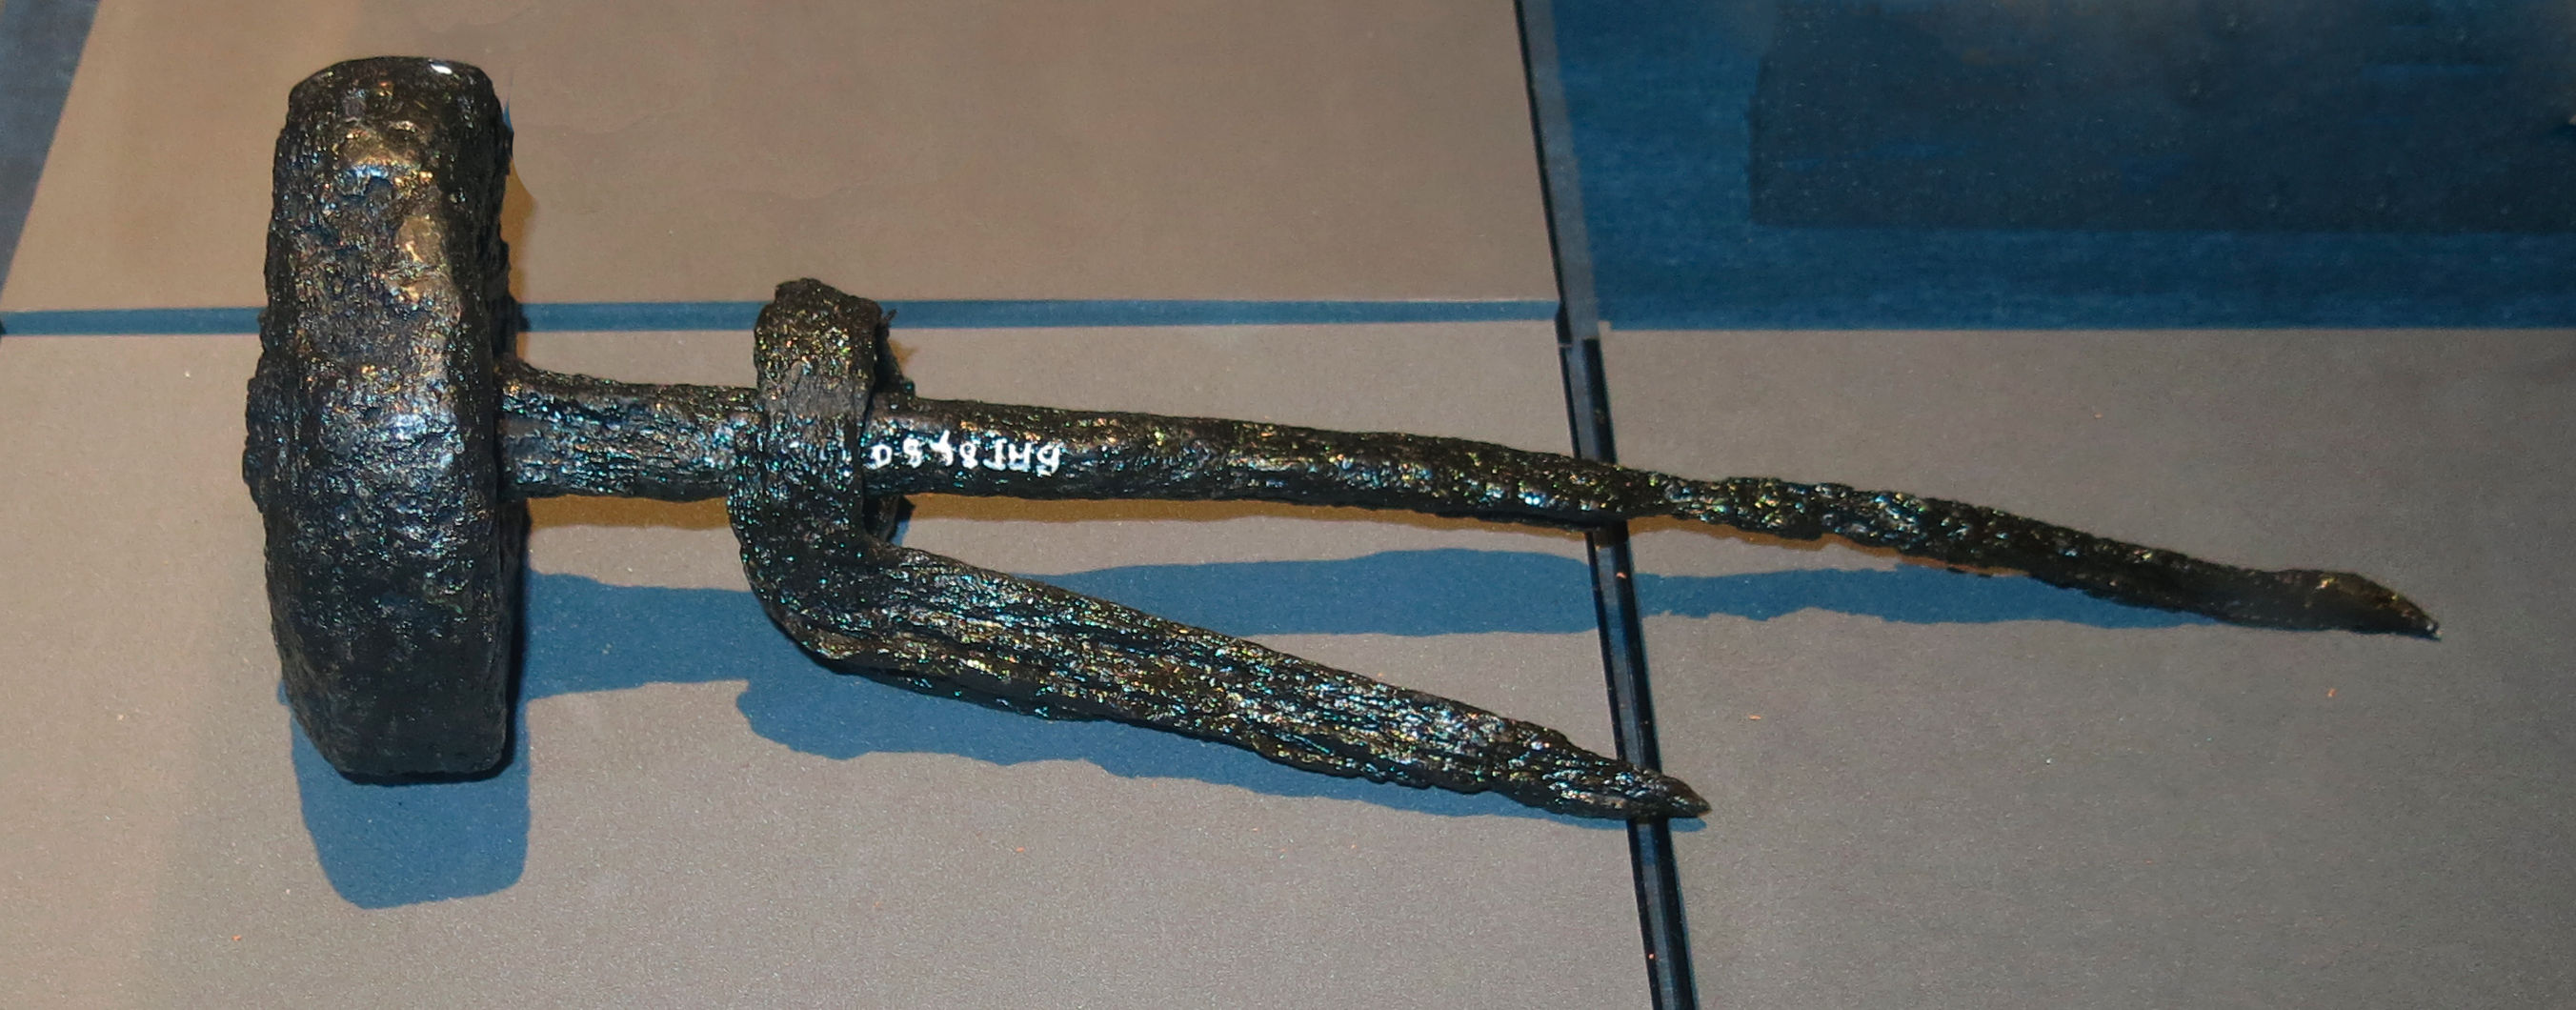
(left) Iron pintle from a door.
(right) Iron staples.
These objects recovered from the Batavia represent items associated with the hull and the fitting out of the ship - the standing and running rigging and underwater protection. Most of the small iron fittings have completely eroded, and the iron fastenings in the hull itself have completely disappeared.
Photo: Don Hitchcock October 2014
Source and text: The Shipwreck Galleries, Western Australia Museum, Fremantle, Western Australia
Copper powder ladle, used for loading cartridge and gunpowder into the bore of a gun. The copper sheet was nailed to a wooden block on a long handle.
Photo: Don Hitchcock October 2014
Source and text: The Shipwreck Galleries, Western Australia Museum, Fremantle, Western Australia
Copper shot gauge, stamped '+11'. The diameter of 113 mm corresponds exactly with the 11 mark on the gunner's tally stick, so shot passing through the gauge would be less than 11 pont in weight.
Photo: Don Hitchcock October 2014
Source and text: The Shipwreck Galleries, Western Australia Museum, Fremantle, Western Australia
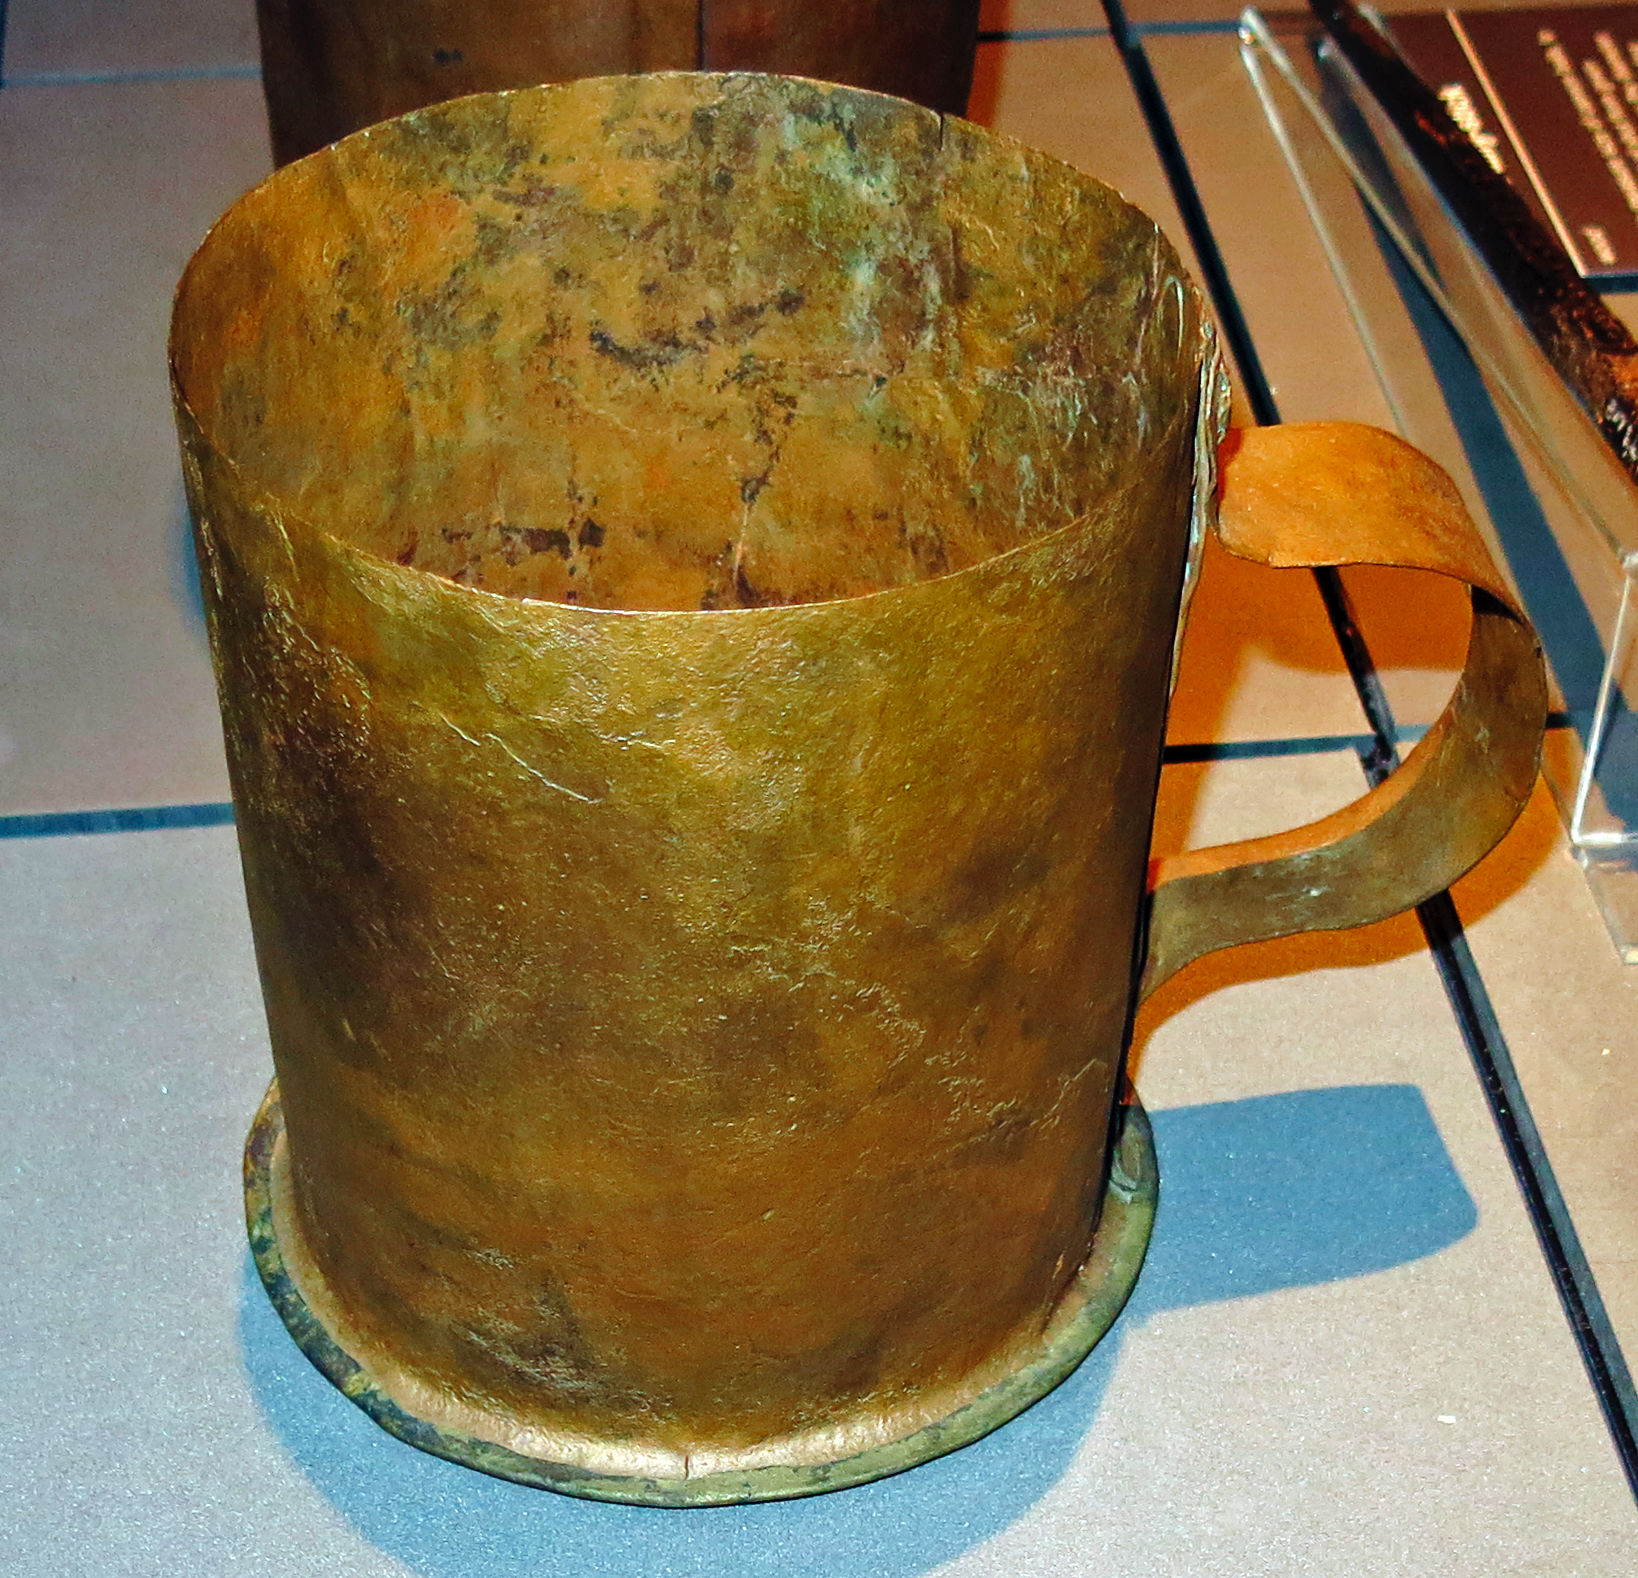
Copper powder canister. Used for carrying the cannon cartridge from the gunpowder magazine (usually at the bottom of the ship) to the gun itself.
This protected the cartridge from accidental ignition.
Photo: Don Hitchcock October 2014
Source and text: The Shipwreck Galleries, Western Australia Museum, Fremantle, Western Australia
Copper measure, used for measuring gunpowder. The measure was dipped into a gunpowder barrel and filled to the top, thus indicating a known weight or measure.
Photo: Don Hitchcock October 2014
Source and text: The Shipwreck Galleries, Western Australia Museum, Fremantle, Western Australia
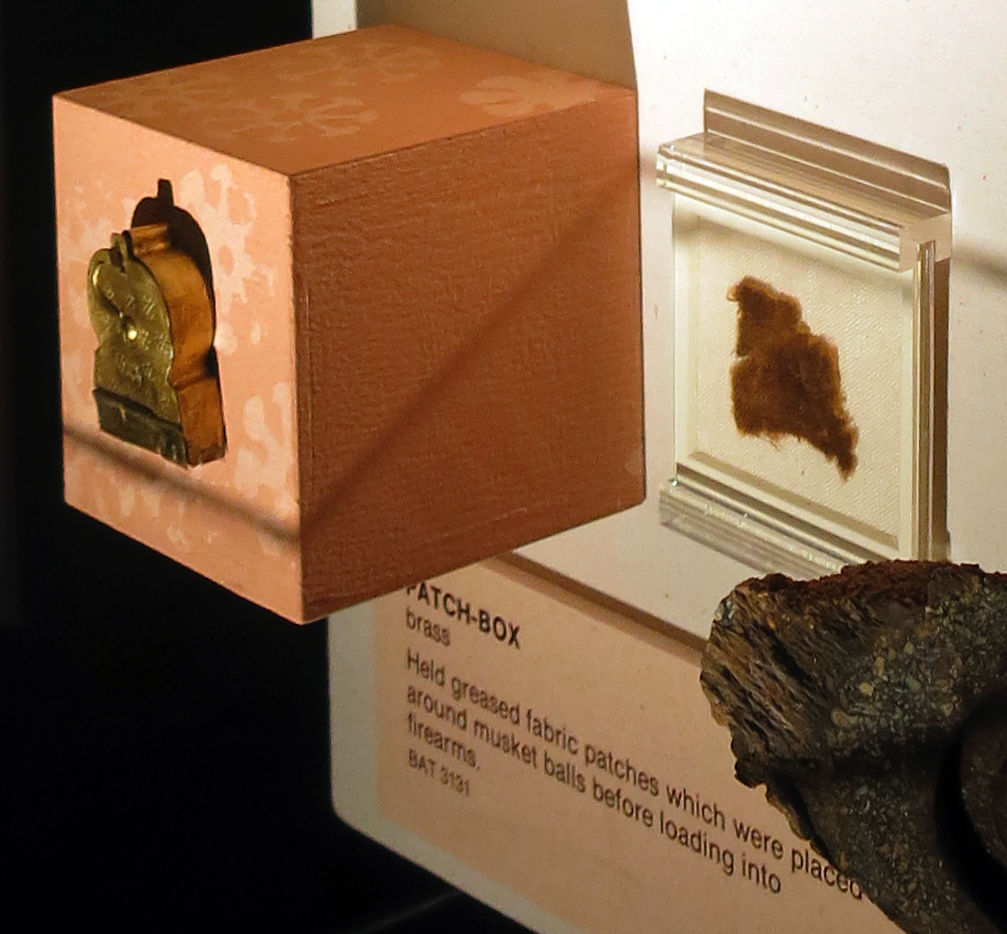
This brass Patch Box held greased fabric patches which were placed around musket balls before loading into firearms.
Photo: Don Hitchcock October 2014
Source and text: The Shipwreck Galleries, Western Australia Museum, Fremantle, Western Australia
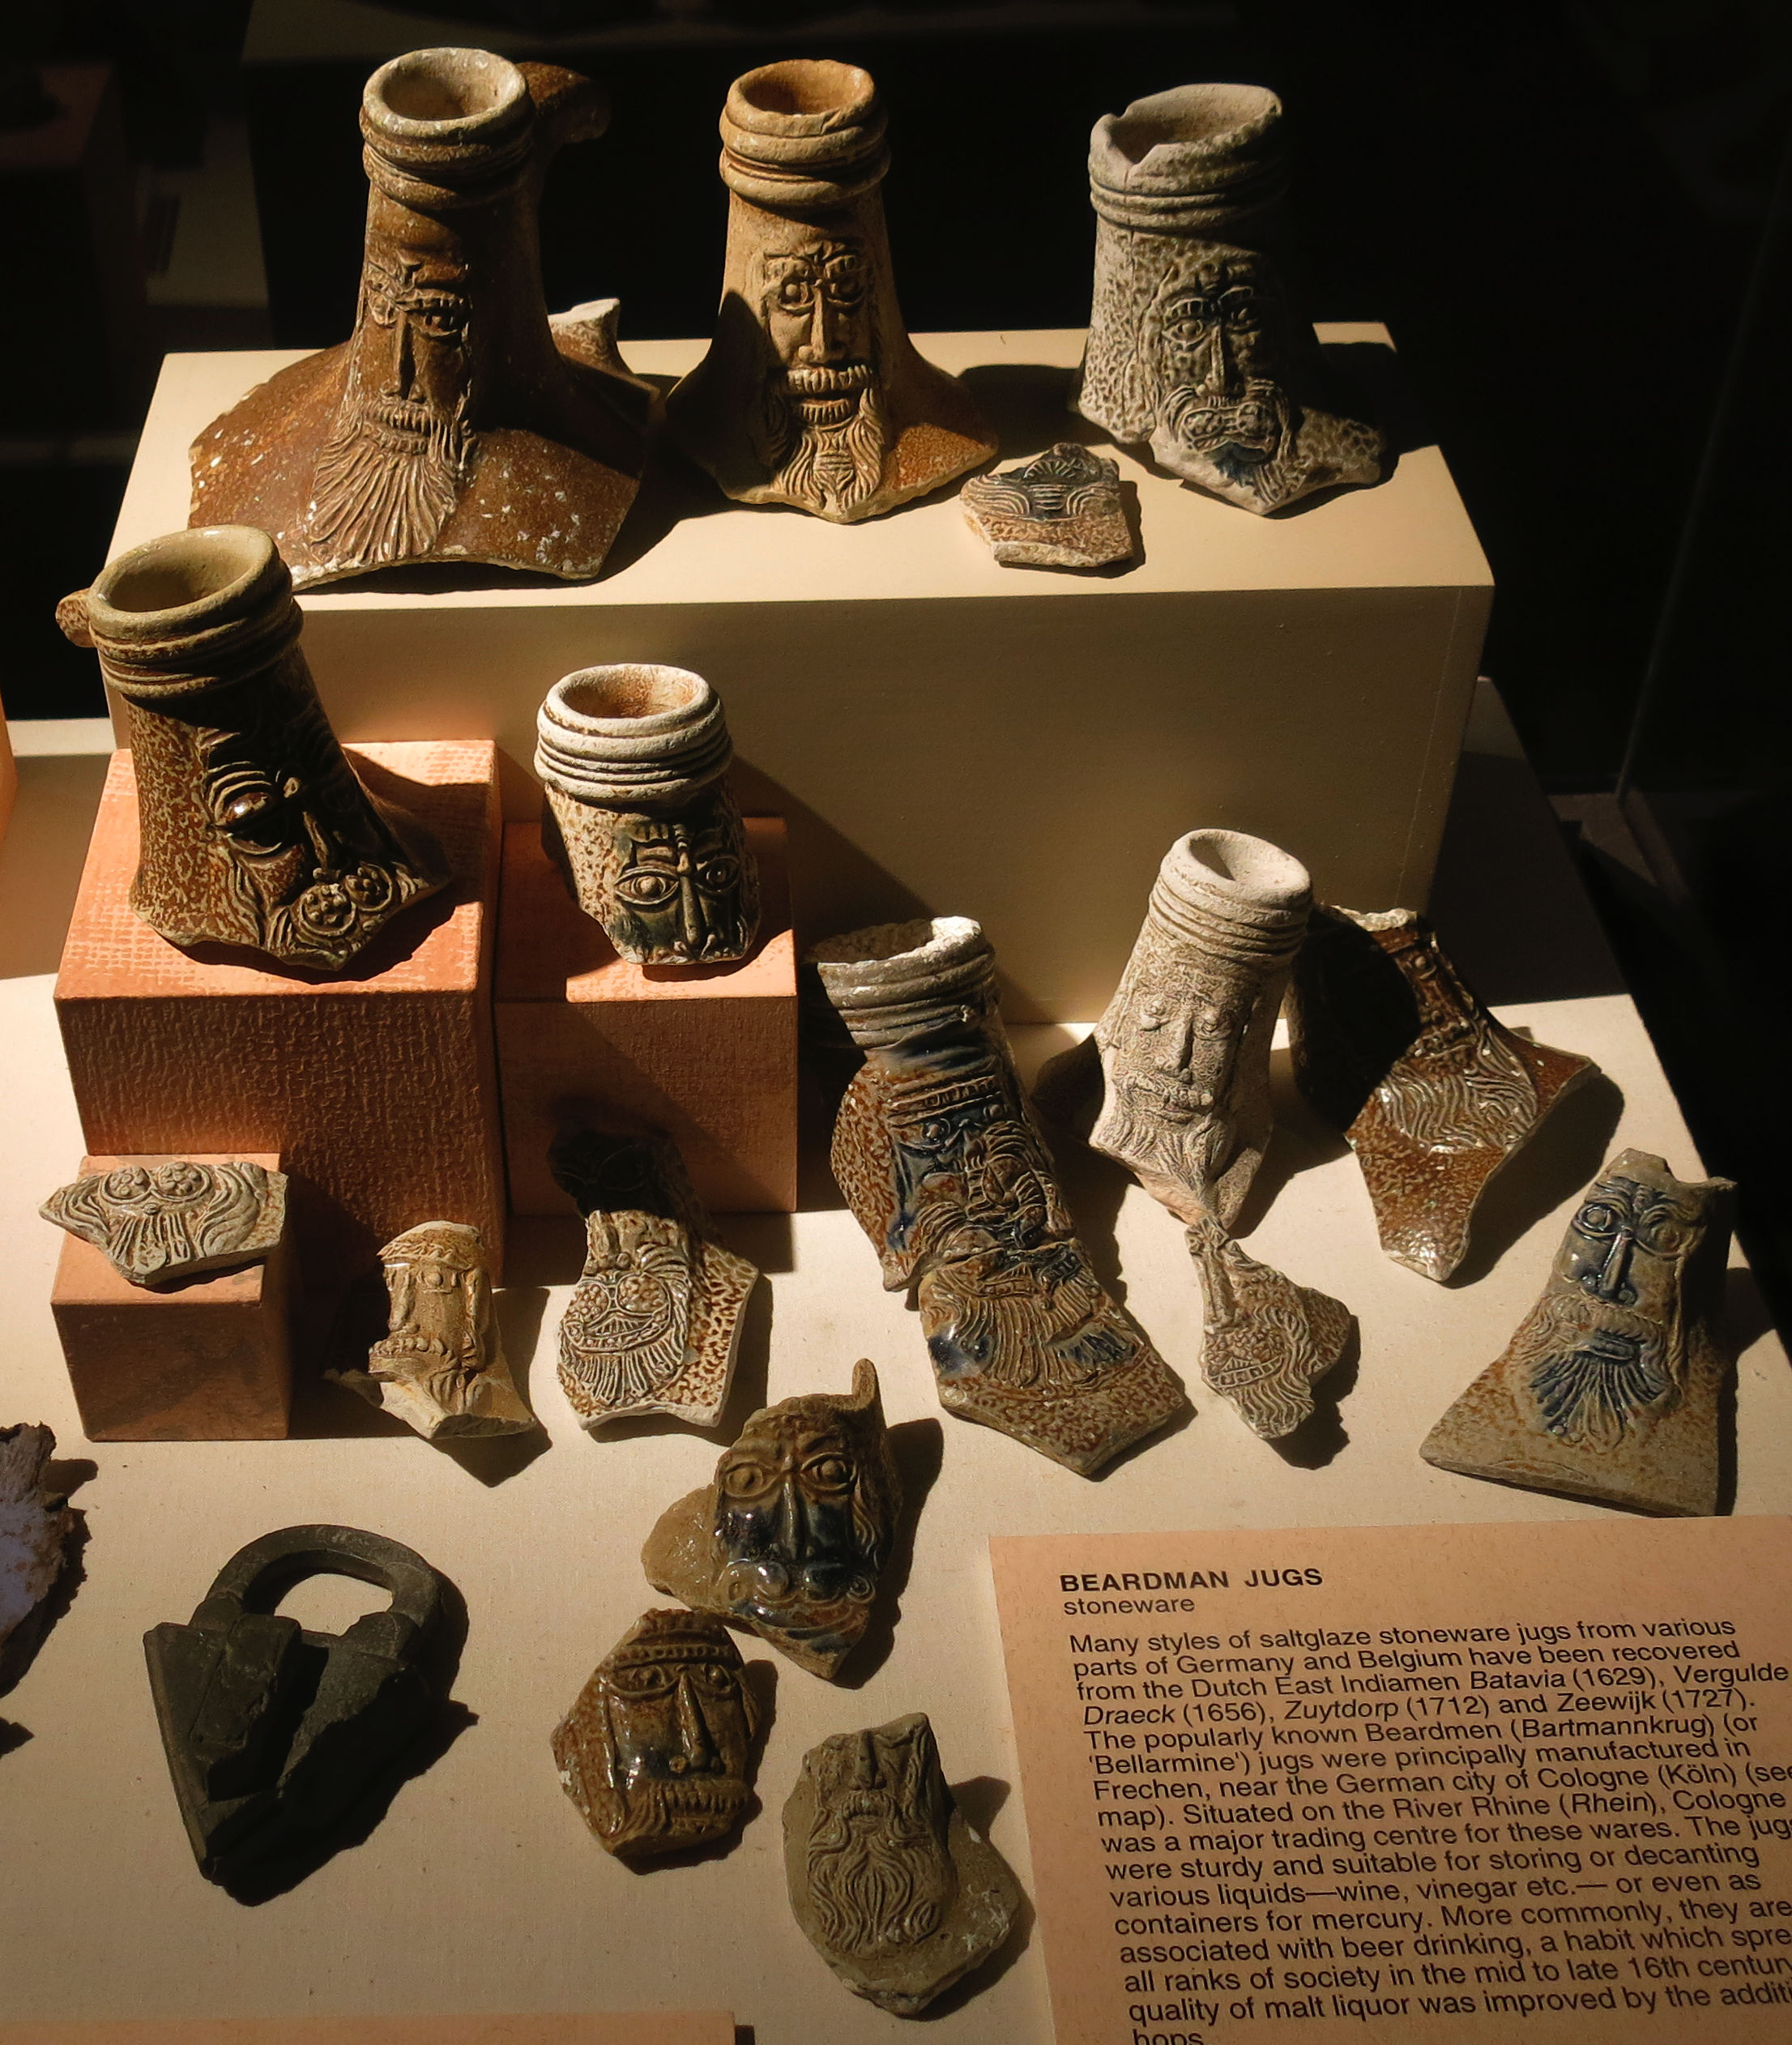
Stoneware Beardman Jugs
Many styles of saltglaze stoneware jugs from various parts of Germany and Belgium have been recovered from the Dutch East Indiamen Batavia (1629), Verguide Draeck (1656), Zuytdorp (1712), and Zeewijk (1727).
The popularly known Beardmen (Bartmannkrug, or 'Bellarmine') jugs were principally manufactured in Frechen, near the German city of Cologne (Köln). Situated on the River Rhine, Cologne was a major trading centre for these wares. The jugs were sturdy and suitable for storing or decanting various liquids - wine, vinegar etc - or even as containers for mercury. More commonly, they are associated with beer drinking, a habit which spread to all ranks of society in the mid to late 16th century as the quality of malt liquor was improved by the addition of hops.
Photo: Don Hitchcock October 2014
Source and text: The Shipwreck Galleries, Western Australia Museum, Fremantle, Western Australia

Batavia Bell.
This bronze bell may have been the watch bell that was on the poop deck. It was found near the stern of the ship.
Catalog: BAT 3404
Photo: Don Hitchcock 2017
Source and text: Museum of Geraldton, Western Australia
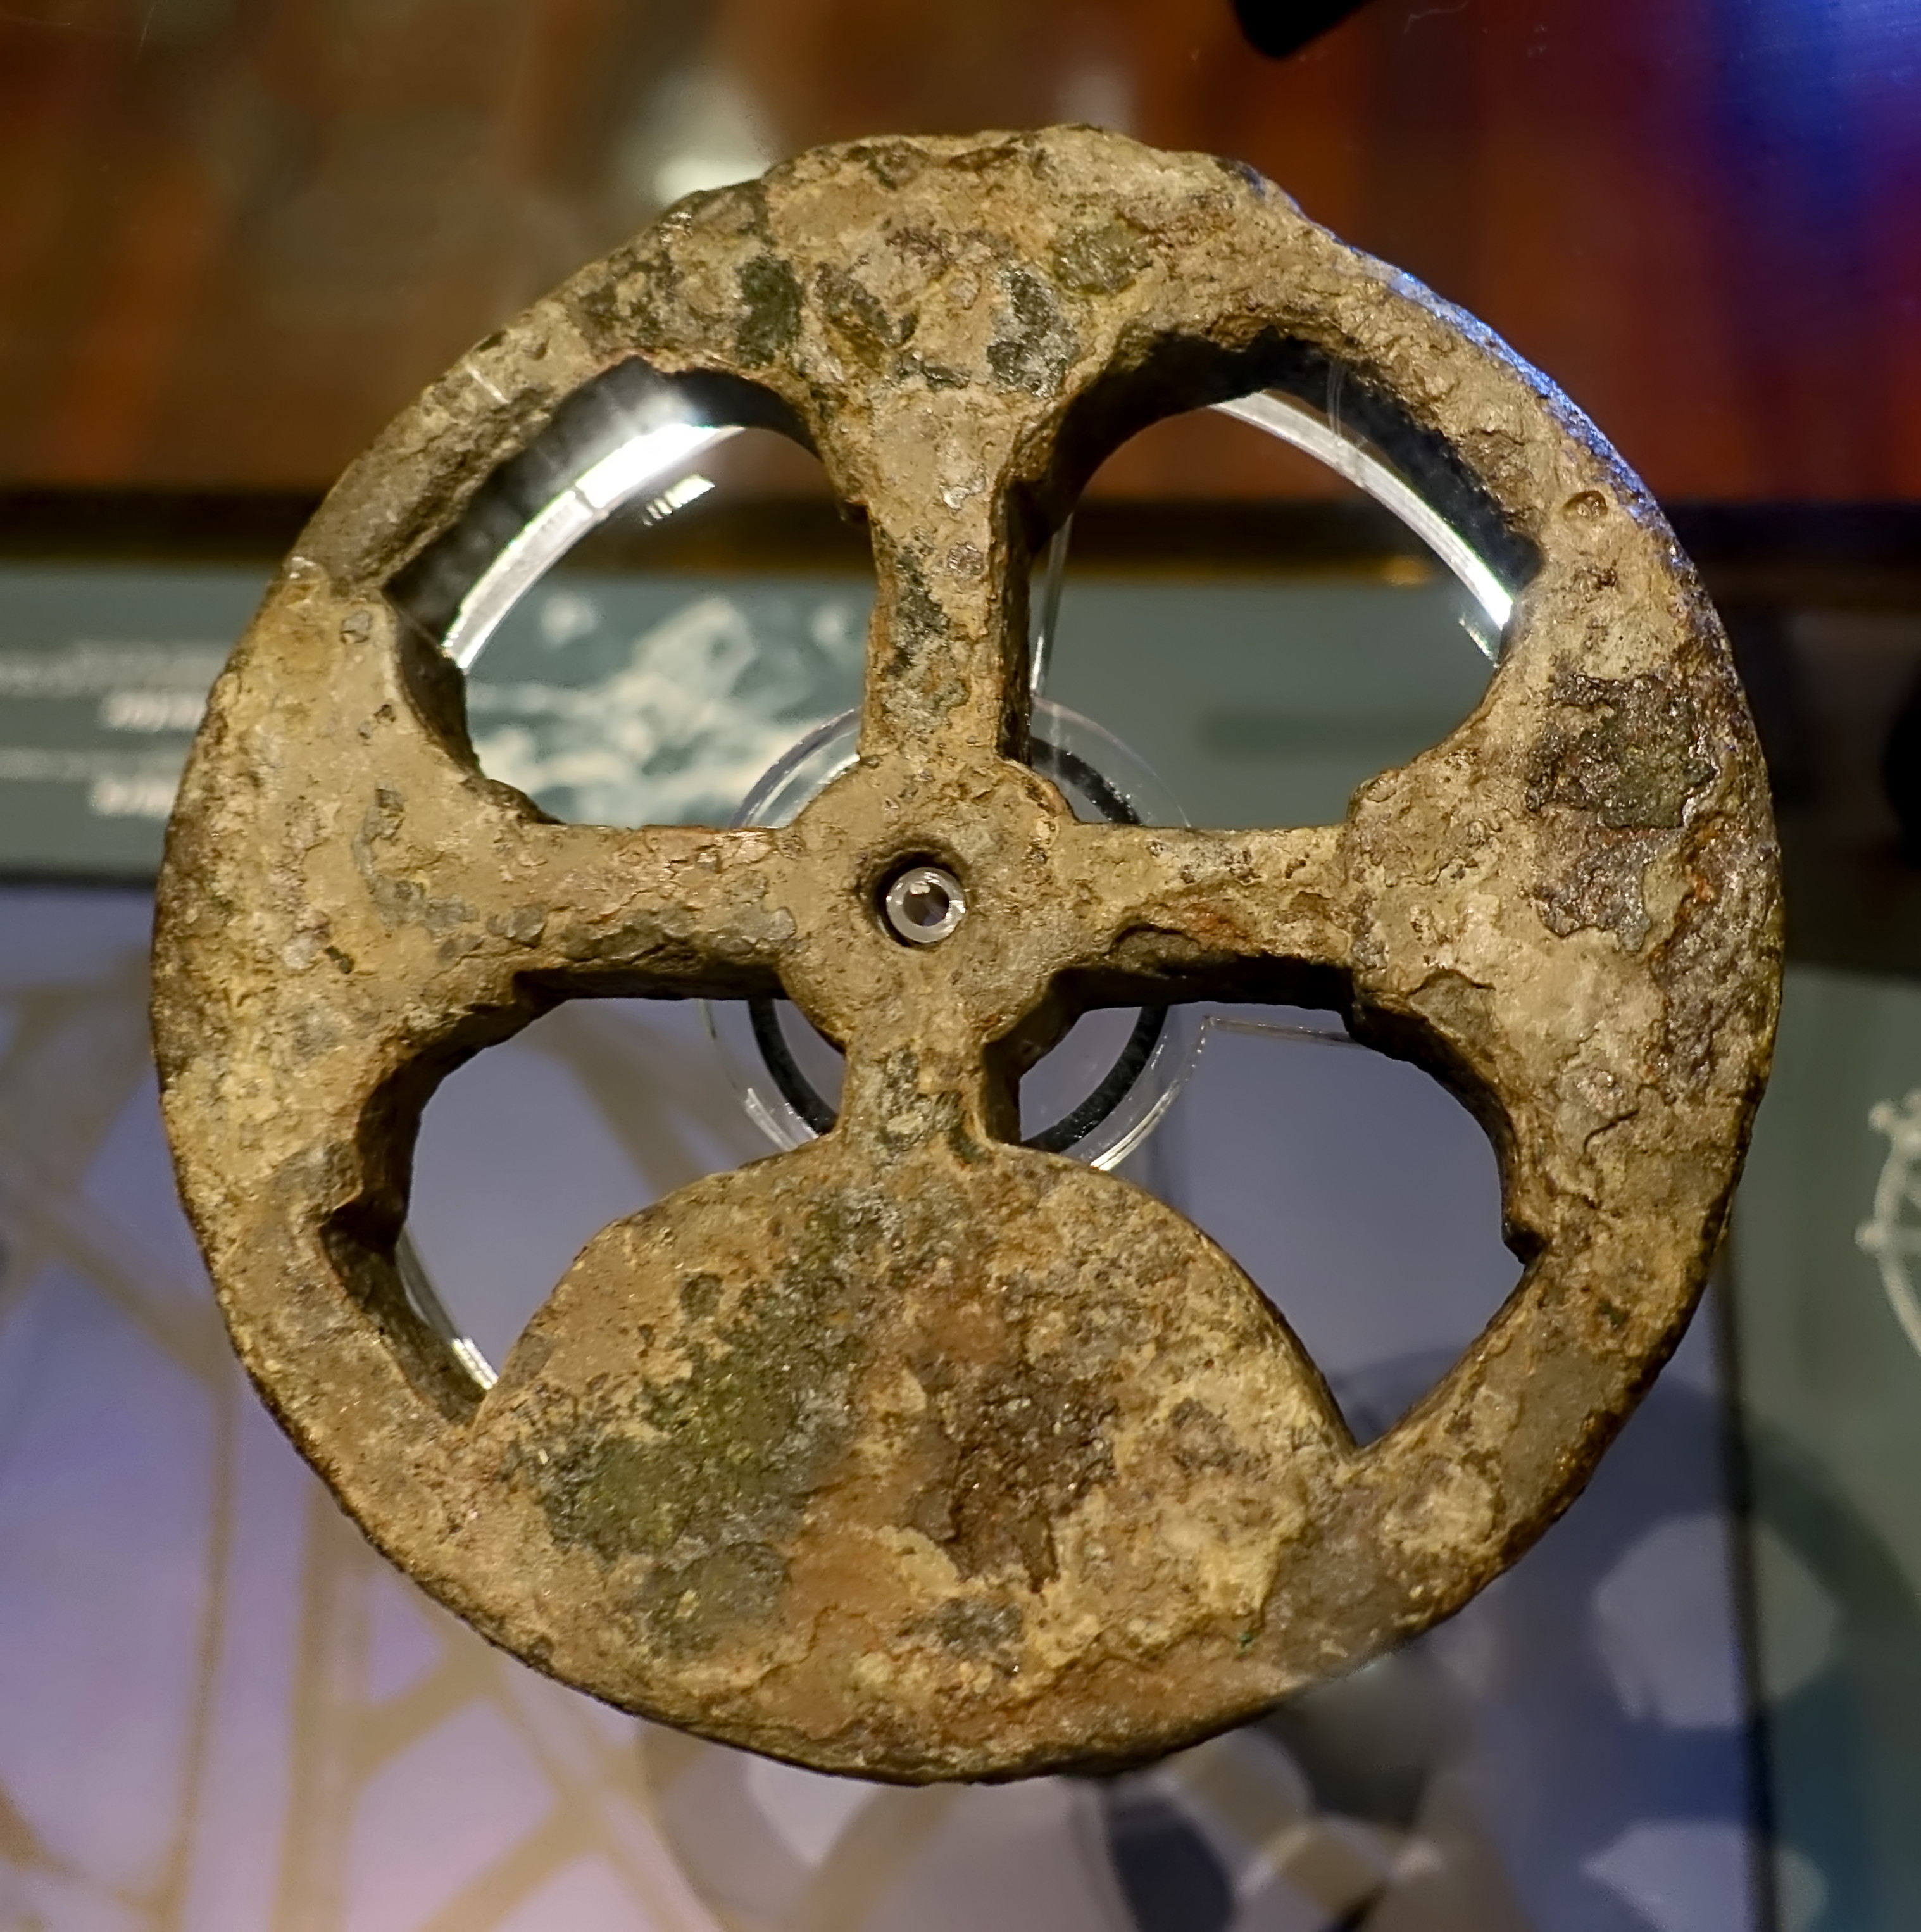
Bronze Astrolabe recovered from the Batavia
Catalog: BAT 3400
Photo: Don Hitchcock 2017
Source and text: Museum of Geraldton, Western Australia
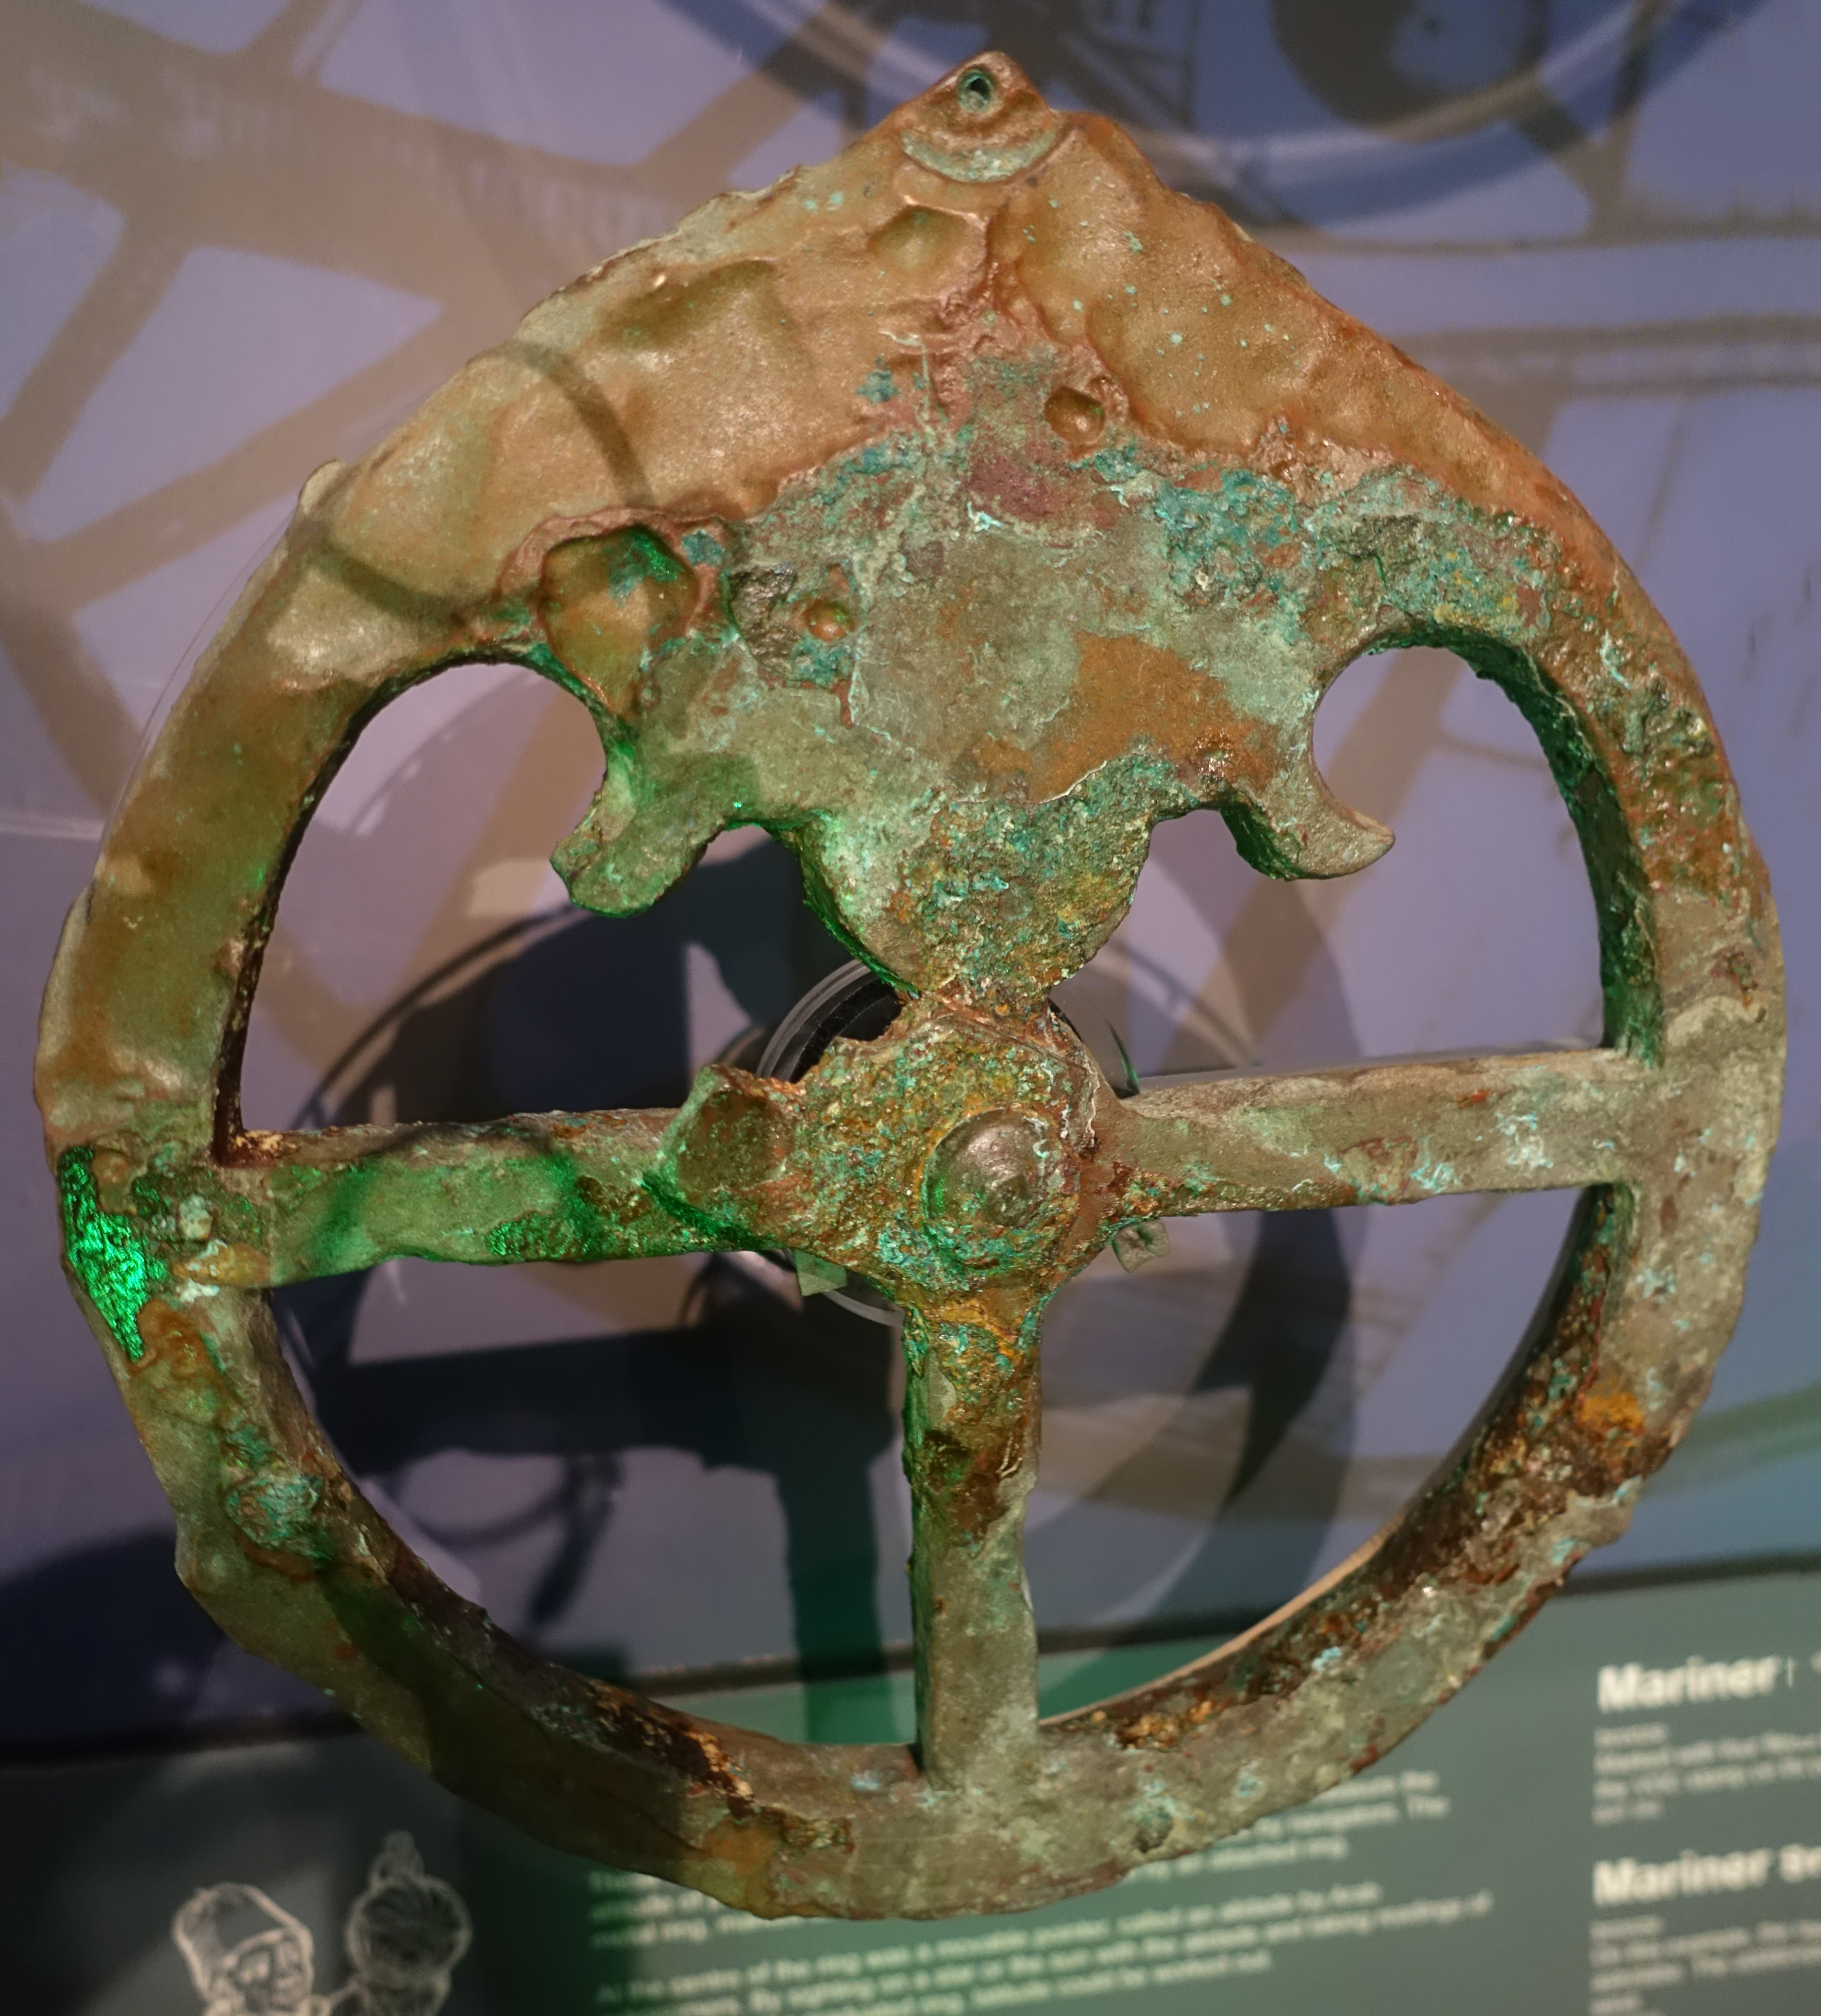
Bronze Astrolabe recovered from the Batavia
Catalog: BAT 394
Photo: Don Hitchcock 2017
Source and text: Museum of Geraldton, Western Australia
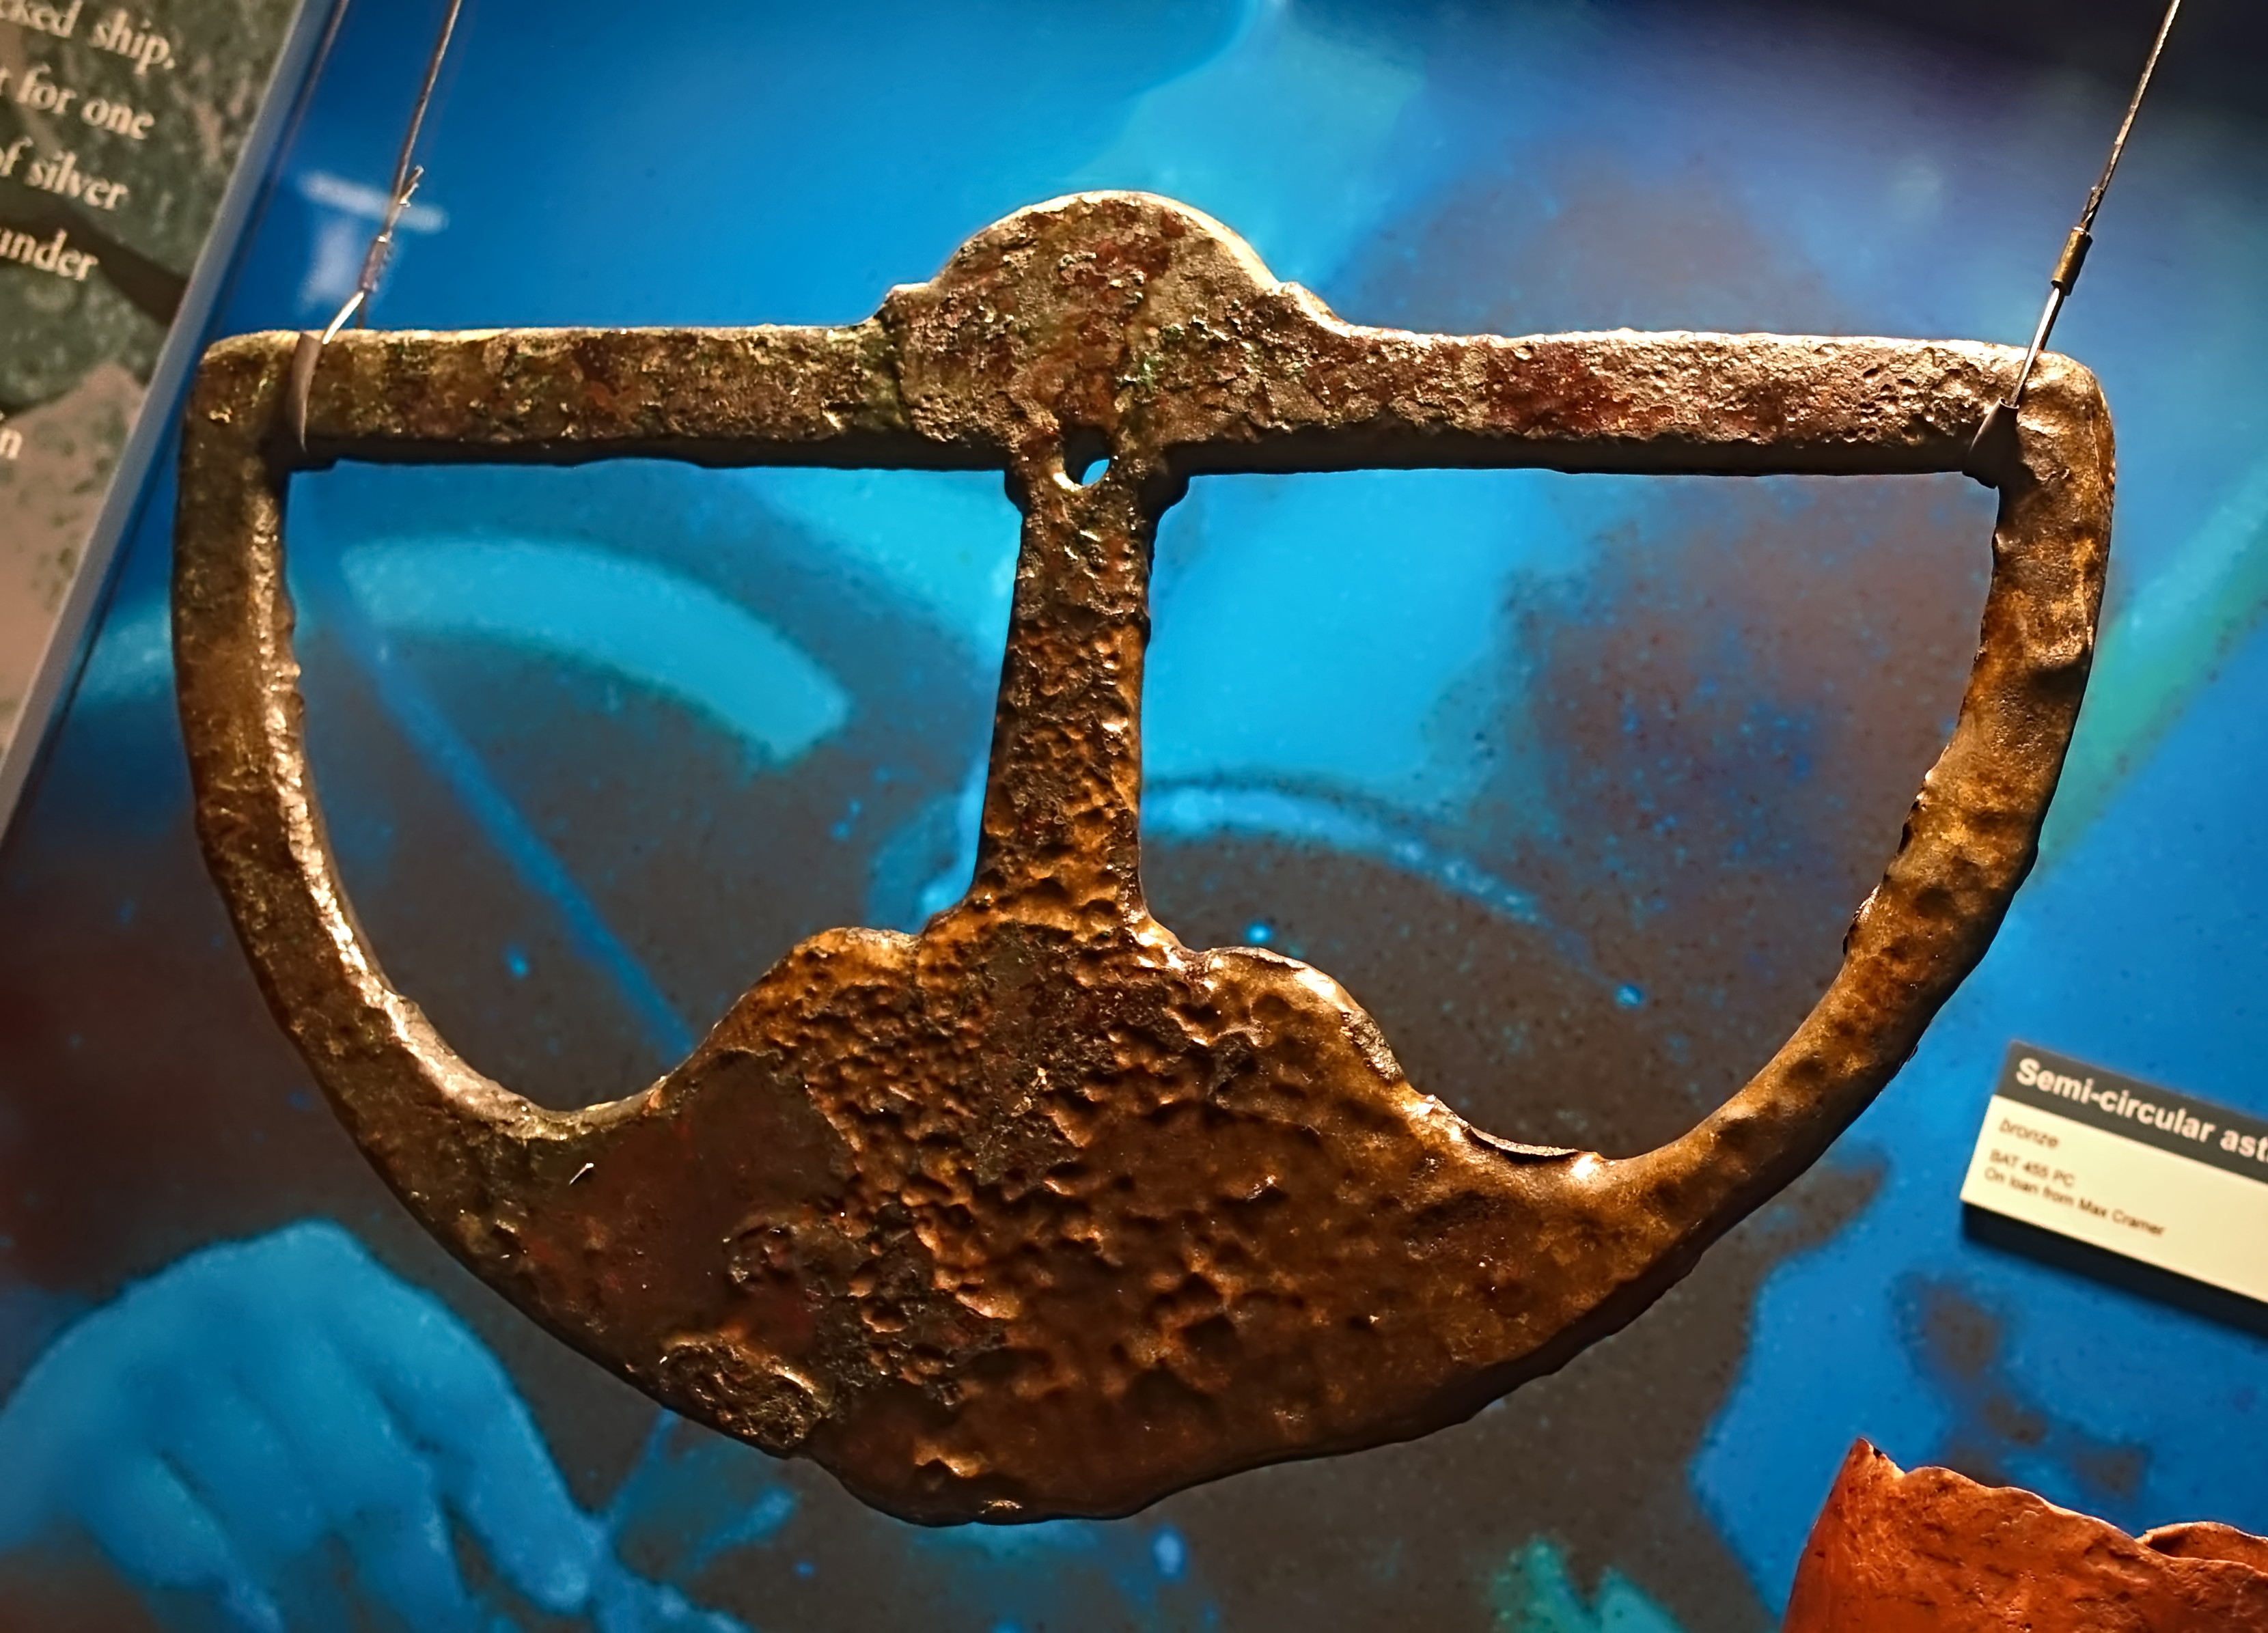
Semicircular bronze Astrolabe recovered from the Batavia.
Catalog: BAT 455, on loan from Max Cramer
Photo: Don Hitchcock 2017
Source and text: Museum of Geraldton, Western Australia
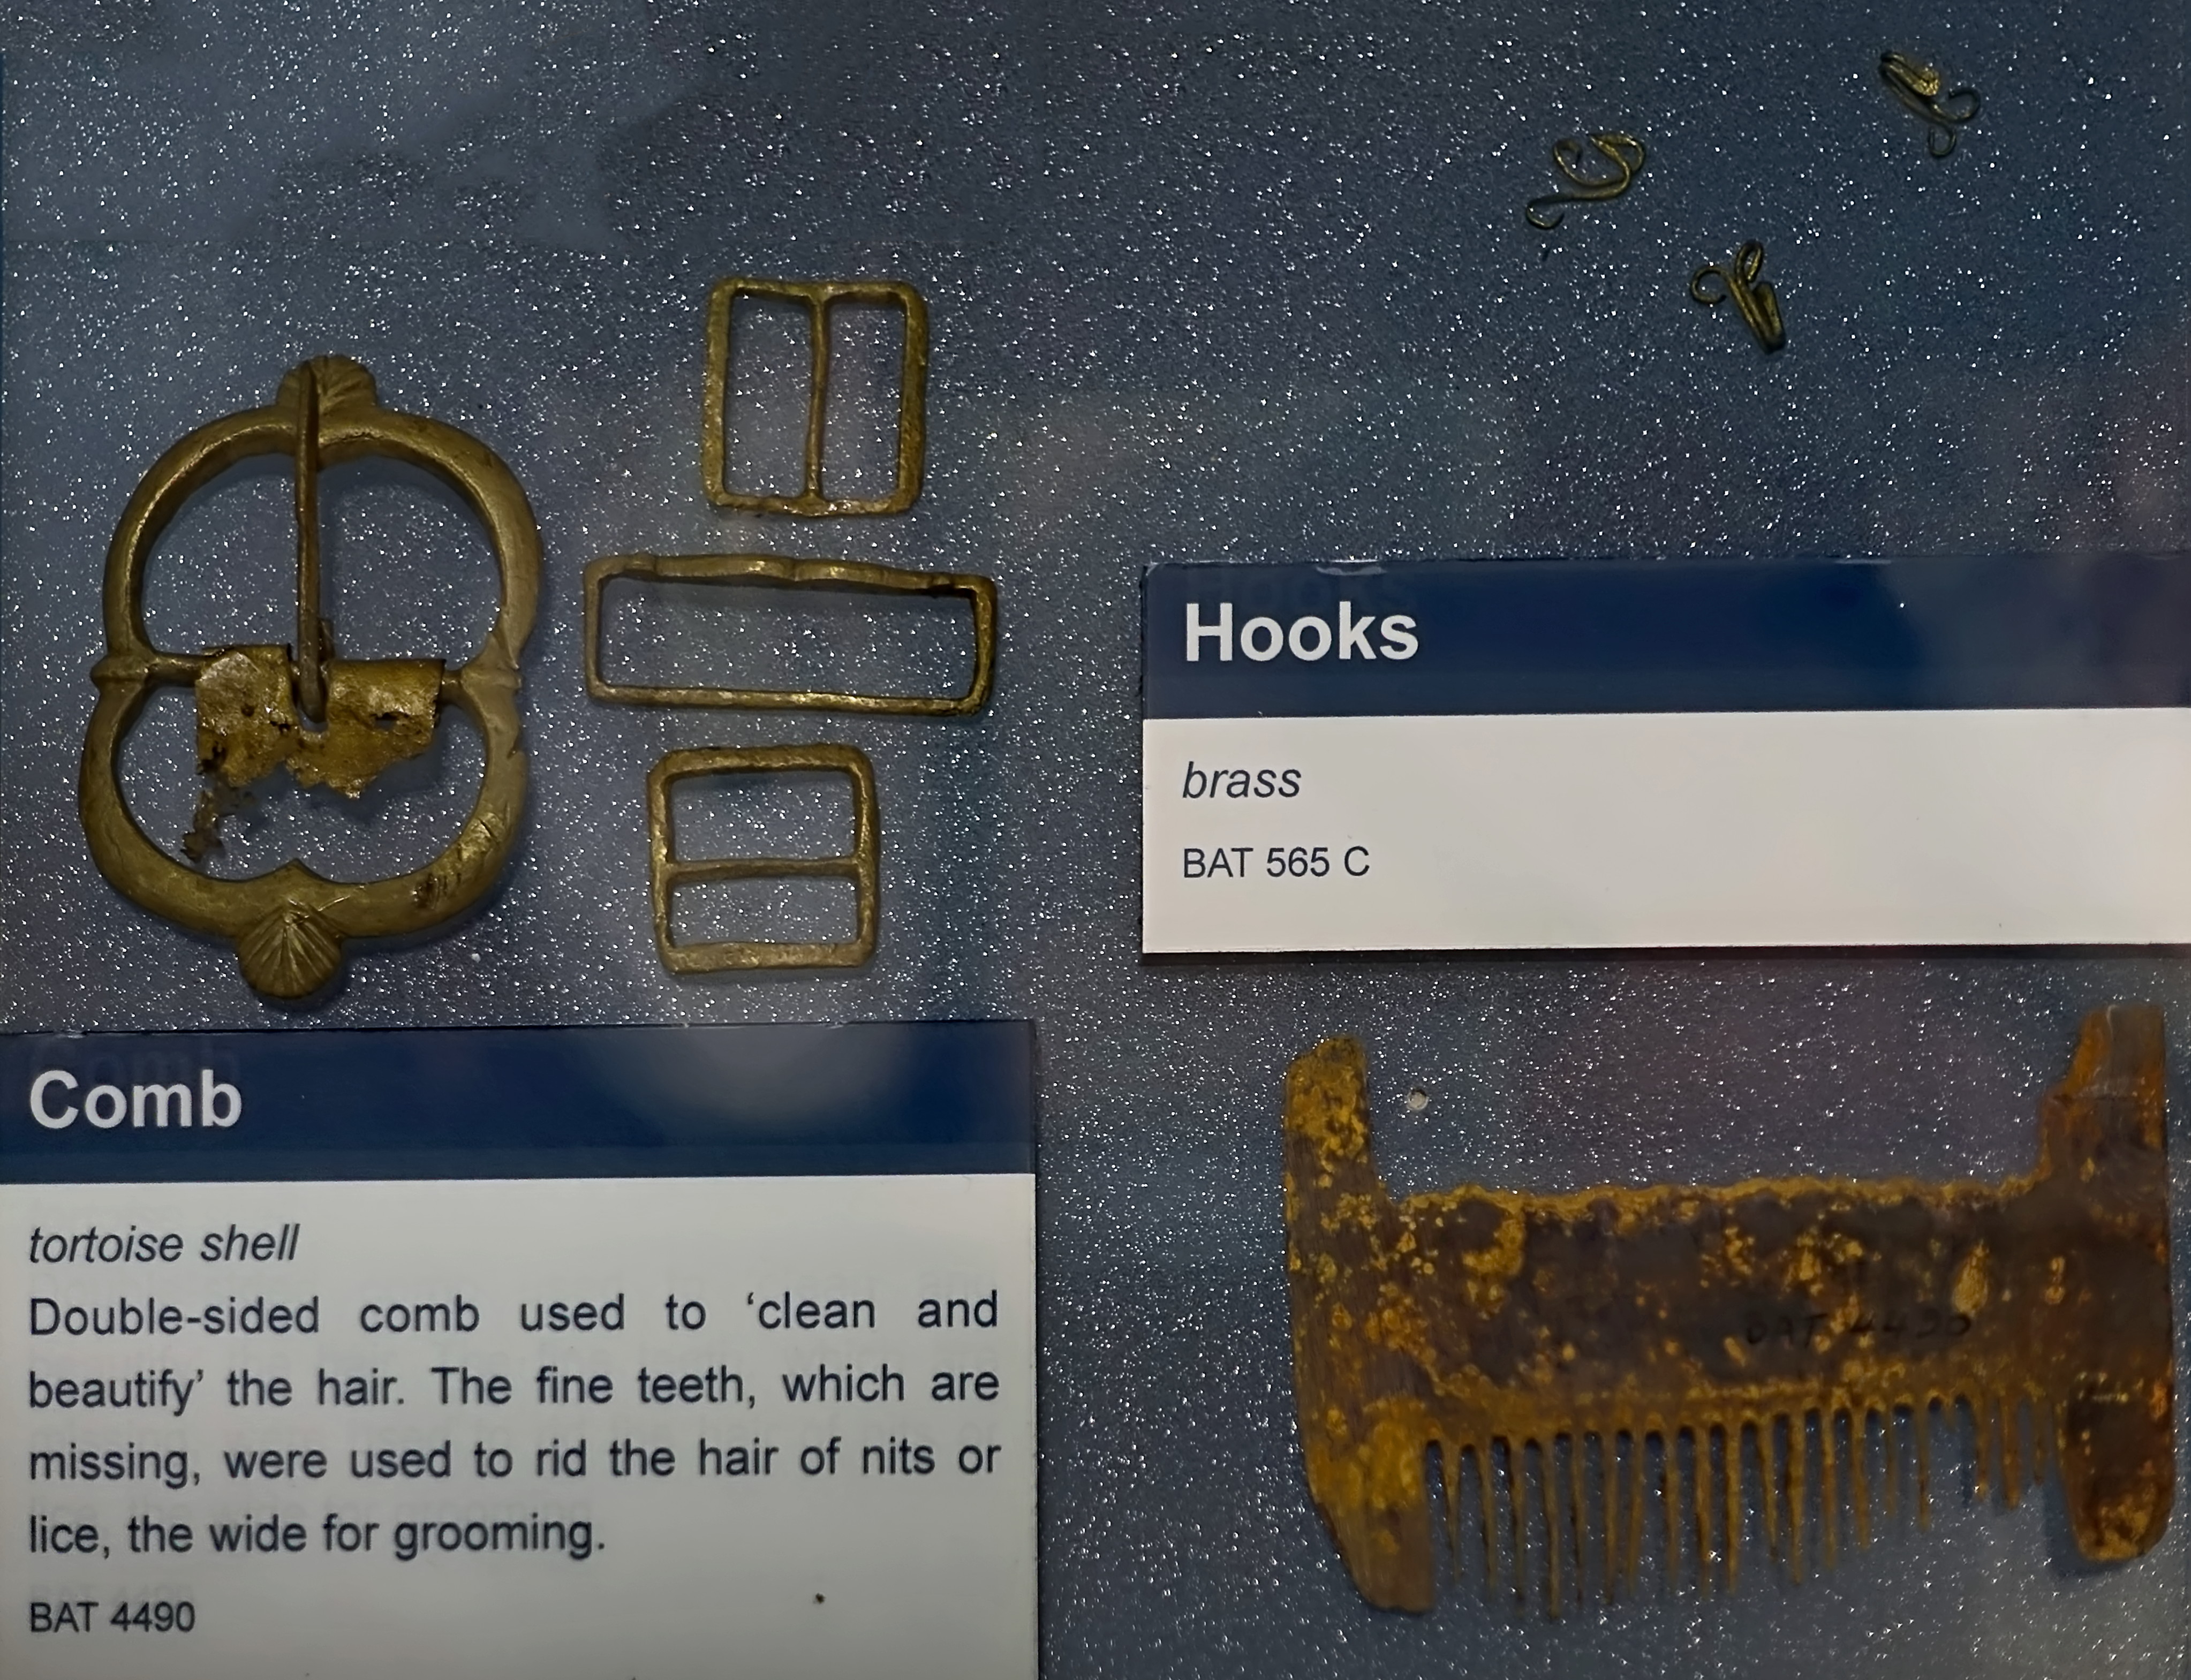
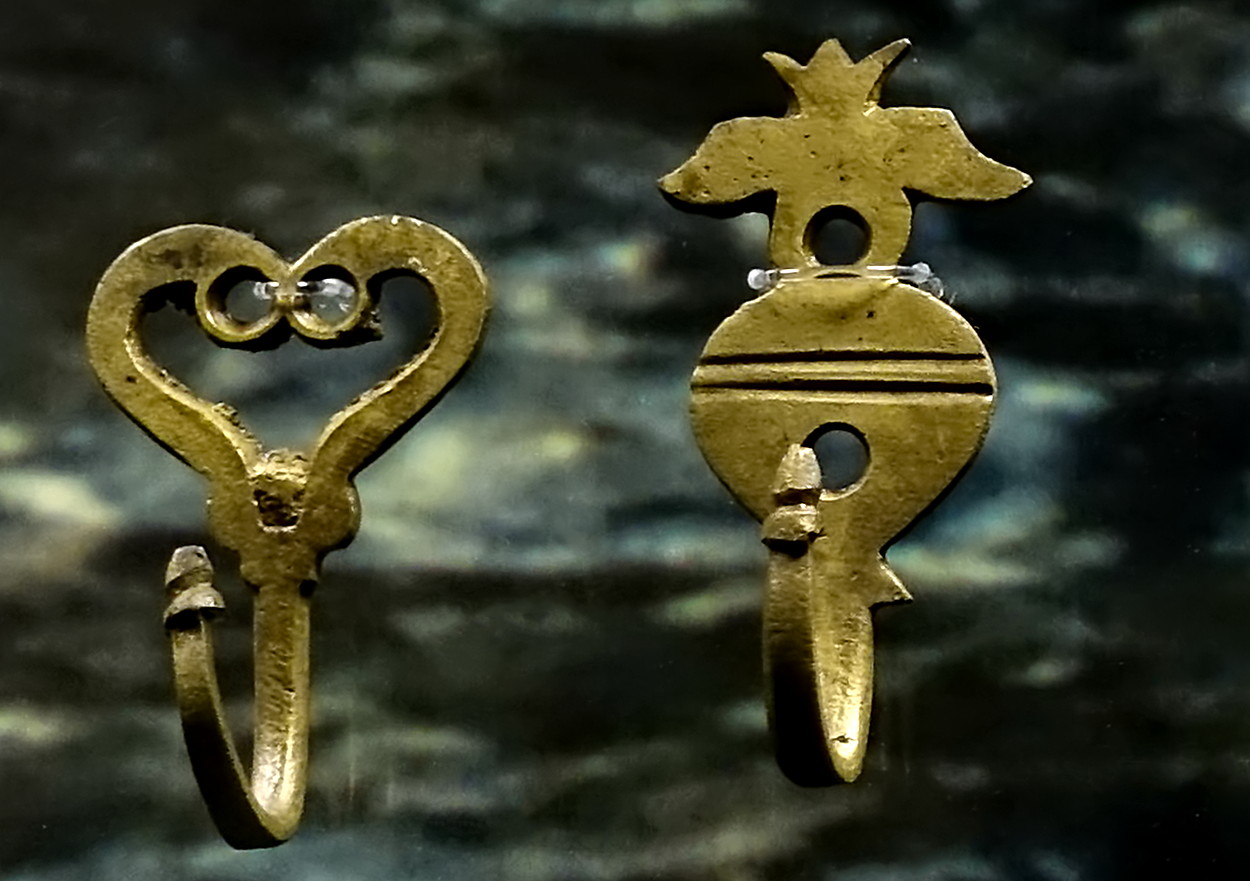
Personal items from the Batavia, clockwise from top left:
Buckles.
Catalog: BAT 561 A,B,C,D
Hooks for garments.
Catalog: BAT 565 C
Double sided comb used to 'clean and beautify' the hair. The fine teeth, which are now missing, were used to rid the hair of nits or lice, the wide teeth for grooming.
Catalog: BAT 4490
Photo: Don Hitchcock 2017
Source and text: Museum of Geraldton, Western Australia
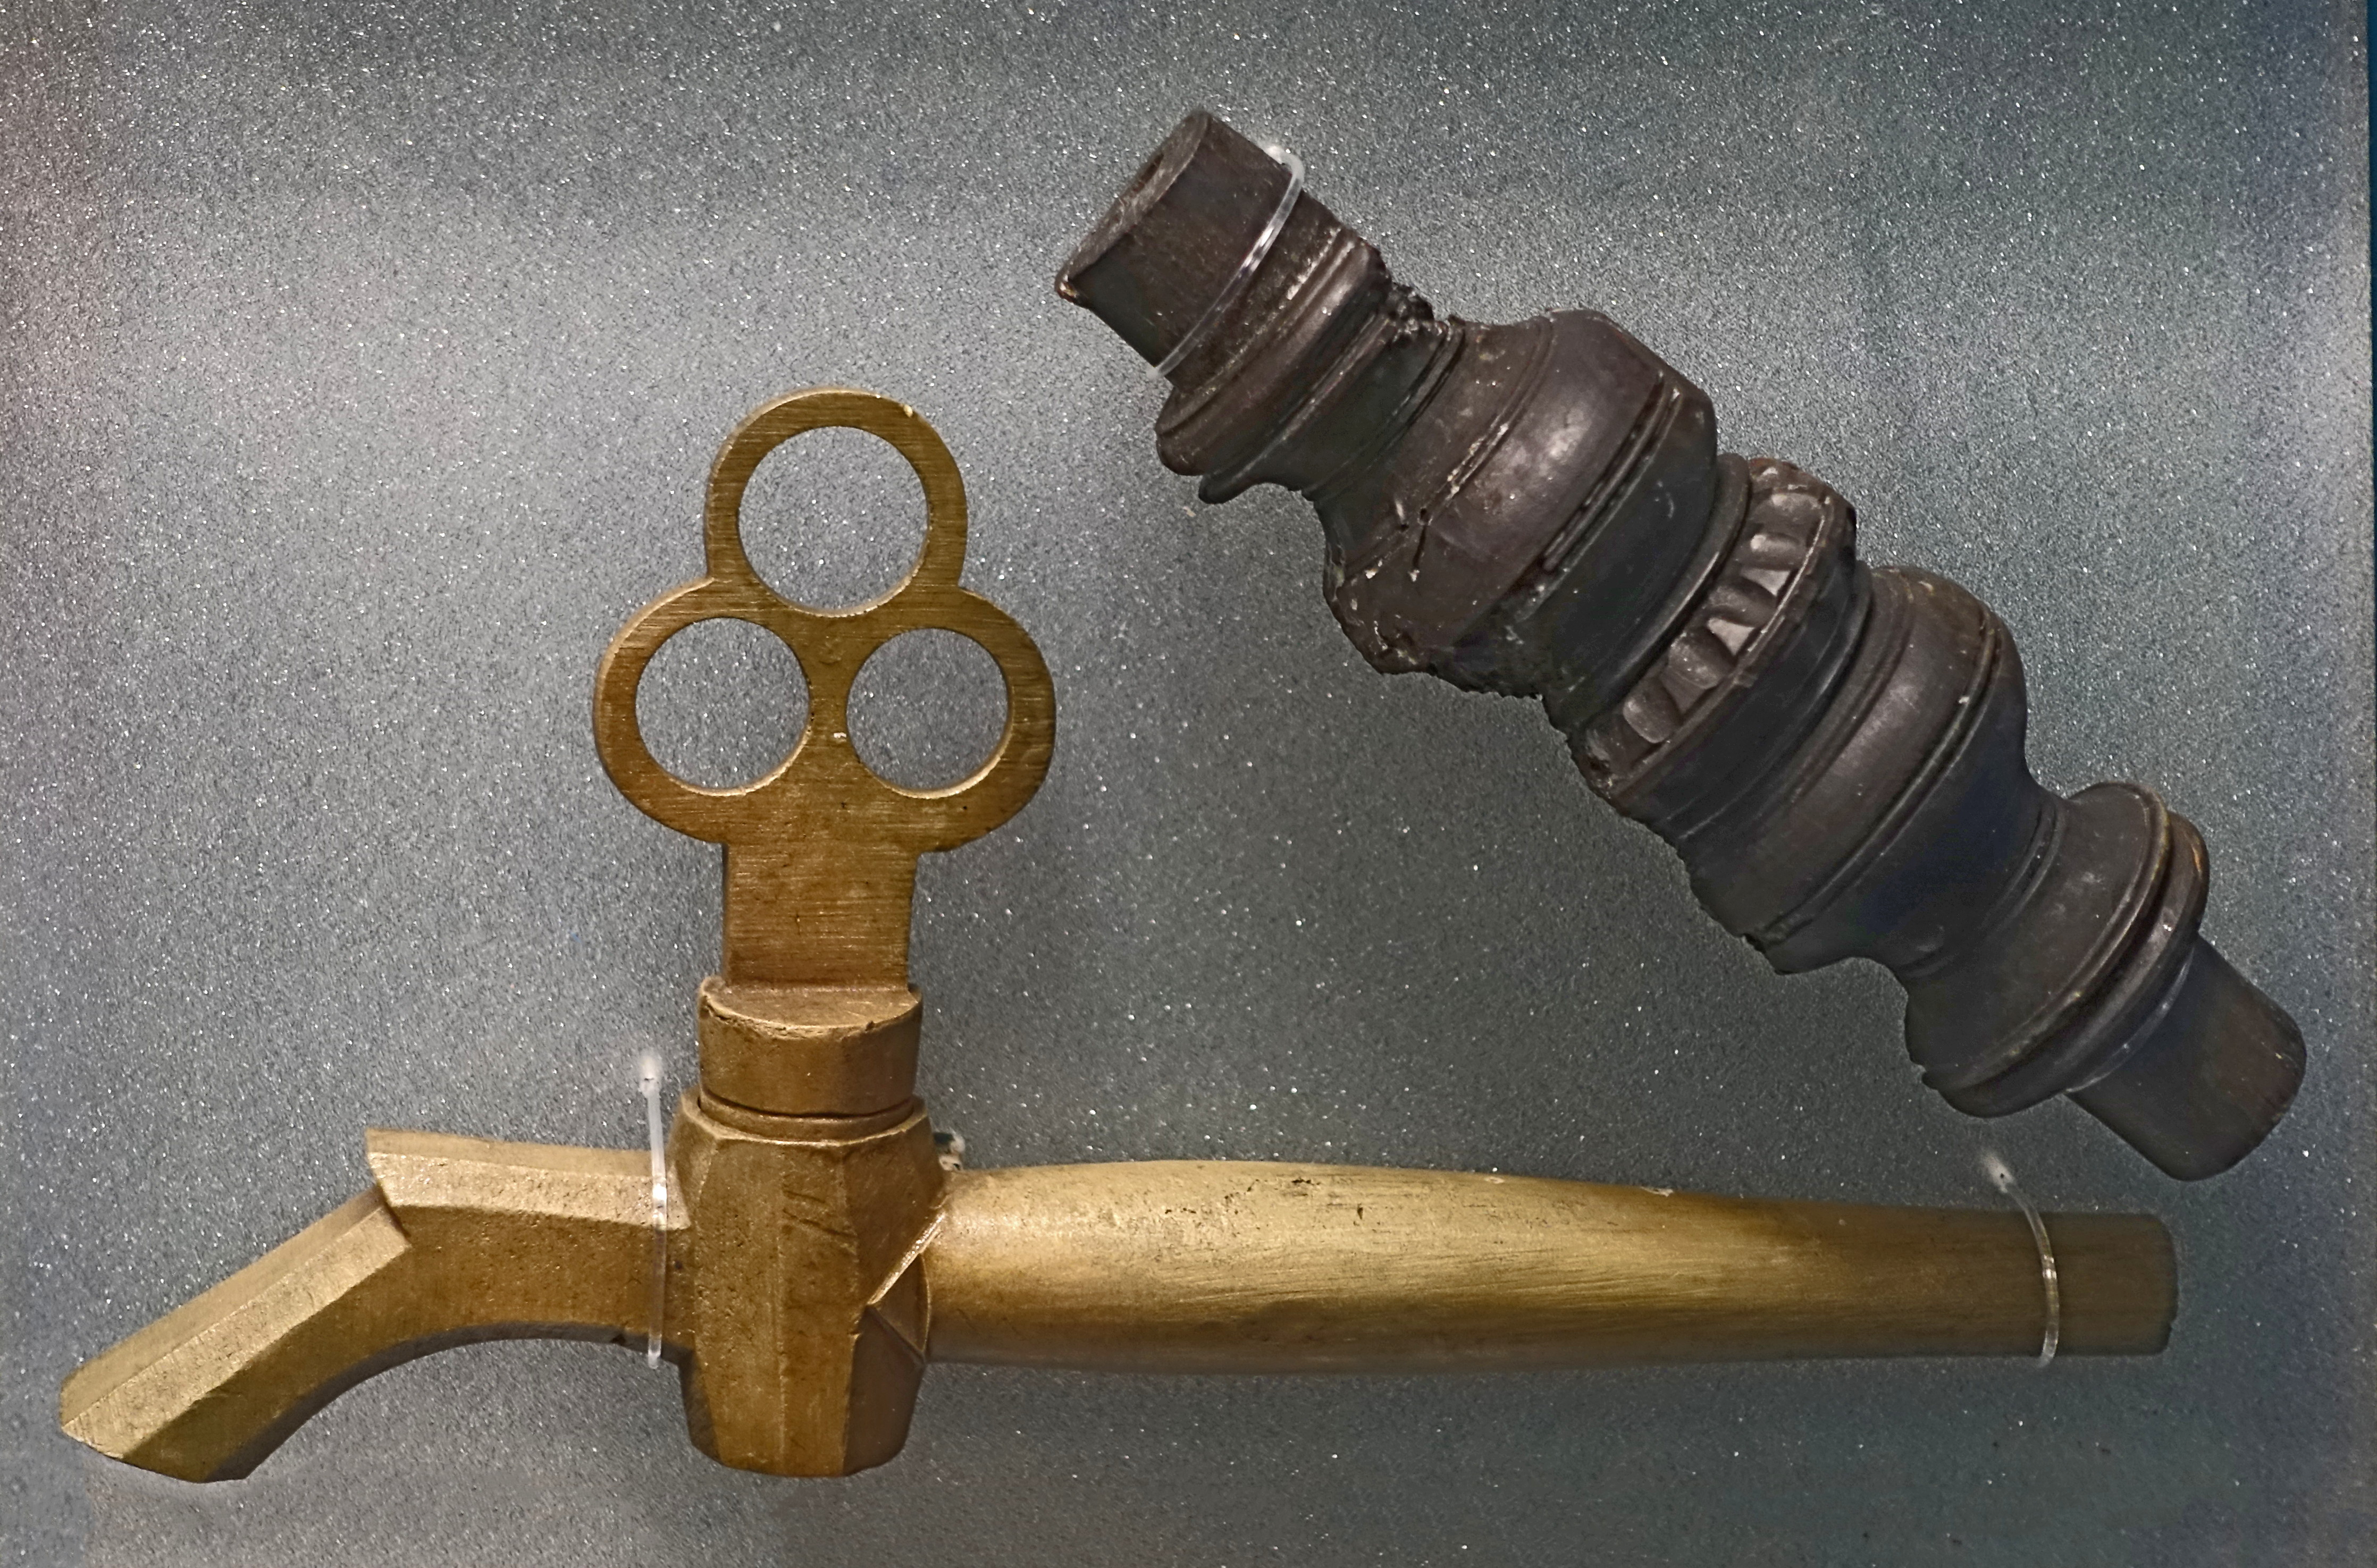
Items from the Batavia.
(left) Cast brass tap for drawing wine or beer from wooden casks.
Catalog: BAT 3260
(right) This decorated wooden handle was probably part of a lace bobbin.
Catalog: BAT 4494
Photo: Don Hitchcock 2017
Source and text: Museum of Geraldton, Western Australia
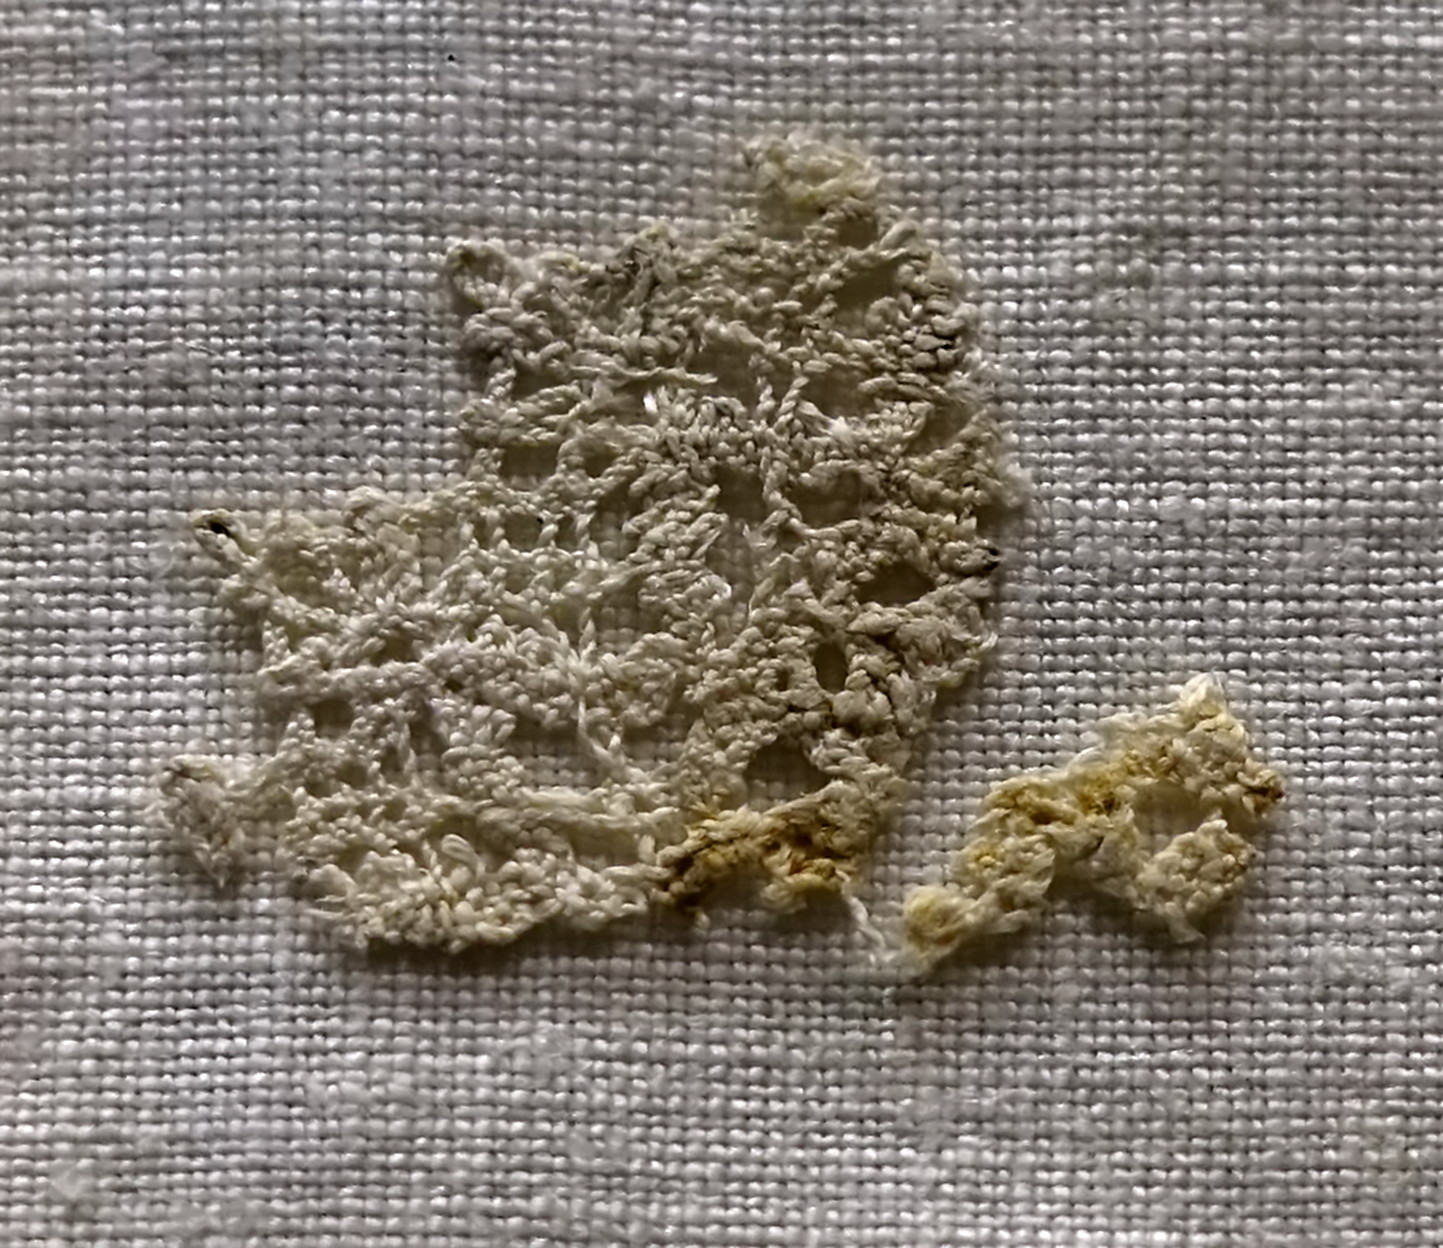
Item from the Batavia.
( This piece of lace was probably found on shore, possibly in a grave, since immersion in sea water for more than three hundred years would have destroyed it - Don )
Italian or Flemish (Belgian) style bobbin lace, made of mixed linen and cotton fibre, suitable for trimming a collar and cuffs, or the neck of a dress.
Catalog: BAT 4492
Photo: Don Hitchcock 2017
Source and text: Museum of Geraldton, Western Australia
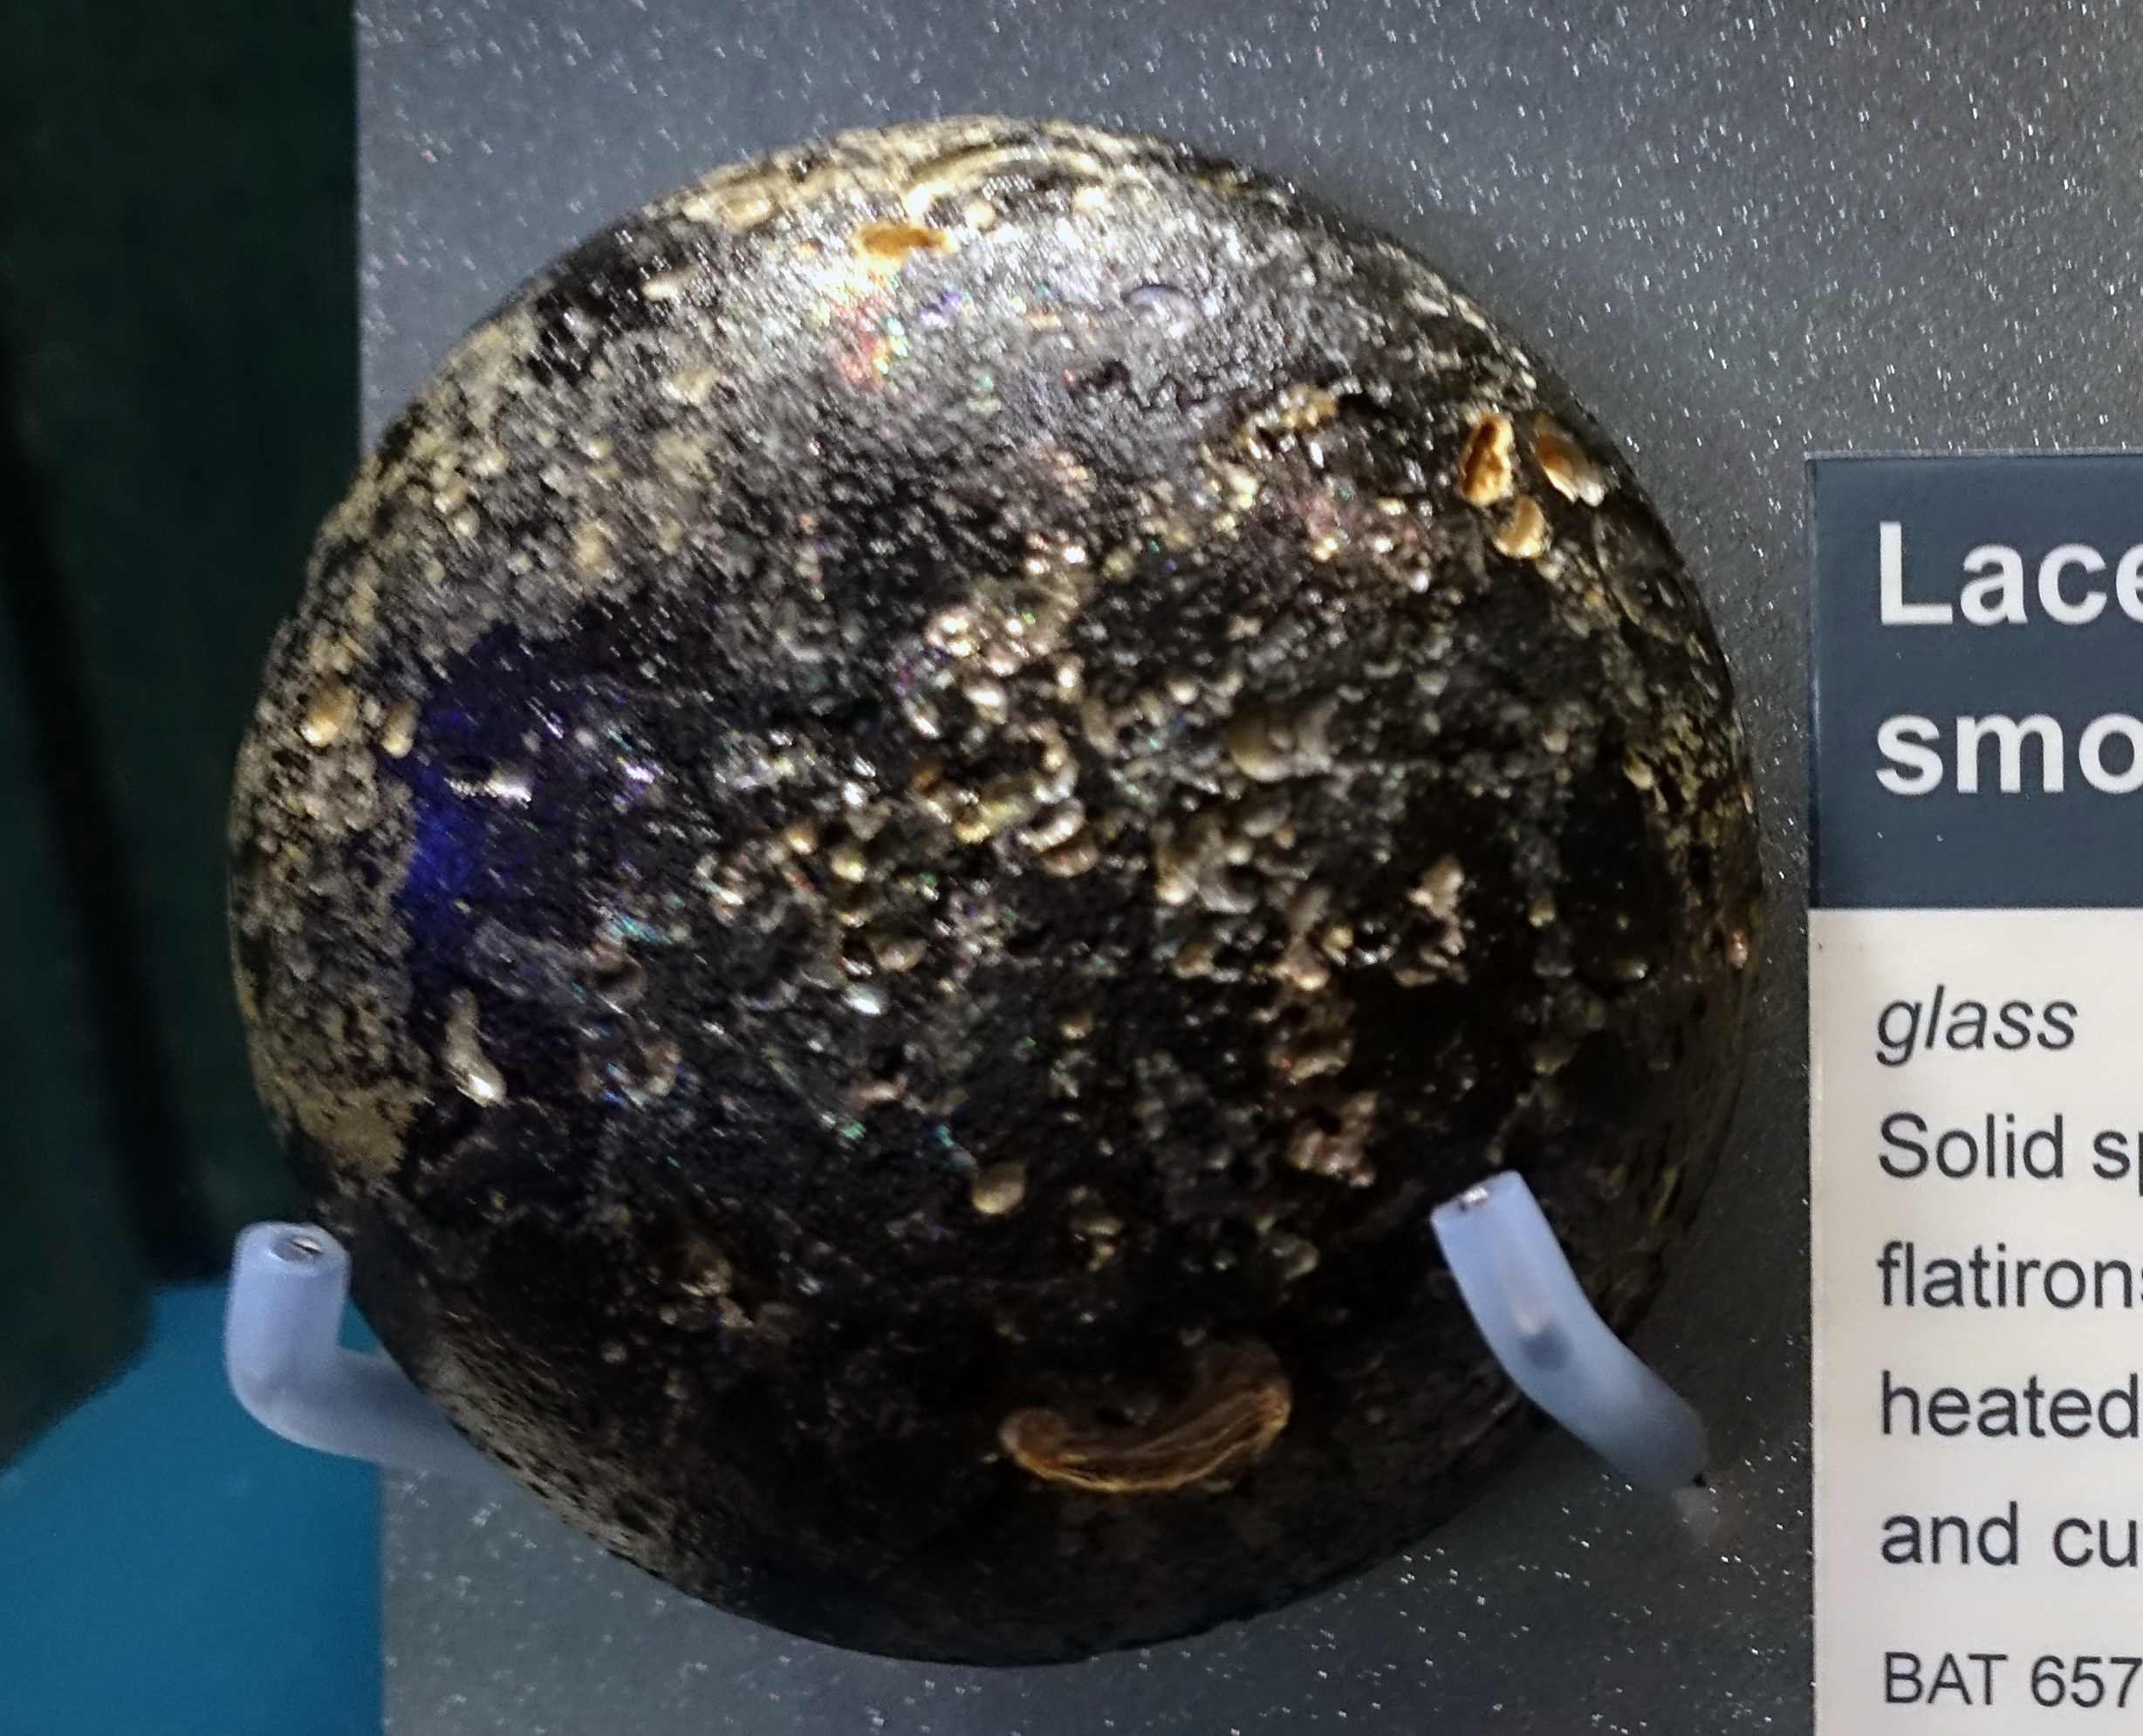
Items from the Batavia.
Lace iron or linen smoother.
Solid spheres of glass were the forerunners of flatirons. They were used cold or slightly heated to press pleats into the lace on collars and cuffs worn by men and women.
Catalog: BAT 657
Photo: Don Hitchcock 2017
Source and text: Museum of Geraldton, Western Australia
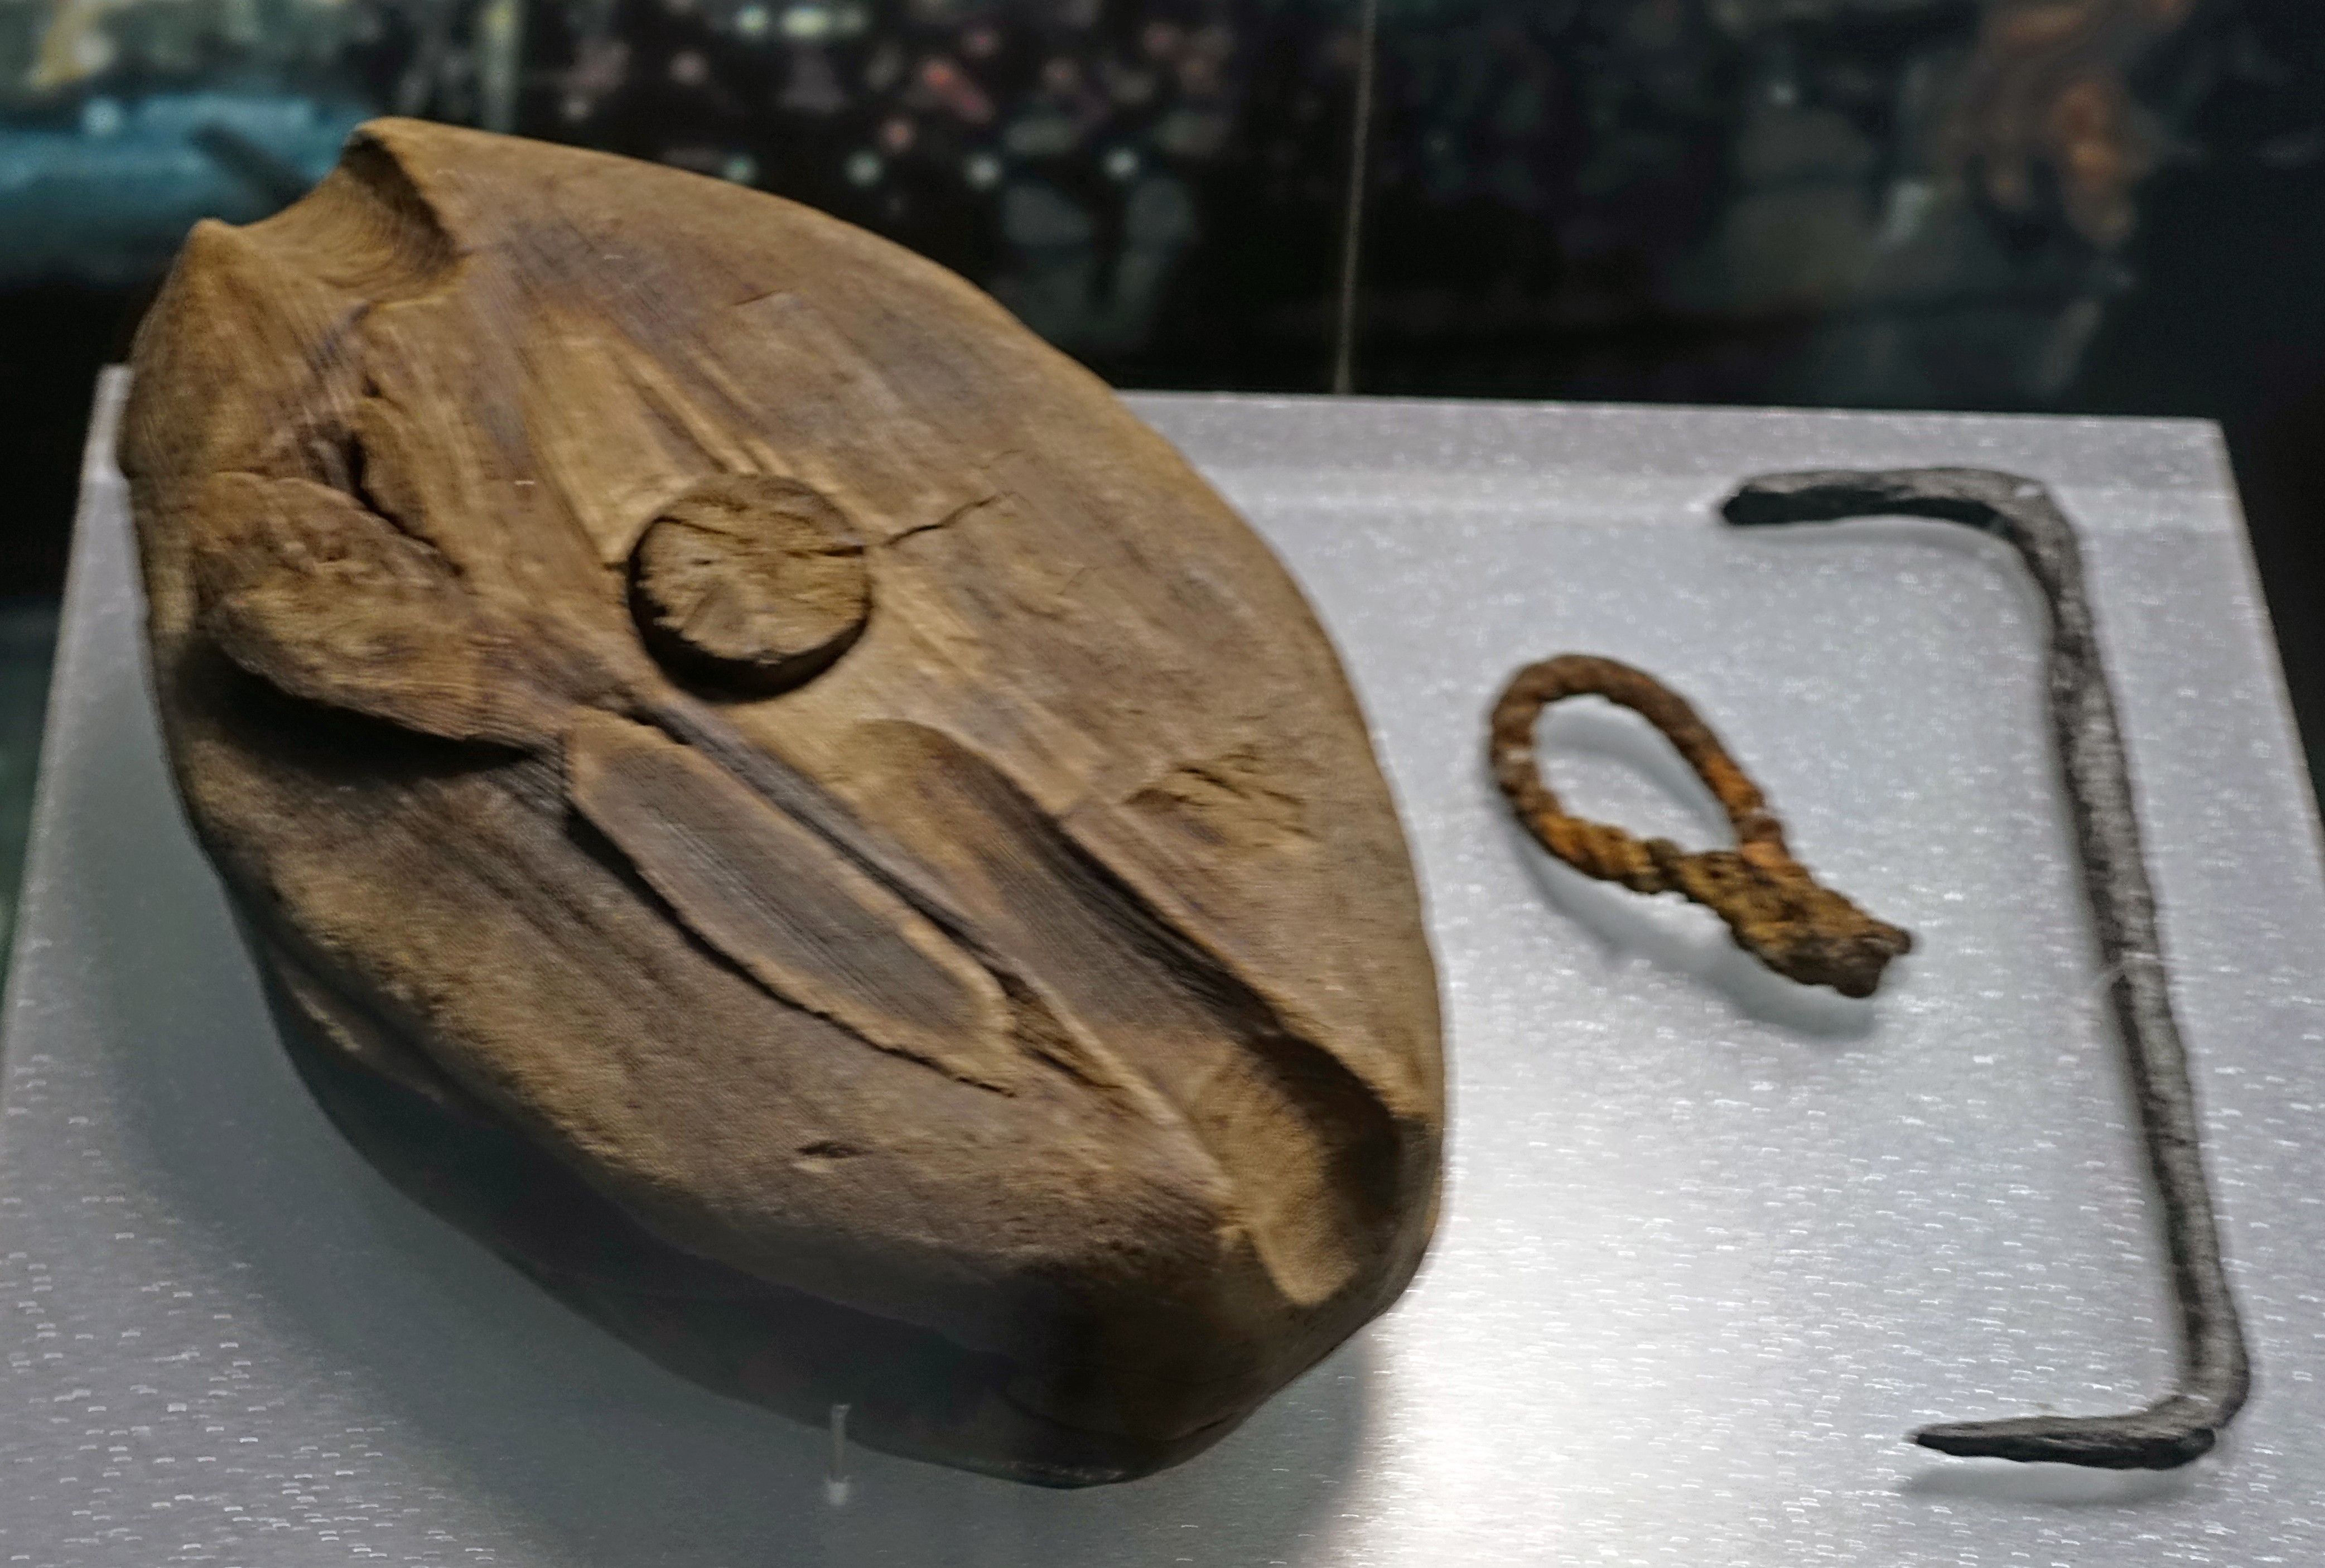
Items from the Batavia.
Wooden pulley block, single sheave.
Catalog: BAT 6447
Piece of rope.
Catalog: 683
Iron keel staple.
Catalog: 366
Photo: Don Hitchcock 2017
Source and text: Museum of Geraldton, Western Australia
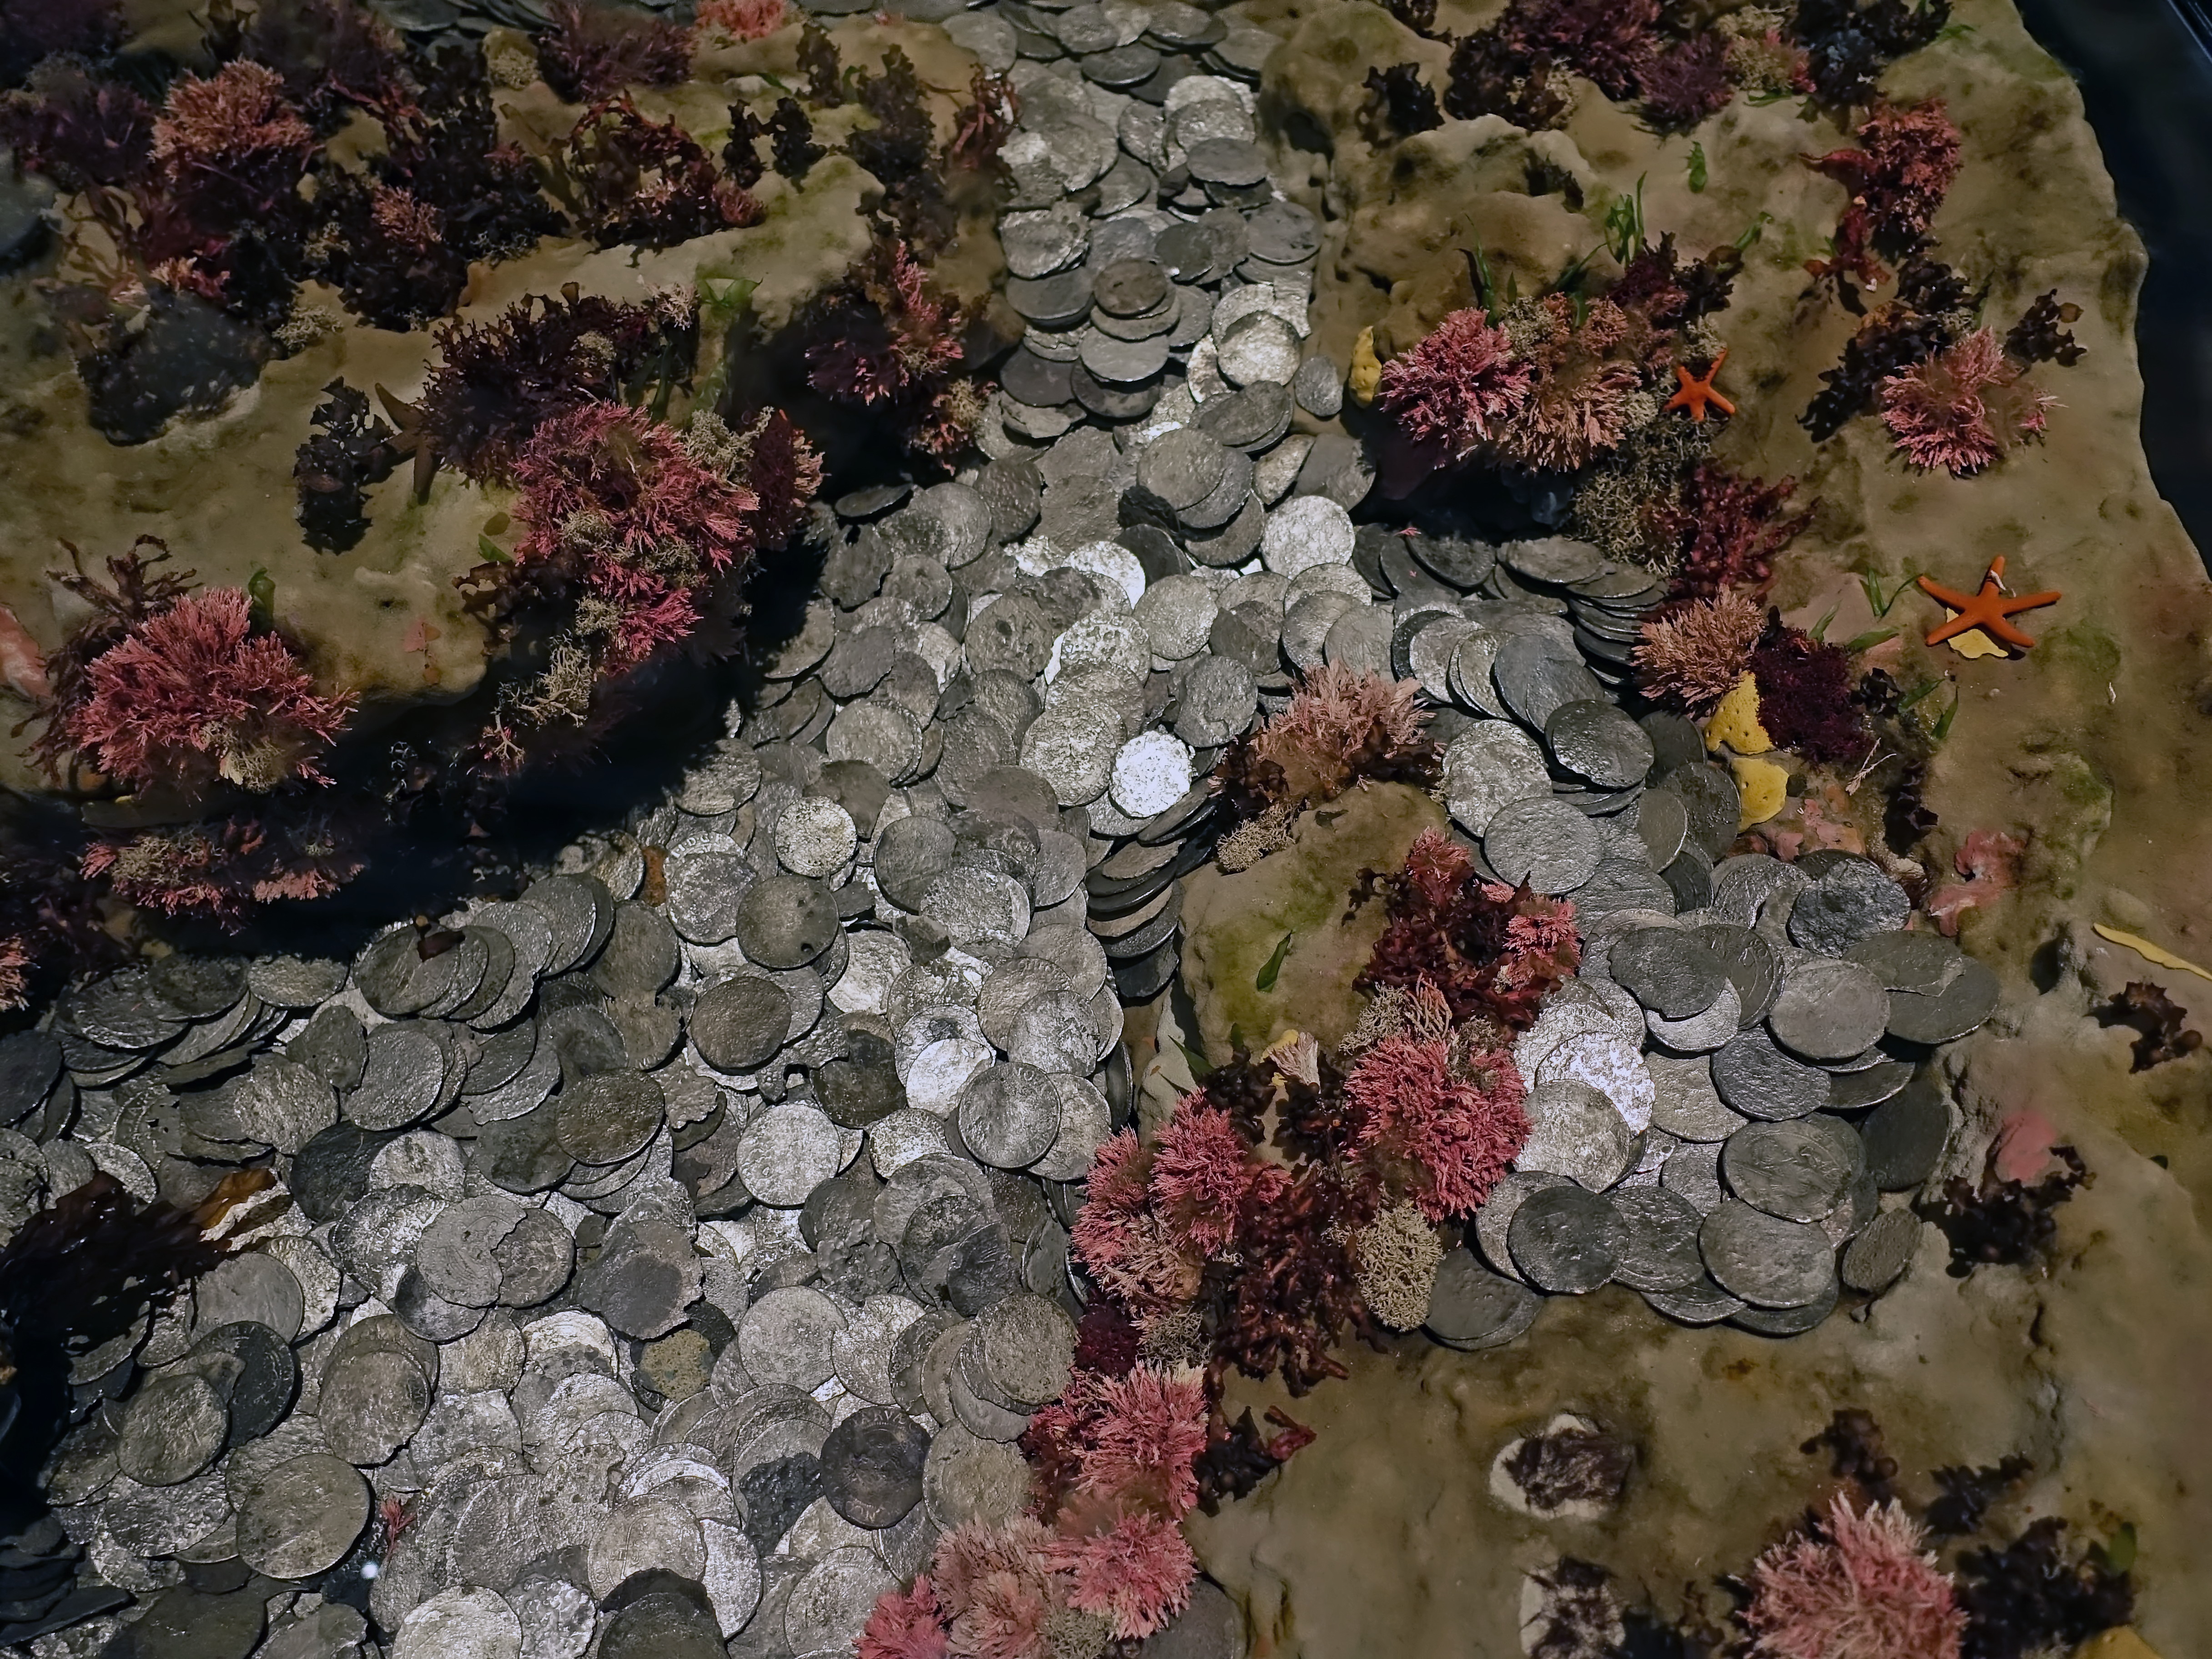
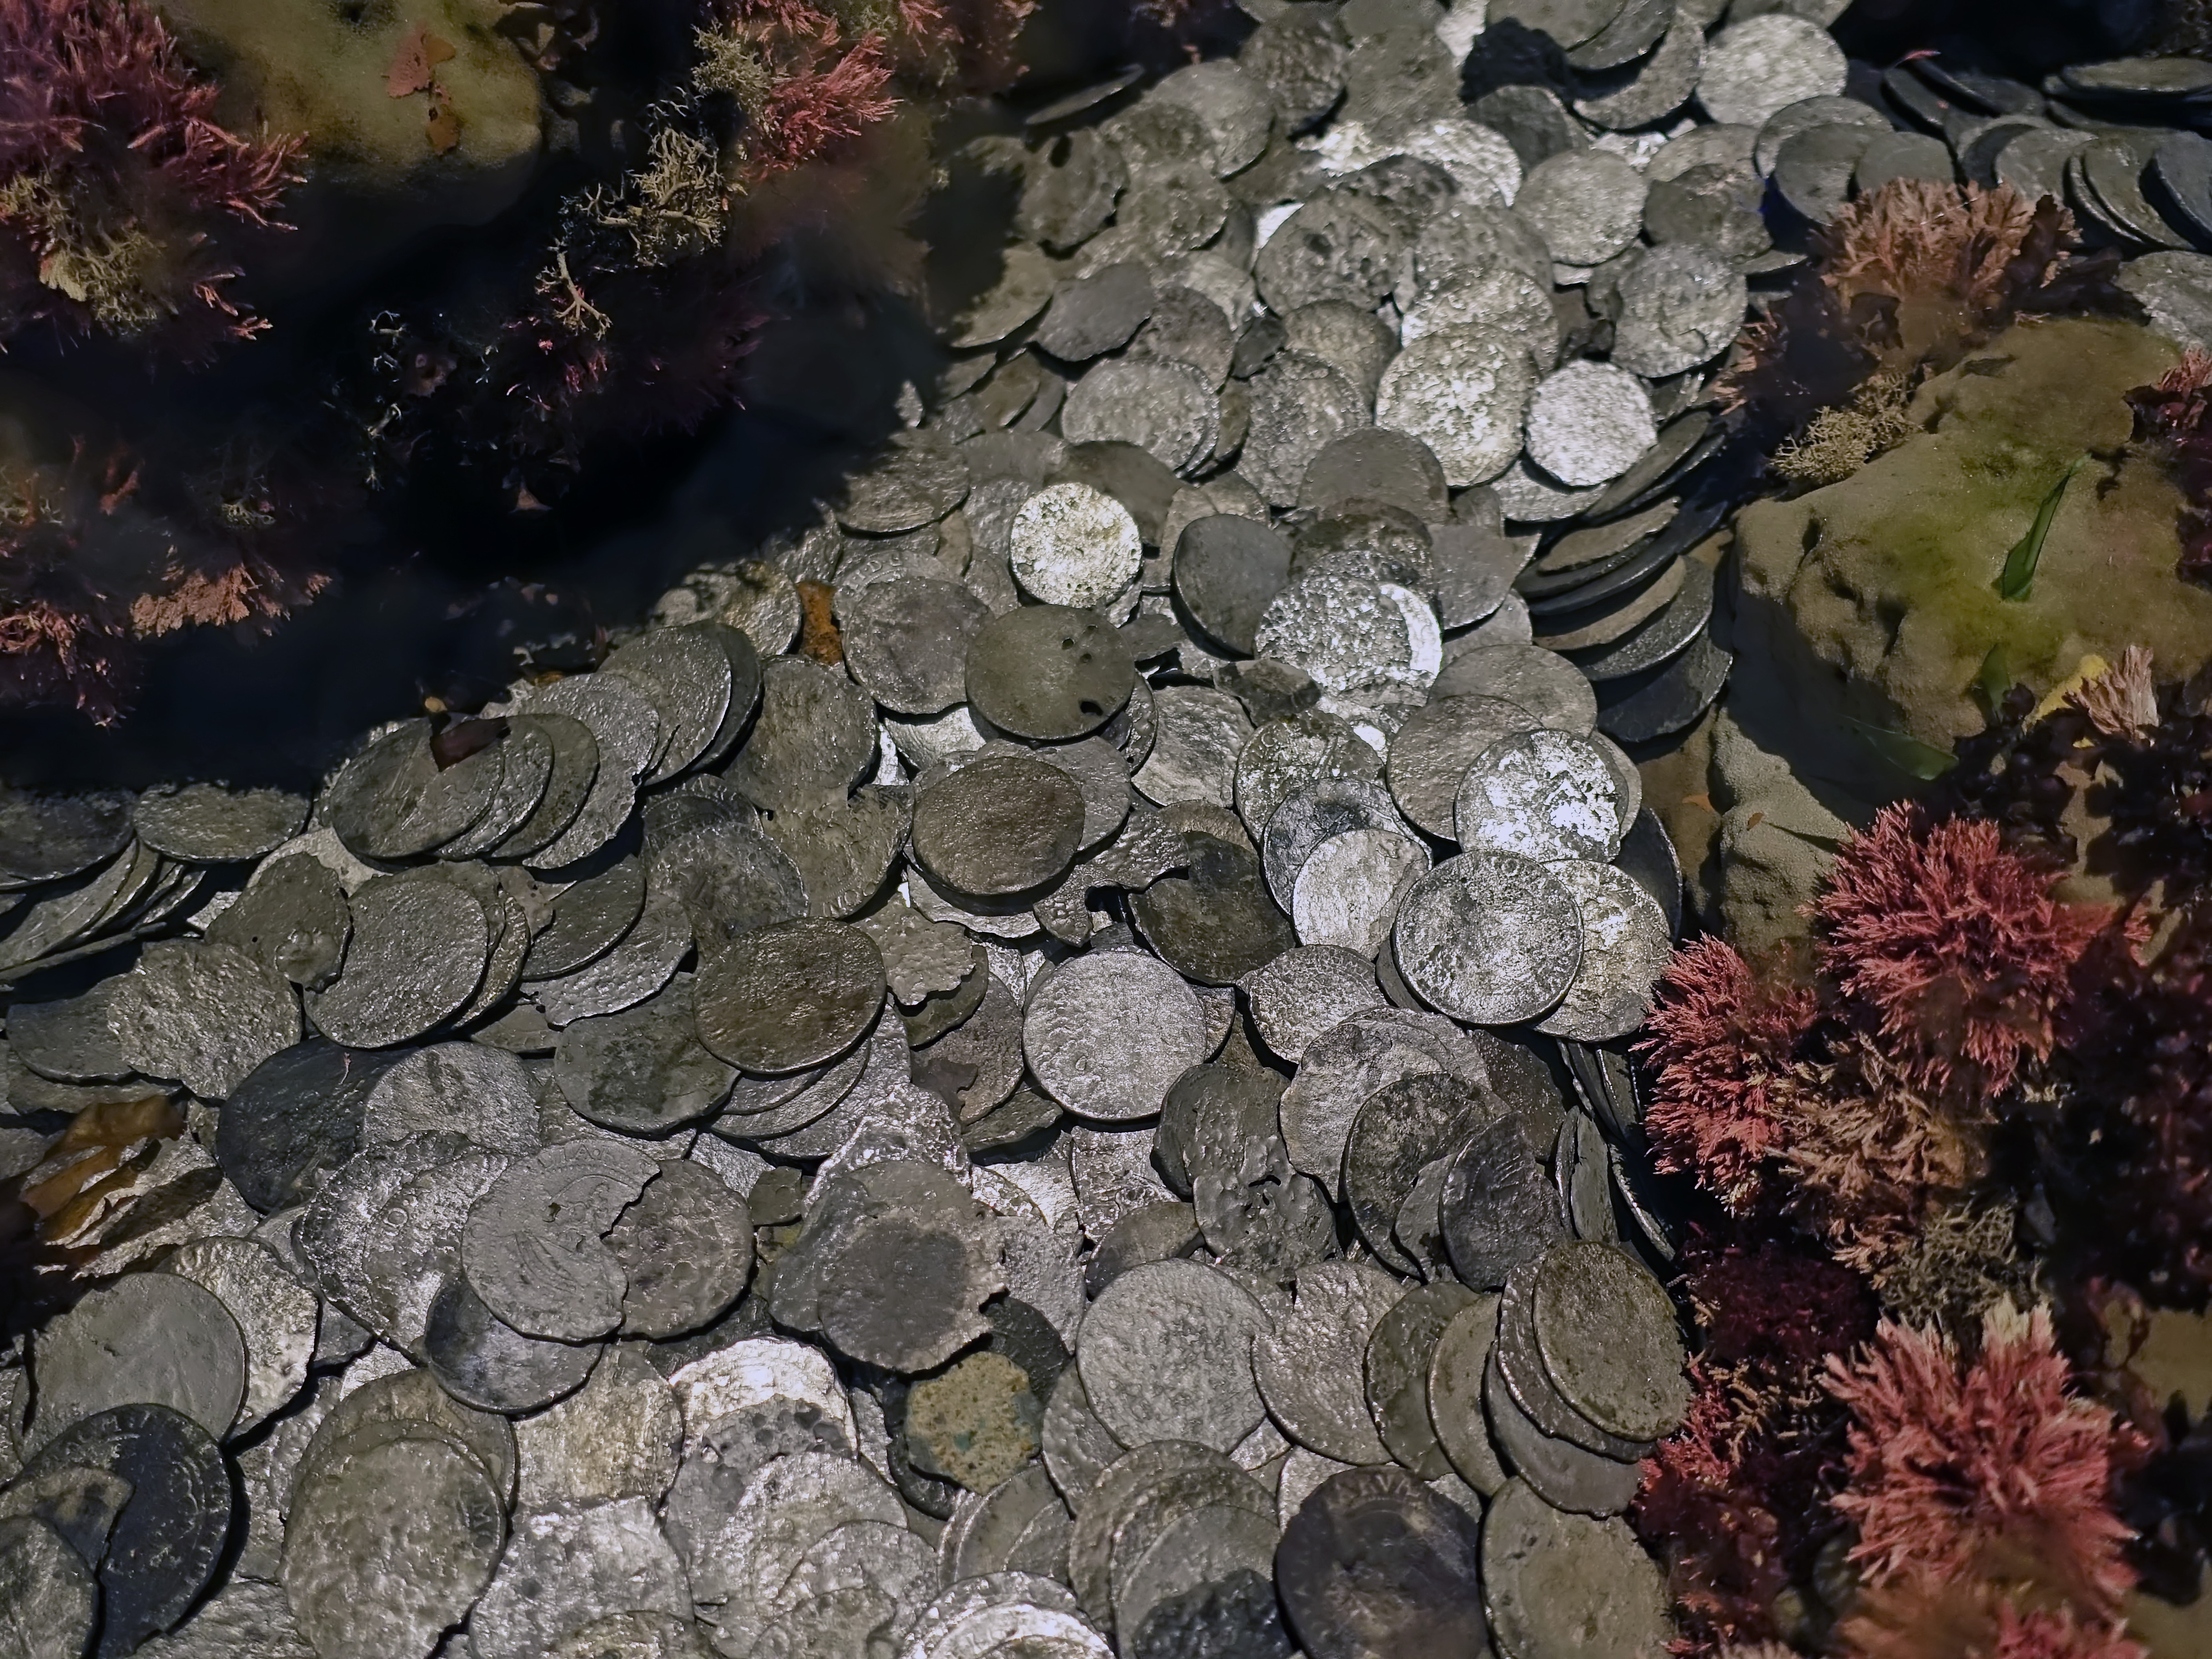
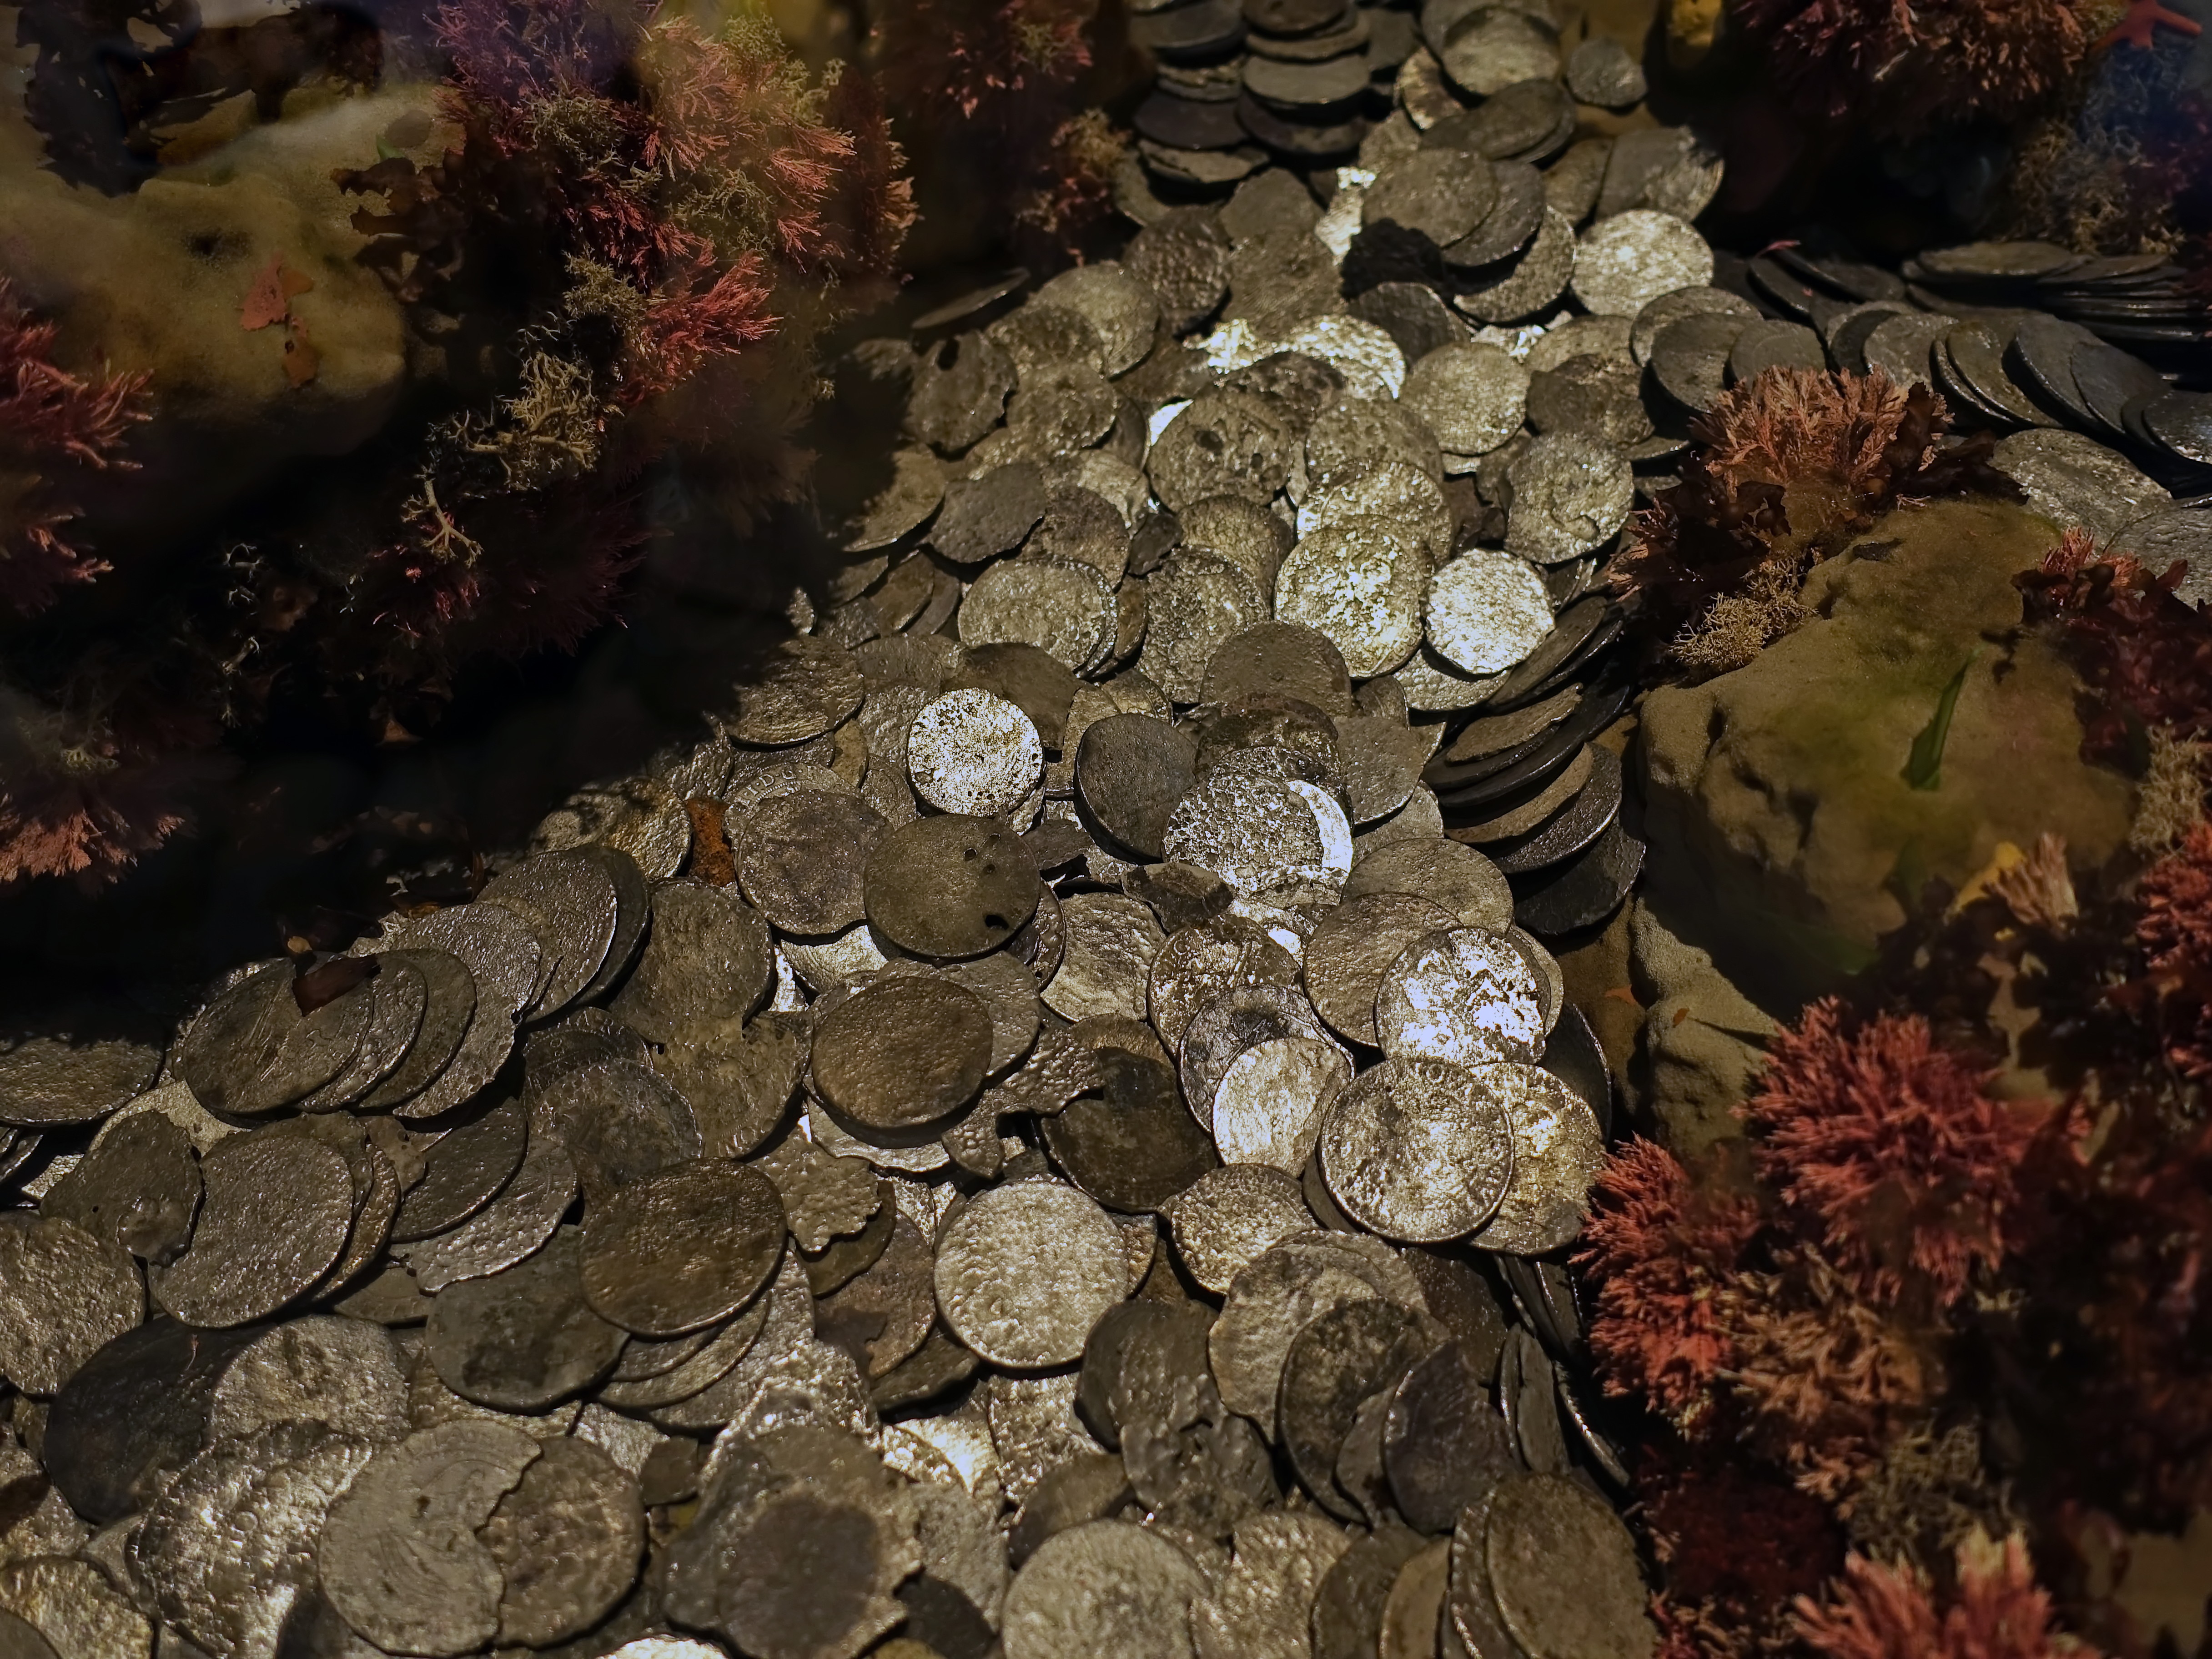
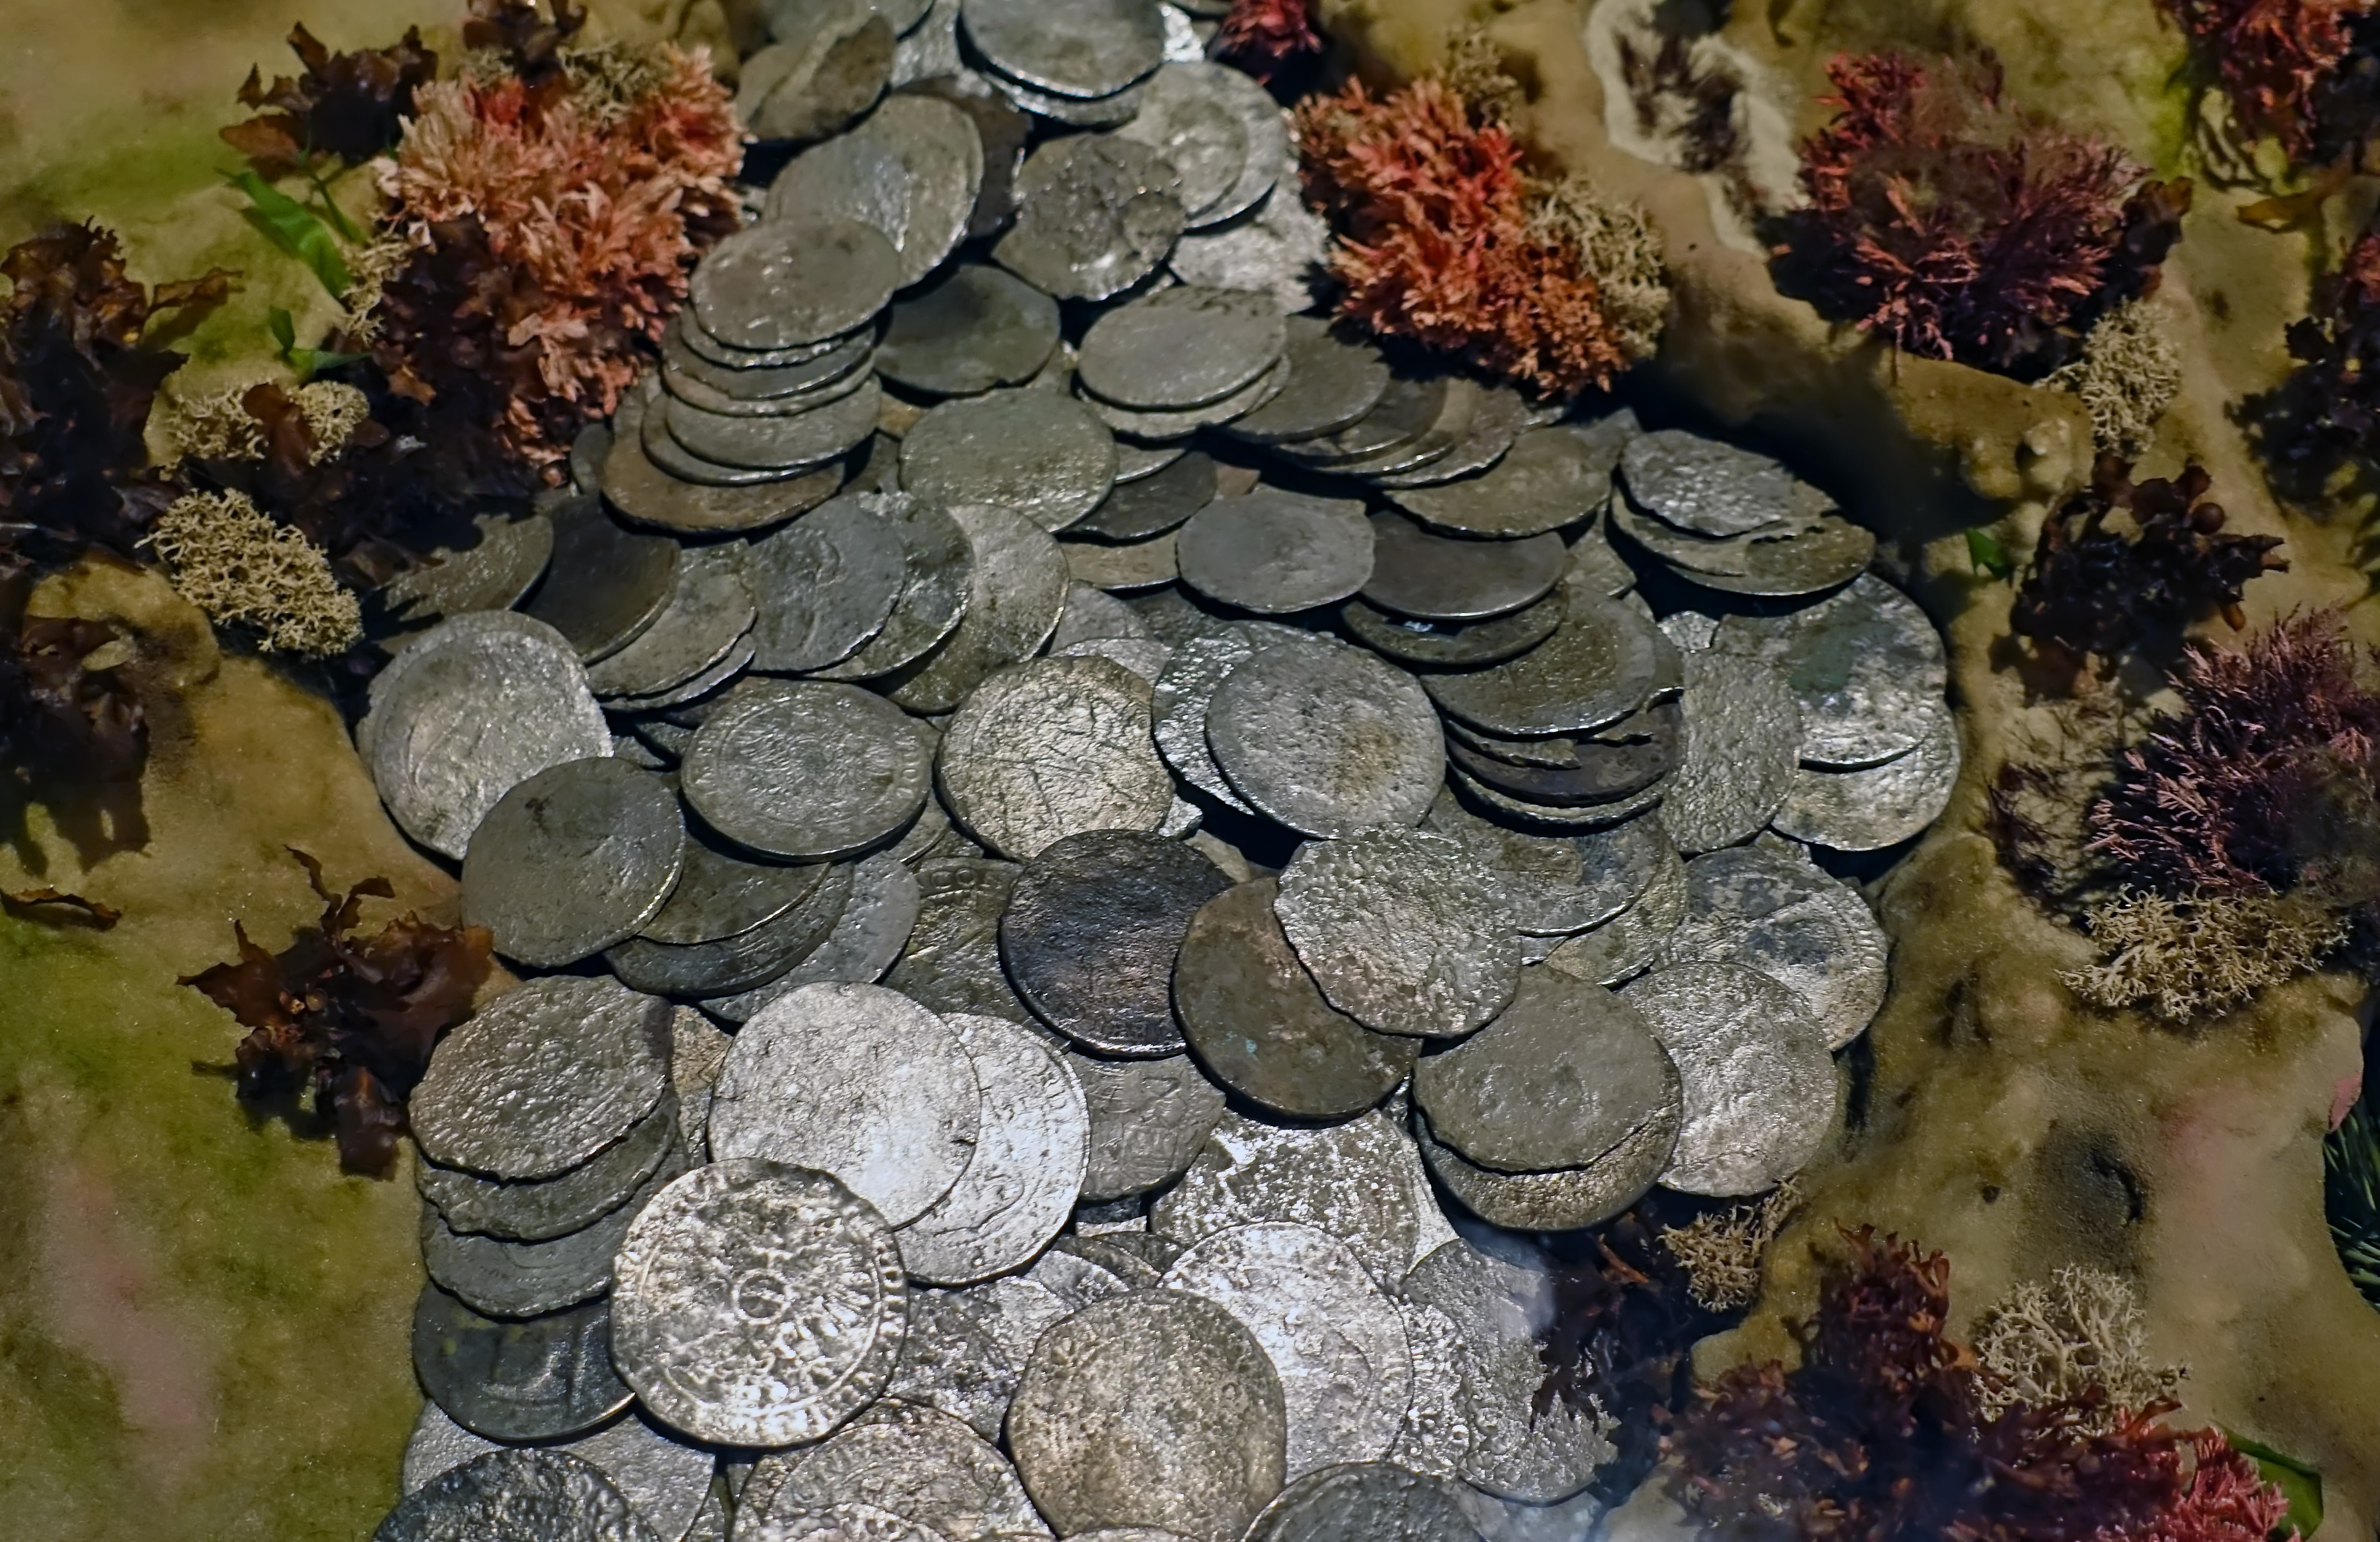
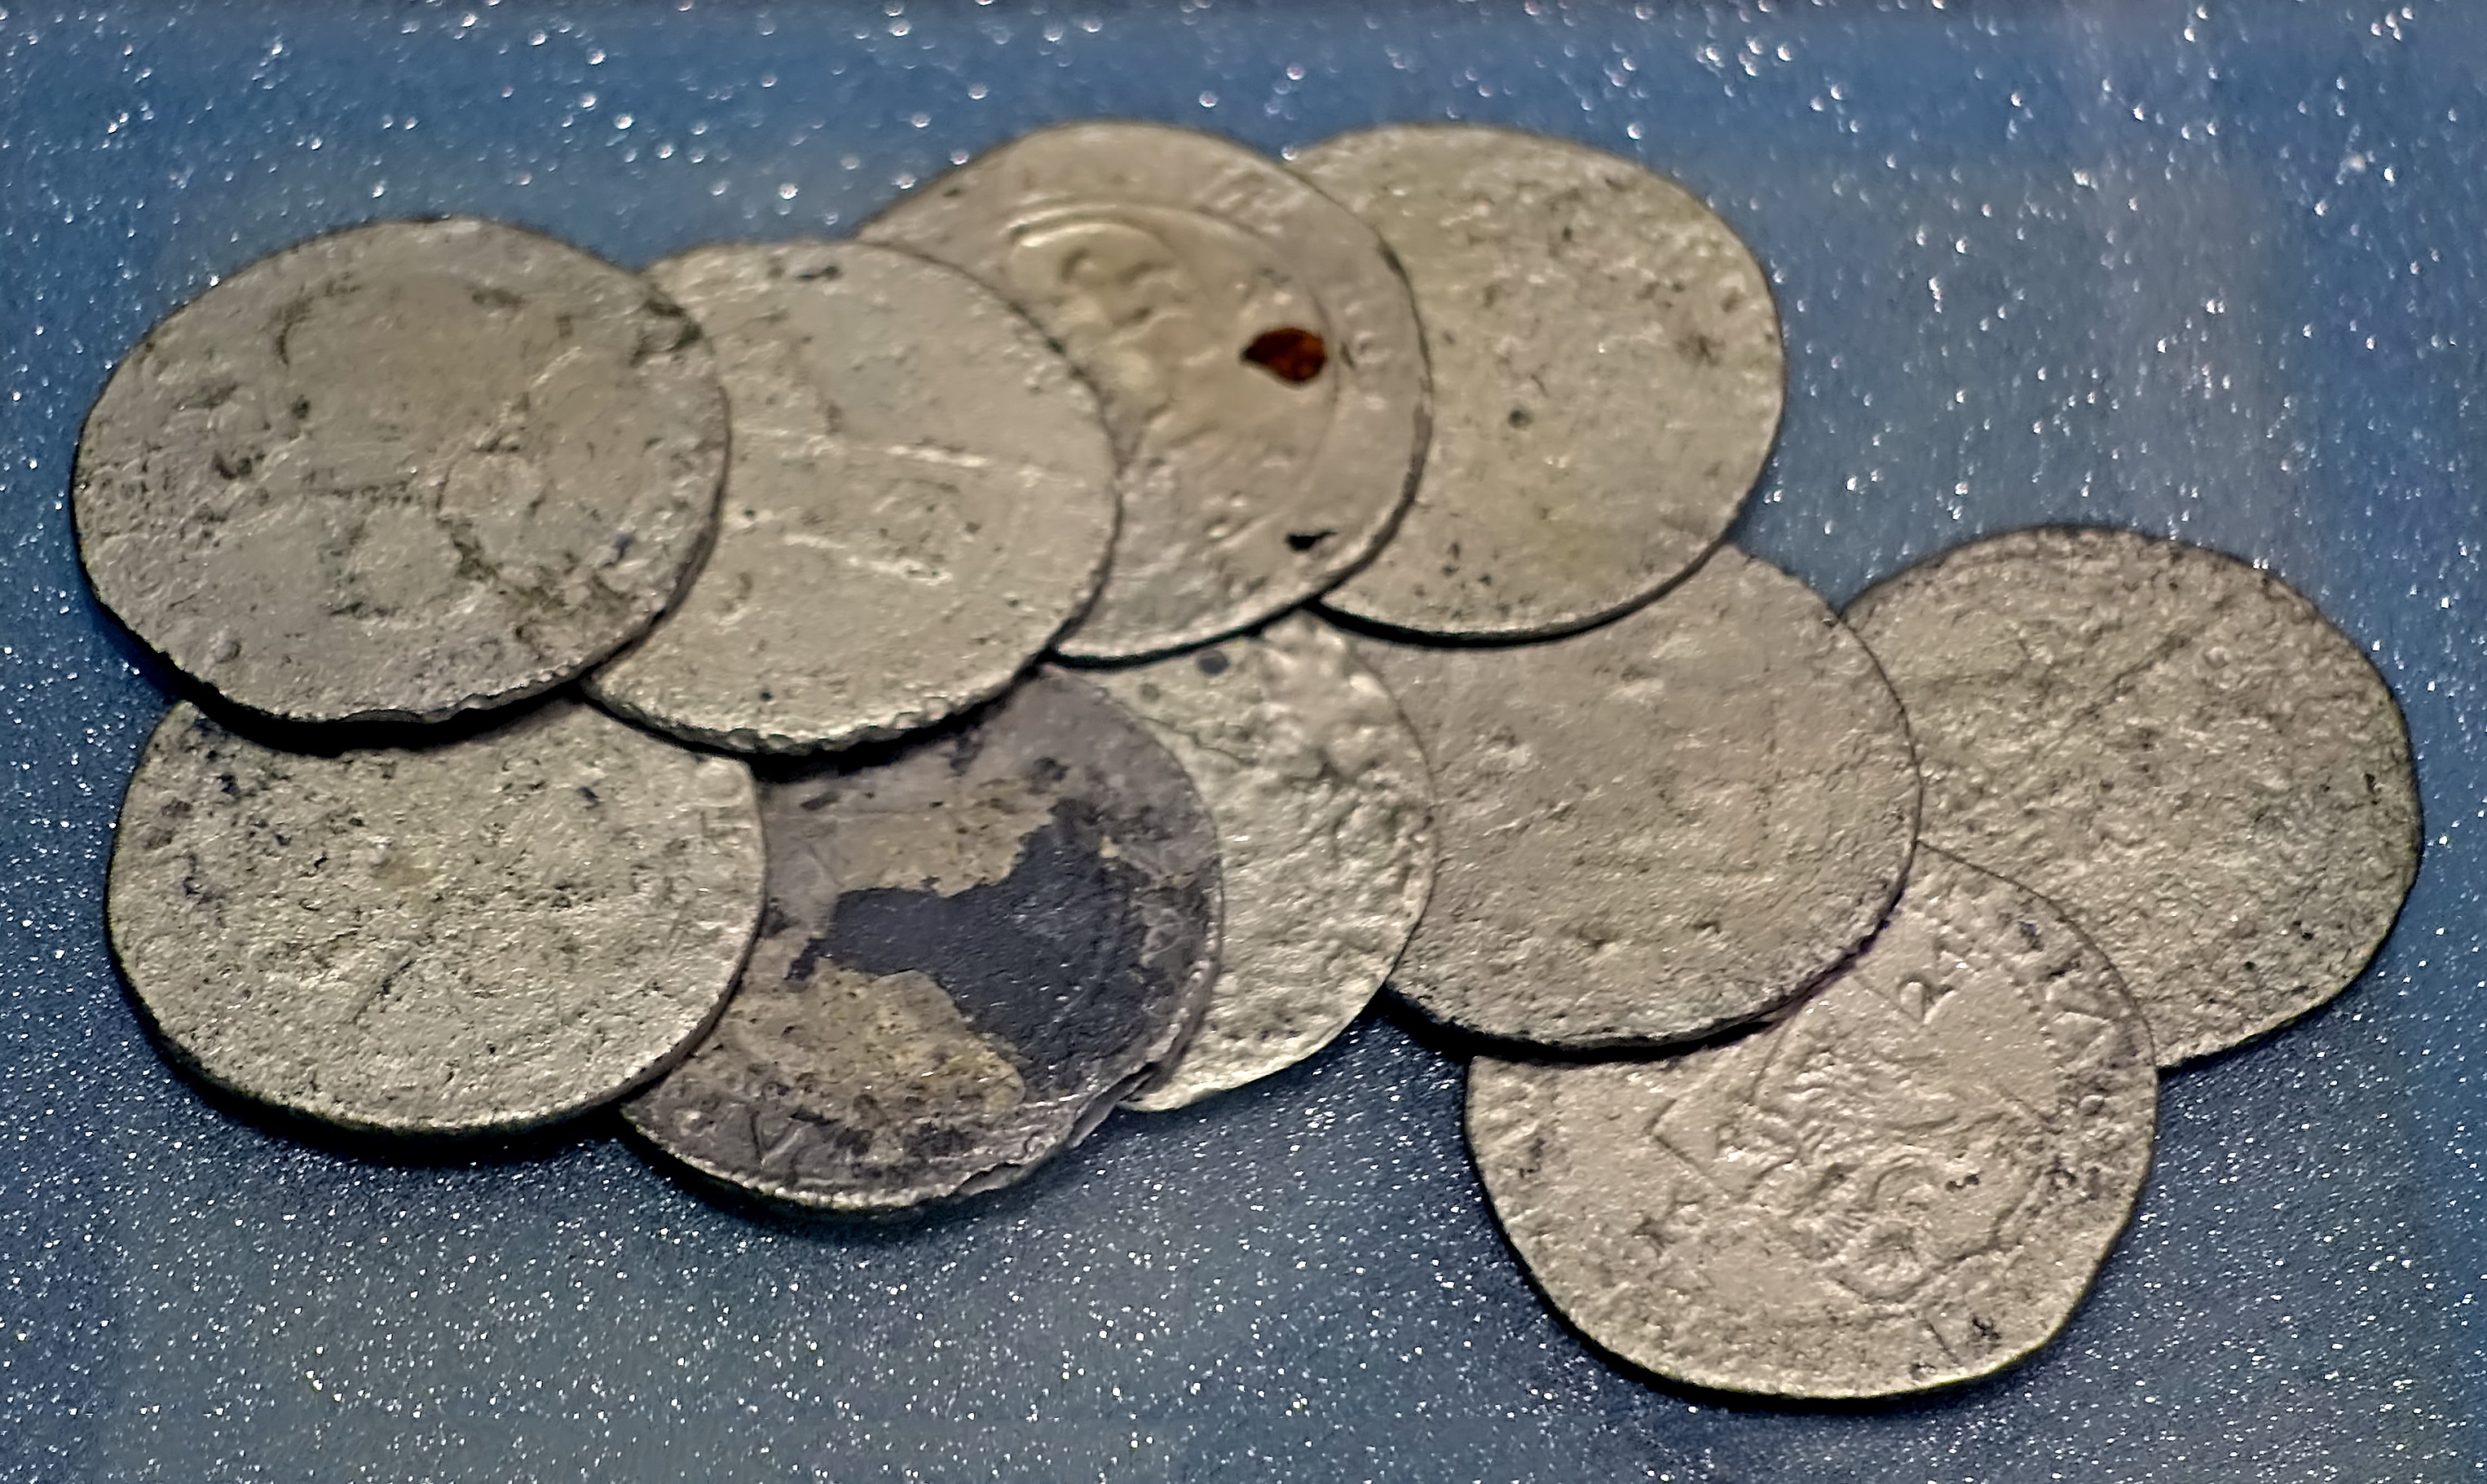
These coins are from the wreck of the Batavia - a mixture of Rijksdaalders (Realm dollars) of the United and Spanish Netherlands and a wide variety of Thalers from the Germanic States.
Although most of the silver carried by the ship was salvaged by the Dutch, some was left behind and discovered by the Museum.
Photo: Don Hitchcock 2017
Source and text: Museum of Geraldton, Western Australia
The rijksdaalder was a Dutch coin first issued by the Republic of the Seven United Netherlands in the late 16th century during the Dutch Revolt. Featuring an armoured half bust of William the Silent, the rijksdaalder was minted to the Saxon reichsthaler weight standard – 448 grains of .885 fine silver. Friesland, Gelderland, Holland, Kampen, Overijssel, Utrecht, West Friesland, Zeeland, and Zwolle minted armoured half bust rijksdaalders until the end of the 17th century.
The 17th century rijksdaalder was set to be equal to from 48 to 50 stuivers (the Dutch equivalent of shillings) and circulated along with silver florins (28 stuivers), daalders (30 strivers), leeuwendaalders (36 to 42 strivers), silver ducats (48 stuivers), and ducatons (60 stuivers). While leeuwendaalders (lion dollars) were made of less pure silver at 427.16 grains of .750 fineness, silver ducats and rijksdaalders were almost of the same size and quality. With the disappearance of the original armoured half bust rijksdaalder design, silver ducats and later 2½ guilders started to be called rijksdaalders.
Photo: Don Hitchcock 2017
Source: Museum of Geraldton, Western Australia
Text: Wikipedia
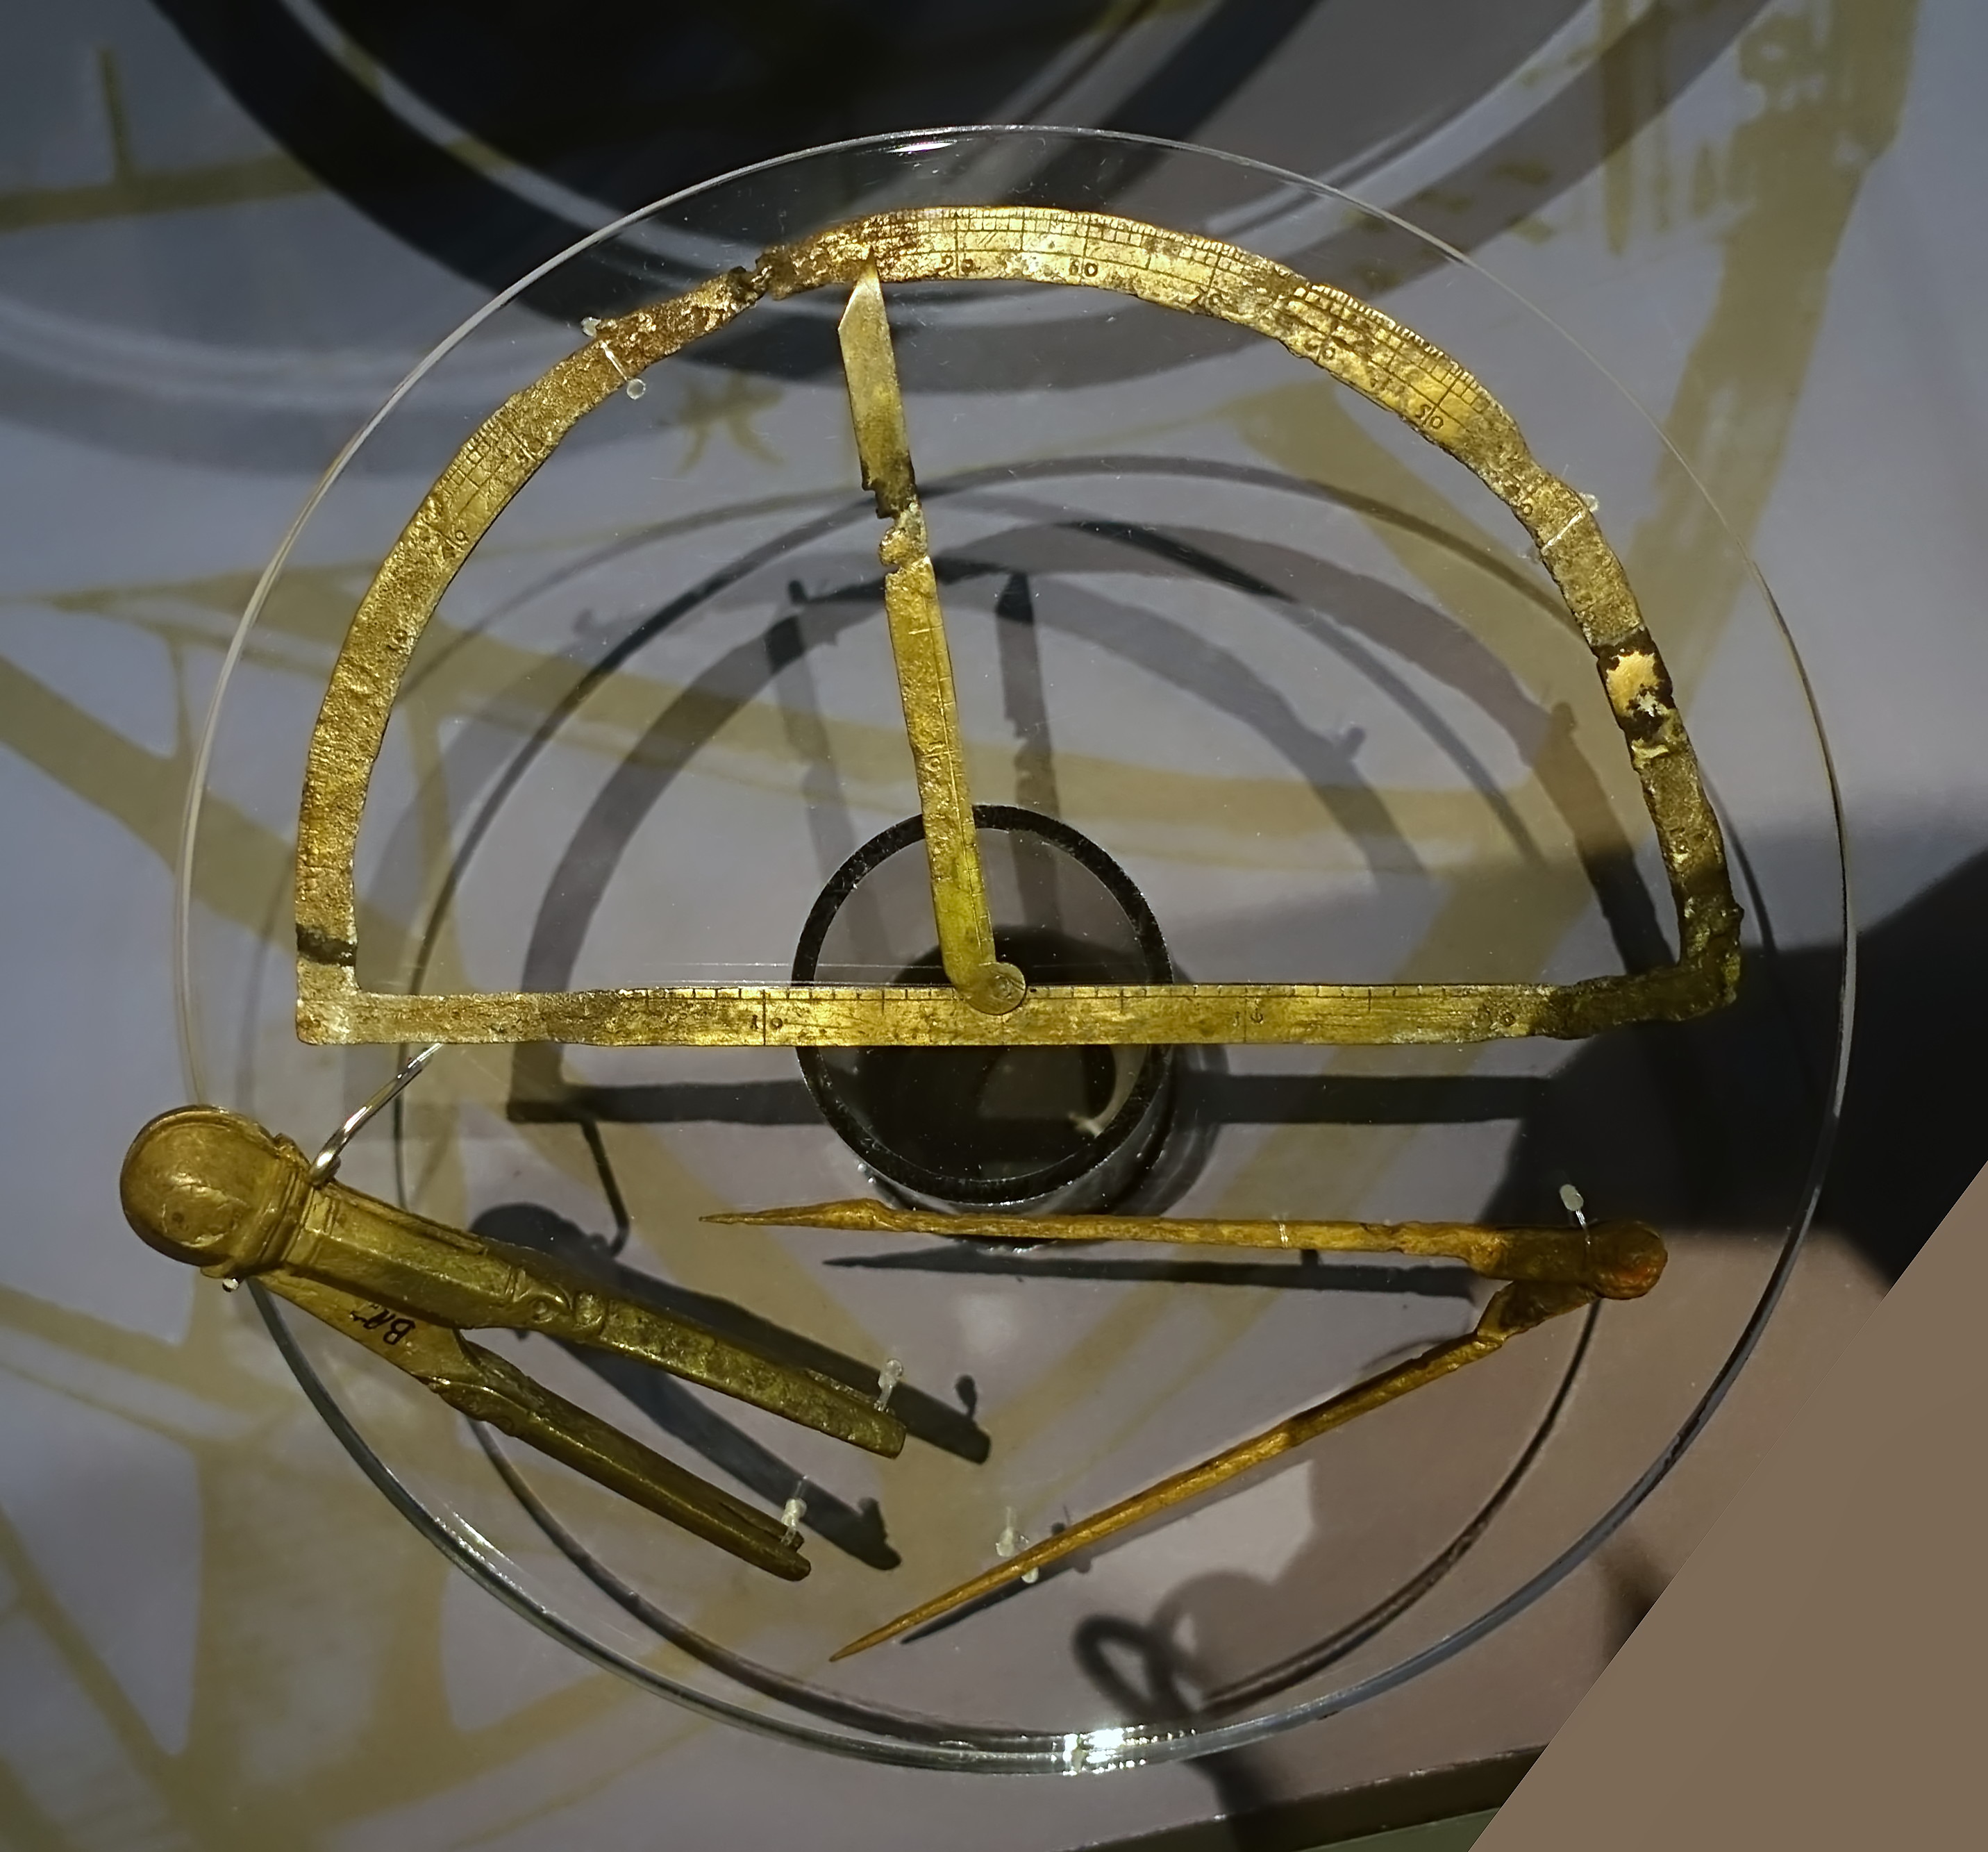
Brass dividers BAT 3406 and BAT 421
Brass protractor BAT 422
This brass protractor is not on the VOC list of equipment. The units on the base and movable arm are 30.5 mm and do not correspond to any known unit of measurement such as an inch.
Before the 19th century, a wide variety of different weights and measures were used by the various Dutch towns and provinces. Despite the country's small size, there was a lack of uniformity. During the Dutch Golden Age, these weights and measures accompanied the Dutch to the farthest corners of their colonial empire, including South Africa, New Amsterdam and the Dutch East Indies.
0.283 m = one Amsterdam foot.
The Rijnland foot which had been in use since 1621 was most commonly used voet in the both Netherlands and in parts of Germany. In 1807, de Gelder measured the copy of the Rijnland foot in the Leiden observatory to be 0.3139465 m while Eytelwien found that the master copy that was in use in Germany was 0.313853543 m – a difference of 0.03%.[10]
Photo: Don Hitchcock 2017
Source: Museum of Geraldton, Western Australia
Text: Wikipedia
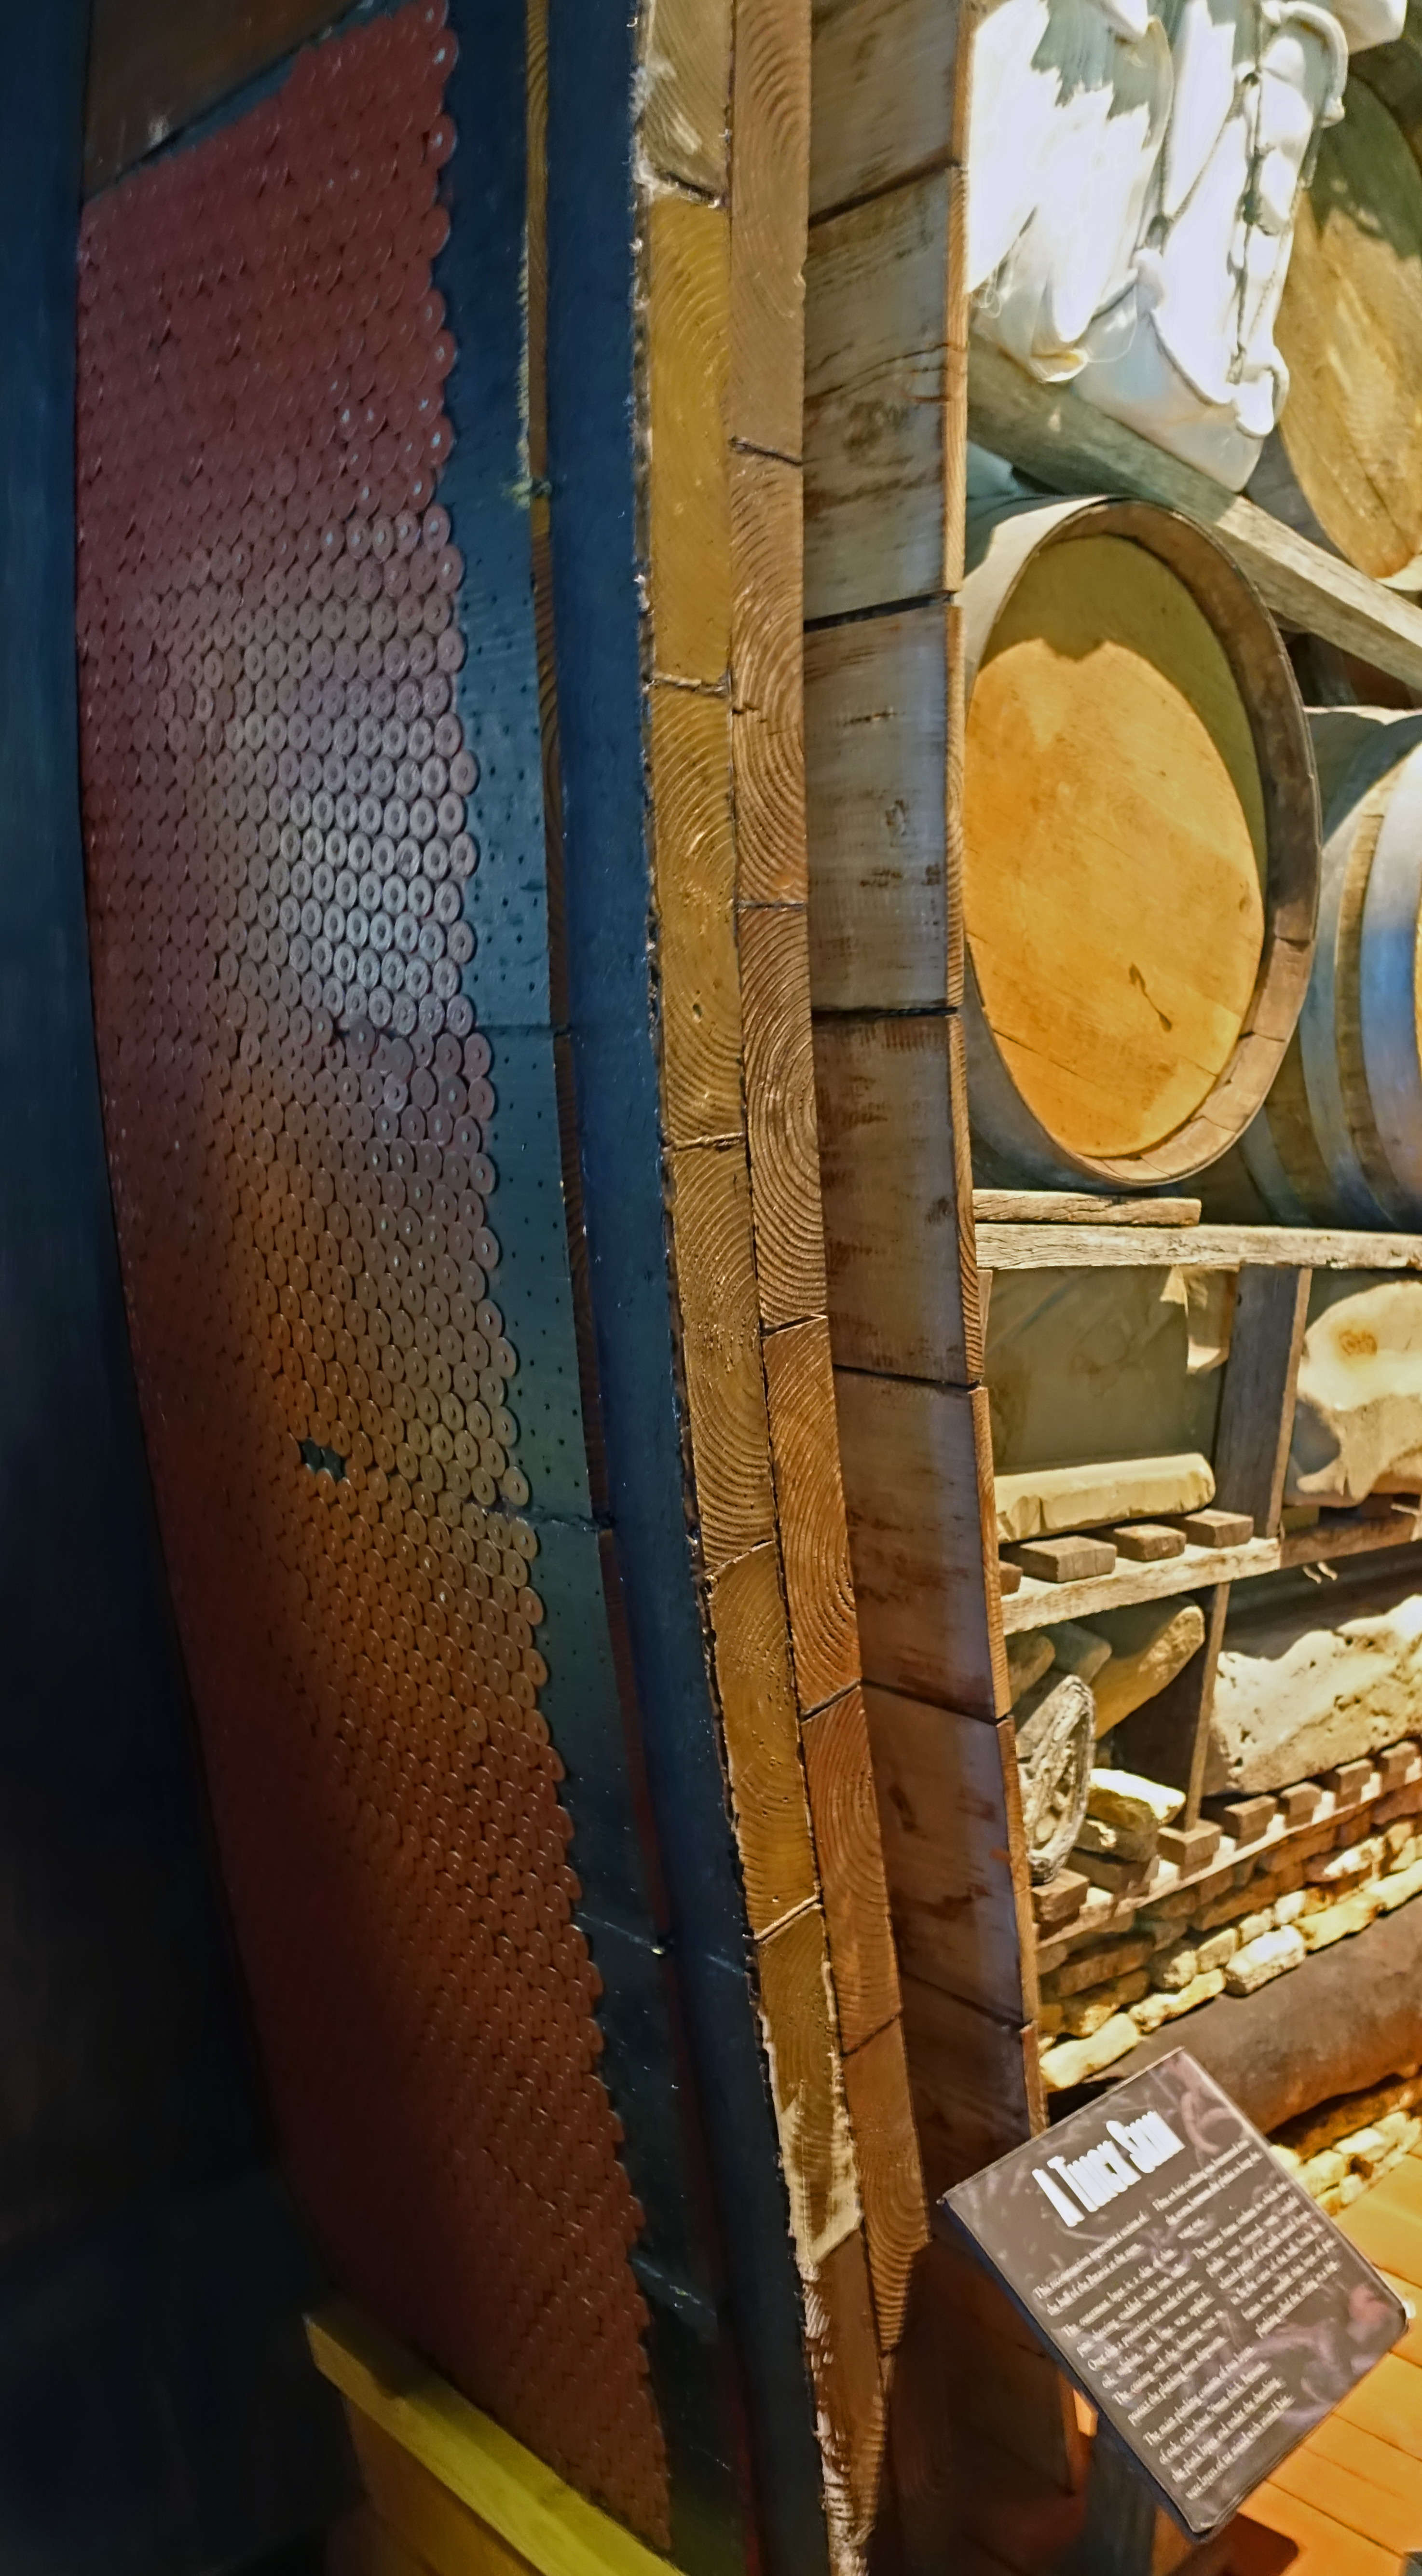
This reconstruction represents a section of the hull of the Batavia at the stern.
The outermost layer is a skin of thin pine sheeting studded with iron nails. Over this a protective coat made of resin, oil, sulphur, and lime was applied. The coating and the sheeting were to protect the planking from shipworm.
The main planking consists of two layers of oak, each about 70 mm thick. Between the plank layers and under the sheathing were layers of tar mixed with animal hair.
Fibre or hair caulking was hammered into the seams between planks to keep the water out.
The heavy frame timbers to which the planks were fastened were carefully selected pieces of oak with natural shapes to fit the curve of the hull. Inside the frames was another thin layer of pine planking called the 'ceiling' in a ship.
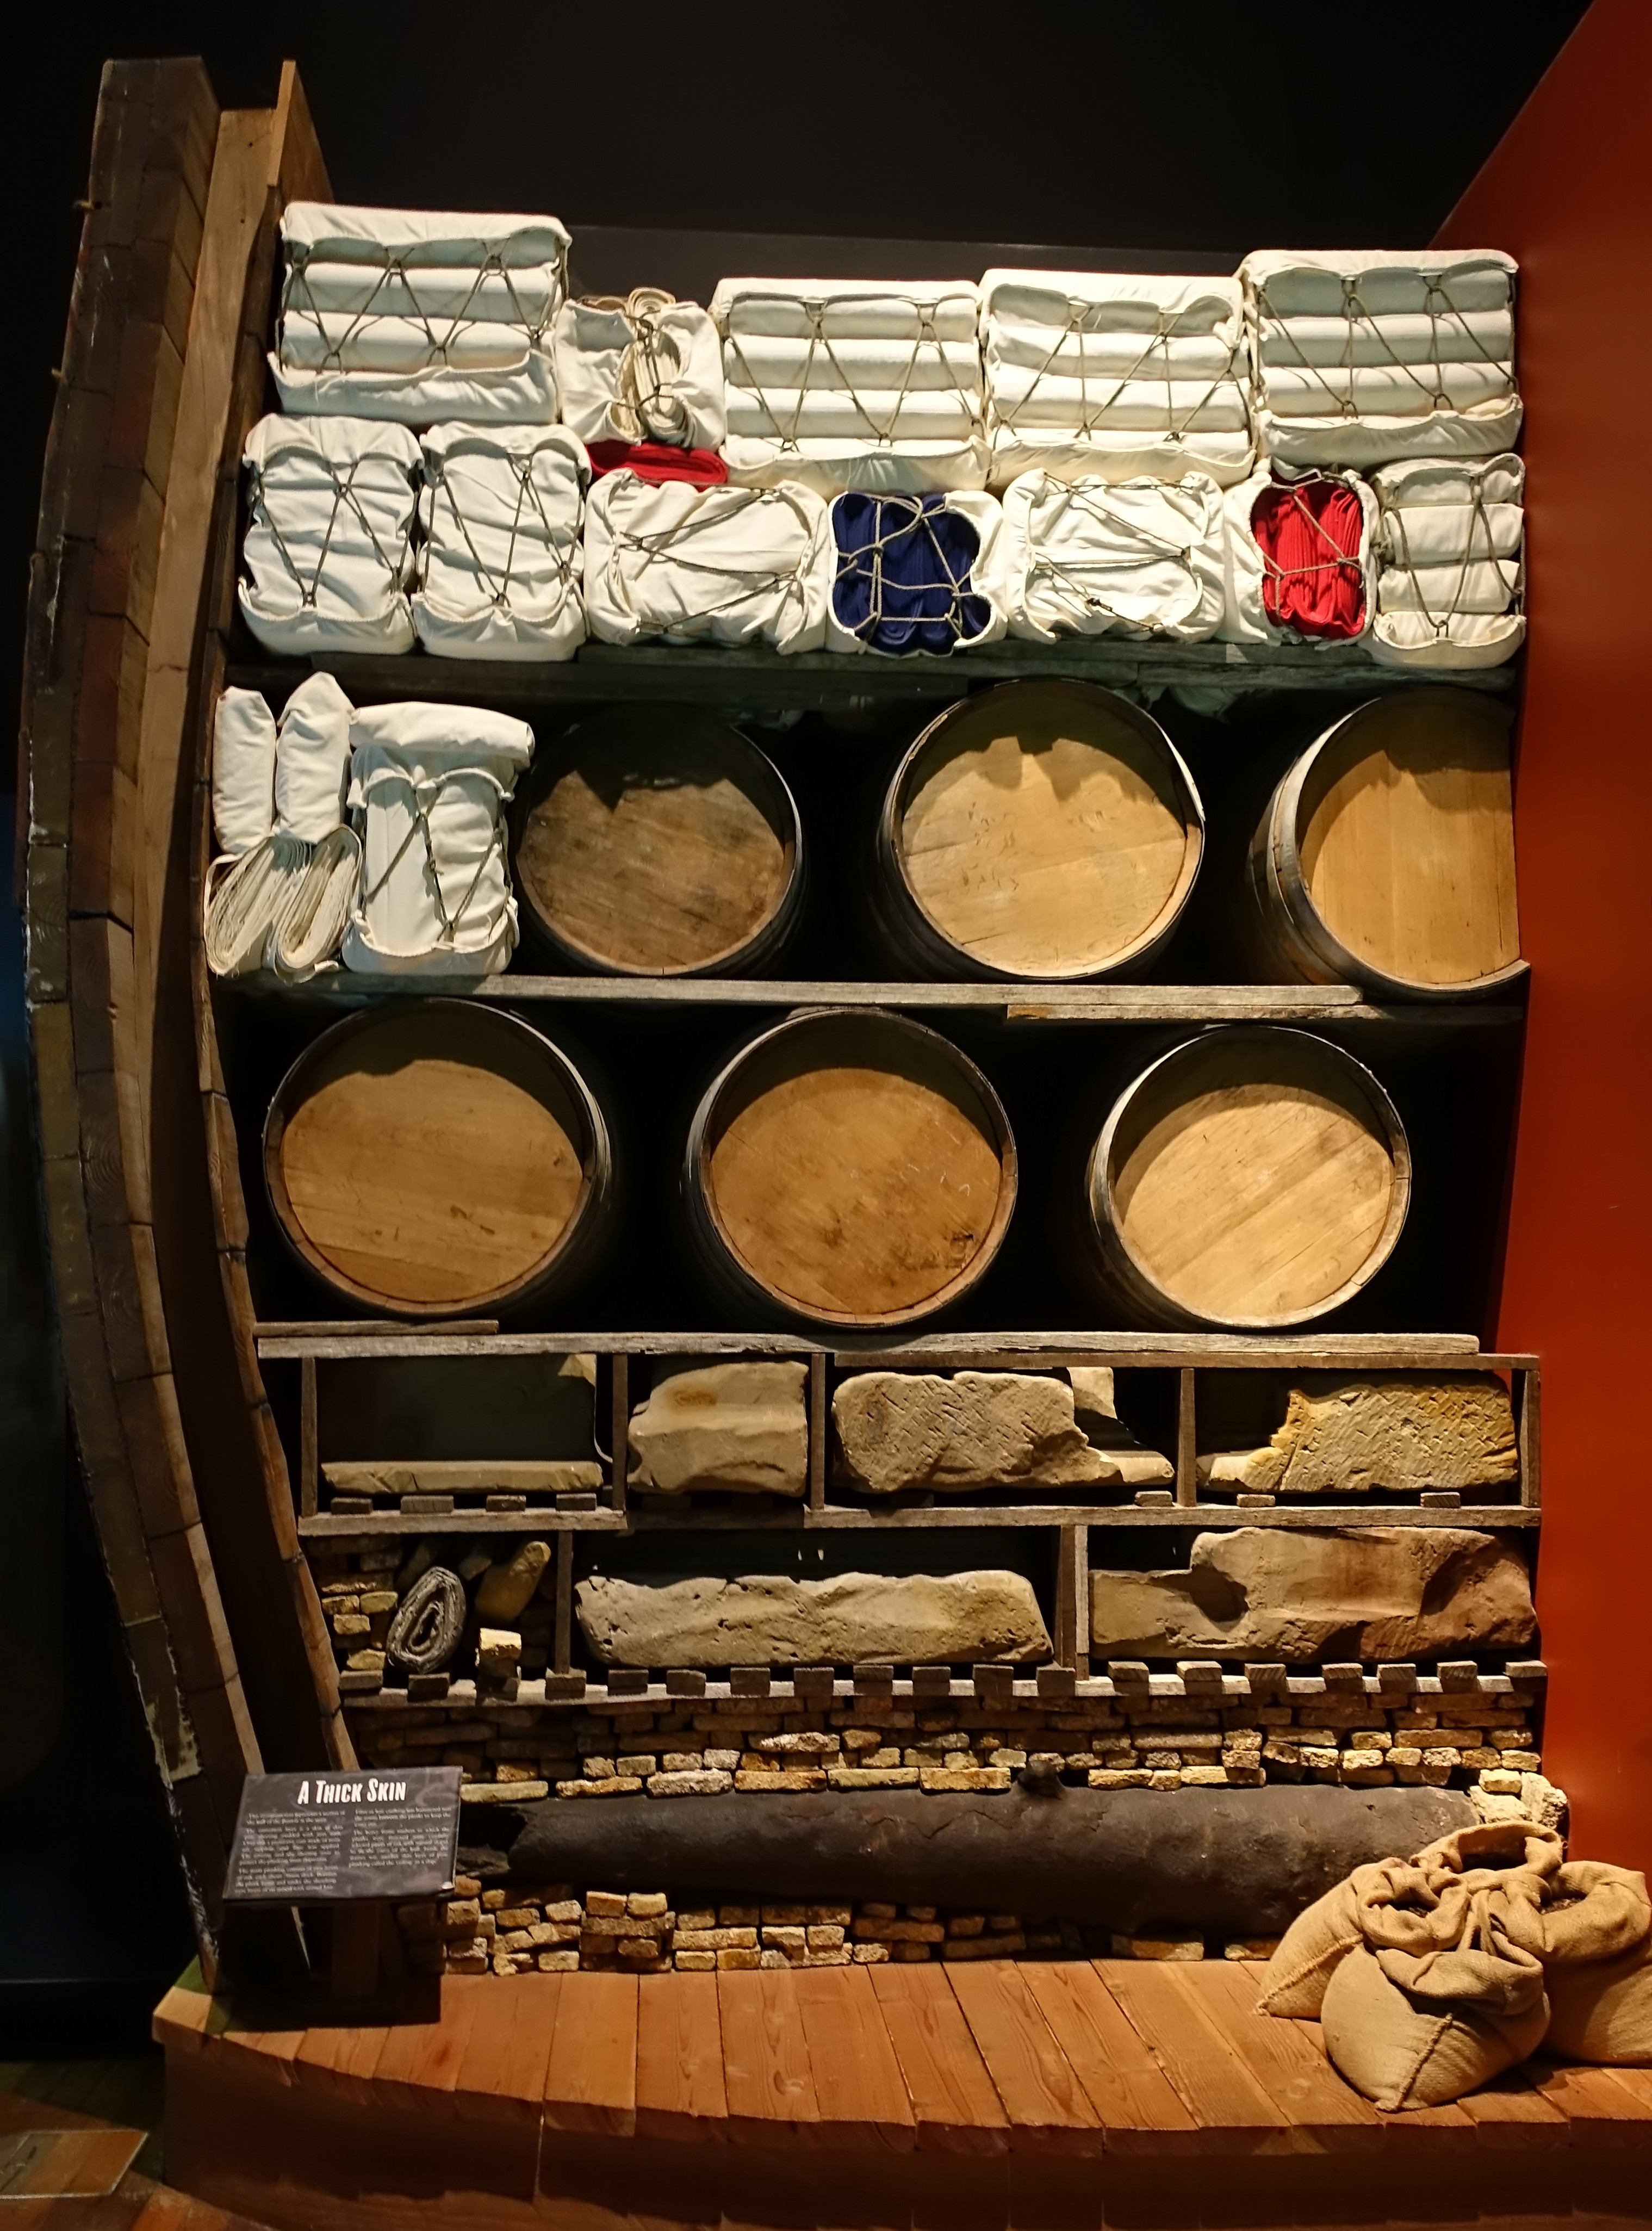
In the hold of the Batavia on its journey to the Indies, there would have been trade goods and supplies, packed like the ones in this reconstruction. Among these were bales of fine woollen material, which the VOC traded in India, and trimmings of gold or silver lace and other fancy haberdashery. Textiles of different kinds including velvet, linen, and woollens formed the most important export, together with wine, beer, and lead.
Photo: Don Hitchcock 2017
Source and text: Museum of Geraldton, Western Australia
A ship sails better and more safely if it is well balanced or 'trimmed'. Ballast and heavy cargo items were placed low down in the hold to give the ship stability.
Over 27 tonnes of the Batavia's heavy cargo were sandstone blocks going to build the portico of the castle of Batavia, as shown here, the original blocks shown as they were to be erected at the castle. The yellow bricks at the bottom were recovered from the Vergulde Draeck, lost in 1656. Disused cannon were sometimes used as permanent ballast.
Great quantities of lead, sometimes 500 tonnes a year were shipped to the Indies. The rolls of lead which weighed about 200 kg each, were another form of ballast.
Photo: Don Hitchcock 2017
Source and text: Museum of Geraldton, Western Australia
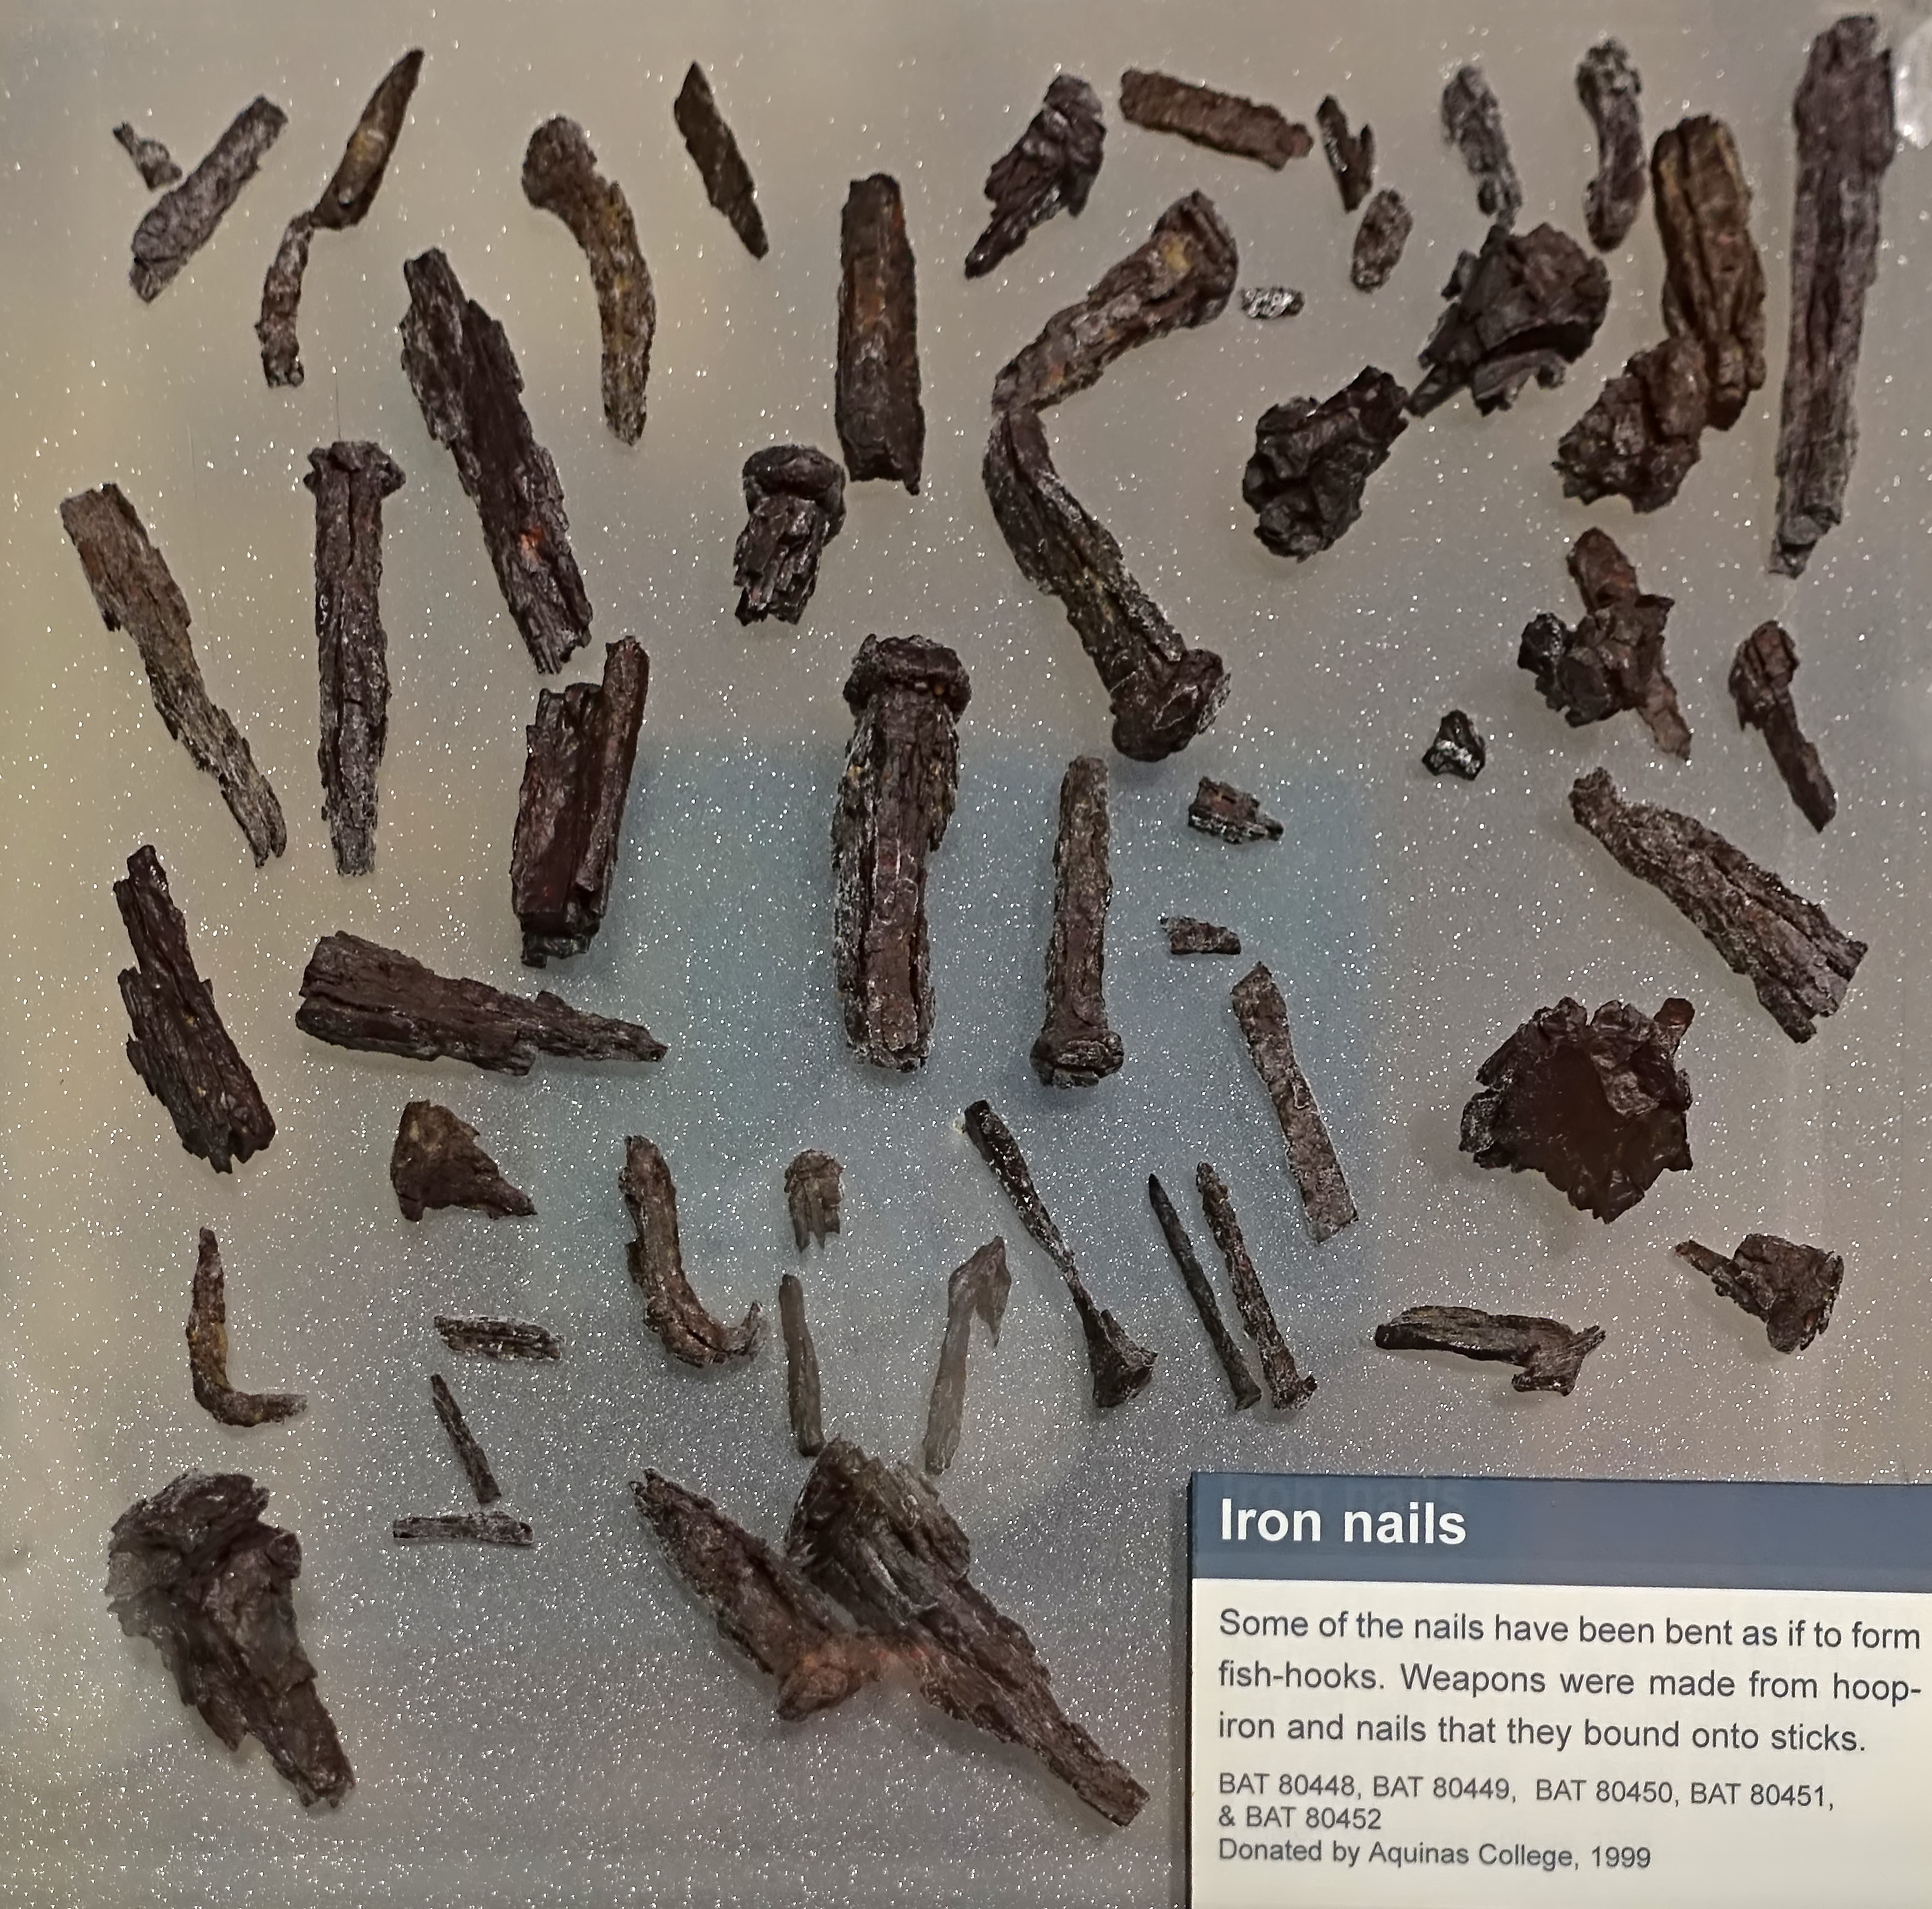
Slaughter Point Site, West Wallabi Island.
Students from Aquinas College found many artefacts during archaeological excavations of the site at Slaughter Point, West Wallabi Island, where Wiebbe Hayes and his group made a camp.
Lead sheathing, iron nails, and barrel-hoop iron from the wreck of the Batavia, and sharp pieces of coral and limestone from the island, provided useful materials for making weapons and tools to aid the group's survival.
Some of these nails have been bent as if to form fish hooks. Weapons were made from hoop-iron and nails that they bound onto sticks.
Catalog: BAT 80448, BAT 80449, BAT 80540, BAT 80451, and BAT 80452
Donated by Aquinas College, 1999
Photo: Don Hitchcock 2017
Source and text: Museum of Geraldton, Western Australia
Slaughter Point Site, West Wallabi Island.
Blunderbuss, copper. This is a type of matchlock blunderbuss used to fire flaming balls or arrows. In sea fights they could be used to set fire to the enemy's sails and rigging. BAT 407
Musket balls, lead. Shot of this size would have been used with muskets and pistols, indicating that the Batavia was armed with these types of firearms. BAT 3909 donated by R.A. Robertson.
Photo: Don Hitchcock 2017
Source and text: Museum of Geraldton, Western Australia
All objects from the Slaughter Point Site, West Wallabi Island.
Dish, copper
Catalog: BAT 666, donated by Mr Kennedy, Underwater Explorers Club 1971
Barrel hoop, part iron
Catalog: BAT 80526
Lead sheeting. Similar sheeting was recovered from the Batavia wreck site.
Catalog: BAT 3934
Photo: Don Hitchcock 2017
Source and text: Museum of Geraldton, Western Australia
All objects from the Slaughter Point Site, West Wallabi Island.
The Batavia survivors on West Wallabi were fortunate in having access to a relatively rich source of food, especially the native tammar wallabies. Oysters and seals were also part of their survival diet.
Catalog: BAT 4736
Photo: Don Hitchcock 2017
Source and text: Museum of Geraldton, Western Australia
All objects from the Slaughter Point Site, West Wallabi Island.
Molten lead fragment
Catalog: BAT 3927, donated by Aquinas College
Ladle made from sheet lead
Catalog: BAT 3925 A and B, donated by Aquinas College
Copper strap, possibly from a pot.
Catalog: BAT 3905, donated by R.A. Robertson
Copper wedge with cut edges
Catalog: BAT 3907, donated by R.A. Robertson
Lead folded strip with notches
Catalog: BAT 3912 A, donated by R.A. Robertson
Piece of lead sheet
Catalog: BAT 3926, donated by Aquinas College
Lead chisel shaped object
Catalog: BAT 3912 B, donated by R.A. Robertson
Photo: Don Hitchcock 2017
Source and text: Museum of Geraldton, Western Australia
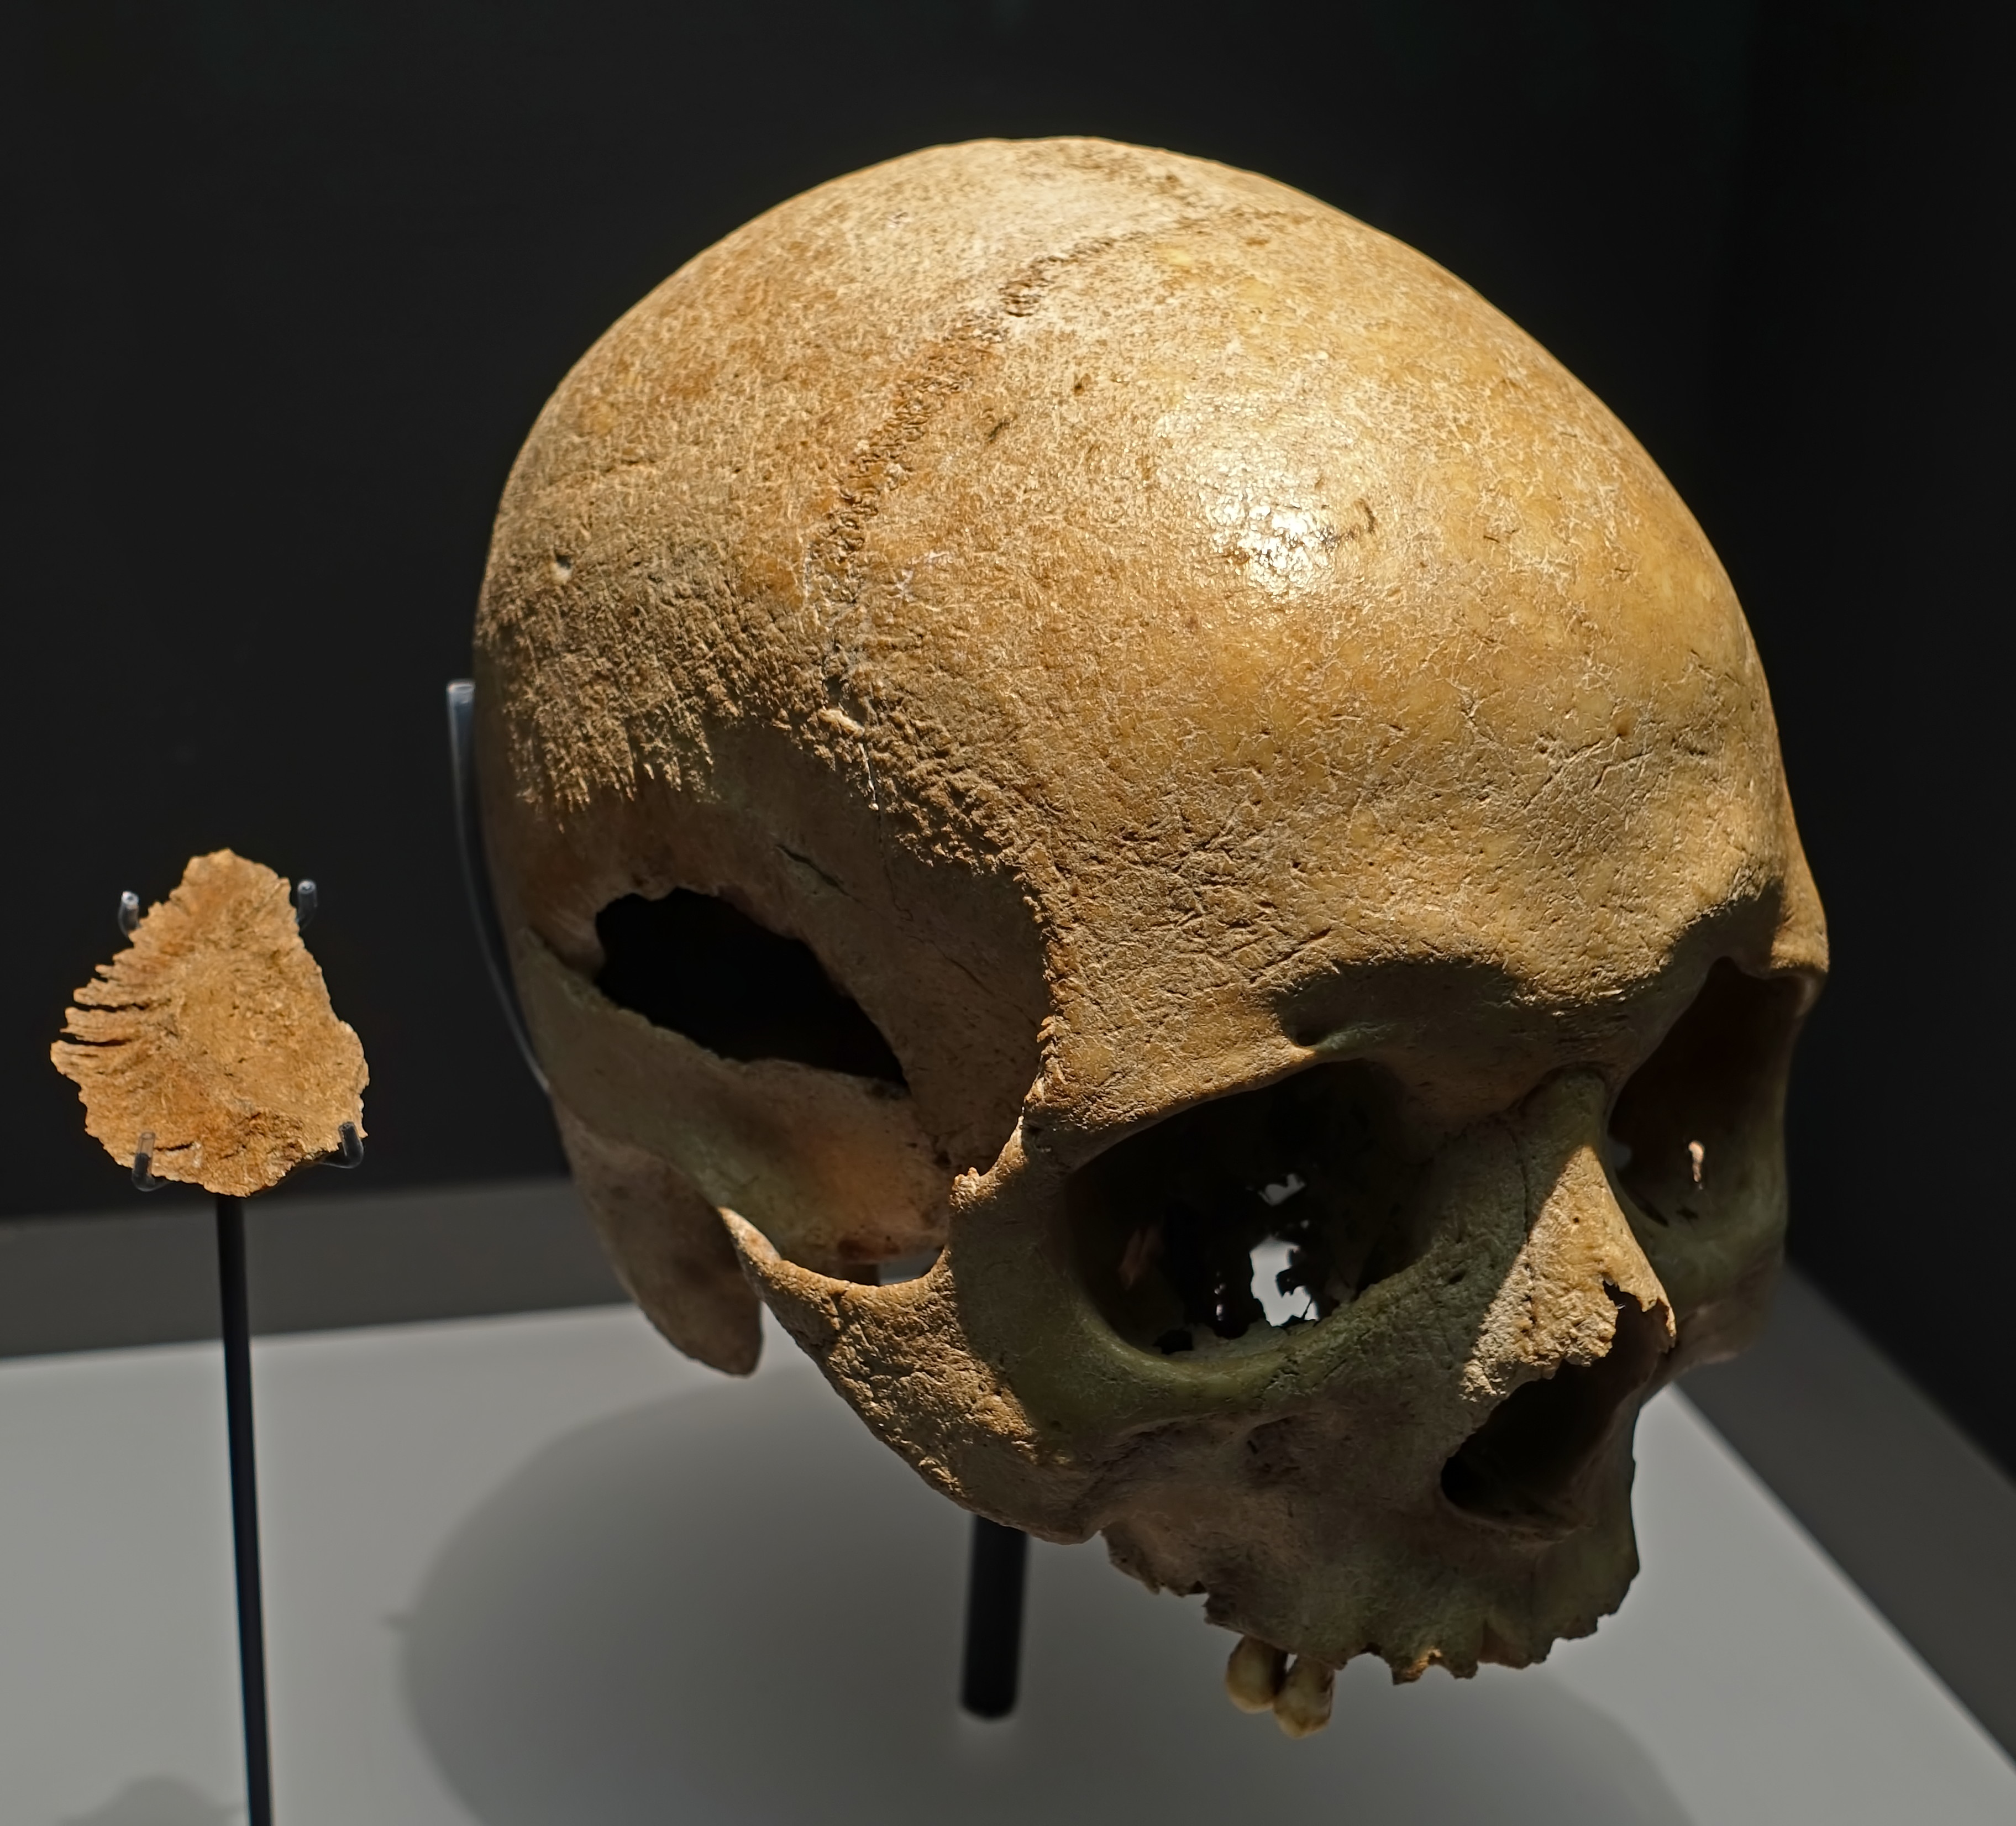
This human skull is from a male aged between 21 and 29.
There is a section of bone missing from the side, and other sever cut marks to the back of the skull. These were produced by a heavy, sharp bladed instrument, probably a sword. The attack was definitely fatal.
The skull was recovered from 'Batavia's graveyard' (Beacon Island) in 1964 by Hugh Edwards and Ron Taylor. In 2015, as part of an Australian Research Council funded project Shipwrecks of the Roaring 40s, archaeologists excavated the remains of the skeleton associated with the skull. The sliver of bone was found in the gravesite and is the missing section from the skull.
Catalog: BAT A 16316
Photo: Don Hitchcock 2017
Source and text: Museum of Geraldton, Western Australia
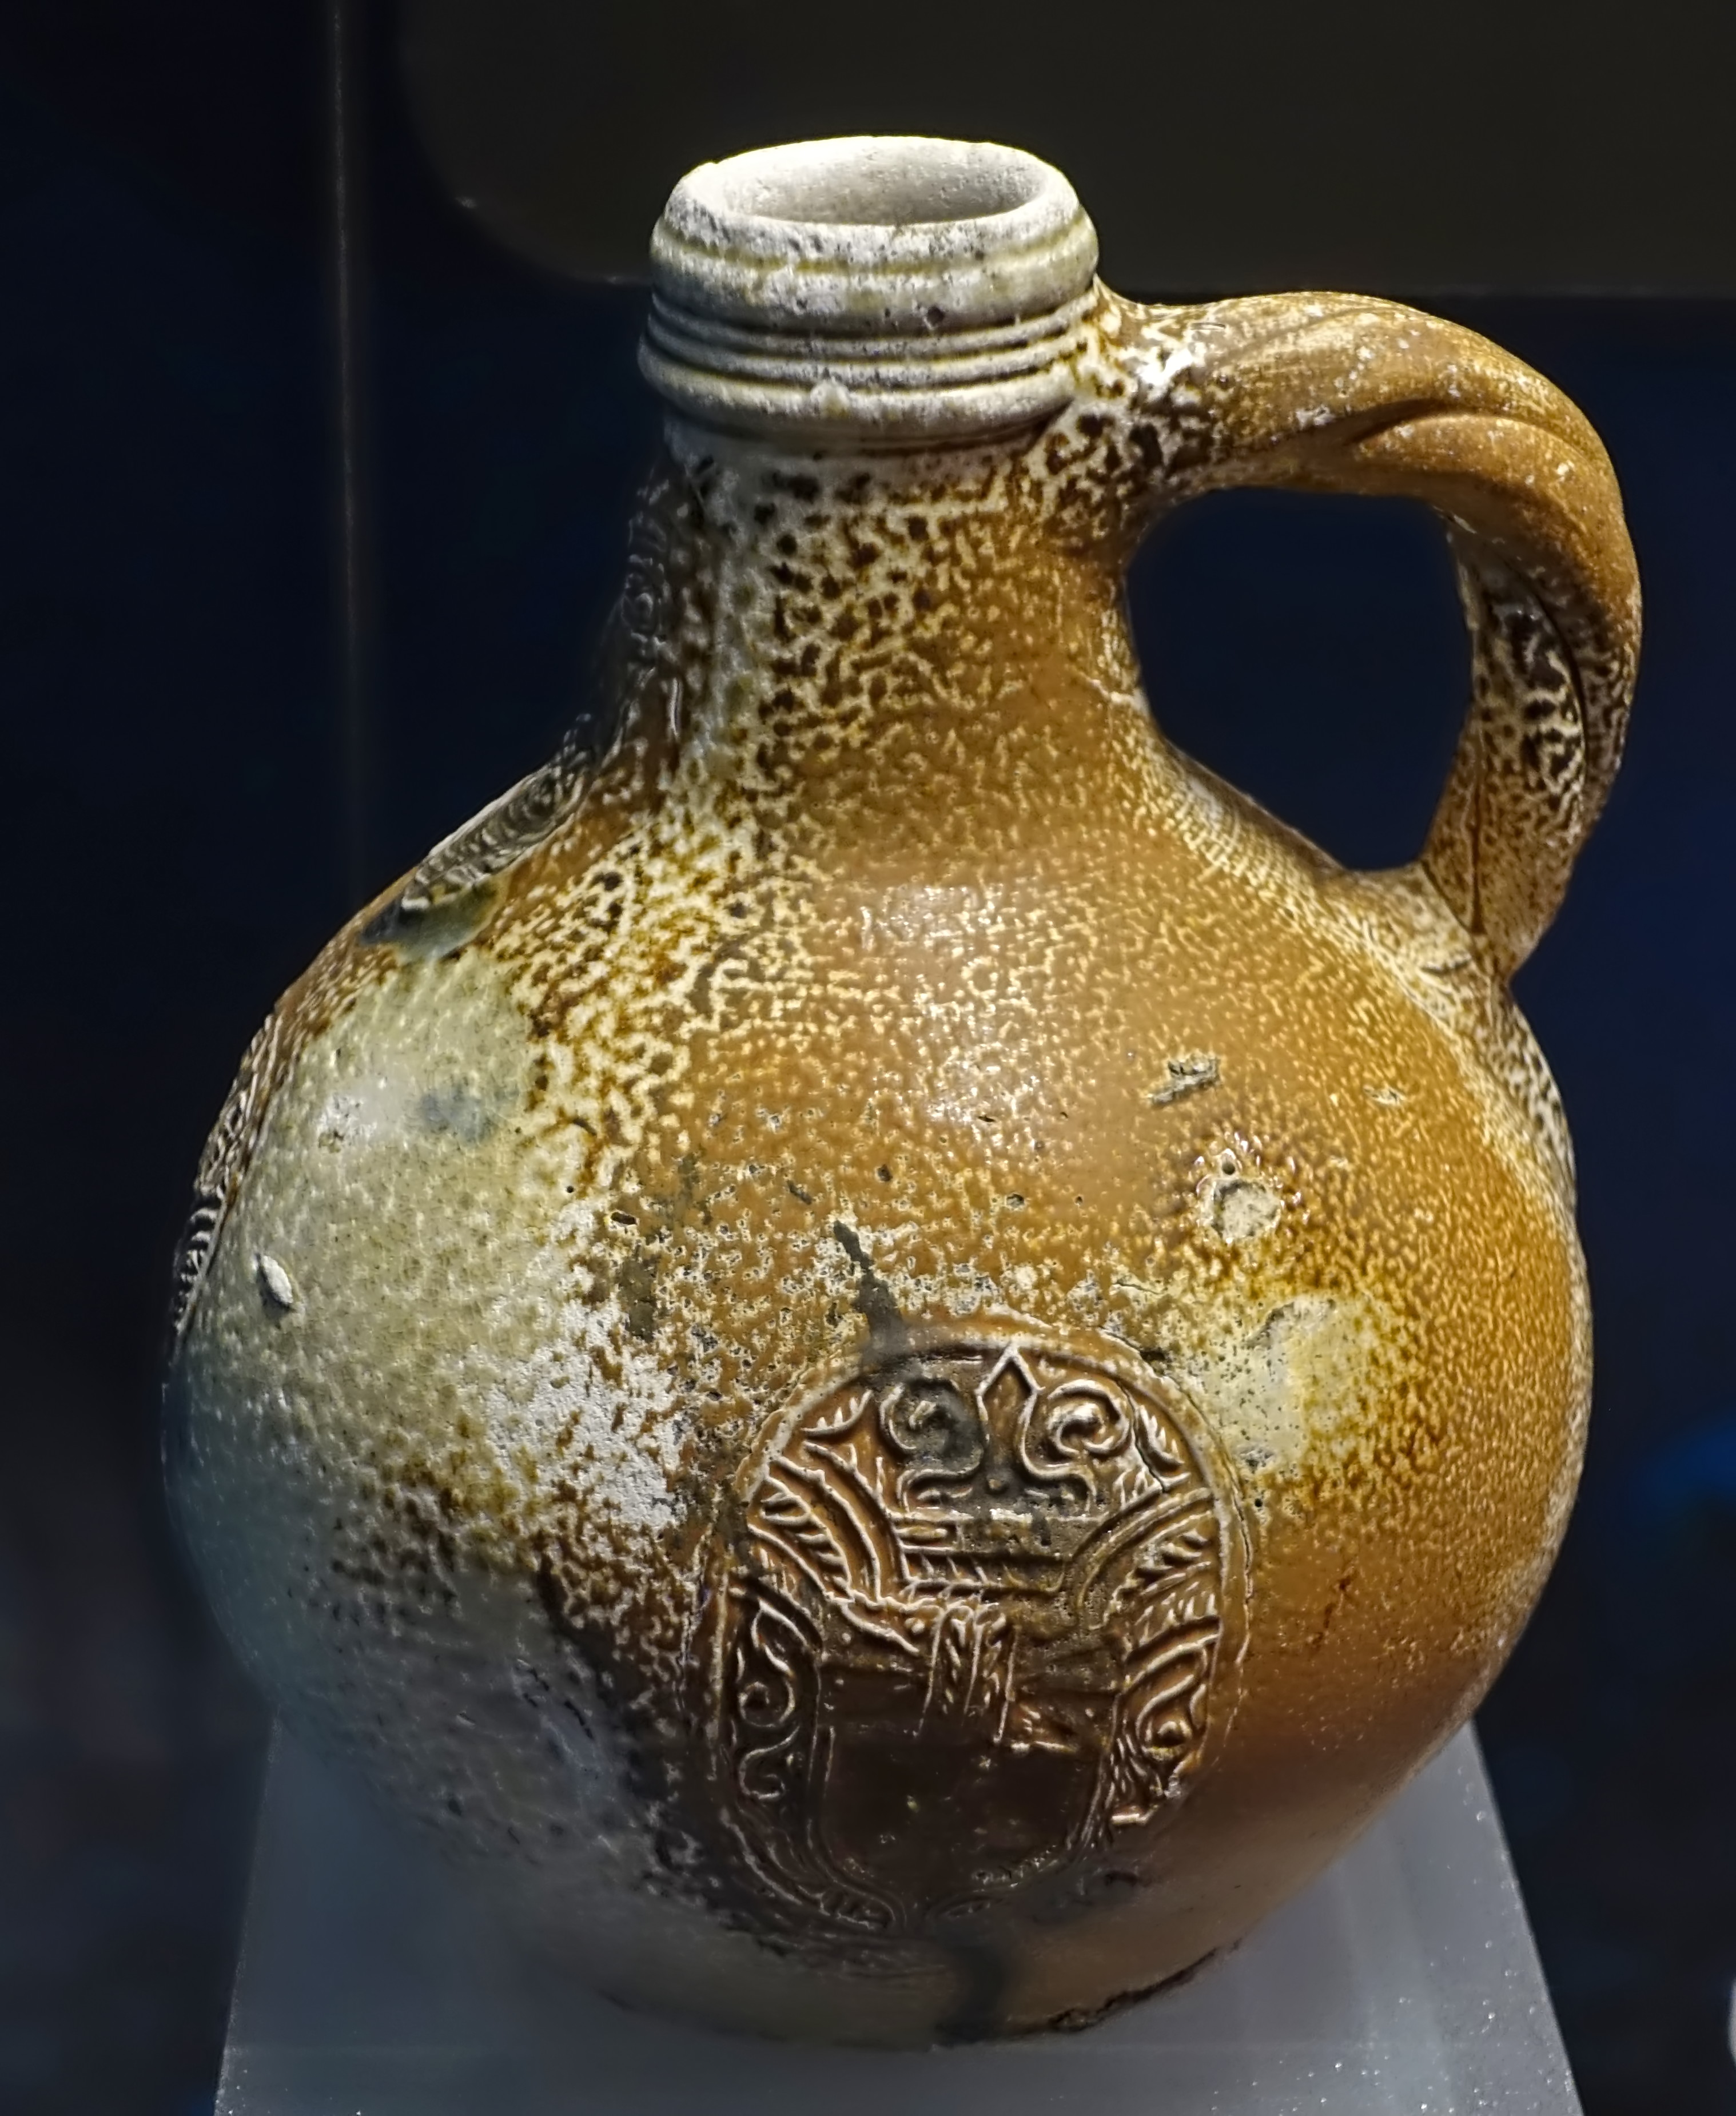
Beardman jug from the Batavia.
Salt glazed stoneware.
Catalog: unknown, possibly BAT 21628
Photo: Don Hitchcock 2017
Source and text: Museum of Geraldton, Western Australia

Westervald jug from the Batavia.
Typical of the highly ornate style of jugs produced in the Westerwald.
Catalog: BAT 2303
Photo: Don Hitchcock 2017
Source and text: Museum of Geraldton, Western Australia
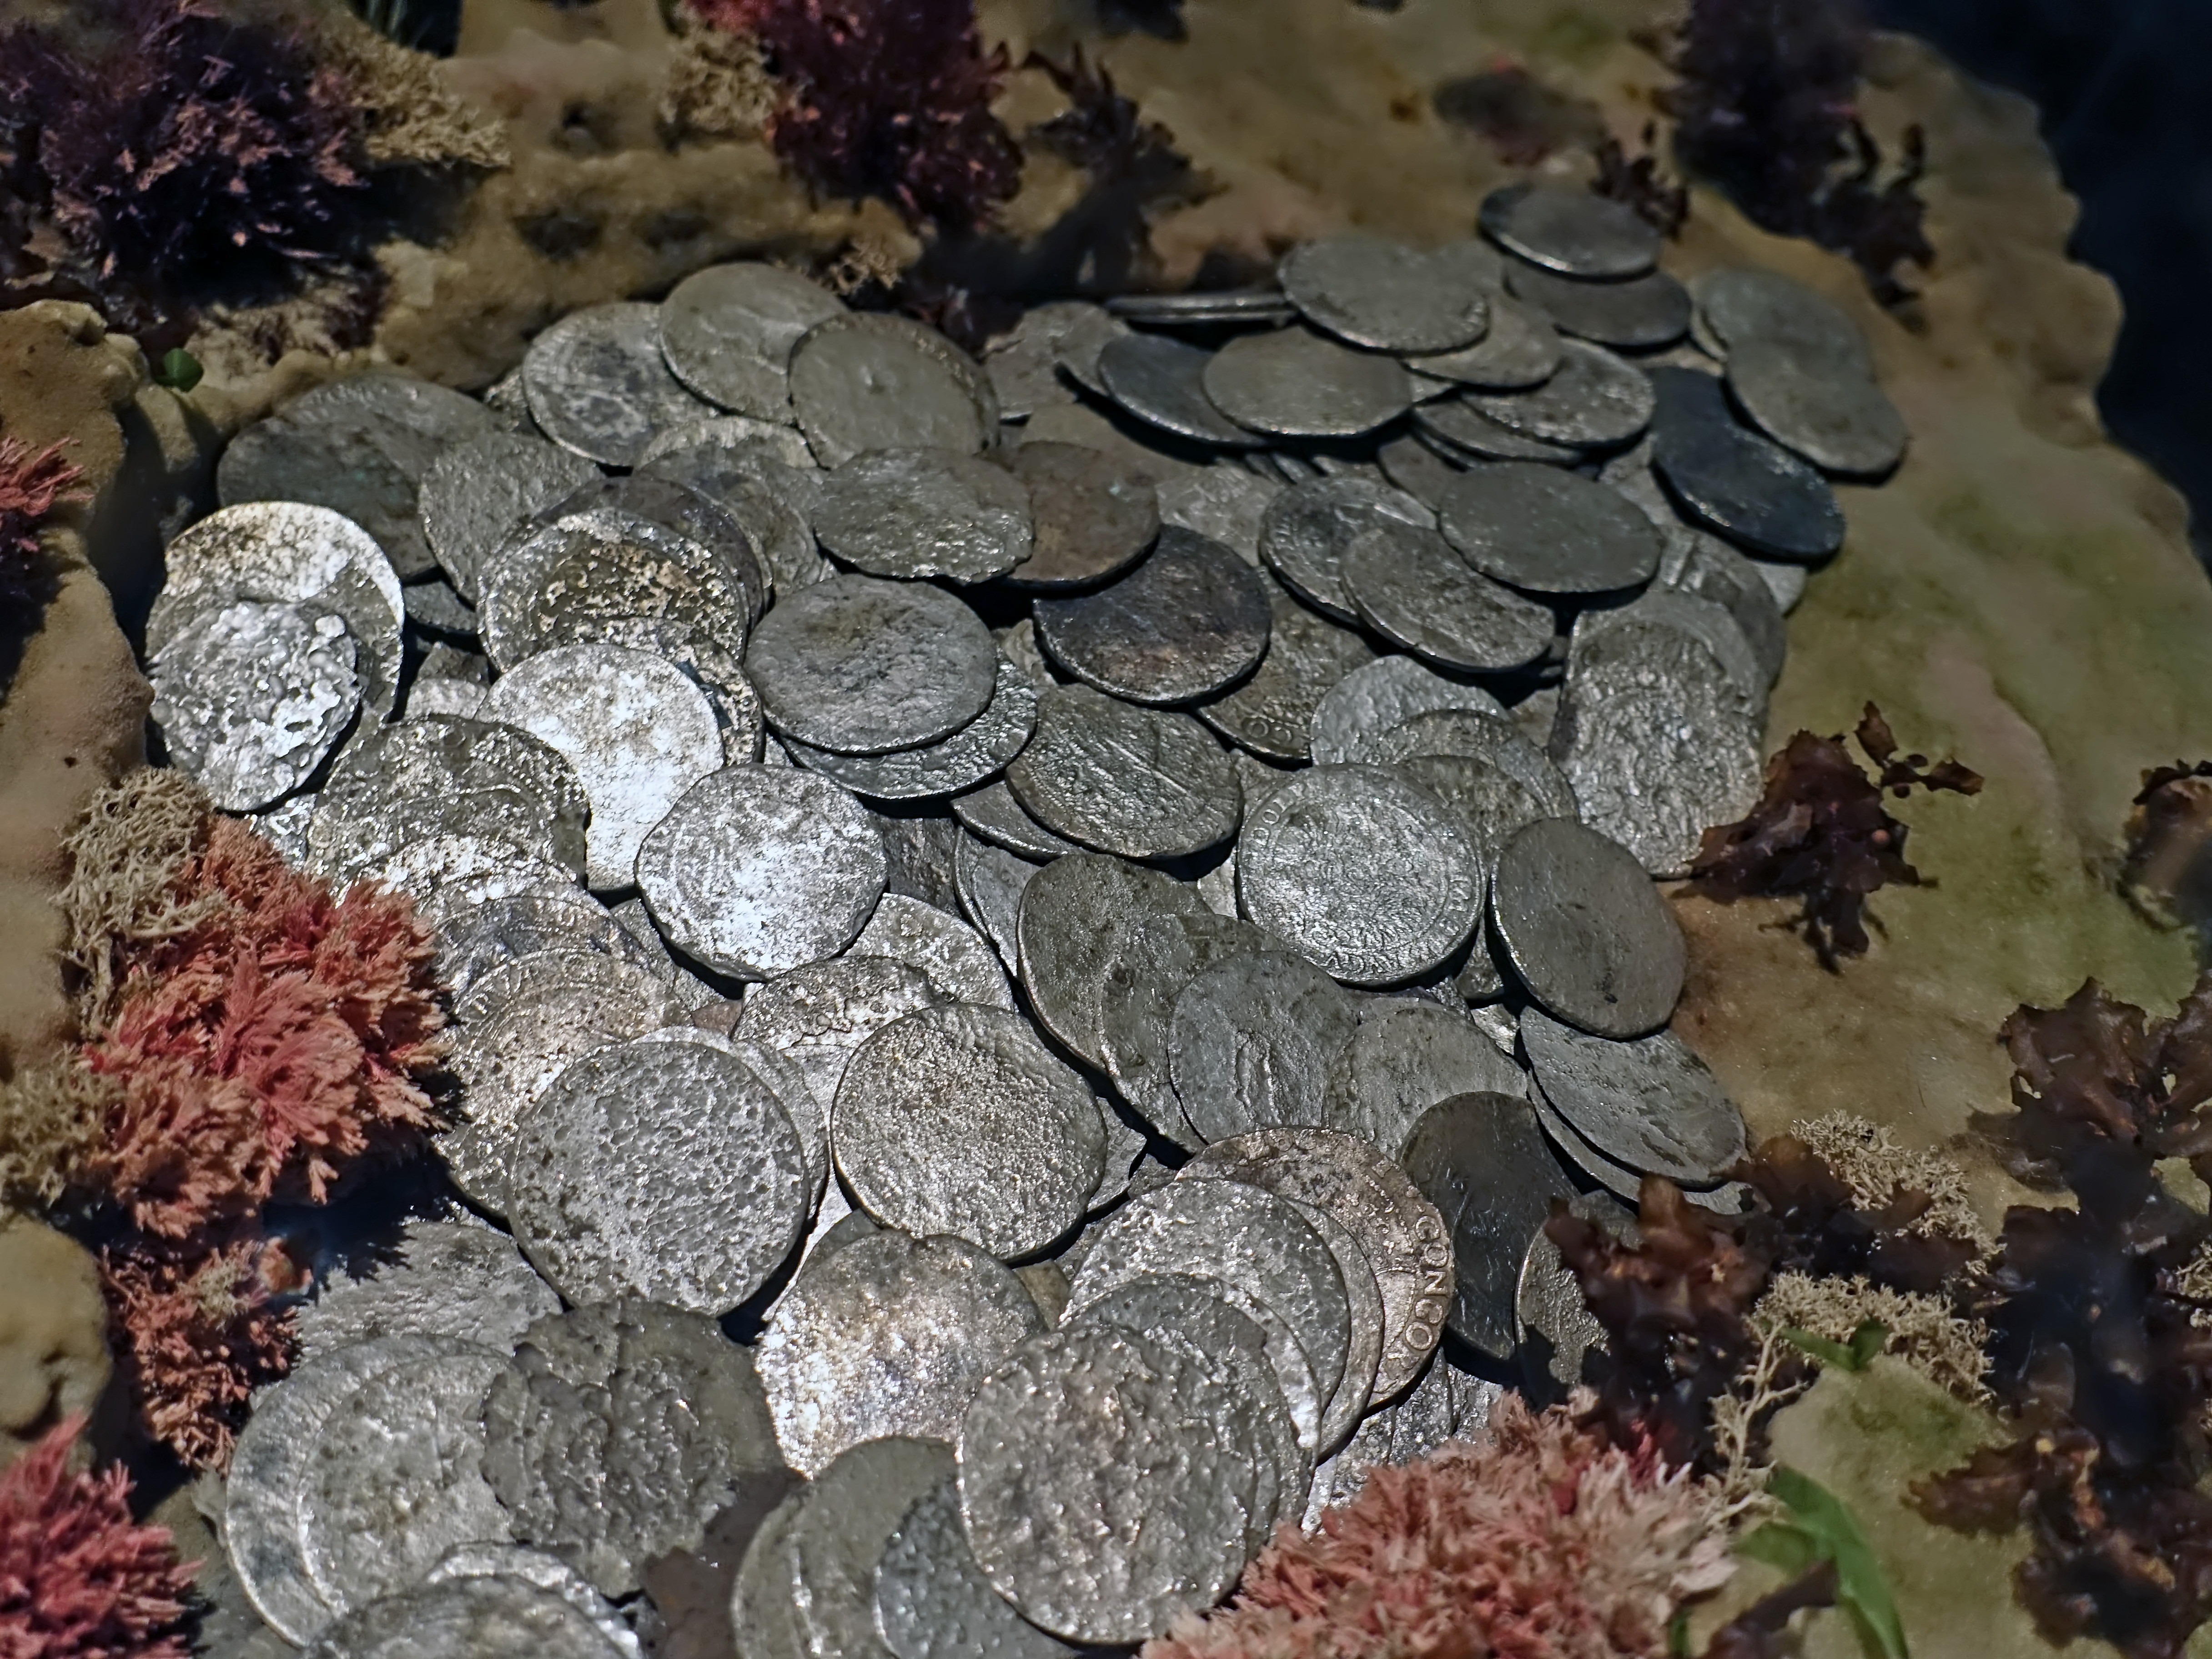
Although most of the silver carried by the Batavia was recovered and taken back to the city of Batavia, some was left behind.
Catalog: unknown
Photo: Don Hitchcock 2017
Source and text: Museum of Geraldton, Western Australia
Copper powder measure with the Roman numerals VII scratched on the handle and the front lip. It has a volume of 3.85 litres.
Copper was used when contact with gun powder was required, so that there was no possibility of a spark occurring, with calamitous results.
Catalog: BAT 589
Photo: Don Hitchcock 2017
Source and text: Museum of Geraldton, Western Australia
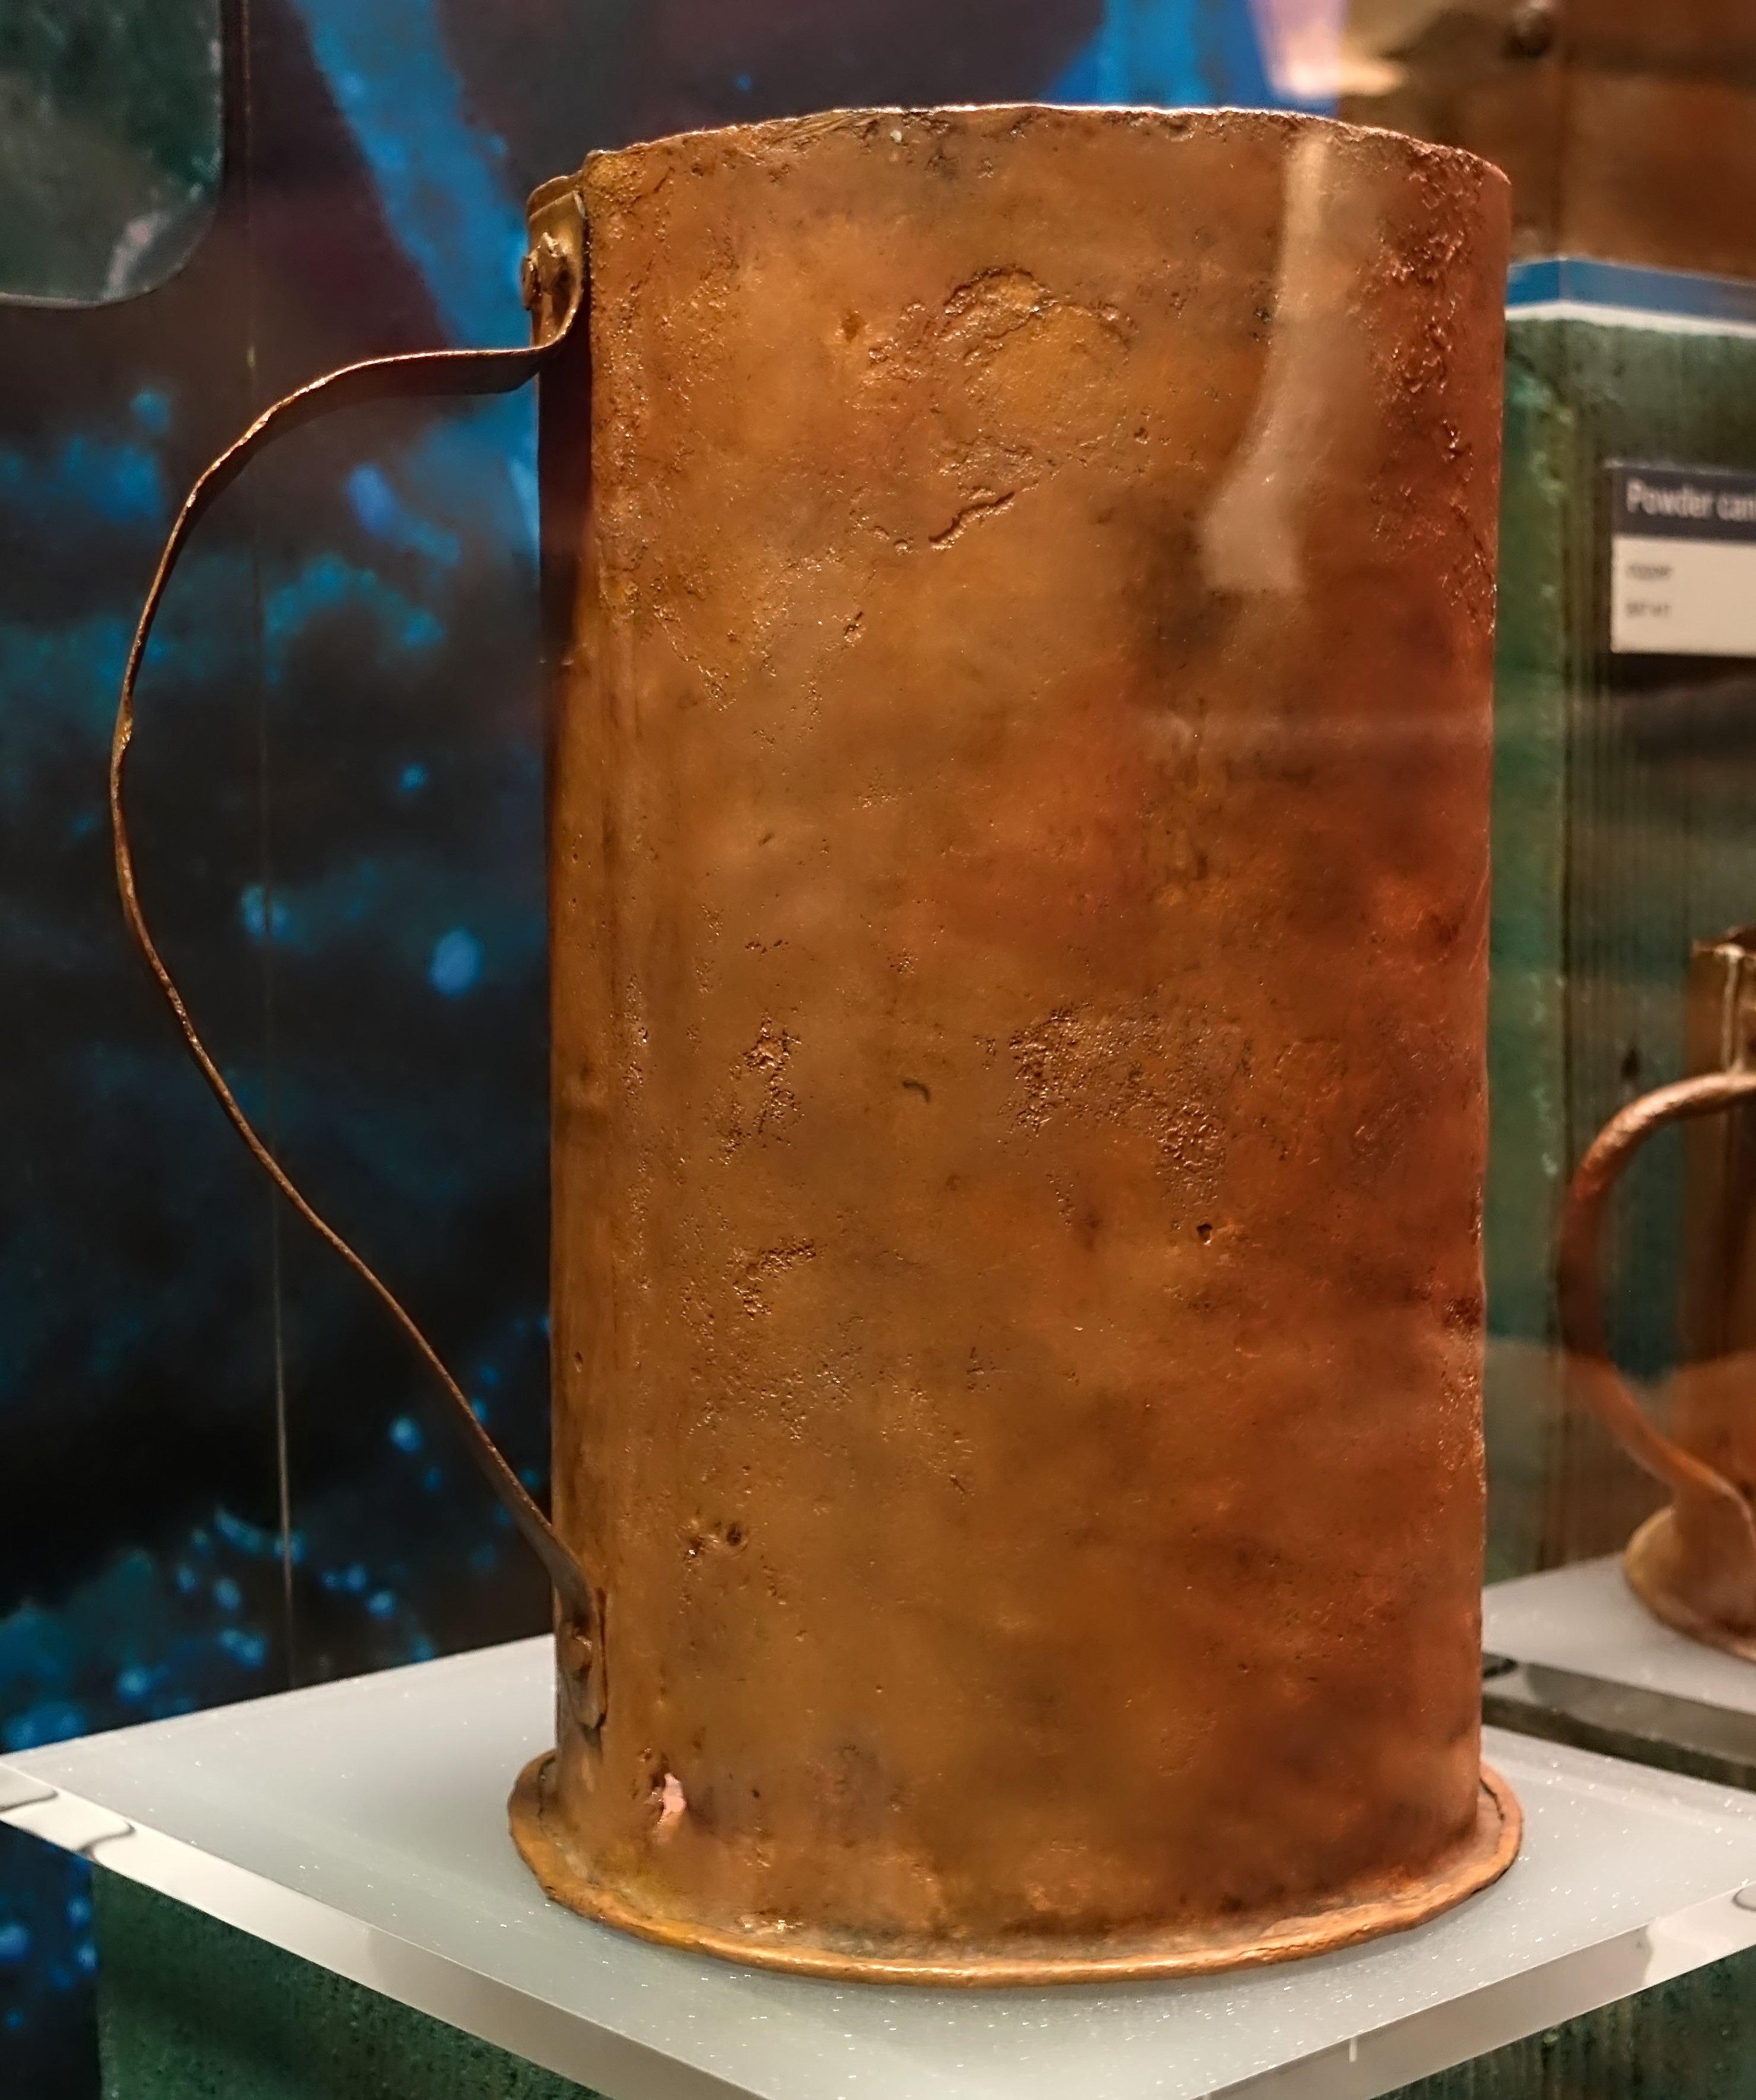
Copper powder canister.
Catalog: BAT 405
Photo: Don Hitchcock 2017
Source and text: Museum of Geraldton, Western Australia
Other wrecks on the West Australian Coast
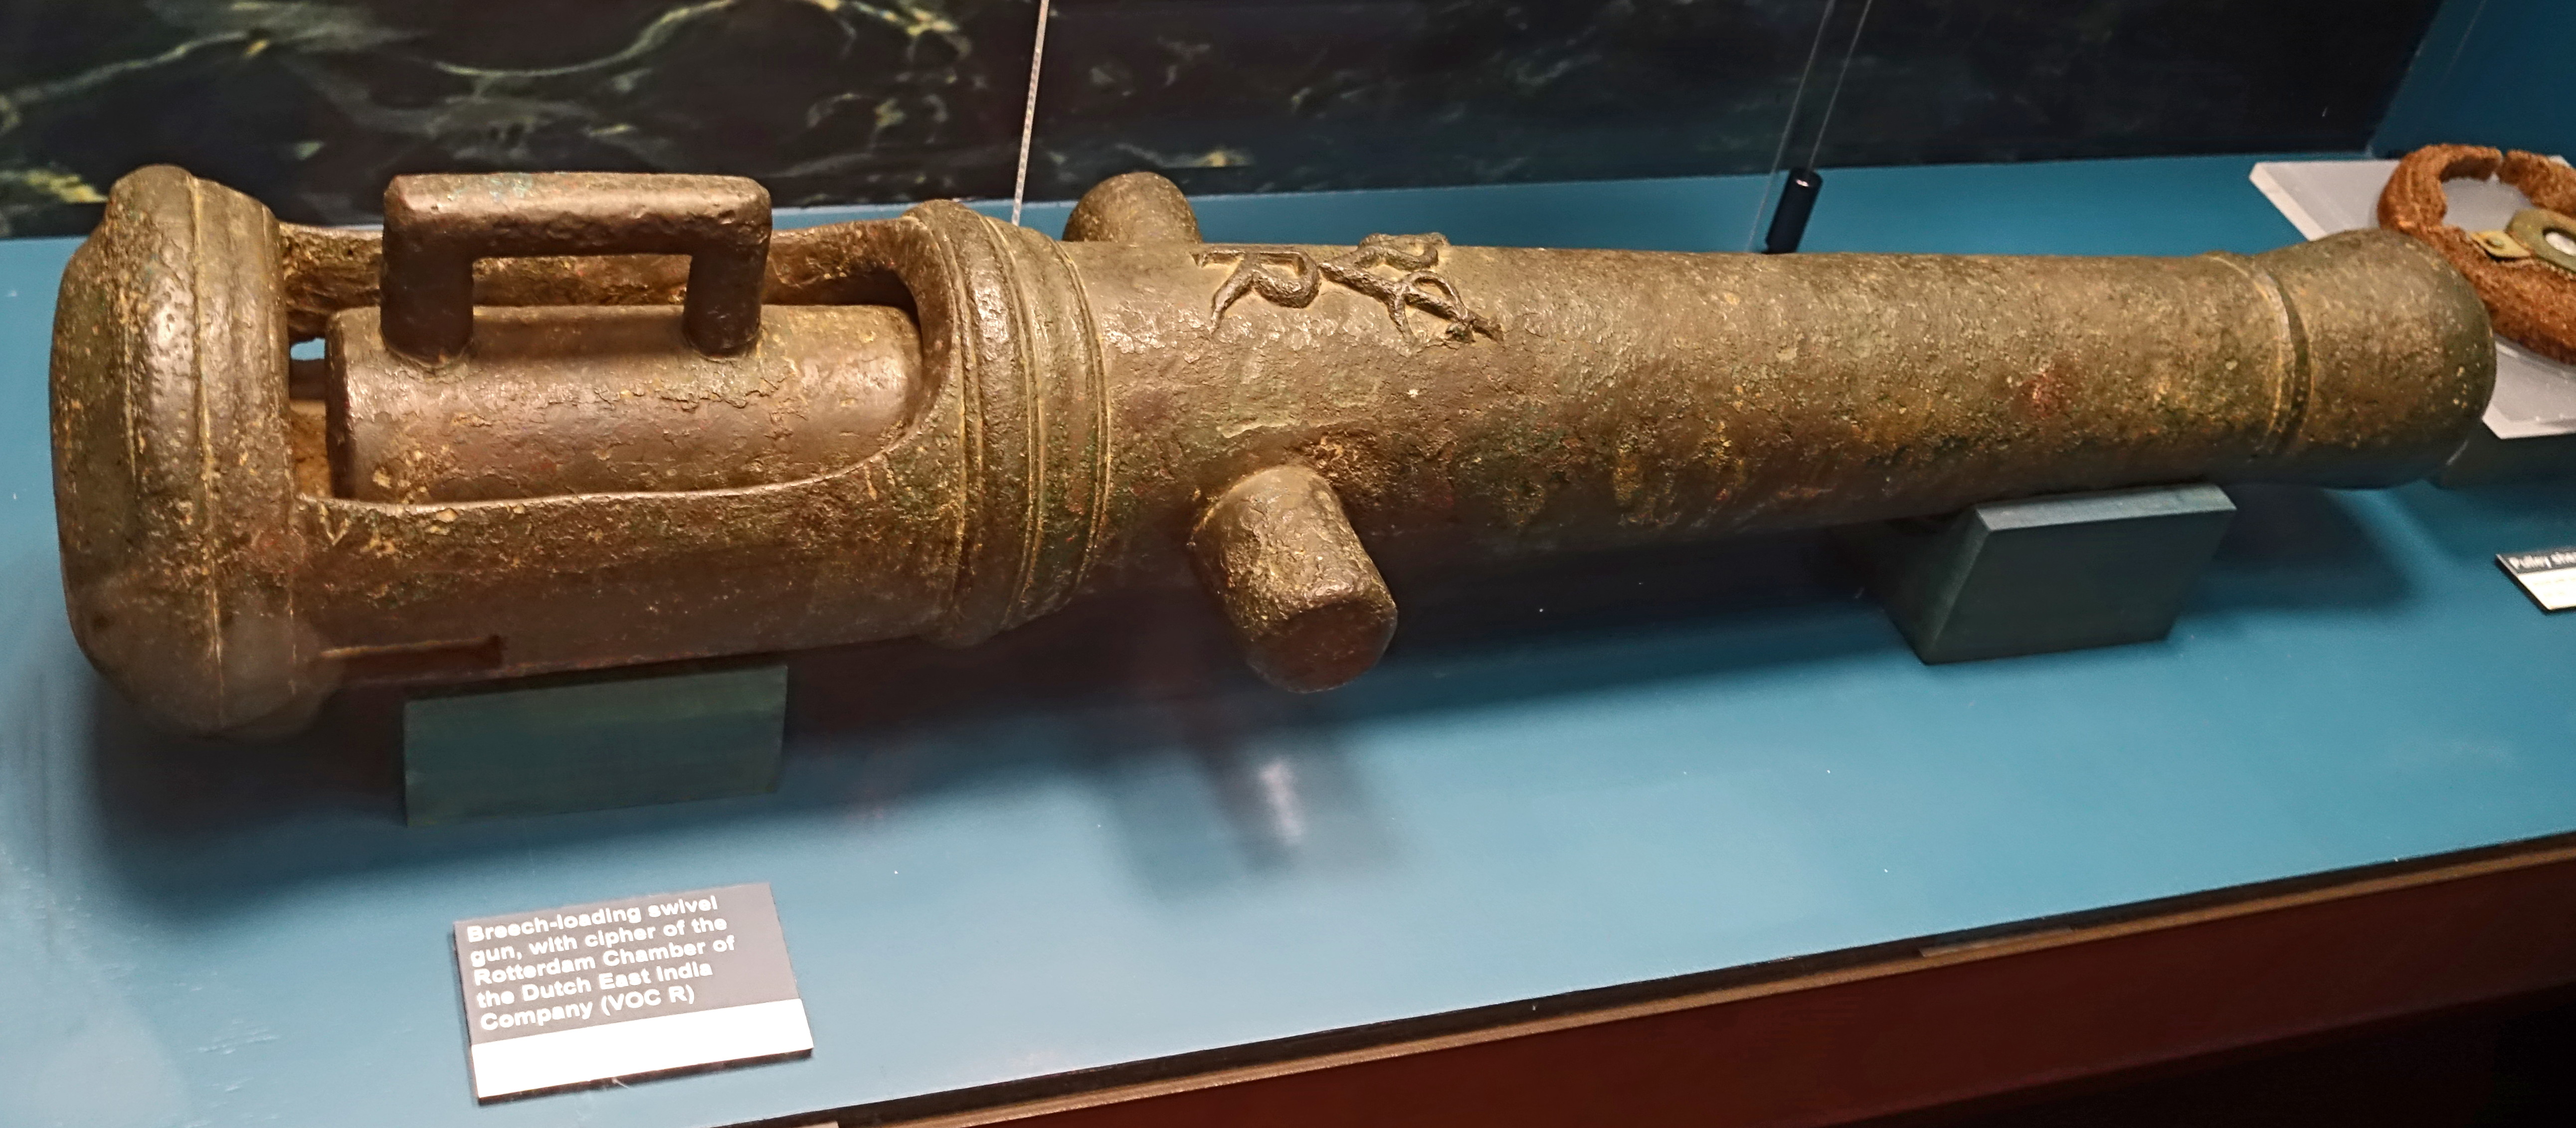
Zeewijk, wrecked on the Abrolhos on June 9th, 1727
Breech loading swivel gun, with cipher of the Dutch East India Company (VOC R).
Photo: Don Hitchcock 2017
Source and text: Museum of Geraldton, Western Australia
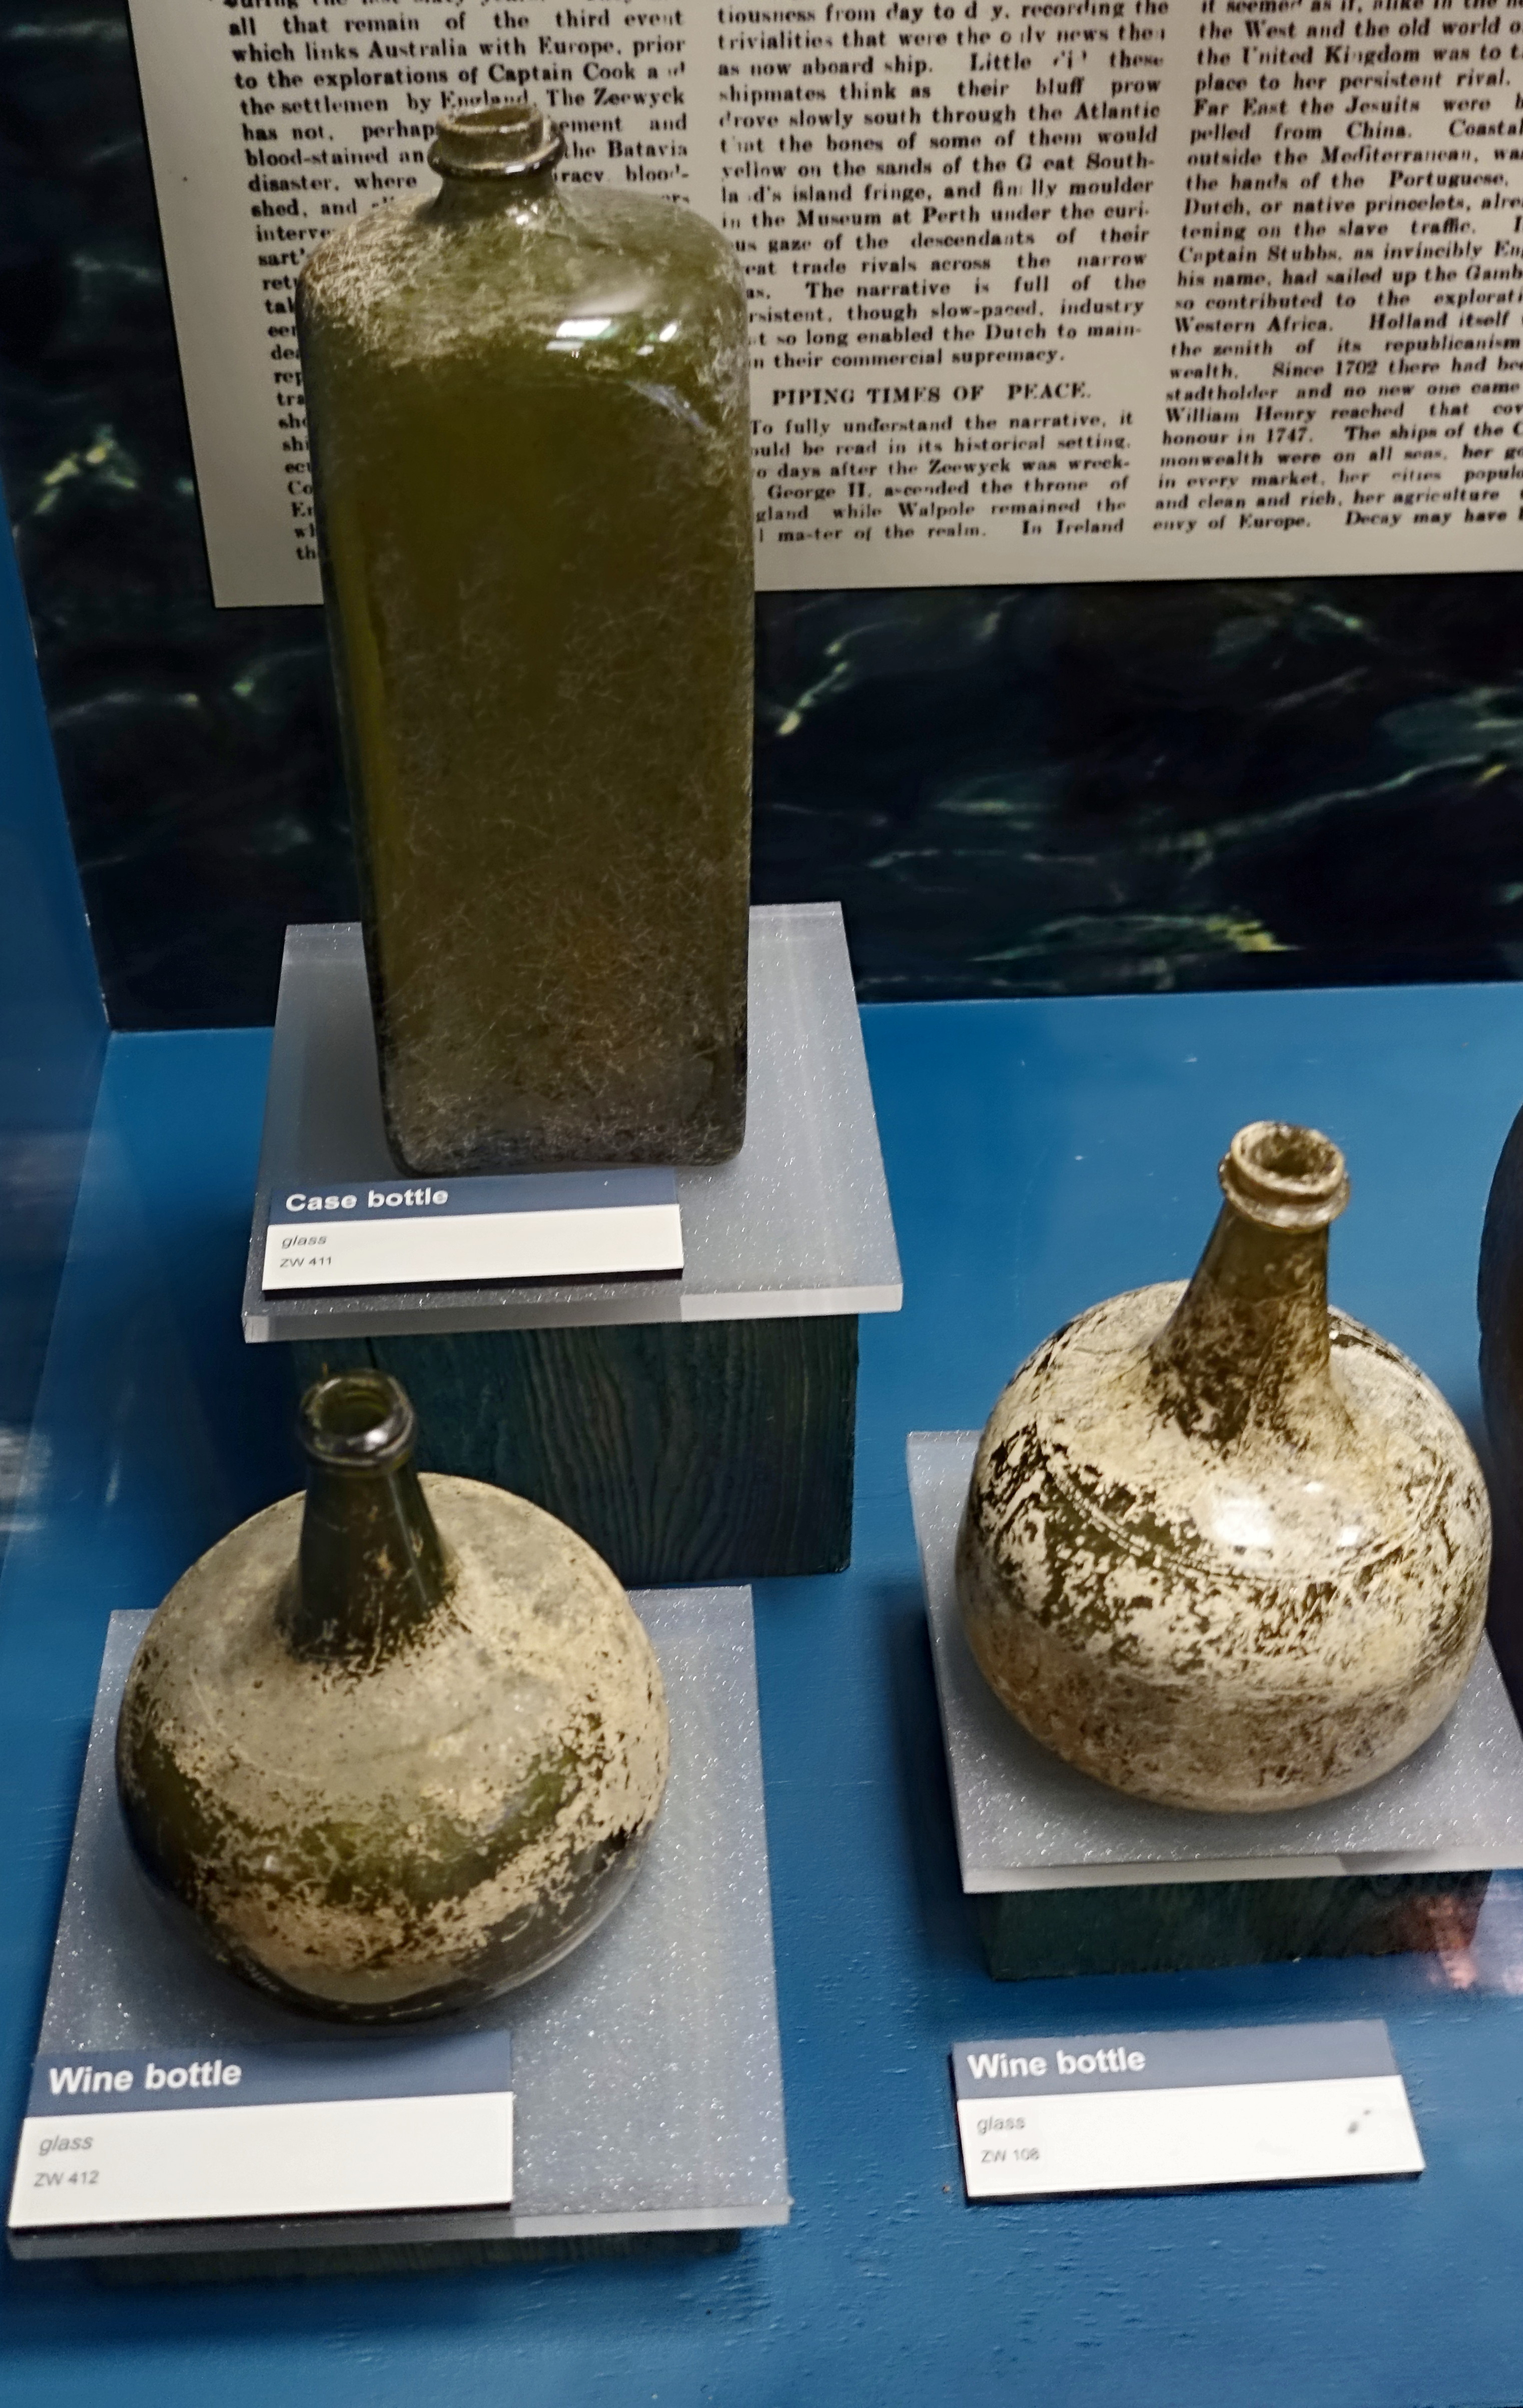
Zeewijk, wrecked on the Abrolhos on June 9th, 1727
Two glass wine bottles, and a glass case bottle.
The case bottle would have held dutch gin, and was designed to fit snugly and securely in groups of 4 to 12 in a rectangular wooden case, with the minimum of wasted space. They were usually made with sides tapering slightly from the top to the bottom.
Olive green was the most popular colour for the glass used in the case bottles, but they were also found in clear, amber, and cobalt blue.
Catalog, clockwise from the lower right: glass wine bottle ZW 108, glass wine bottle ZW 412, case bottle ZW 411.
Photo: Don Hitchcock 2017
Source and text: Museum of Geraldton, Western Australia
Additional text: http://www.odysseysvirtualmuseum.com/products/Case-Gin-Bottle.html
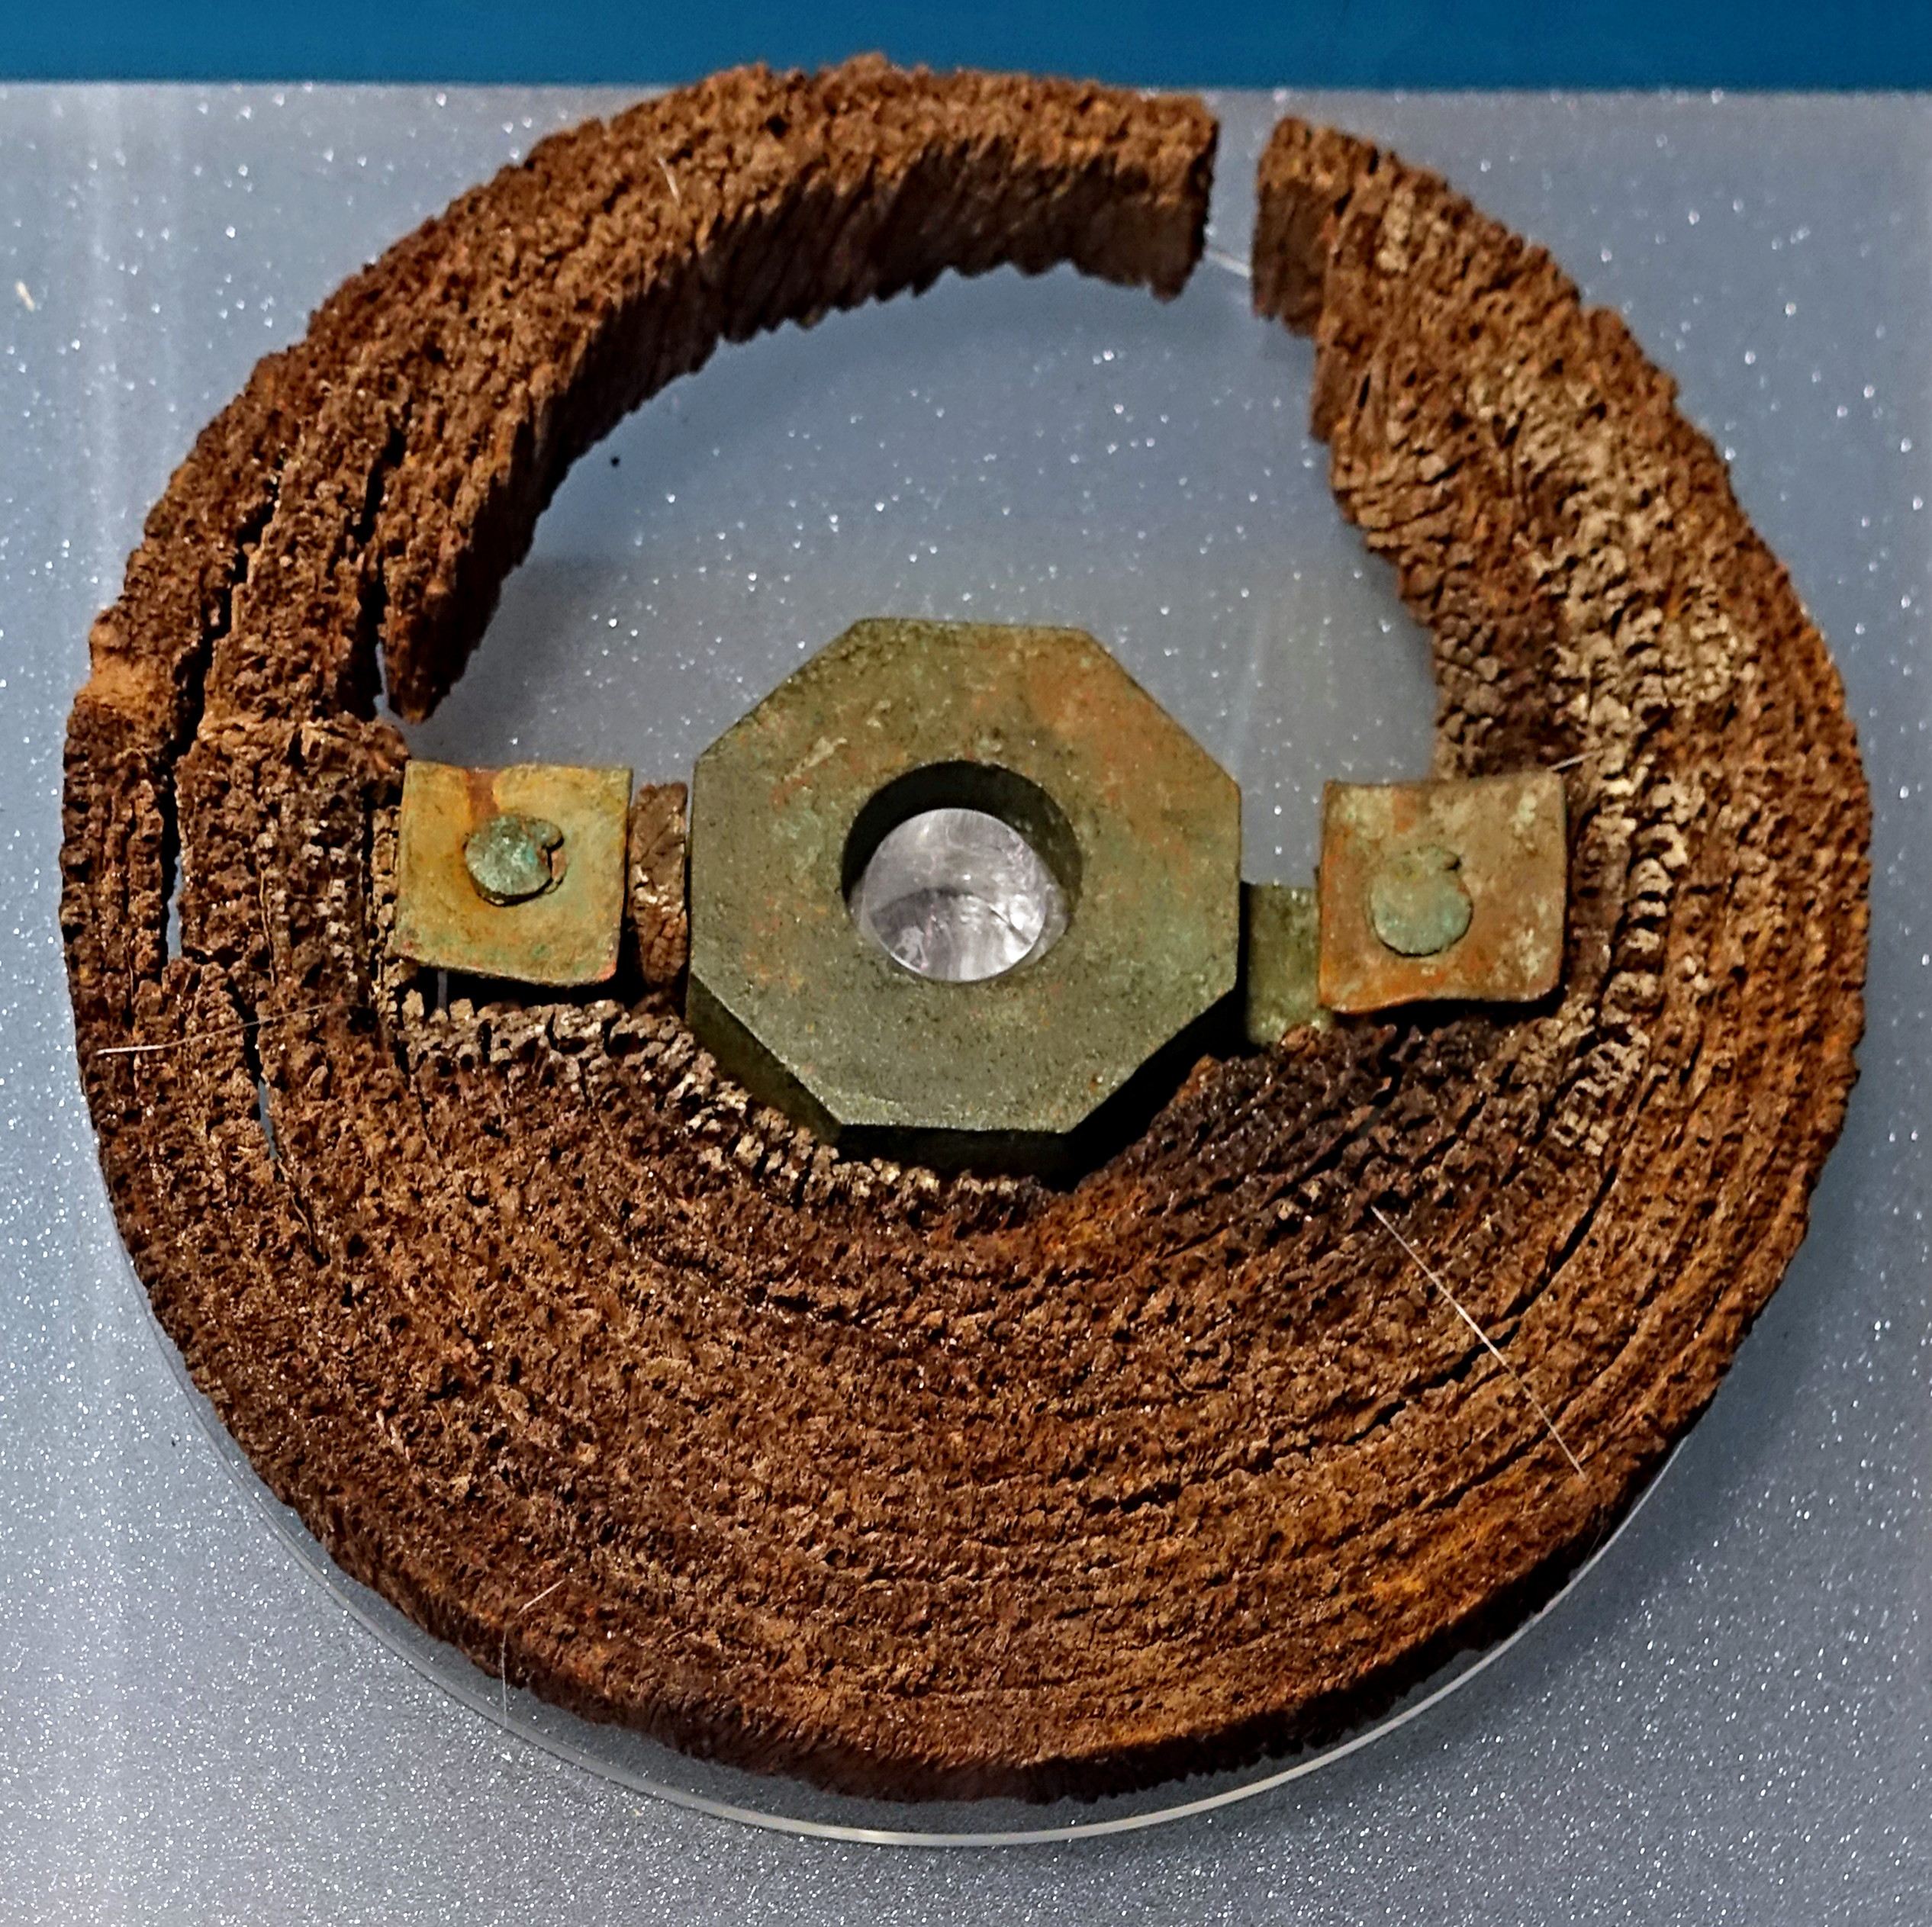
Zeewijk, wrecked on the Abrolhos on June 9th, 1727
Pulley blocks/sheaves made the handling and manoeuvering of sailing ships easier. Sheaves were usually made of lignum vitae, a strong dense wood. Many sheaves were fitted with bronze fittings for extra strength.
(left) Pulley Sheave. Wood with brass bearing.
Catalog: ZW 169
(right) Catalog: ZW 168, Broadhurst Collection
Photo: Don Hitchcock 2017
Source and text: Museum of Geraldton, Western Australia
Zeewijk, wrecked on the Abrolhos on June 9th, 1727
Knife blade, in two pieces.
Catalog: Iron, ZW 538
Photo: Don Hitchcock 2017
Source and text: Museum of Geraldton, Western Australia
Zeewijk, wrecked on the Abrolhos on June 9th, 1727
Scissor handles.
Catalog: Brass, ZW 202B, ZW 203
Photo: Don Hitchcock 2017
Source and text: Museum of Geraldton, Western Australia
Zeewijk, wrecked on the Abrolhos on June 9th, 1727
Clay pipes.
Catalog: ZW 152 A-F
Photo: Don Hitchcock 2017
Source and text: Museum of Geraldton, Western Australia
Zeewijk, wrecked on the Abrolhos on June 9th, 1727
Wall hooks.
Catalog: cast brass, ZW 200 A-B
Photo: Don Hitchcock 2017
Source and text: Museum of Geraldton, Western Australia
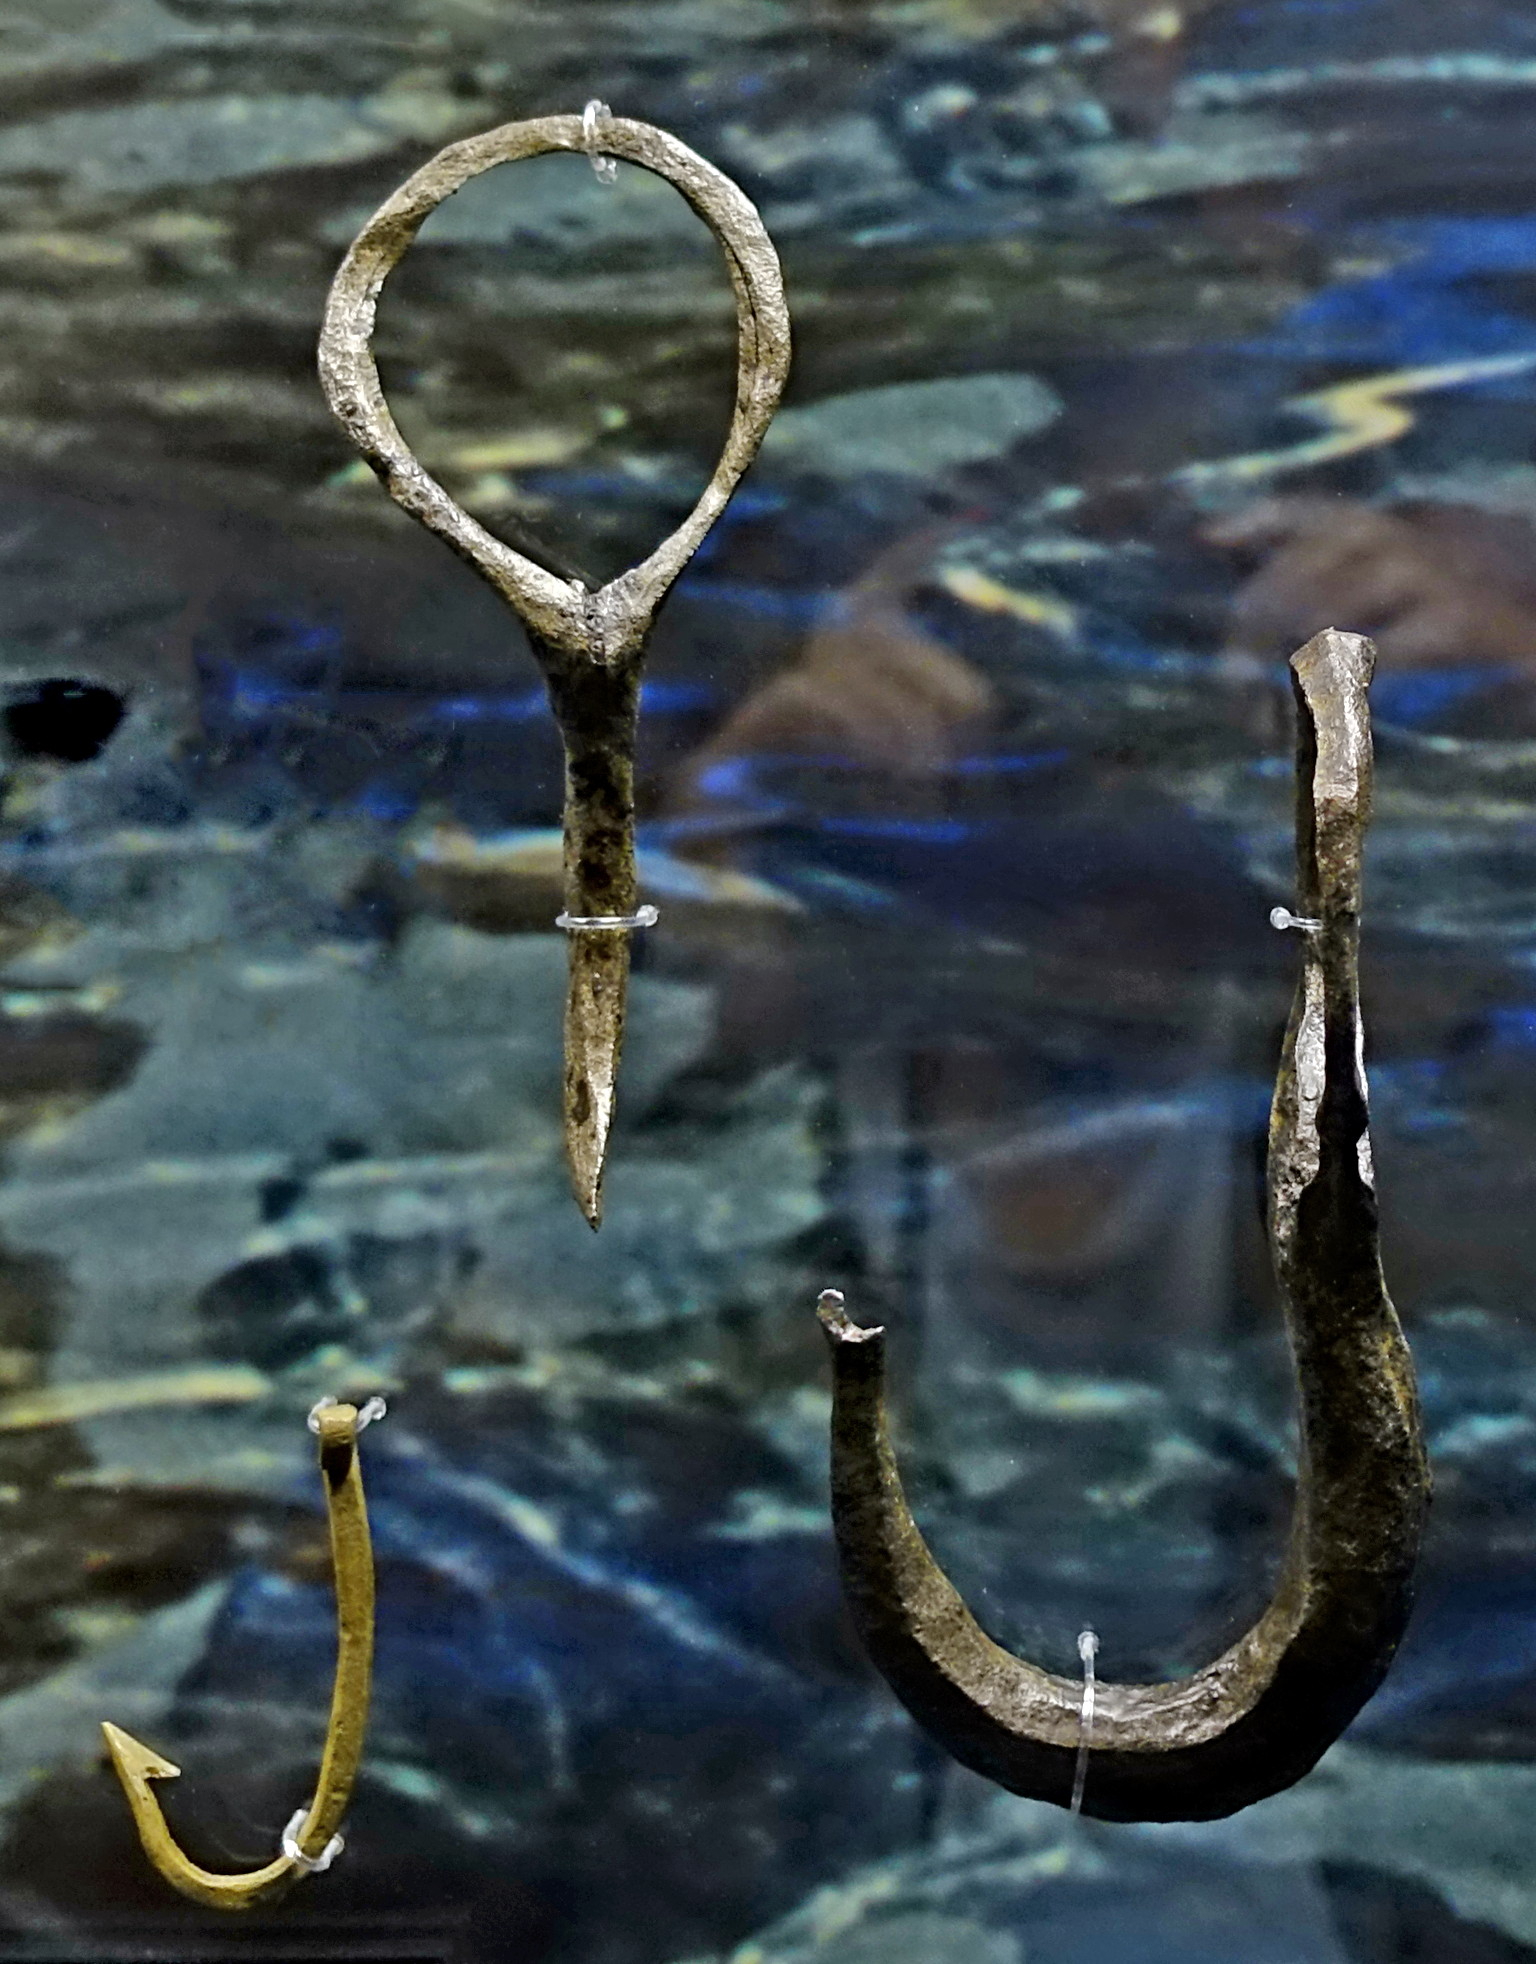
Zeewijk, wrecked on the Abrolhos on June 9th, 1727
Left: Fish Hook
Catalog: Copper, ZW 201 A ( though it looks far more like brass - Don )
Right and above: Hooks.
( note that the upper object does not look at all like a fish hook, it looks more like an eye bolt. - Don )
Catalog: Iron, ZW 262 A-B
Photo: Don Hitchcock 2017
Source and text: Museum of Geraldton, Western Australia
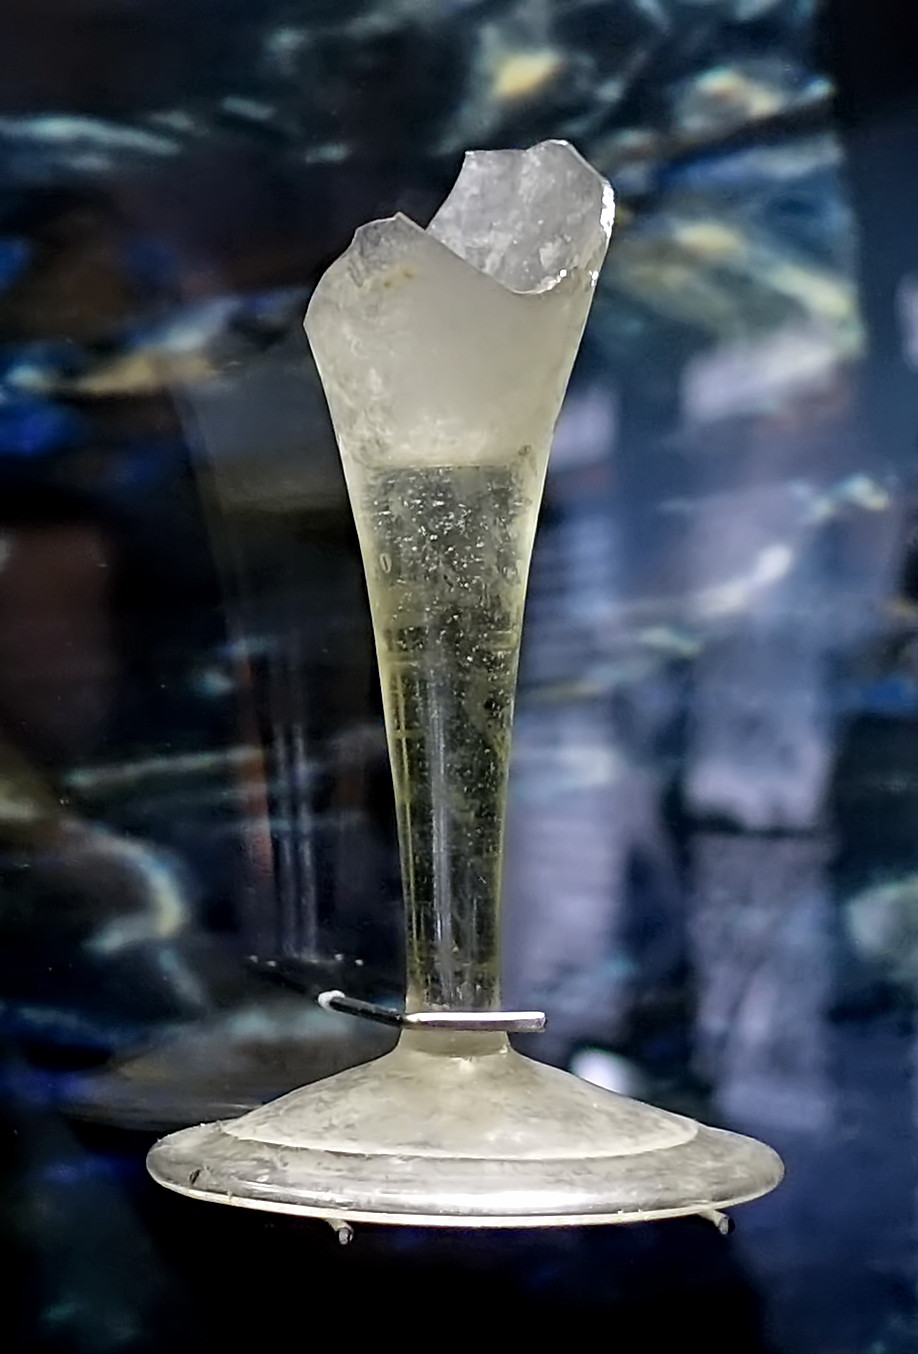
Zeewijk, wrecked on the Abrolhos on June 9th, 1727
Wine glass, base and stem.
Catalog: ZW 413
Photo: Don Hitchcock 2017
Source and text: Museum of Geraldton, Western Australia
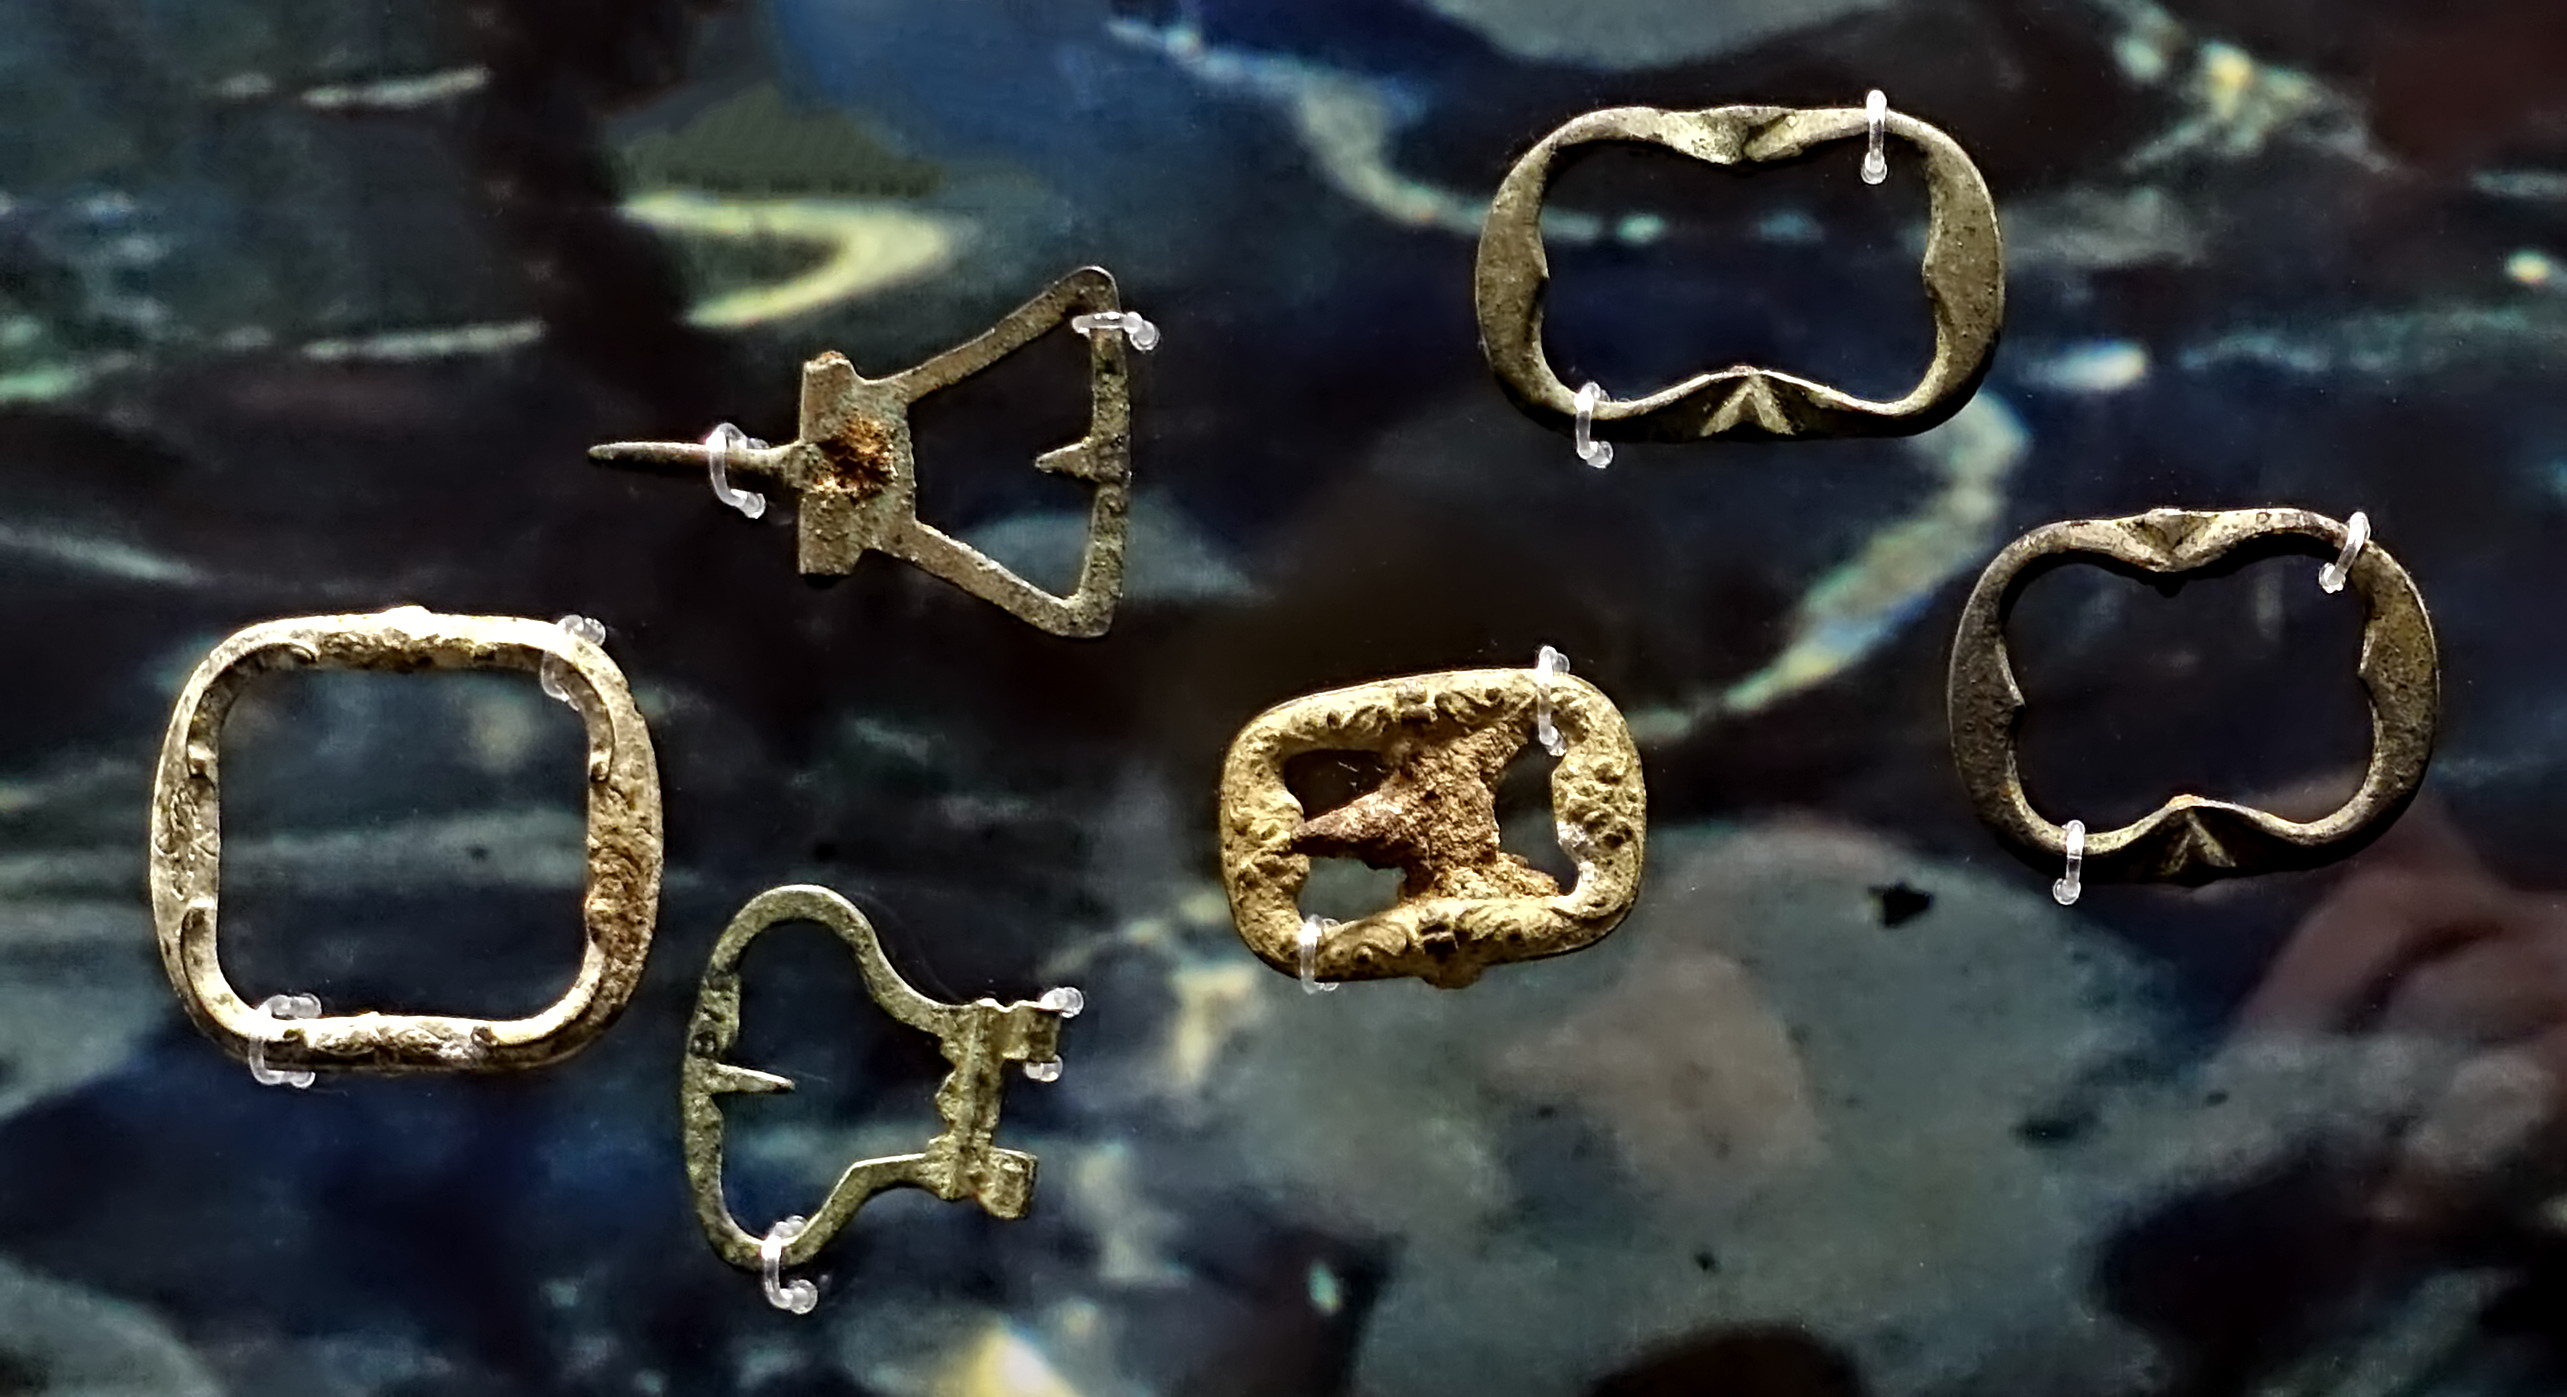
Dutch East Indian Zeewijk, wrecked on the Abrolhos on June 9th, 1727
Brass buckles.
Catalog: ZW 196 A-F
Photo: Don Hitchcock 2017
Source and text: Museum of Geraldton, Western Australia
Dutch East Indian Zeewijk, wrecked on the Abrolhos on June 9th, 1727
Brass charcoal tongs.
Charcoal is preferred over wood as a cooking fuel in many parts of the world because it does not produce smoke, is easier to transport and ready to use in a convenient dry and broken up form.
It produces nearly twice the energy for a given weight of fuel than wood. For these reasons it was an ideal fuel for the galley of a sailing ship.
Catalog: ZW 210
Photo: Don Hitchcock 2017
Source and text: Museum of Geraldton, Western Australia
Additional text: https://vuthisa.com/2010/09/05/is-it-better-to-burn-wood-or-charcoal/

Dutch East Indian Zeewijk, wrecked on the Abrolhos on June 9th, 1727
Brass tobacco box lid marked 'Leyden'.
Now spelt Leiden, it is a University city about forty kilometres south west of Amsterdam, and was an important port and the second largest city of Holland, after Amsterdam, during the 'golden age' of Dutch colonialism.
However by the time of the wreck of the Zeewijk, it had declined somewhat in importance.
Catalog: ZW 1045
Photo: Don Hitchcock 2017
Source and text: Museum of Geraldton, Western Australia
Additional text: Wikipedia
Dutch East Indian Zeewijk, wrecked on the Abrolhos on June 9th, 1727
Rush lamp
Catalog: unknown
Photo: Don Hitchcock 2017
Source and text: Museum of Geraldton, Western Australia
Dutch East Indian Zeewijk, wrecked on the Abrolhos on June 9th, 1727
Butt plate from pistol.
Catalog: ZW 430
Photo: Don Hitchcock 2017
Source and text: Museum of Geraldton, Western Australia
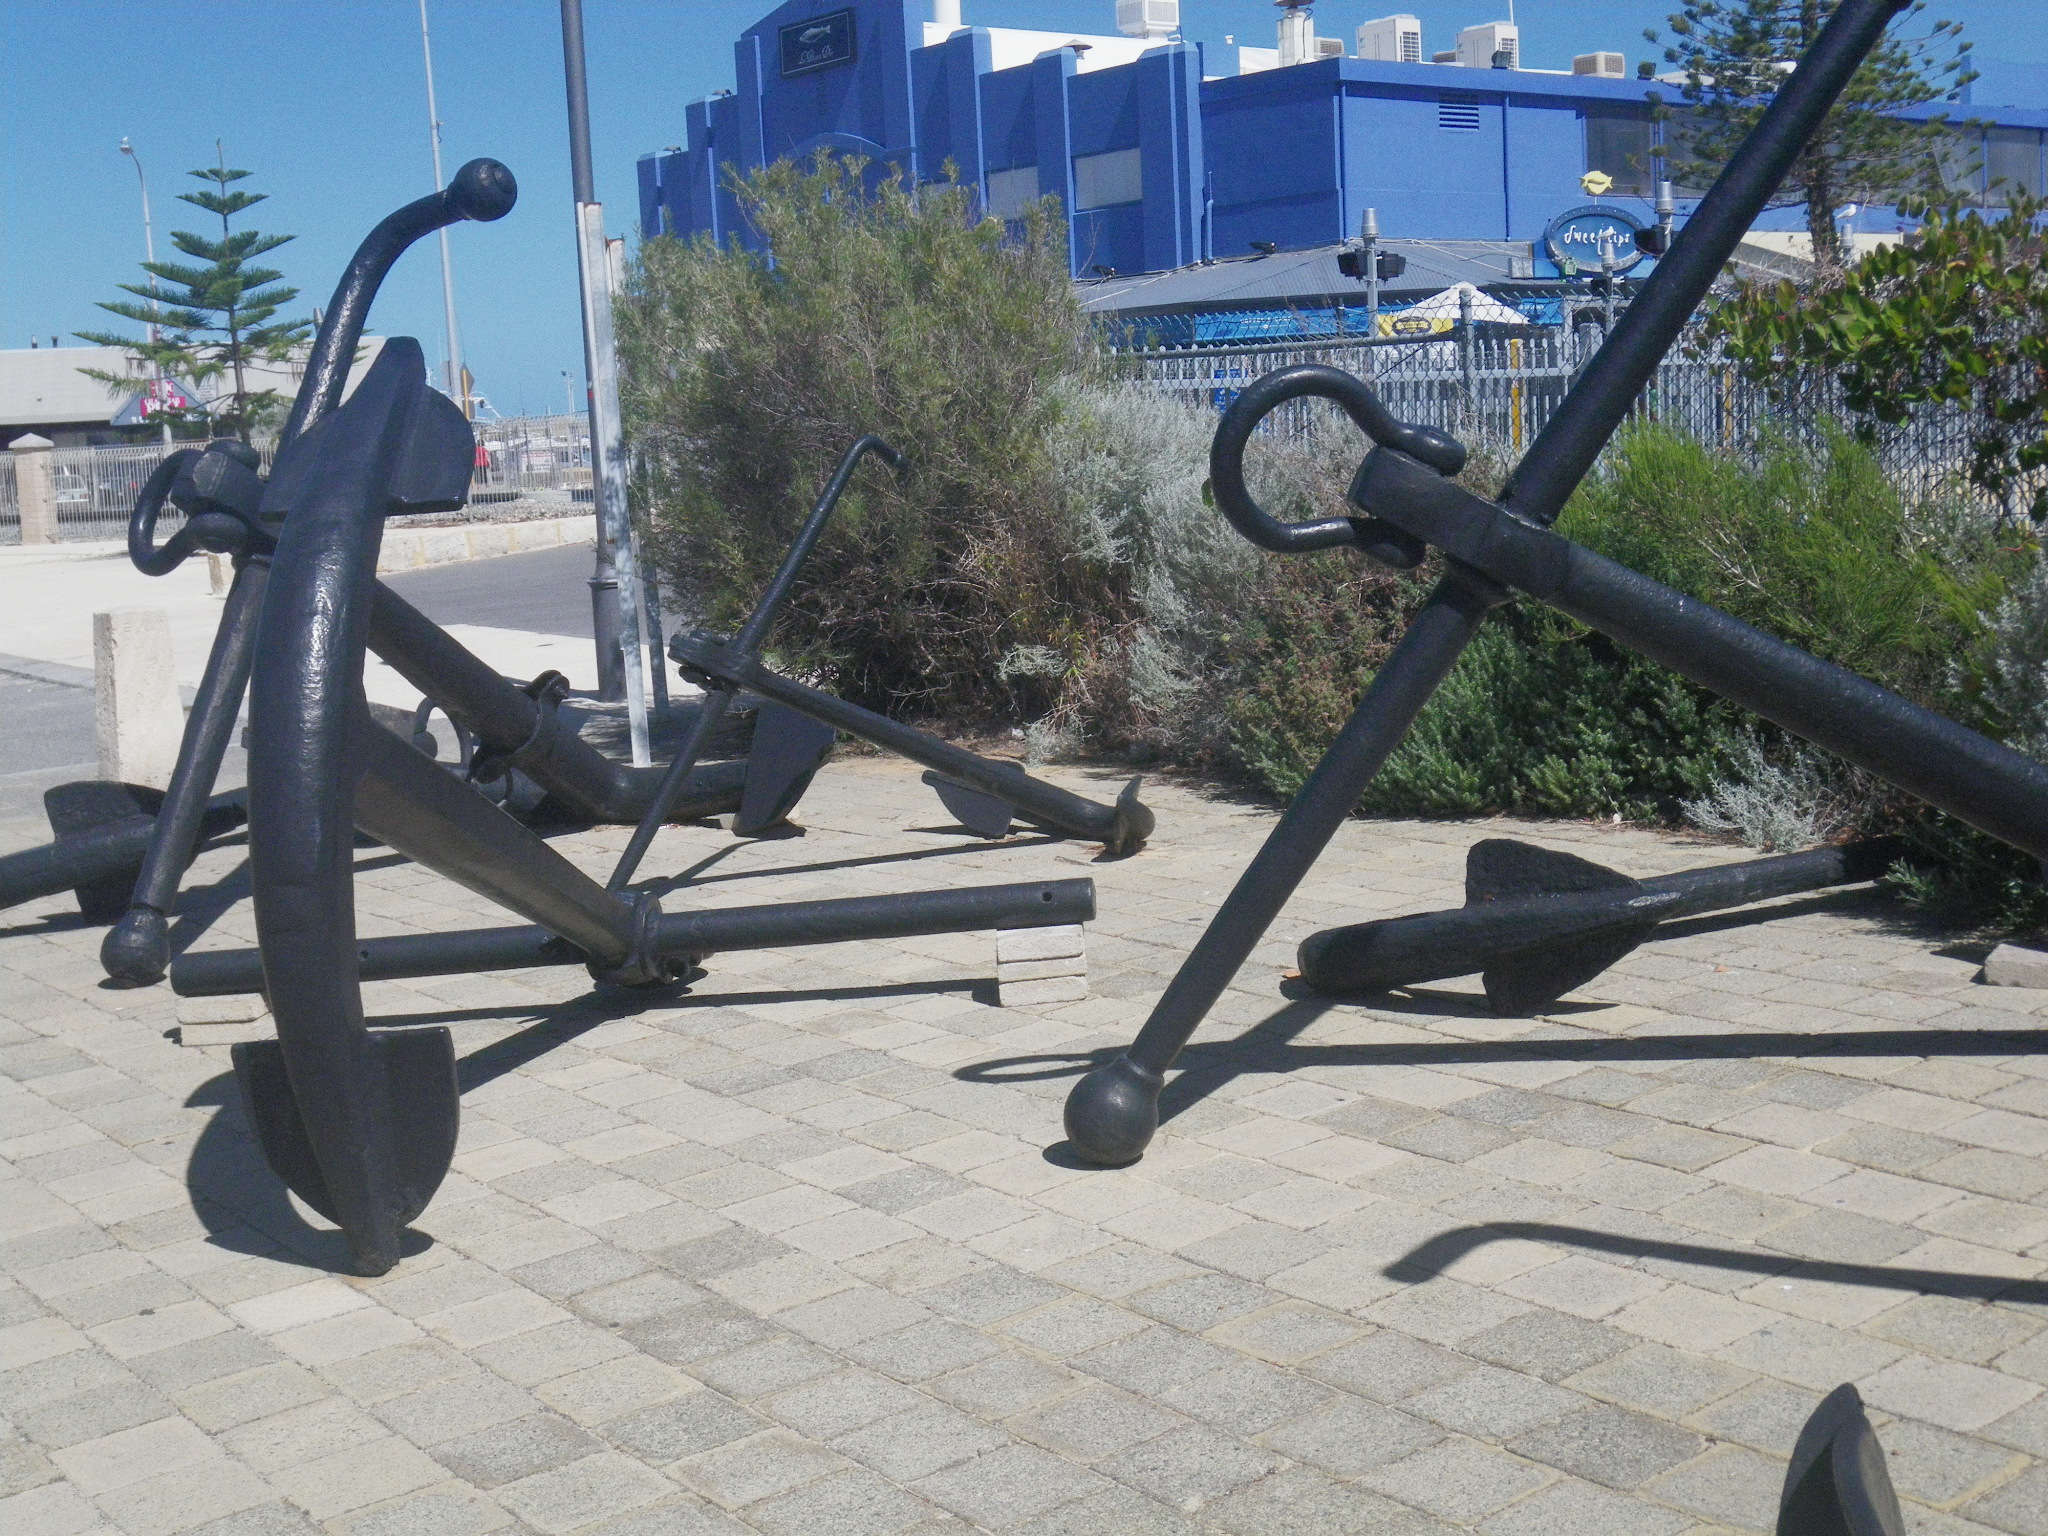
Anchors have gone through a long period of improvement over the years. Modern anchors look quite different to these.
Photo: Don Hitchcock April 2014
Source: The Shipwreck Galleries, Western Australia Museum, Fremantle, Western Australia
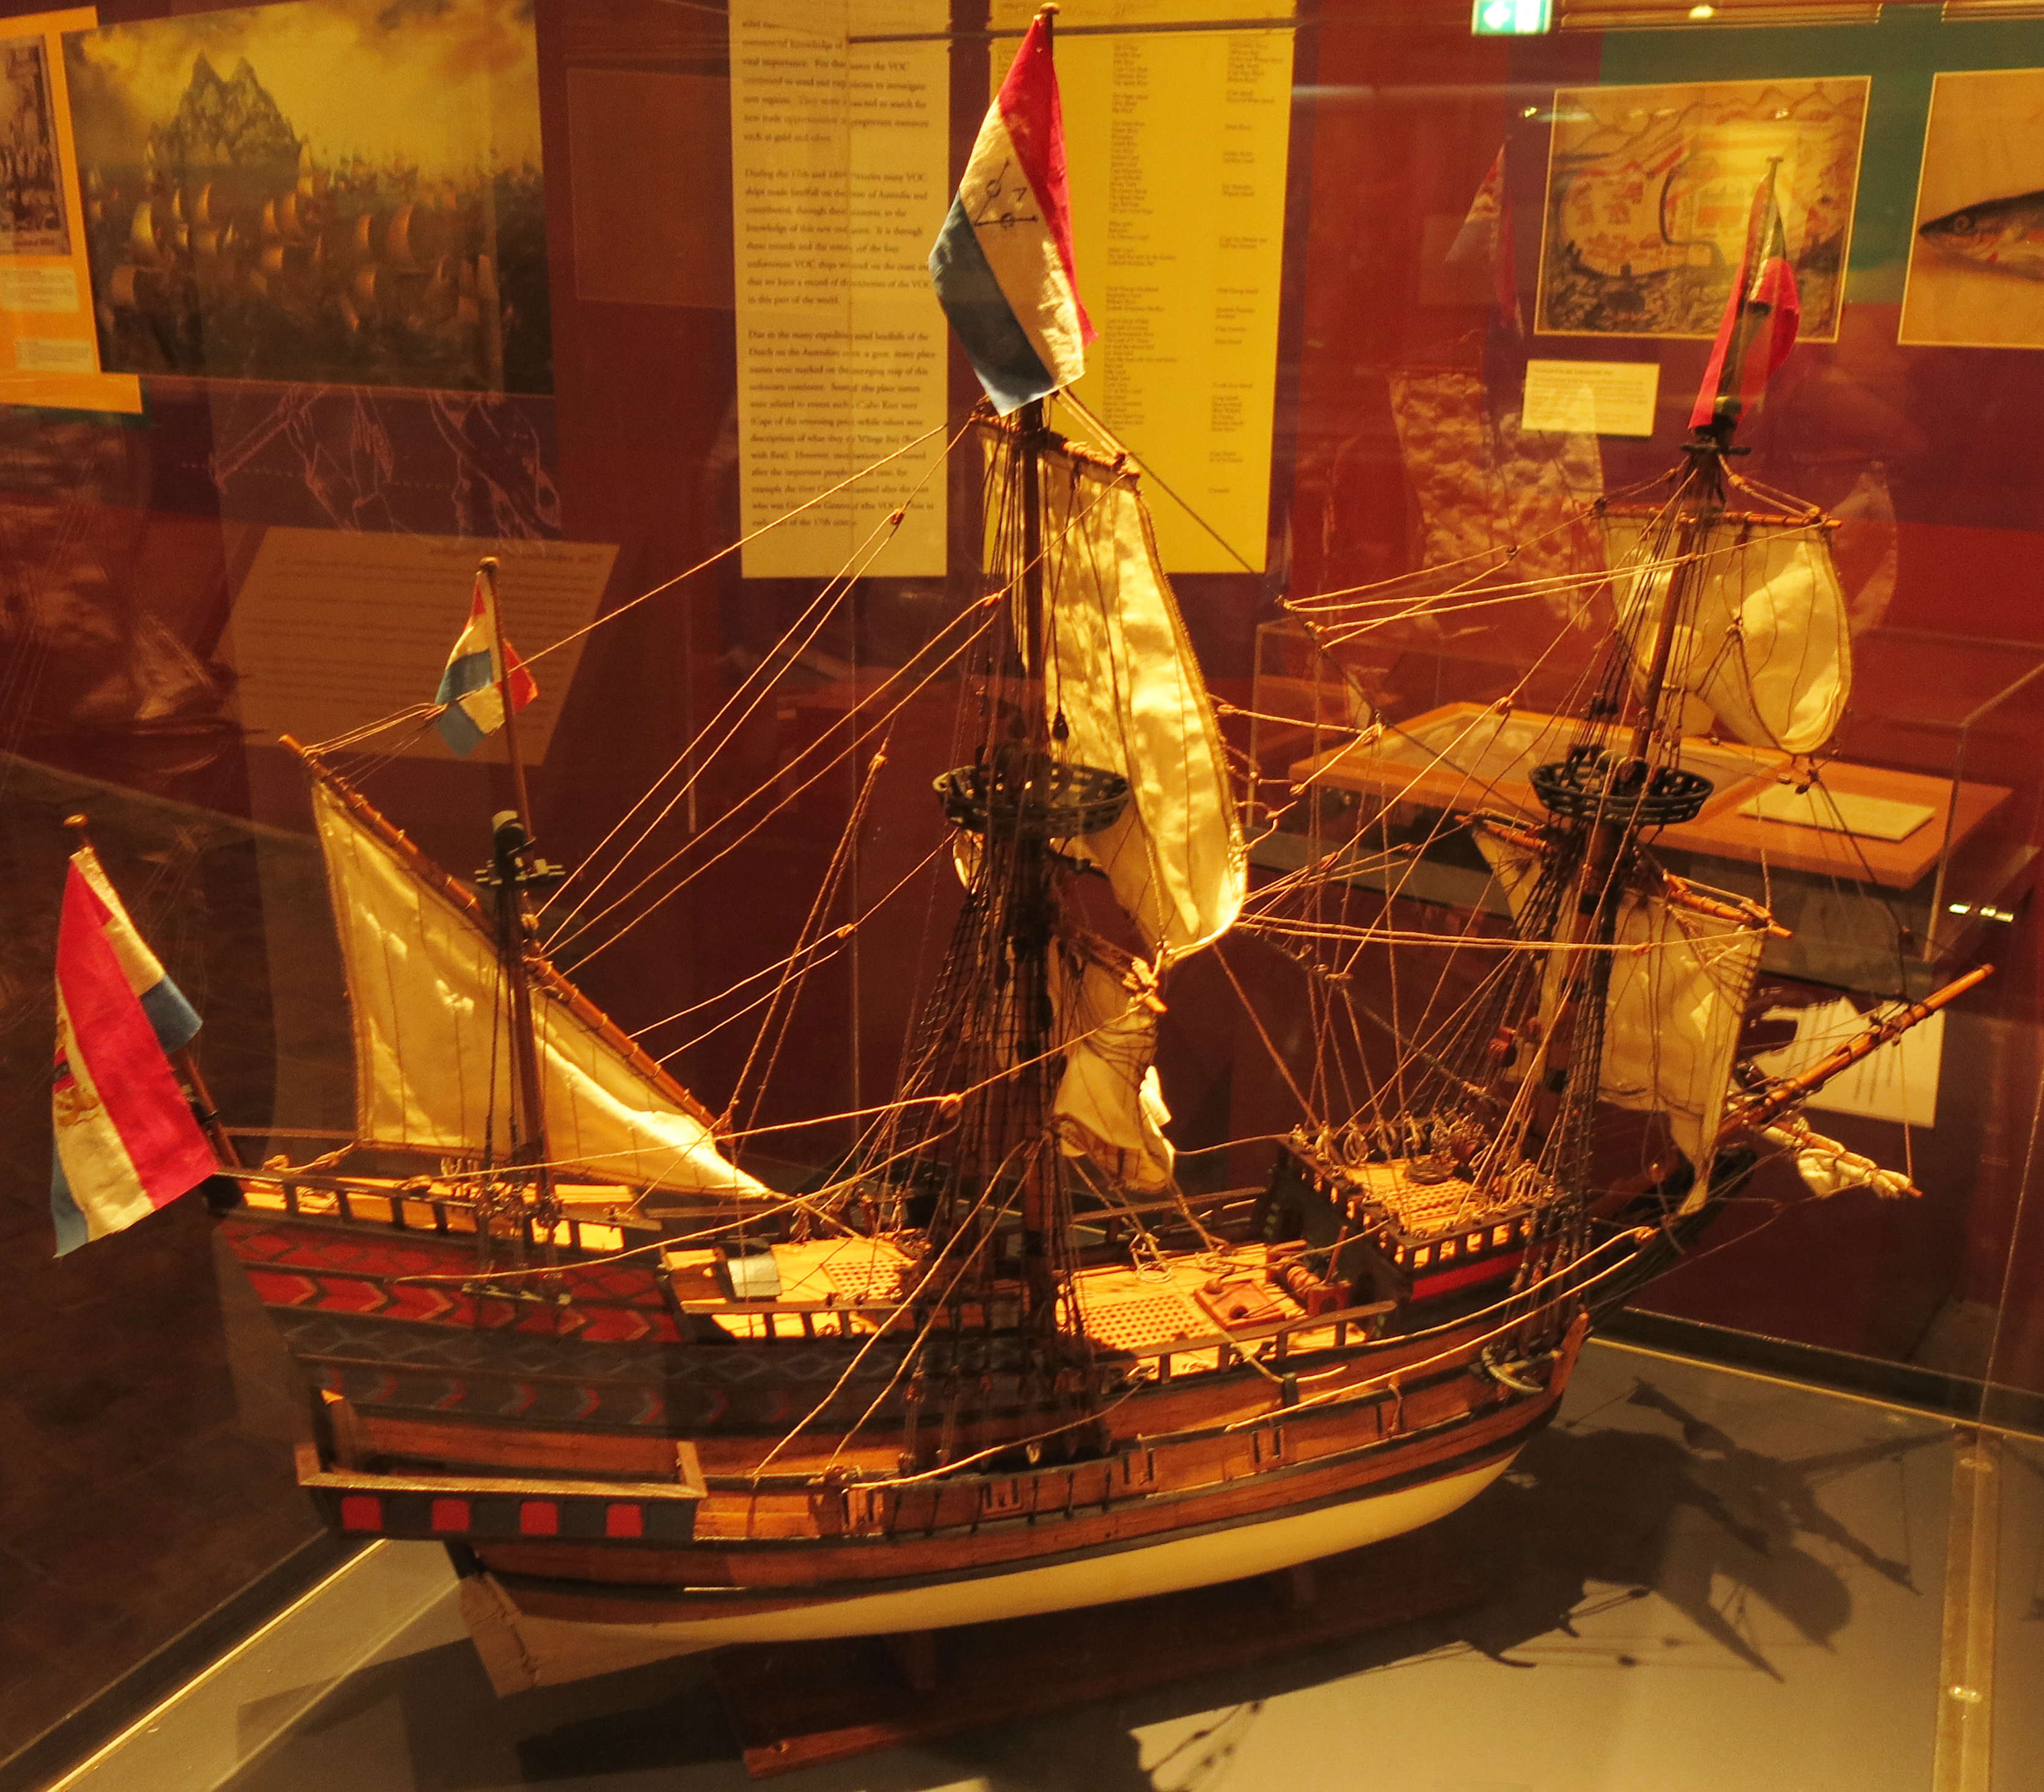
The Edam model here was a typical 17th century warship, similar to the Batavia, and gives an idea of the sheer size of the Batavia.
Probably built about 100 years ago, the model is an authentic representation of the Dutch frigate Edam, Amsterdam Admiralty, built in 1644, 28-34 guns, captured by the English in 1665 and incorporated into the Royal Navy as the Black Bull, retaken by the Dutch in 1666.
On the taffrail are the arms of the City of Edam: a black bull below three stars within an oval wreath. On the rail above are the Arms of the City of Amsterdam; on the counter are two shields, the arms of Prince Frederick Hendrick and the arms of the Admiralty of Amsterdam.
Catalogue K 56. Acquired through the assistance fo the Netherlands Government and Dutch community in Western Australia.
Photo: Don Hitchcock October 2014
Source and text: The Shipwreck Galleries, Western Australia Museum, Fremantle, Western Australia
Another view of the Edam model.
Photo: Don Hitchcock April 2014
Source: The Shipwreck Galleries, Western Australia Museum, Fremantle, Western Australia
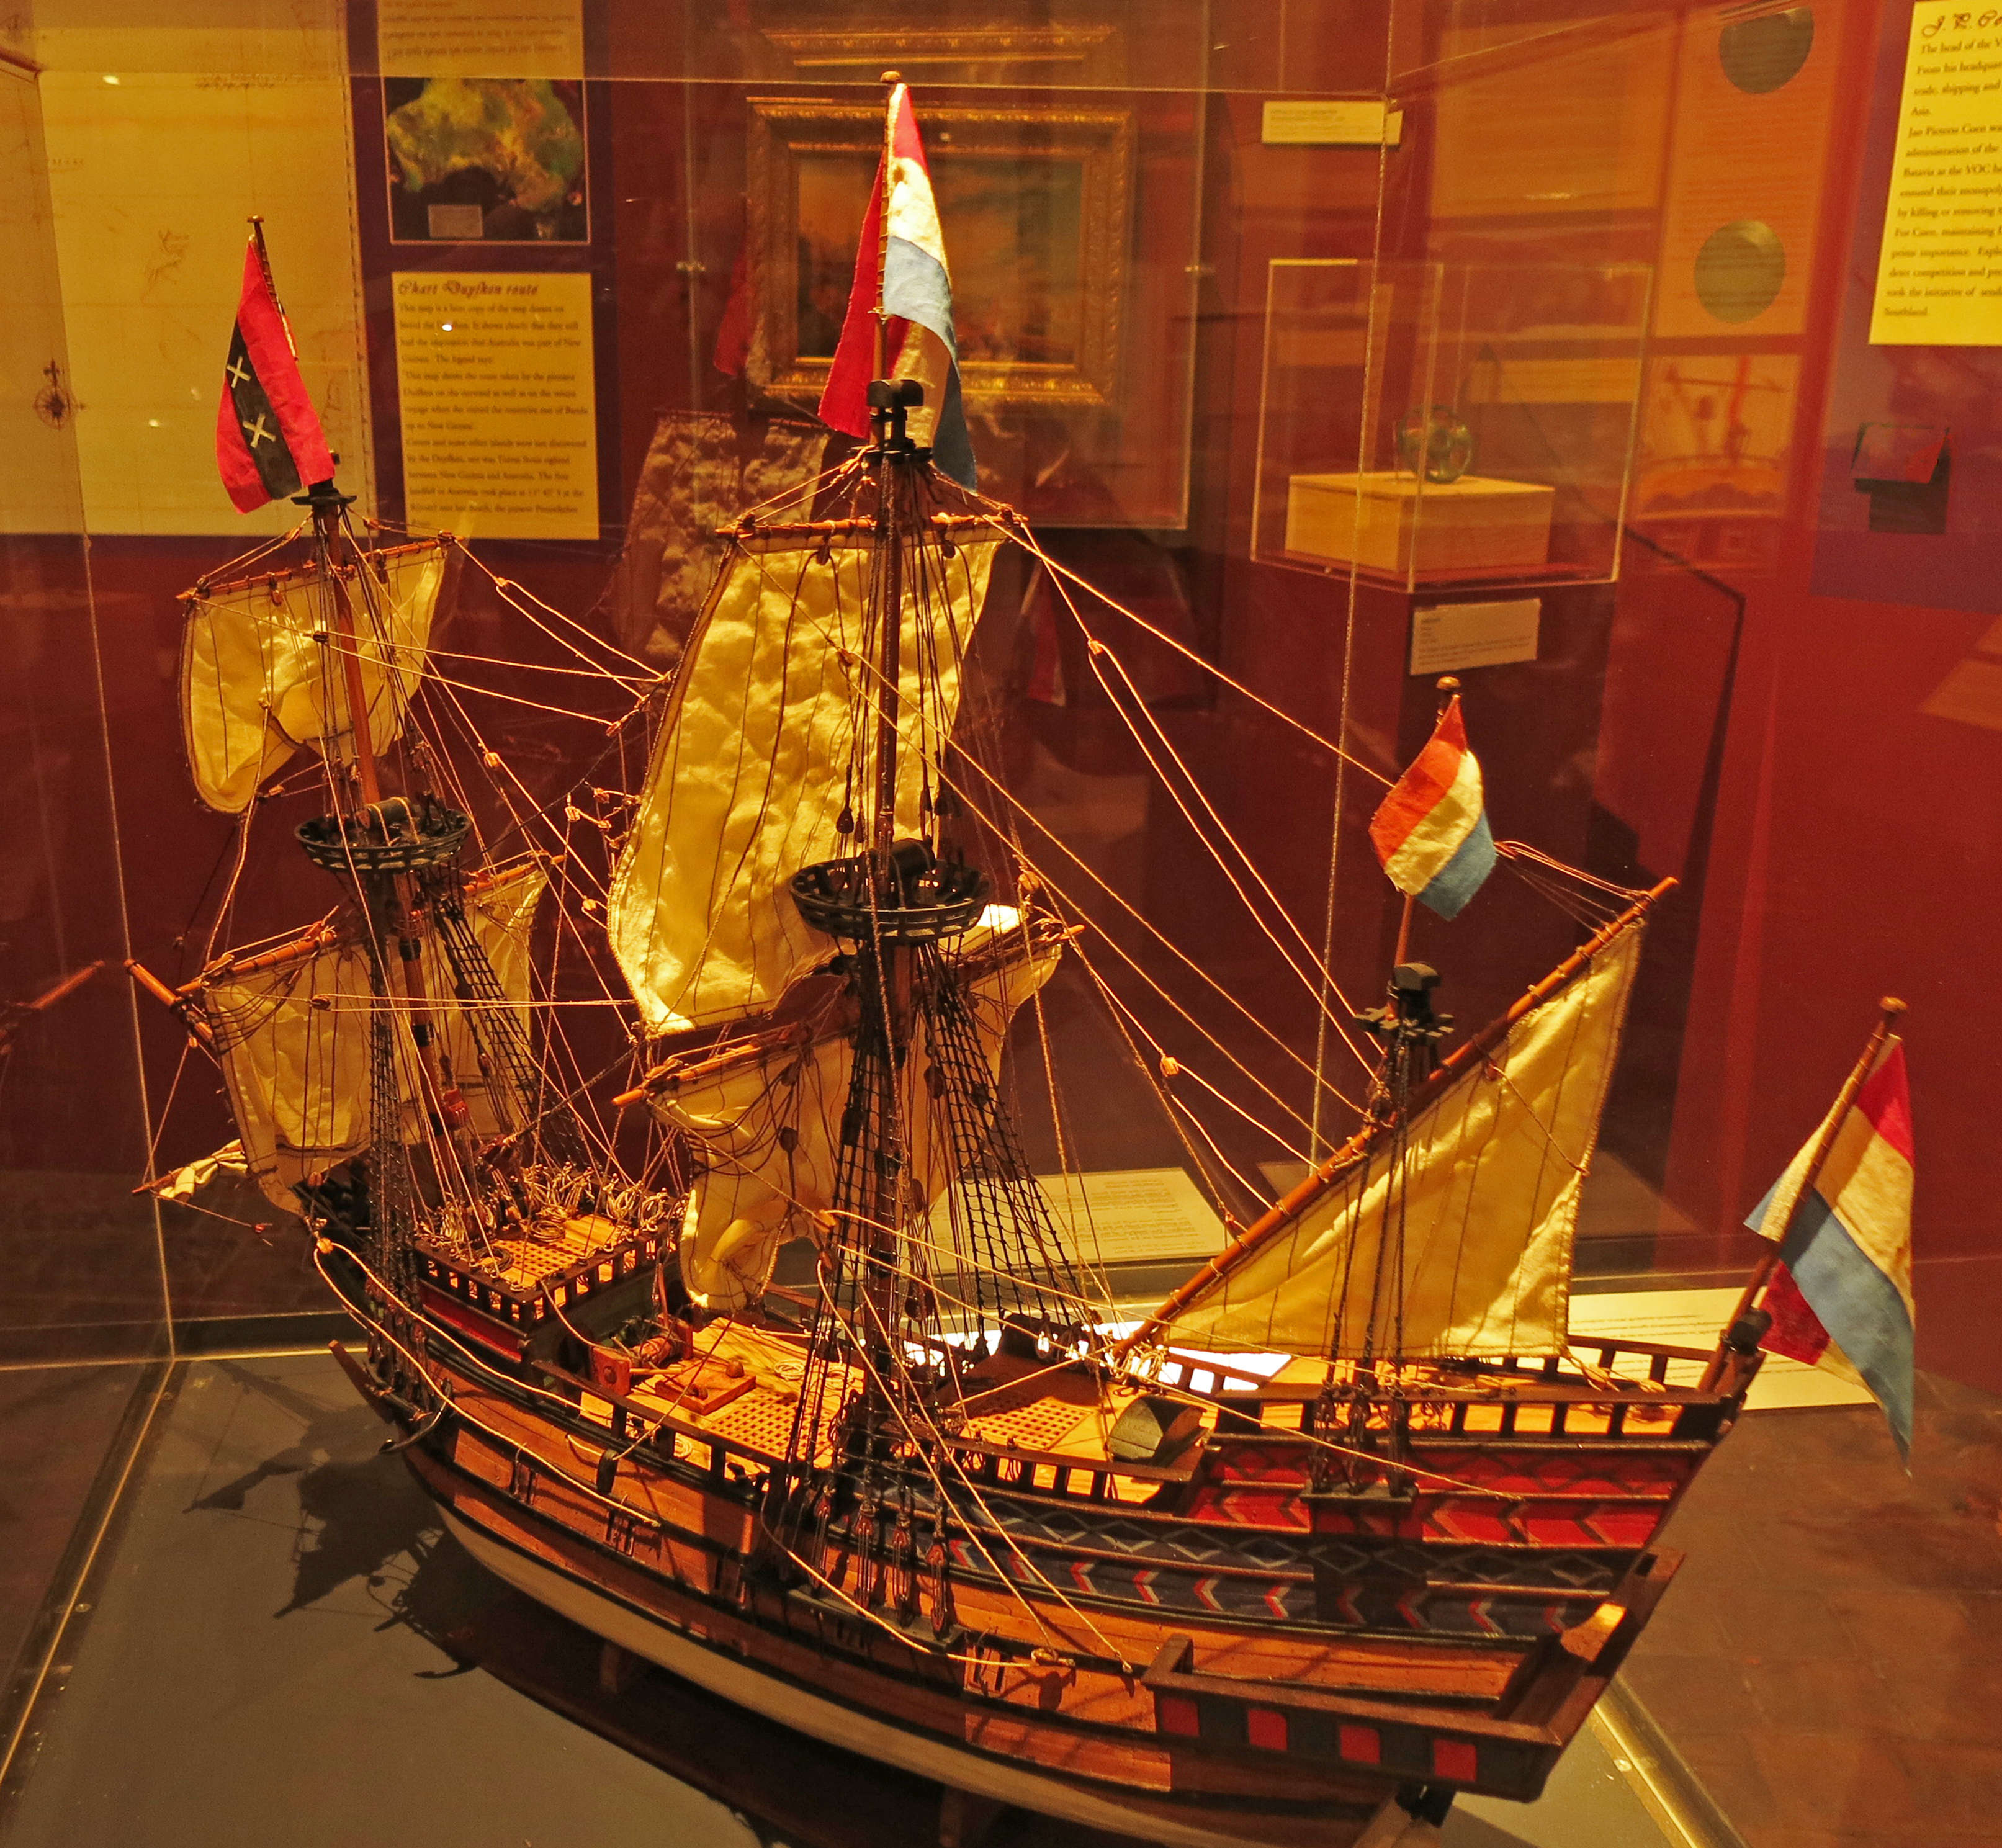
Model of the Duyfken.
In 1606, the small Dutch vessel Duyfken made the first known voyage to Australia. Its commander, Captain Willem Janszoon, was sent on a voyage of exploration to the Australian continent, beginning the Dutch reconnaissance that includes the voyages of Hartog, Tasman and De Vlamingh.
The model was built by the late Dr Kees de Heer to give an impression of the appearance of the Duyfken. The replica of the Duyfken, built at Fremantle using traditional shipbuilding techniques, was launched on 24th January 1999 by the Duyfken 1606 Replica Foundation.
Model on loan by courtesy of Mrs K. de Heer.
Photo: Don Hitchcock April 2014
Source and text: The Shipwreck Galleries, Western Australia Museum, Fremantle, Western Australia
References
- Drake-Brockman H., 1963: Voyage to disaster: the life of Francisco Pelsaert: covering his Indian report , and the wreck of the ship Batavia in 1629. Angus & Robertson, Sydney.
- Fitzsimons P., 2011: Batavia, Random House Australia
- Souter C., Gainsford M., Anderson R., 2005: Long Island archaeological survey 30 September – 3 October 2005Report—Department of Maritime Archaeology, Western Australian Museum, No. 209. 2005