Back to Don's Maps
 Back to Archaeological Sites
Batavia - the journey, the shipwreck and the massacre
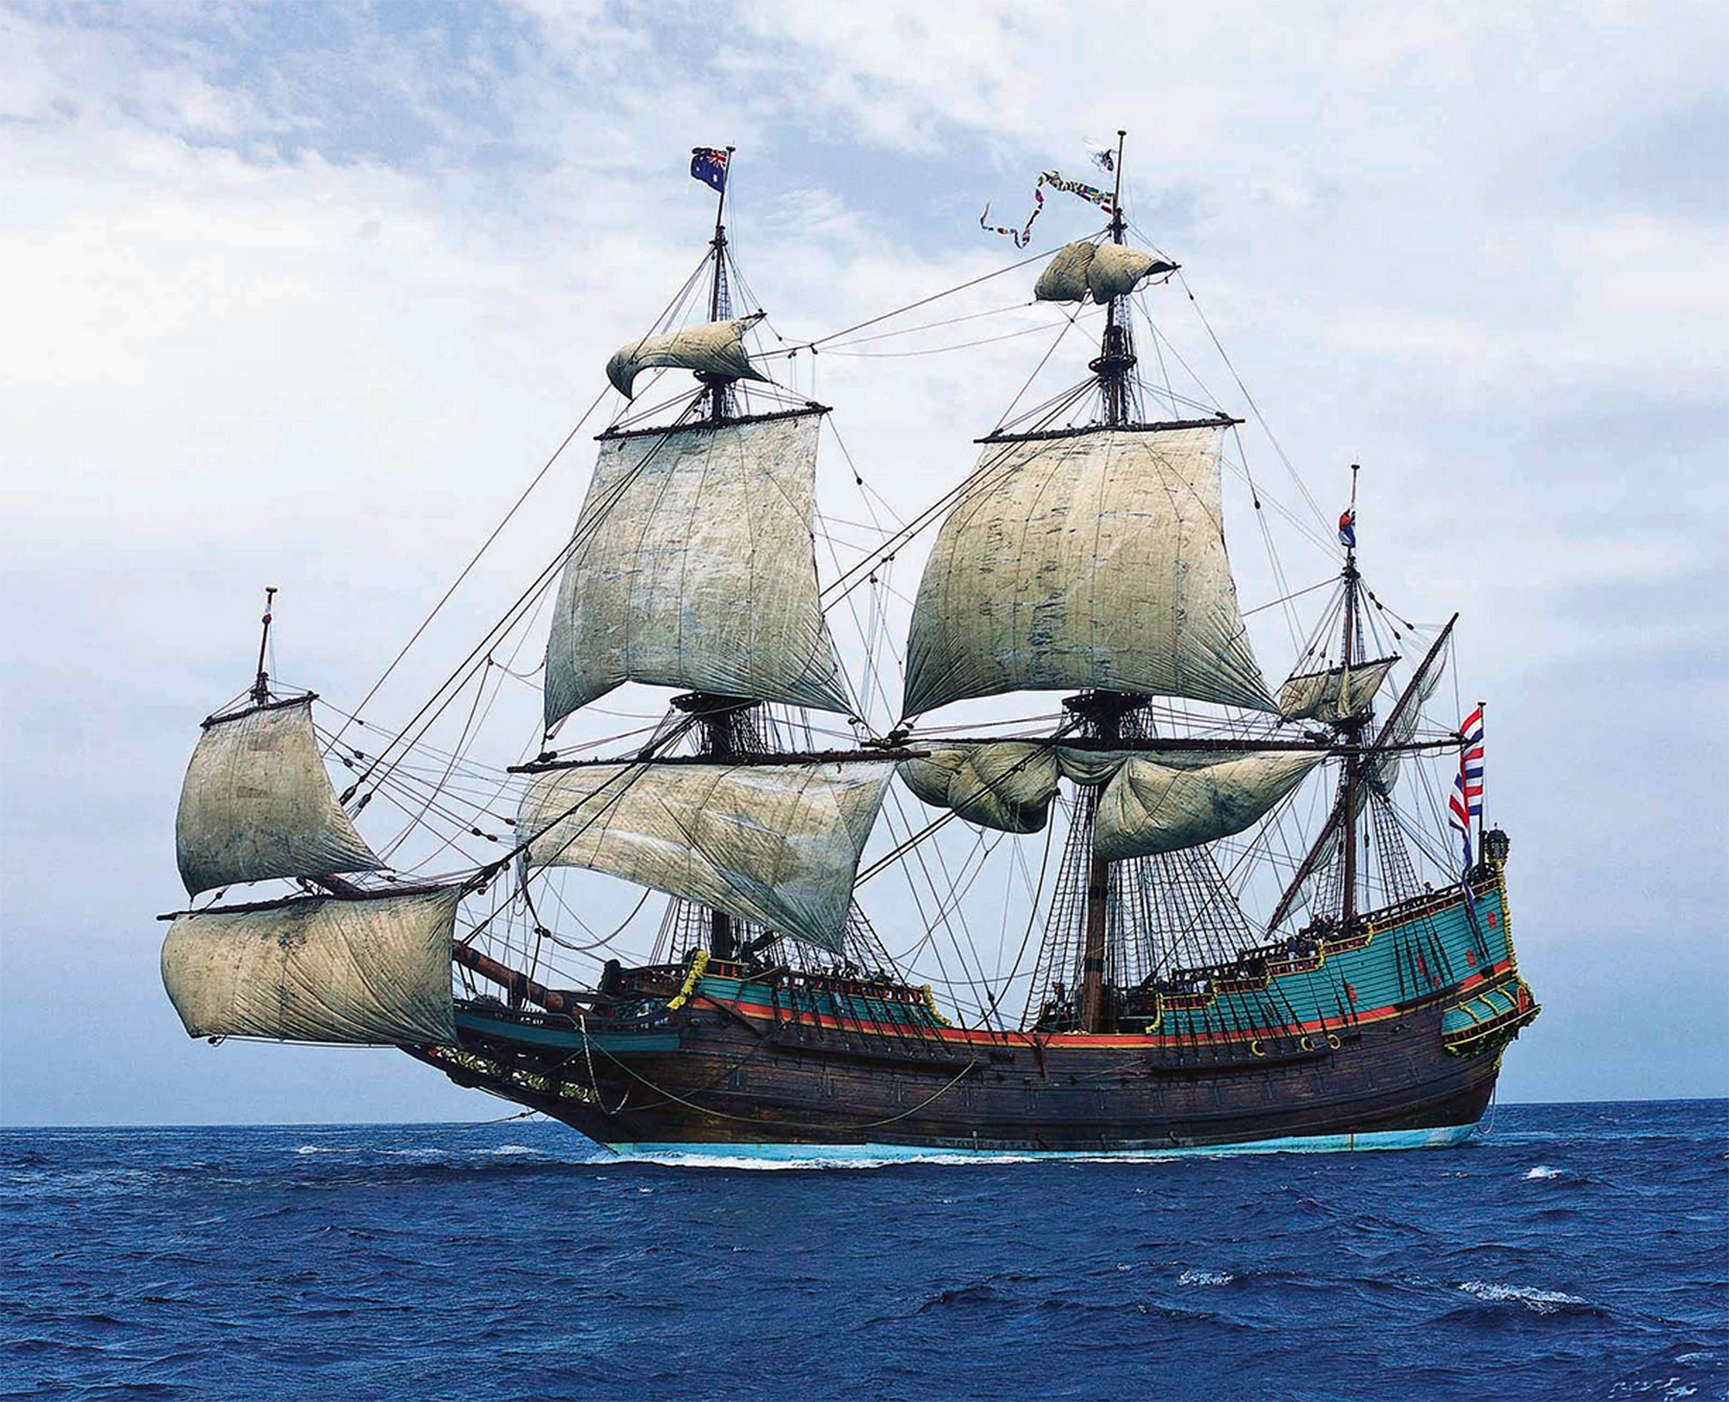
A superb replica of the Batavia under sail.
Photo: http://forum.worldoftanks.com/index.php?/topic/374931-the-voc-batavia/
Unless otherwise noted, much of the text below has been adapted from a translation of François Pelsaert's Journal, at http://www.kb.nl/sites/default/files/docs/batavia-translation.pdf which is also available at http://en.wikisource.org/wiki/The_Abrolhos_tragedy . Both are in the public domain.
Another invaluable resource is 'Batavia' by Peter Fitzsimons, Fitzsimons (2011)
The Dutch East India Company (Vereenigde Oostindische Compagnie, VOC) was a chartered company established in 1602, and is often considered to have been the first multinational corporation in the world and it was the first company to issue stock. It was also arguably the first megacorporation, possessing quasi-governmental powers, including the ability to wage war, imprison and execute convicts, negotiate treaties, coin money, and establish colonies. The VOC enjoyed huge profits from its spice monopoly through most of the 17th century.
(Above text adapted from Wikipedia)
One of these voyages occurred in 1628, when 8 ships of the VOC sailed from Texel bound for the East Indies on the 28th of October 1628 - the Batavia, under the command of François Pelsaert, of Antwerp; Dordrecht, having for her merchant-captain the collector of revenue, Isaac van Swaenswyck, of Leyden; and the yacht Assendelft, under the command of the second merchant-captain, Cornelis Vlack, of Amsterdam.

The Batavia's departure from Texel, after it was loaded and provisioned and sailed away bound for the East Indies and its fate, must have looked rather like this, albeit a much larger ship than the one shown in this painting.
Texel is one of a group of northern islands guarding the entrance to the Zuider Zee.
The painting is known as 'The Harbour mole of Texel' by Willem van de Velde the Younger, 1673
Museum Boijmans van Beuningen, Rotterdam
Source: http://www.sailingwarship.com/category/17th-century
The Batavia grounded on shallows outside Antwerp, as did another of the fleet, and although the Batavia was able to float off unharmed on the next high tide, the other ship had to spend some months being repaired, and the fleet of seven continued.
The ship called at Sierra Leone on the west coast of northern Africa, and then at Cape of Good Hope, where fresh meat, water and other provisions were obtained, and the ship's hull was cleaned of seaweed and barnacles.
The plan to mutiny and to take over the ship, which was carrying a huge amount of money and jewels, was hatched along the way, principally by Jeronimus and the skipper. They recruited others to their plan.
When in the Roaring Forties, a storm appeared dead ahead just at nightfall, and by dousing the huge rear light of the Batavia that the other ships were following in convoy, and then altering course to the south, the Batavia lost contact with the rest of the fleet. This was necessary for the mutineers in order that there be no outside help for the officers and soldiers on board. The Batavia continued on to the East Indies alone.
An early attempt to discredit the VOC commander, Pelsaert, and make the crew ready to depose him on the basis of unfair punishment of the sailors backfired when he did nothing after a rich woman on board was attacked and raped.
However the only way to make an estimate of your longitude was by dead reckoning, and the Batavia made much better time in the strong winds encountered than the skipper allowed for, and they turned north towards Java when they were much closer to the western Australia coast than they realised.
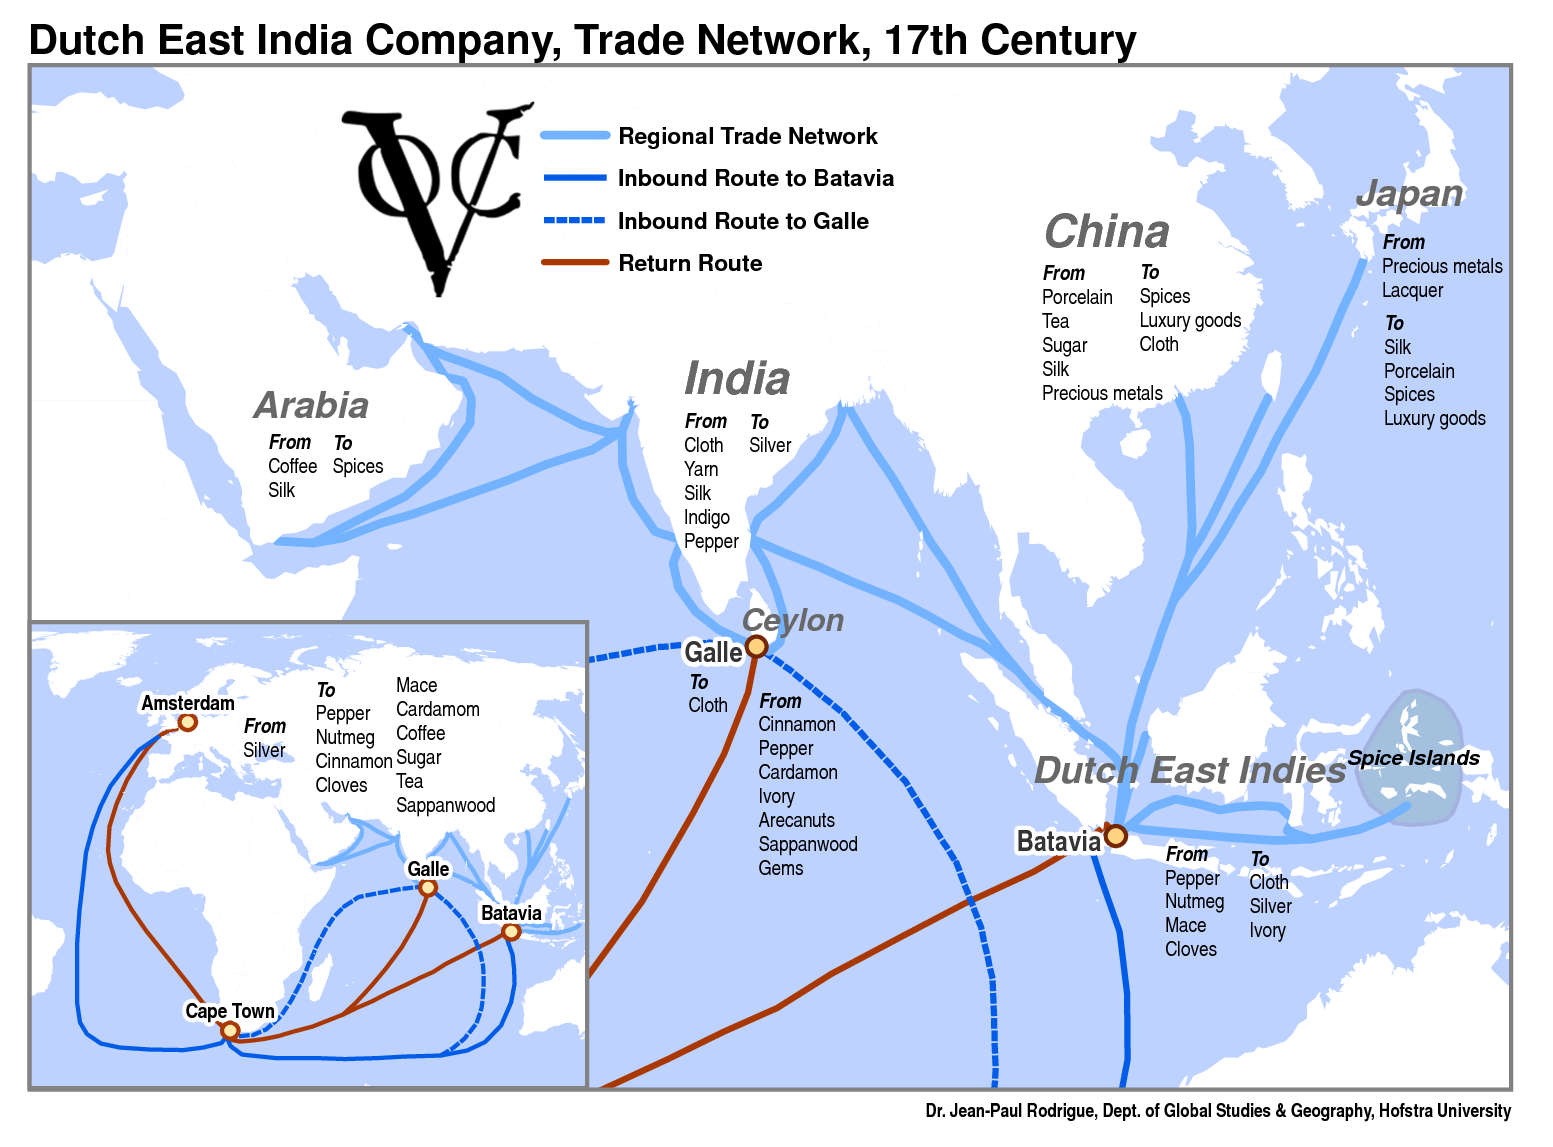
The Dutch East India Company, Trade Network, 17th Century
At the time, the fastest and best method of getting to the East Indies was to use the Hendrik Brouwer route of 1611, which by this time was obligatory for VOC ships. From Cape of Good Hope, ships kept south, with the roaring forties behind them for as long as possible, estimating the distance travelled and thus the longitude by dead reckoning, then changed course to the north, following the west coast of what was to become Australia, in order to reach Batavia in Java, the head office of the VOC. This took as much as six months off the alternative journey up the east coast of Africa, to Java via India, and resulted in better health and less loss of life for the crew and passengers.
The problem was estimating your longitude, as no method was available for this calculation for ships at sea.
Photo: © Dr Jean-Paul Rodrigue, Dept of Global Studies and Geography, Hofstra University
Source: http://www.docstoc.com/docs/41061537/Dutch-East-India-Company-Trade-Network-17th-Century
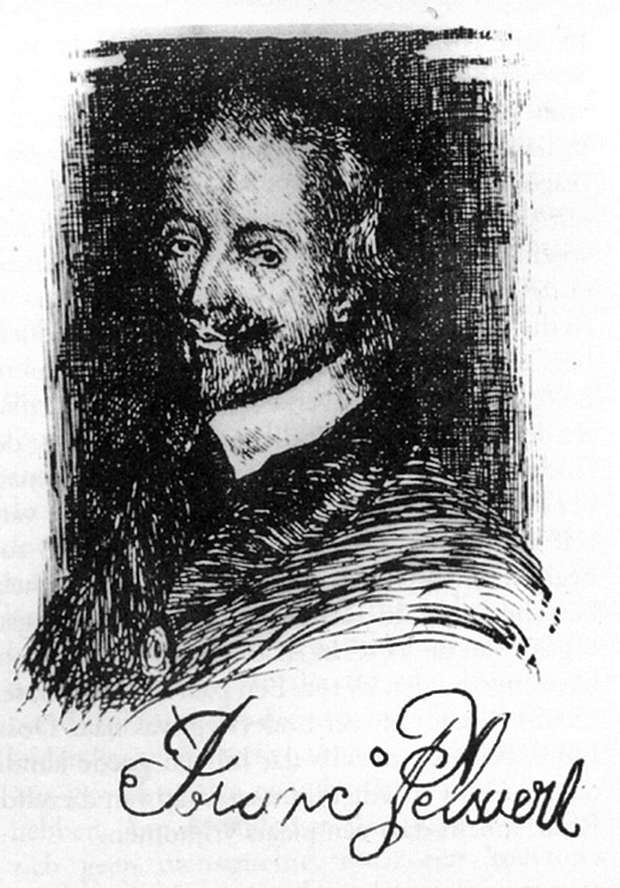
Pelsaert.
Photo: https://www.flickr.com/photos/bataviawerf/4638489515/
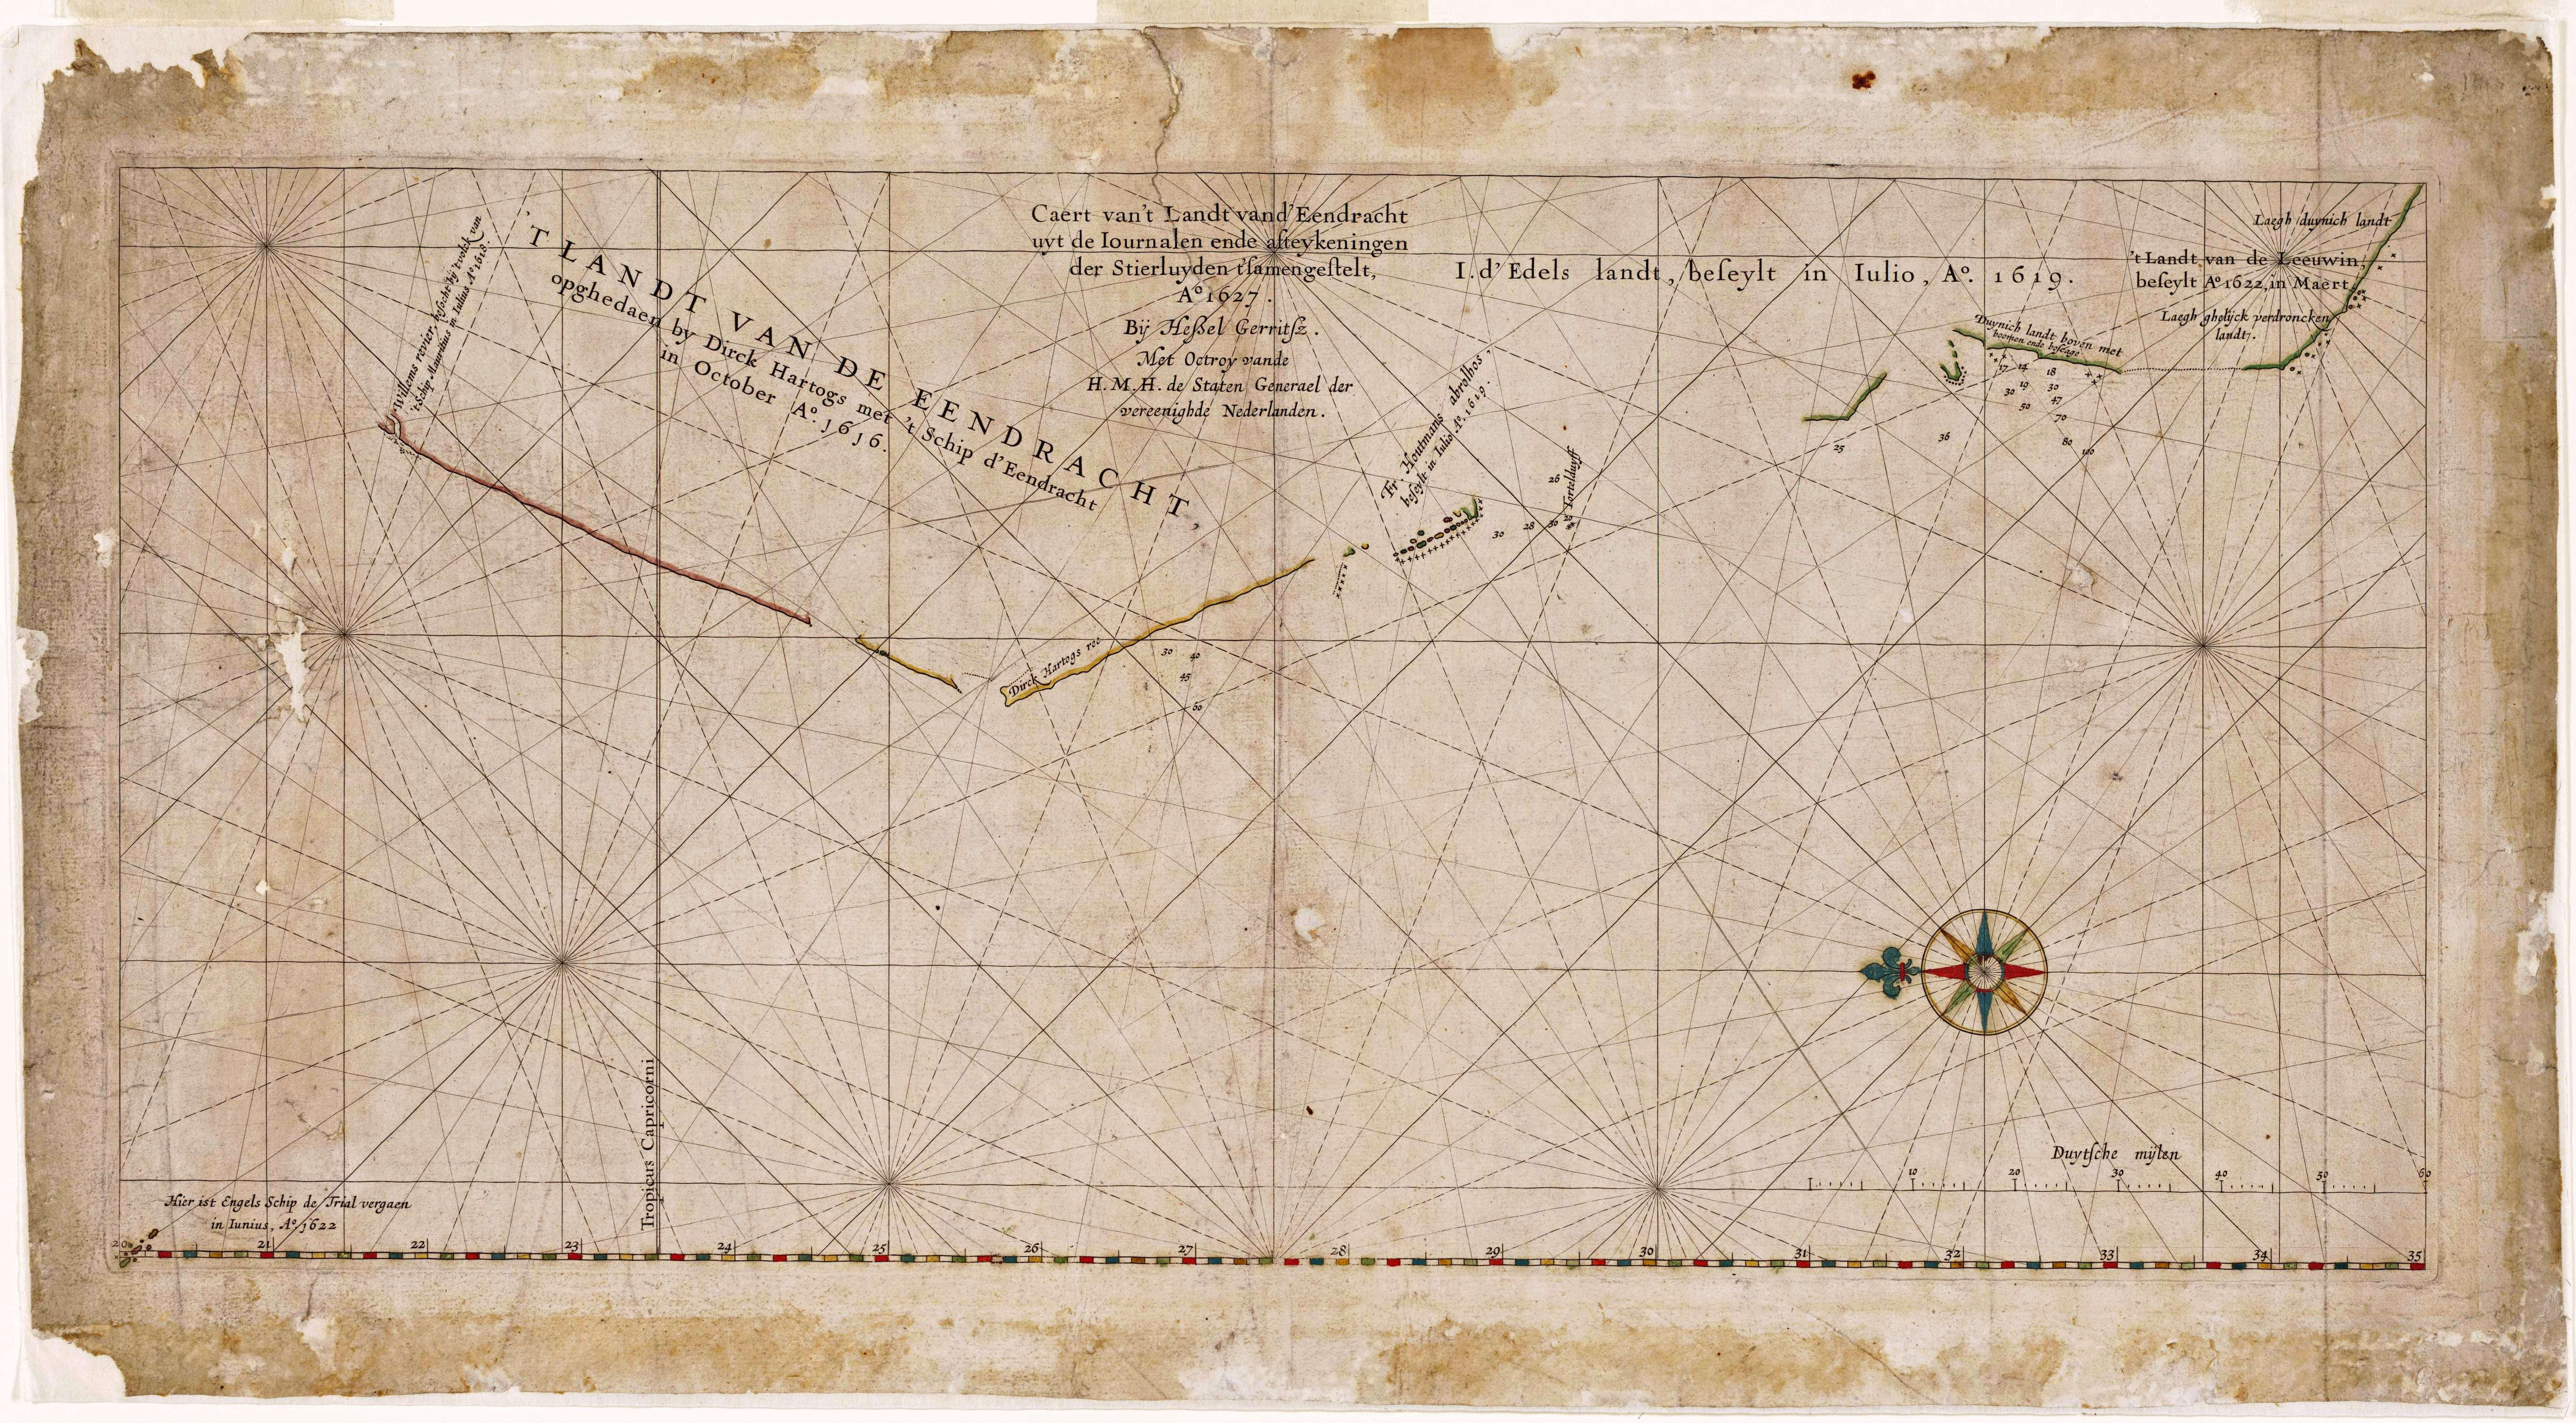
This is the map of the West Coast of Australia that Pelsaert was using at the time his ship ran aground on the Abrolhos.
It is Hessel Gerritszoon's 1627 map of the west coast of Australia. The title is "Caert van't Landt van d'Eendracht" which translates as "Chart of the Land of Eendracht". It is so named because that part of the coast was first charted by Dirk Hartog in the Eendracht in 1616.
Note that North is to the left on this map, and that no longitudes are given, because longitude was not able to be calculated on a ship at that time.
Important points shown on this map are Cape Leeuwin, the most south-western point of Australia, the Abrolhos Islands, Dirk Hartog's Island, and the most northerly point, the Willems River, now known as the Ashburton River. This river would have been an important watering point on a very dry coastline, and there was no need to plot any further points further north, as the coastline trends ENE after that point, and is no danger to ships heading for Java.
The chart shows it as Willems revier, besocht by 't volck van 't Schip Mauritius in Iulius A° 1618 ('Willem's River, visited by the crew of the ship Mauritius in July 1618').
Date: The original map was published in 1627
Photo: http://nla.gov.au/nla.map-rm749, National Library of Australia
Permission: Public Domain
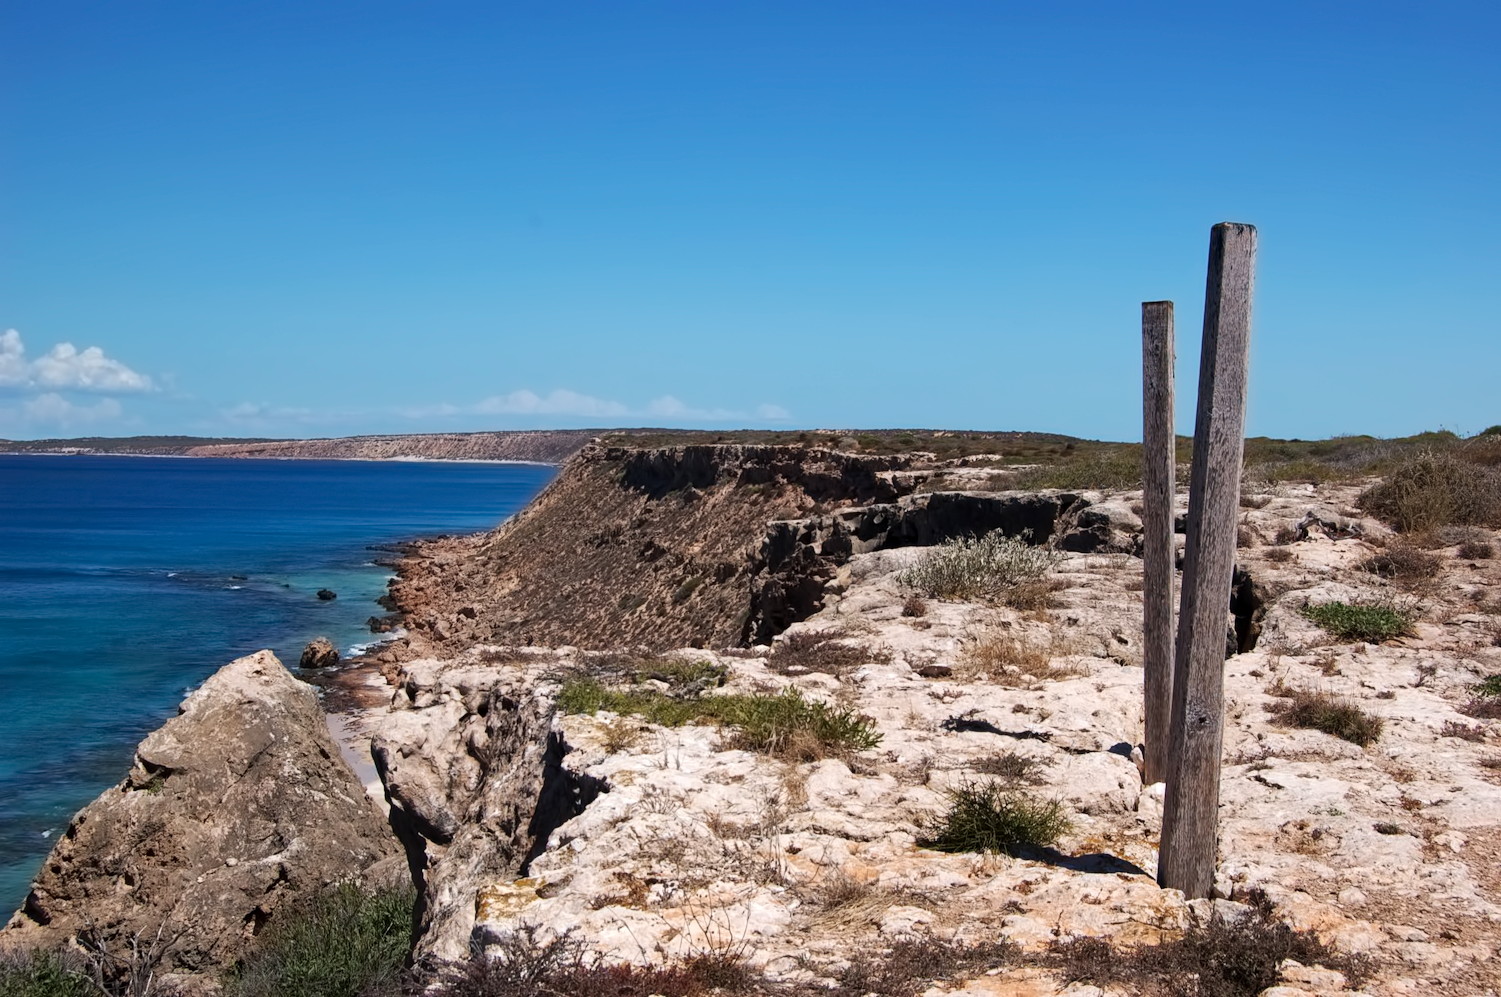
Hartog and Vlaminghs posts, probably modern facsimiles, at Cape Inscription.
The photograph comes from Tyler Roberts' excellent blog, which is linked below. The web page includes other good photographs, and valuable information about the area.
Photo: © Tyler Roberts
Source: http://thewoventhreads.blogspot.com/2012/01/dirk-hartog-island.html
From Dirk Hartog's Post, a report on the site of the 1616 monument site at Cape Inscription, Dirk Hartog Island. By Dr Martin Gibbs for the Department of Maritime Archaeology, WA Museum.
Report - Department of Maritime Archaeology WA Maritime Museum, no. 129 Author/s M. Gibbs
Year of publication 1996
Report Number: 129
Dirk Hartog's Post. A report on the site of the 1616 monument site at Cape Inscription, Dirk Hartog Island and an analysis of historical evidence of the posts erected there.
Dirk Hartog's Ree = roadstead. A roadstead is a generally sheltered area outside a harbour, where a ship can lie reasonably safely at anchor.
Dirk Hartog Island forms the western edge of Shark Bay, a shallow embayment at the southern end of the Carnarvon Basin. The island itself is essentially a continuation of the Edel Land Peninsula, from which it is separated by a narrow channel, the South Passage.
The west side of the island includes high cliffs and a high energy coastal environment, while the east coast has a significantly lower elevation and many sheltered bays and sandy beaches.
The surface of the island is covered by sands, with large mobile dunes on the southern end. There is no surface fresh water. The vegetation consists of low Eucalypts, Acacias and hummock grasses (Triodia).
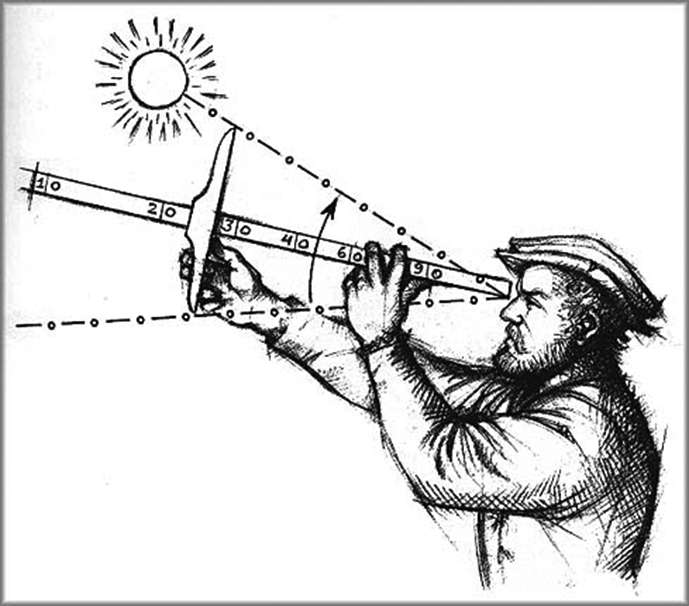
Latitude is calculated by measuring the height of the pole star at night in the northern hemisphere, or the noon sun above the horizon in both hemispheres. This cross-staff or Jacob's staff replaced the quadrant as the favoured instrument of mariners. The cross-staff was a wooden rod with a peep-hole at one end, and a sliding cross-piece. It was cheap and easily replaced if lost or broken. The navigator placed his eye against one end of the staff, and slid the cross-piece until he saw the lower tip at the horizon and the upper tip at the sun at local noon. The altitude of the celestial body could then be read from a scale marked on the main staff.
Local noon is easily determined by recording periodic readings of the altitude of the sun. Since periodic readings of the altitude will plot a sine wave, the maximum reading is the one used for local noon, and ten or twenty minutes or so either side of the correct noon will make no appreciable difference to the latitude measured.
The sun is also at noon when it is directly north or south of the observer. If a compass is used, and allowance is made for magnetic declination in that area of the globe, noon can be approximated. It just so happens that on the track of Pelsaert's journey north, magnetic declination is approximately zero, but this is not the case in other places.
When shooting the sun at noon, a table had to be consulted, with the latitude dependent on the day of the year.
Very accurate measurements of latitude had to account for correction for such things as the refraction of the sun's light as it passes through the atmosphere, and the fact that the angle should be measured from the centre of the earth, but the observer is necessarily at the surface. This accuracy was not required for voyages such as this.
Photo: http://www.historymuseum.ca/cmc/exhibitions/hist/frobisher/fr57601e.shtml
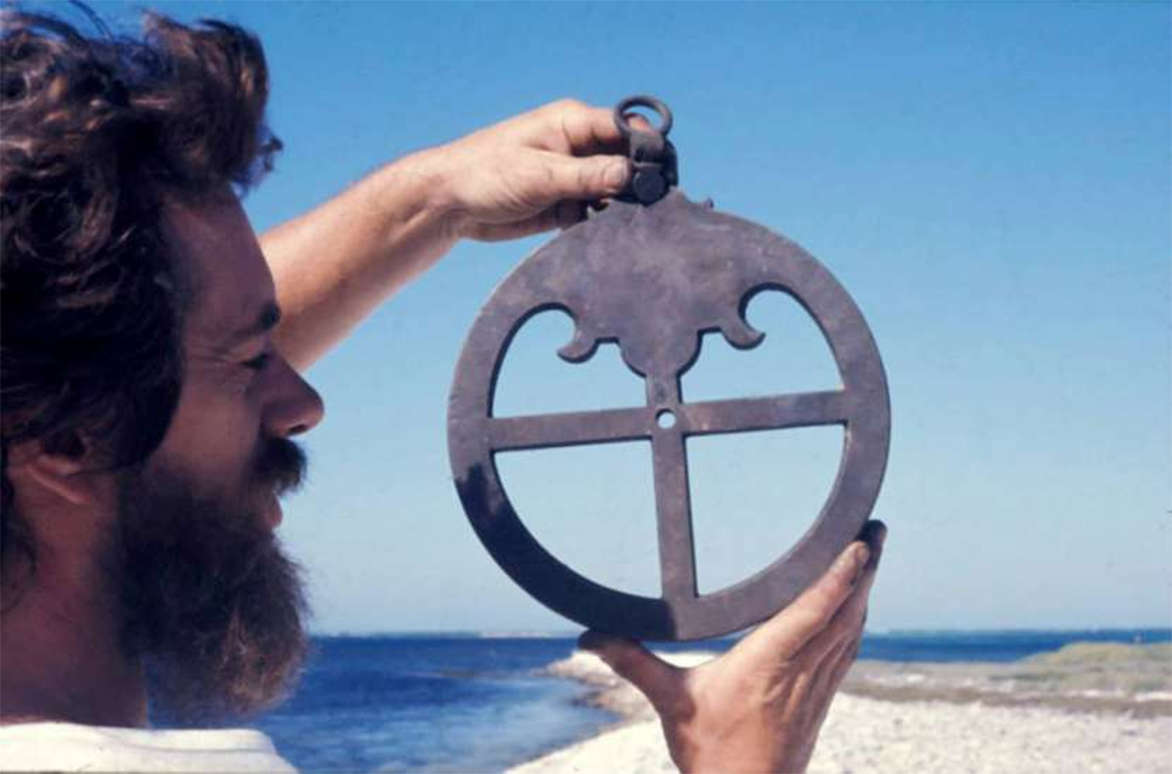
However on the Batavia the Astrolabe, another instrument for measuring latitude, was certainly used. This was recovered from the wreck.
Photo: © WA Museum
Source: http://museum.wa.gov.au/explore/galleries/batavia-discovery-50th-anniversary
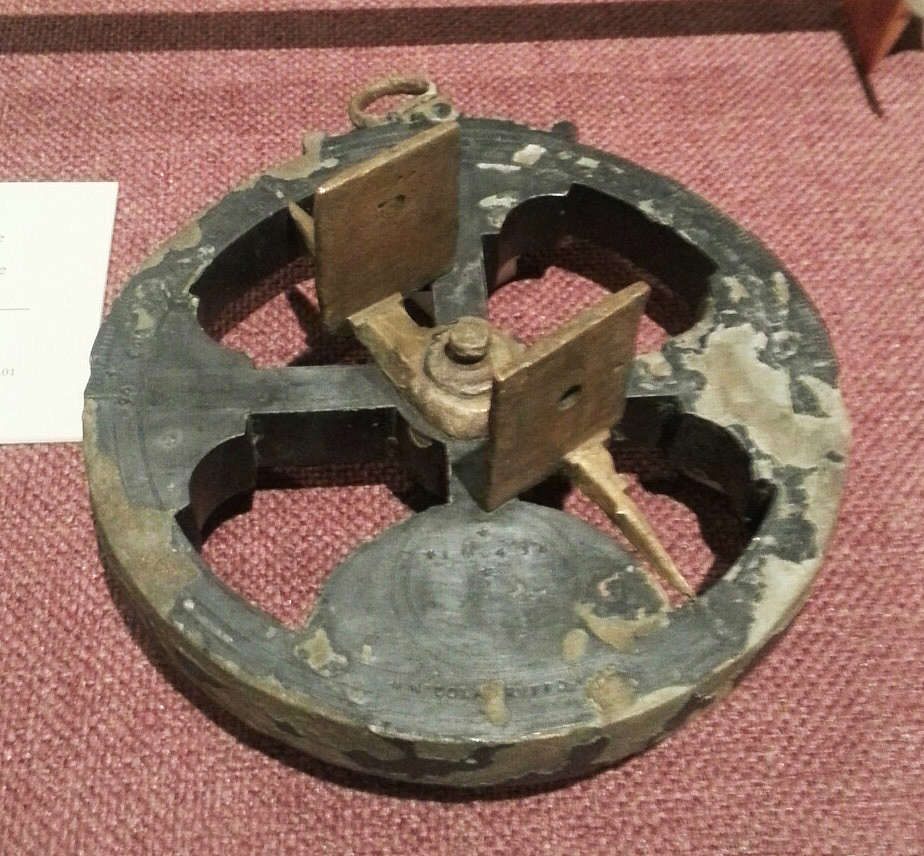
One advantage of the astrolabe is that if it is heavy, and suspended from the ring, it remains vertical, even in a boat, and thus it was not necessary to see the horizon. Another big advantage is that it was not even necessary to look directly at the sun, as was required in the use of the cross-staff. The light of the sun passing through a hole in the alidade is aligned on a second similar hole, or a mark, on the other end of the alidade. When aligned, the altitude in degrees of the sun is measured on the scale on the circumference. The latitude is obtained by subtracting this value from 90 degrees, at least at the time of the equinoxes.
A correction must then be made at other times of the year from a table. Mariner's astrolabes of this type were not very accurate, especially when they were used on a small boat or in a strong wind, but were extremely useful.
This is a silver-plated mariner's astrolabe made by Nicolao Ruffo and dated 1645. The astrolabe was found by Gigi Fernandes Corcia, an experienced diver and full time member of the Arqueonautus dive team, during the survey and excavation of a wreck site at Passa Pau on the island of Santiago in November of 1999.
The astrolabe was found associated with other wreck material of mid-seventeenth century date within a complex of deep gullies and caves at a depth of 7 to 12 meters. There was little or no site contamination with extraneous material.
This astrolabe has been catalogued as the 84th astrolabe in existence with The National Maritime Museum at Greenwich. It is in the collection at The Mariners' Museum in Newport News, Virginia.
Photo: Neochichiri11
Permission: Creative Commons CC0 1.0 Universal Public Domain Dedication.
Additional text concerning this particular astrolabe is from Wikipedia.
Distances: Note that the dutch mile was about 5 840 metres. Since a degree of latitude is about 111 km, this is equivalent to 19 dutch miles. This is important when trying to make sense of Pelsaert's journal of his journey north in the longboat to the Citadel of Batavia on the island of Java. However Pelsaert seems to have used a value close to 15.4 dutch miles to the degree latitude.
For example:
On 24 June at noon, had the latitude of l3 degrees 30 minutes, this 24 hours sailed 25 miles, held north by west, the wind mostly s.-e. by s., topgallant, with dry weather. On 25 June at noon, had the latitude of 11 degrees 30 minutes, this 24 hours sailed 31 miles, held n. by w., the wind more to s.-e., topgallant, with dry weather, nevertheless we saw much steenkroos (Bladder Weed) floating. On 26 June. at noon had the latitude of 9 degrees 56 minutes, this 24 hours sailed 24 miles, held n. by w., the wind mostly s.-east with dry weather.
So in two days he had sailed 3.57 degrees and made 55 miles by his reckoning, making 15.4 dutch miles to the degree latitude.
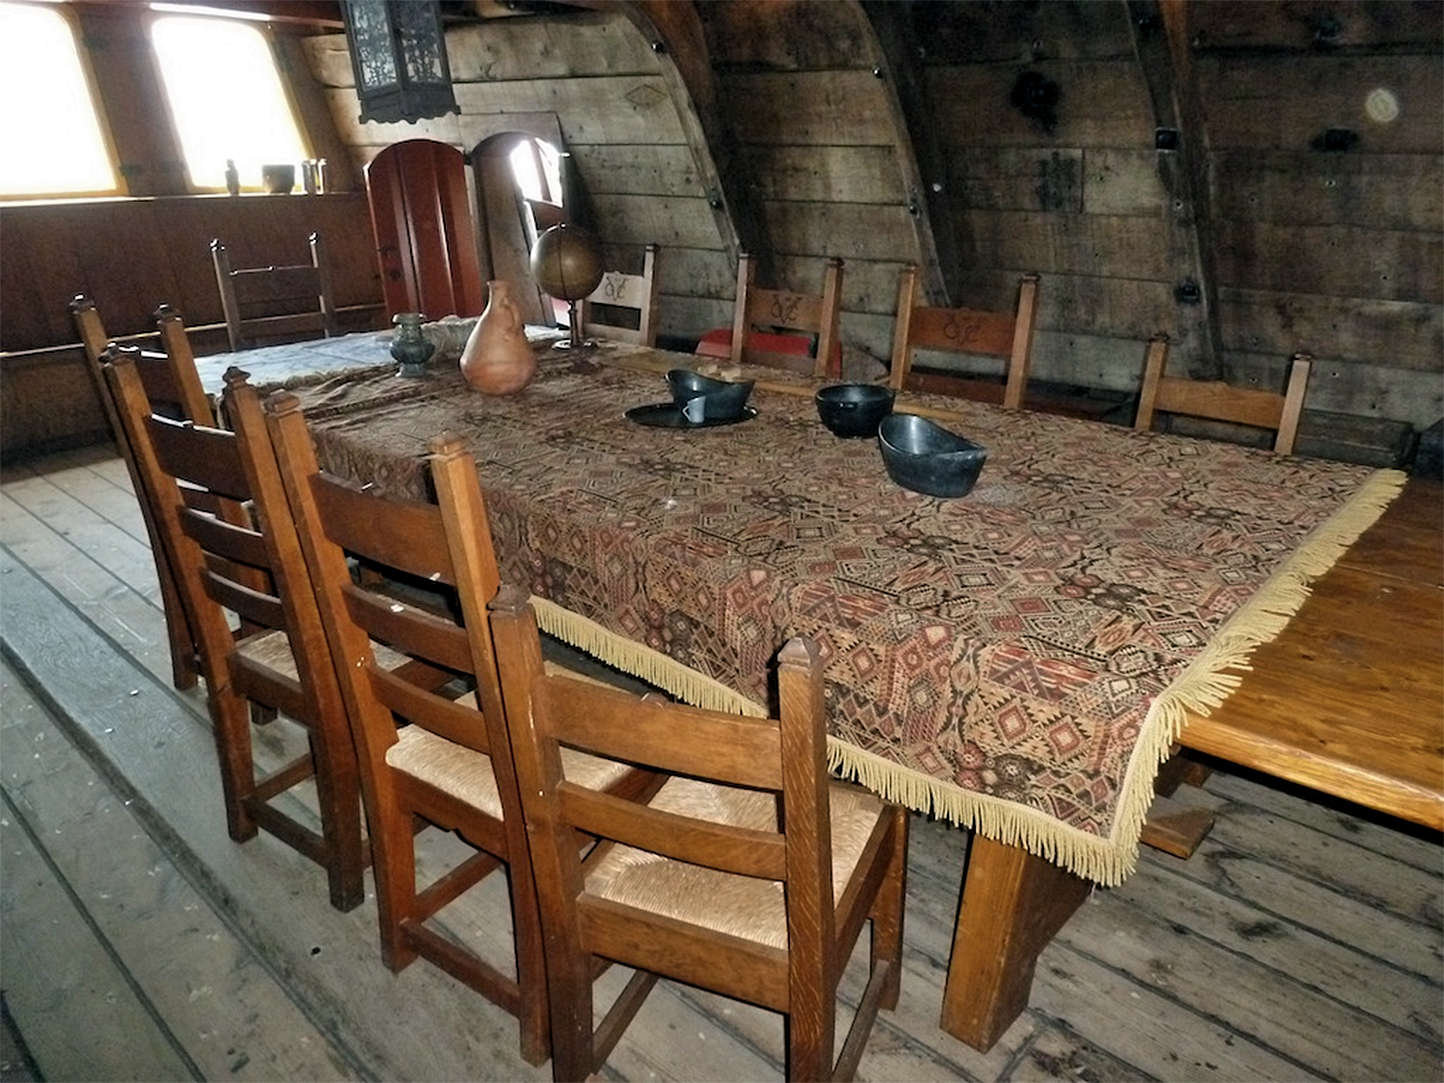
The Great Cabin shown was the nerve centre of the ship. Here the Skipper and his colleagues met and decided on important matters. The Skipper lived and slept here, Pelsaert had his own separate, albeit smaller, cabin as the highest official of the VOC on board.
Photo: http://addiator.blogspot.com.au/2012/06/batavia-shipyard.html
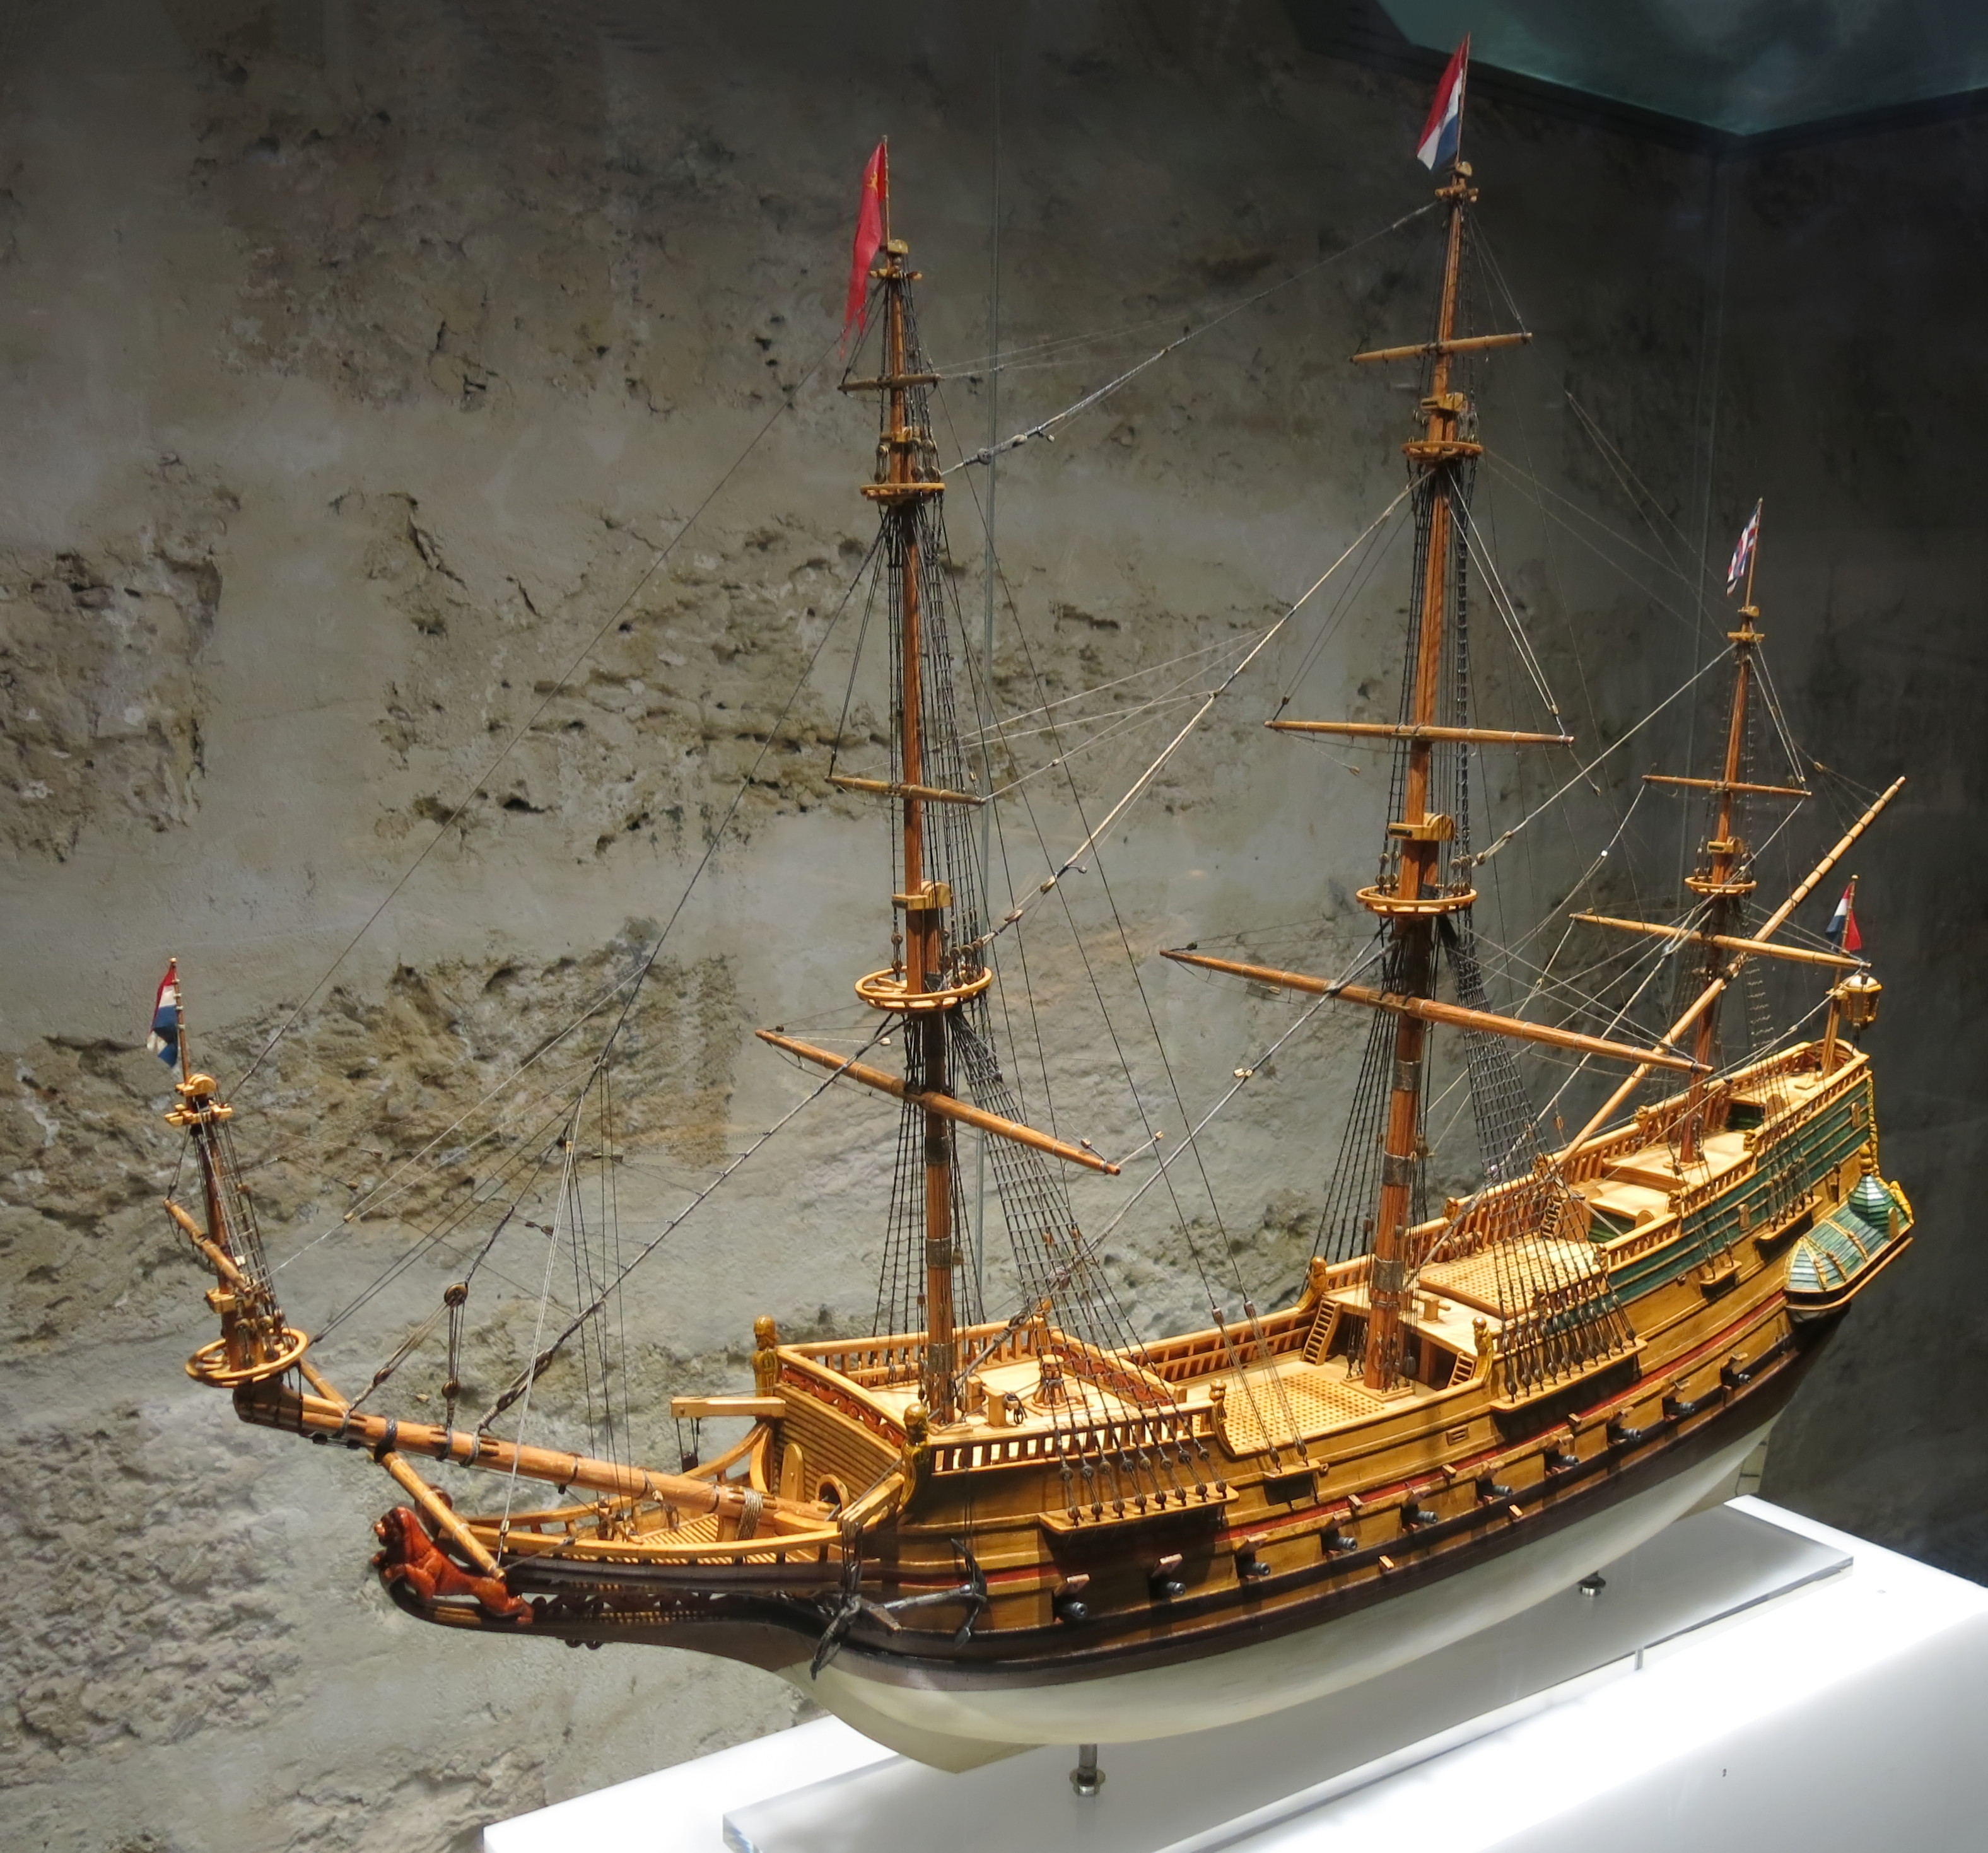
Model of the Batavia
This model was constructed by Geoff Kimpton, a former member of the WA Museum's Dept of Maritime Archaeology, who generously donated it to the department in April 2013. The model was built over a ten year period.
Geoff was also responsible for fabricating the steel frame for the Batavia hull reconstruction, and assembling the timbers recovered from the wreck site. These are now displayed in the Batavia Gallery of the WA Museum.
Catalog: BAT6514
Photo: Don Hitchcock April 2014
Source: The Shipwreck Galleries, Western Australia Museum, Fremantle, Western Australia
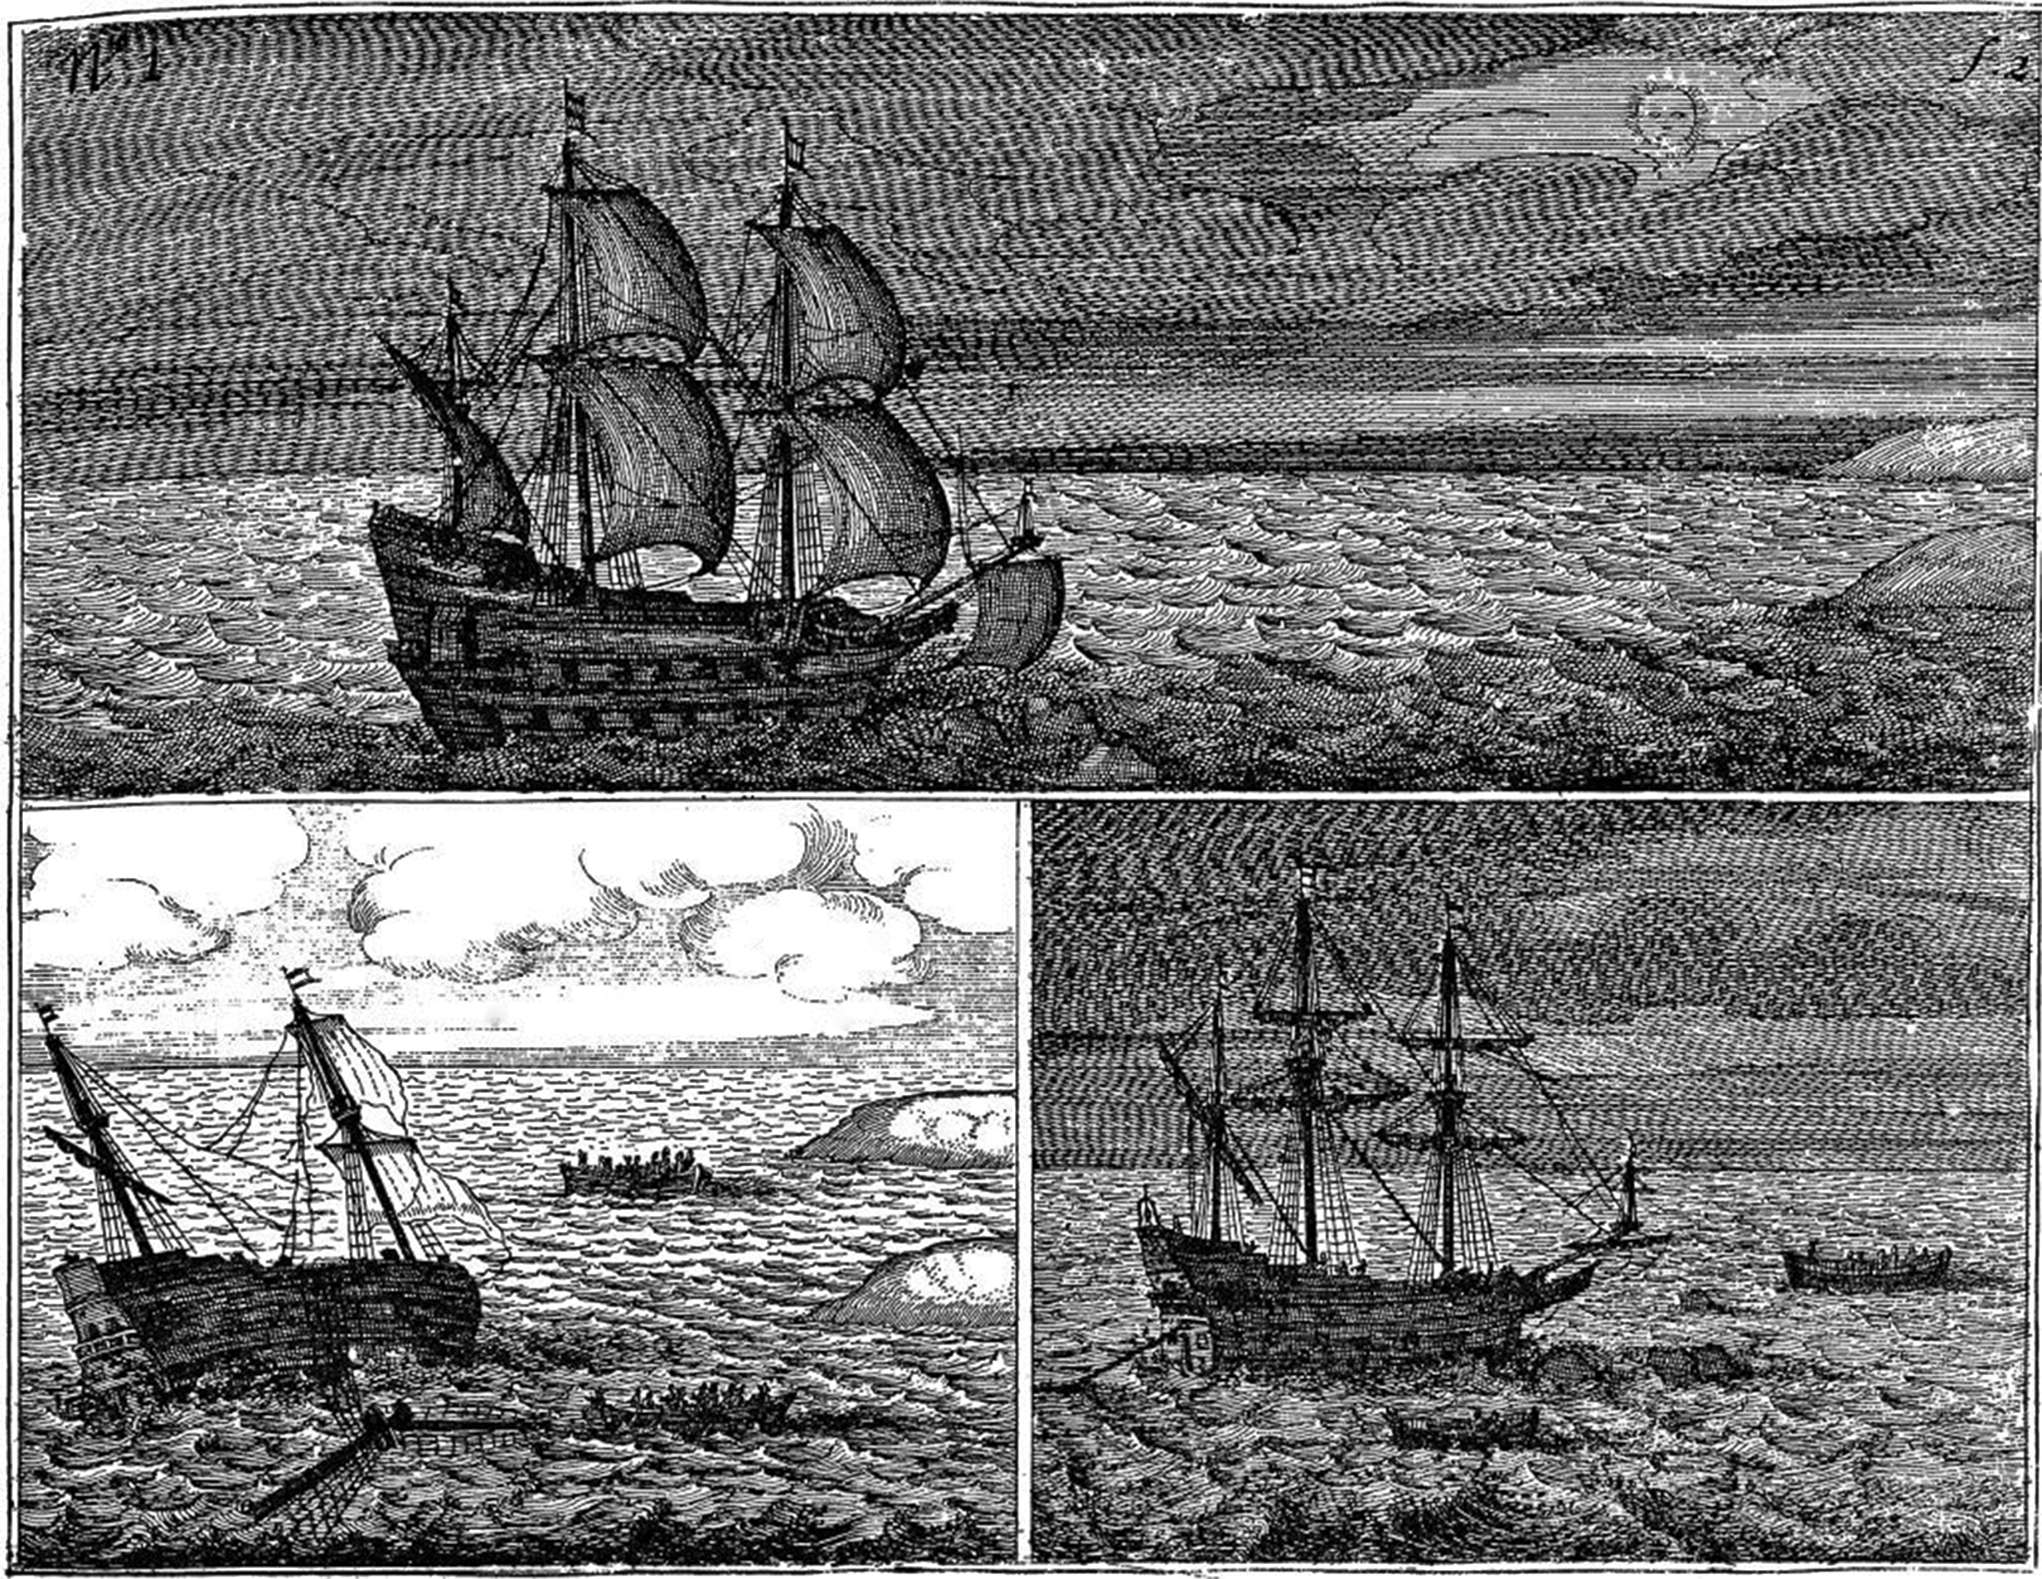
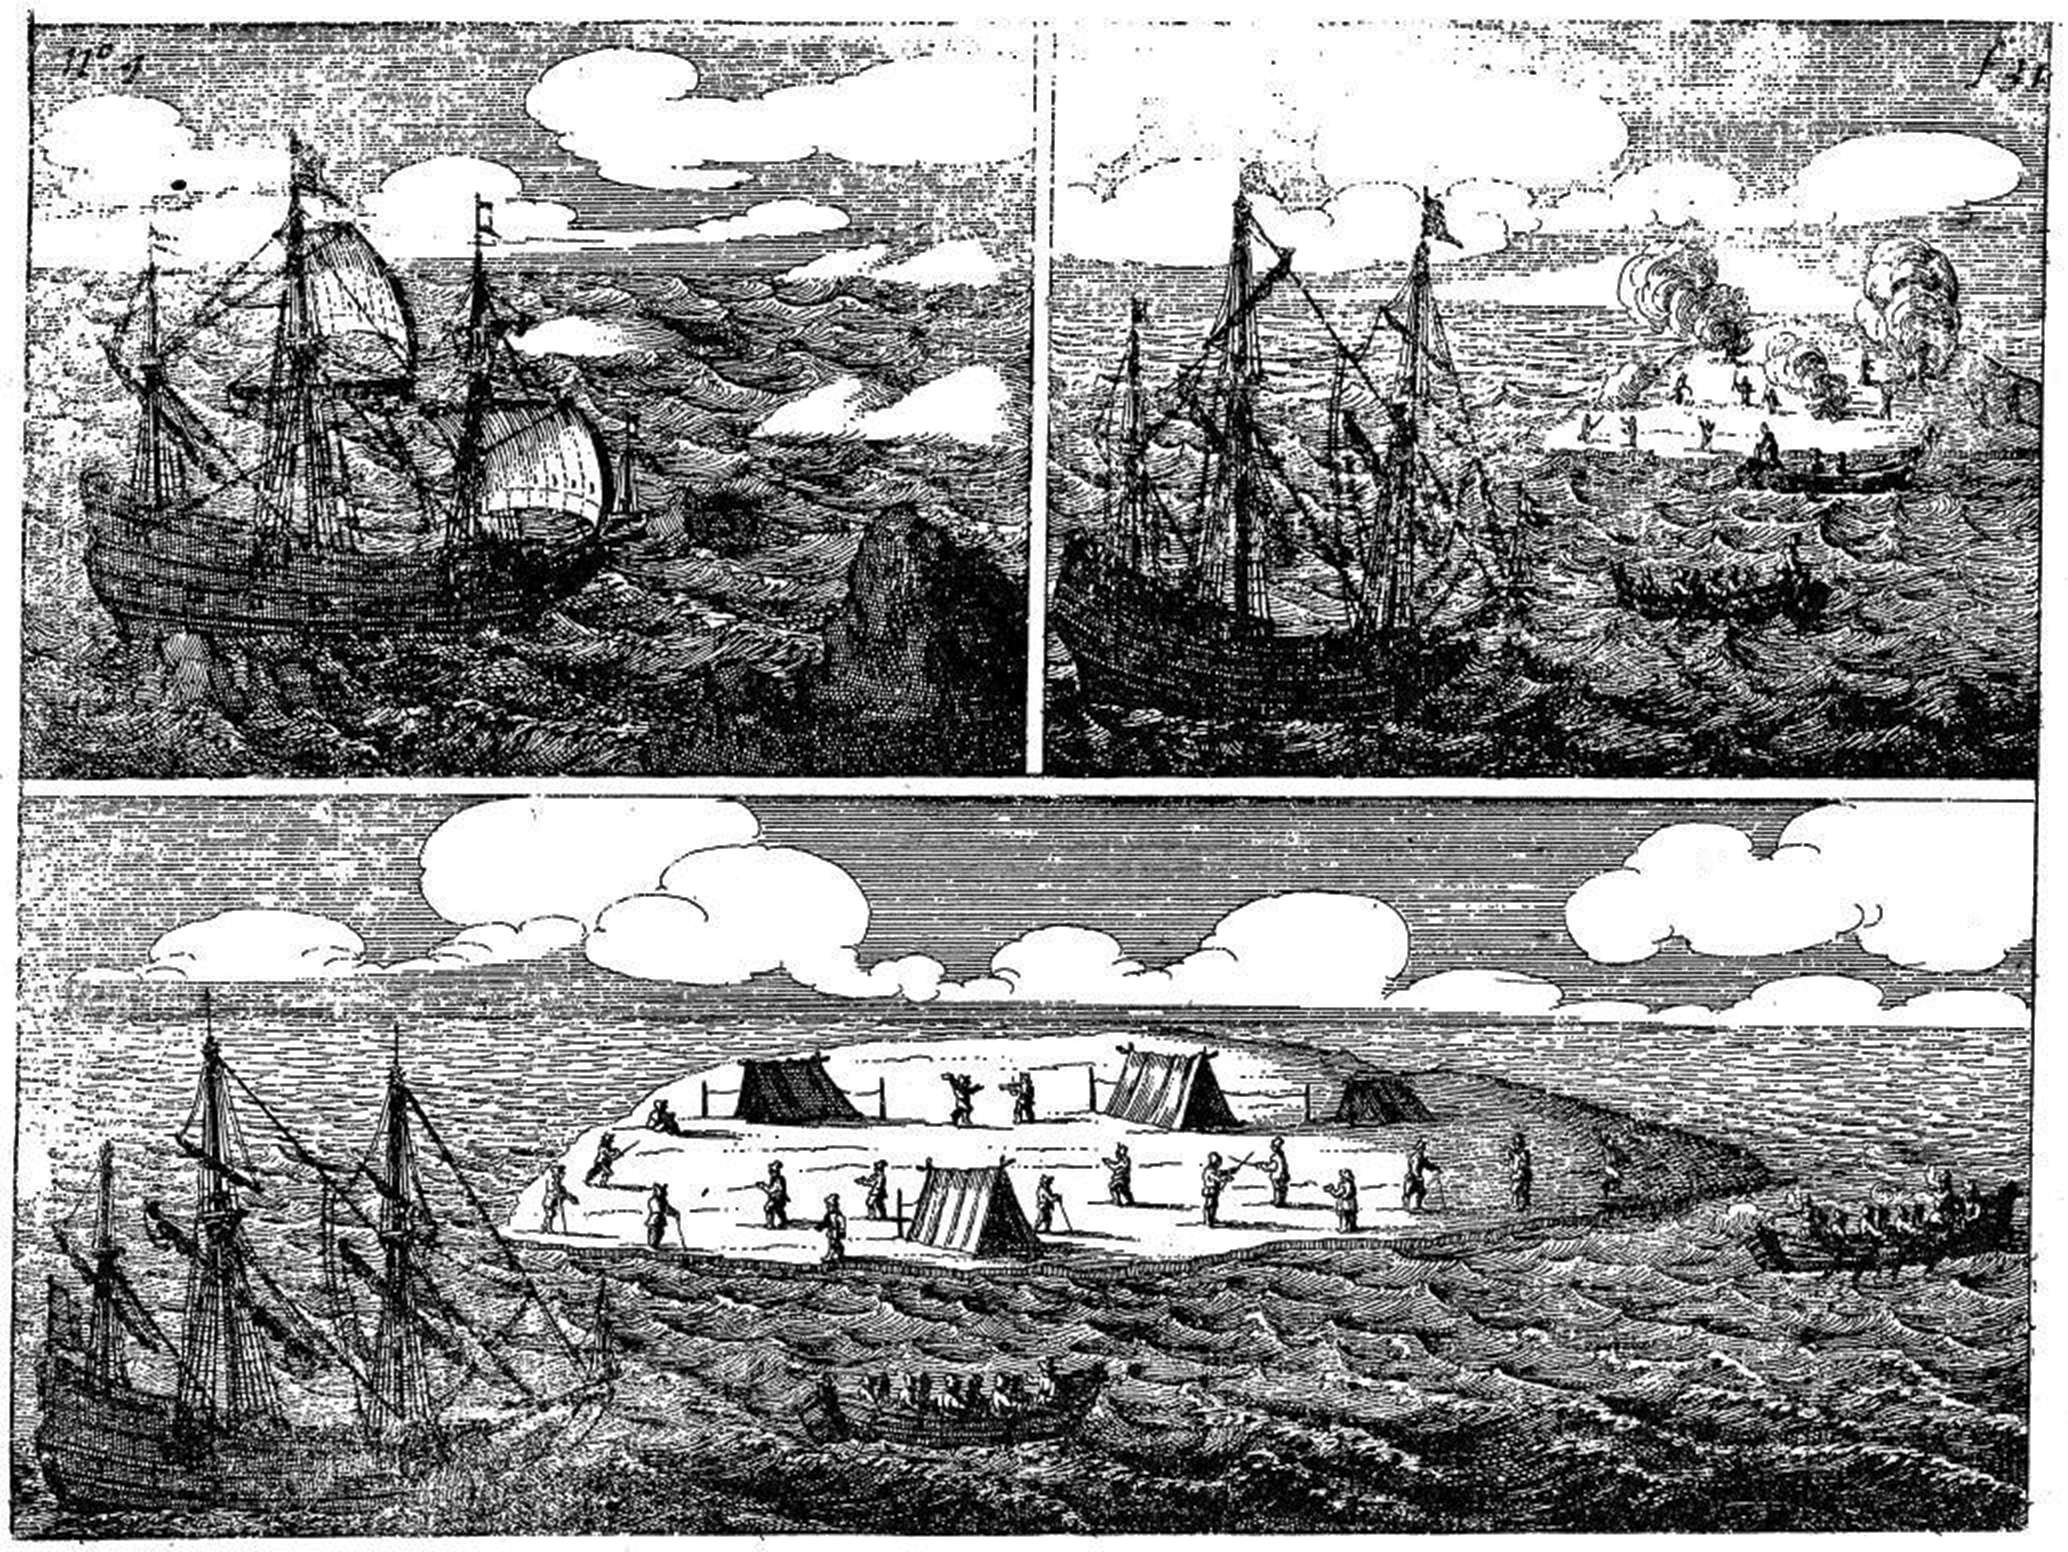
Here we see, clockwise from the top:
1. the Batavia approaching the Abrolhos in the early hours of the 4th of June 1629,
2. Running aground, with boats put out to ferry passengers and food and water to the island nearby.
3. The Batavia's main mast was cut down in order to lighten the load and to try to mitigate the ceaseless battering of the ship against the coral in the strong seas that were running.
Photo: Plate 1, 1647 Dutch book Ongeluckige voyagie, van't schip Batavia ('Unlucky voyage of the ship Batavia). This plate following page 2.
Permission: Public Domain
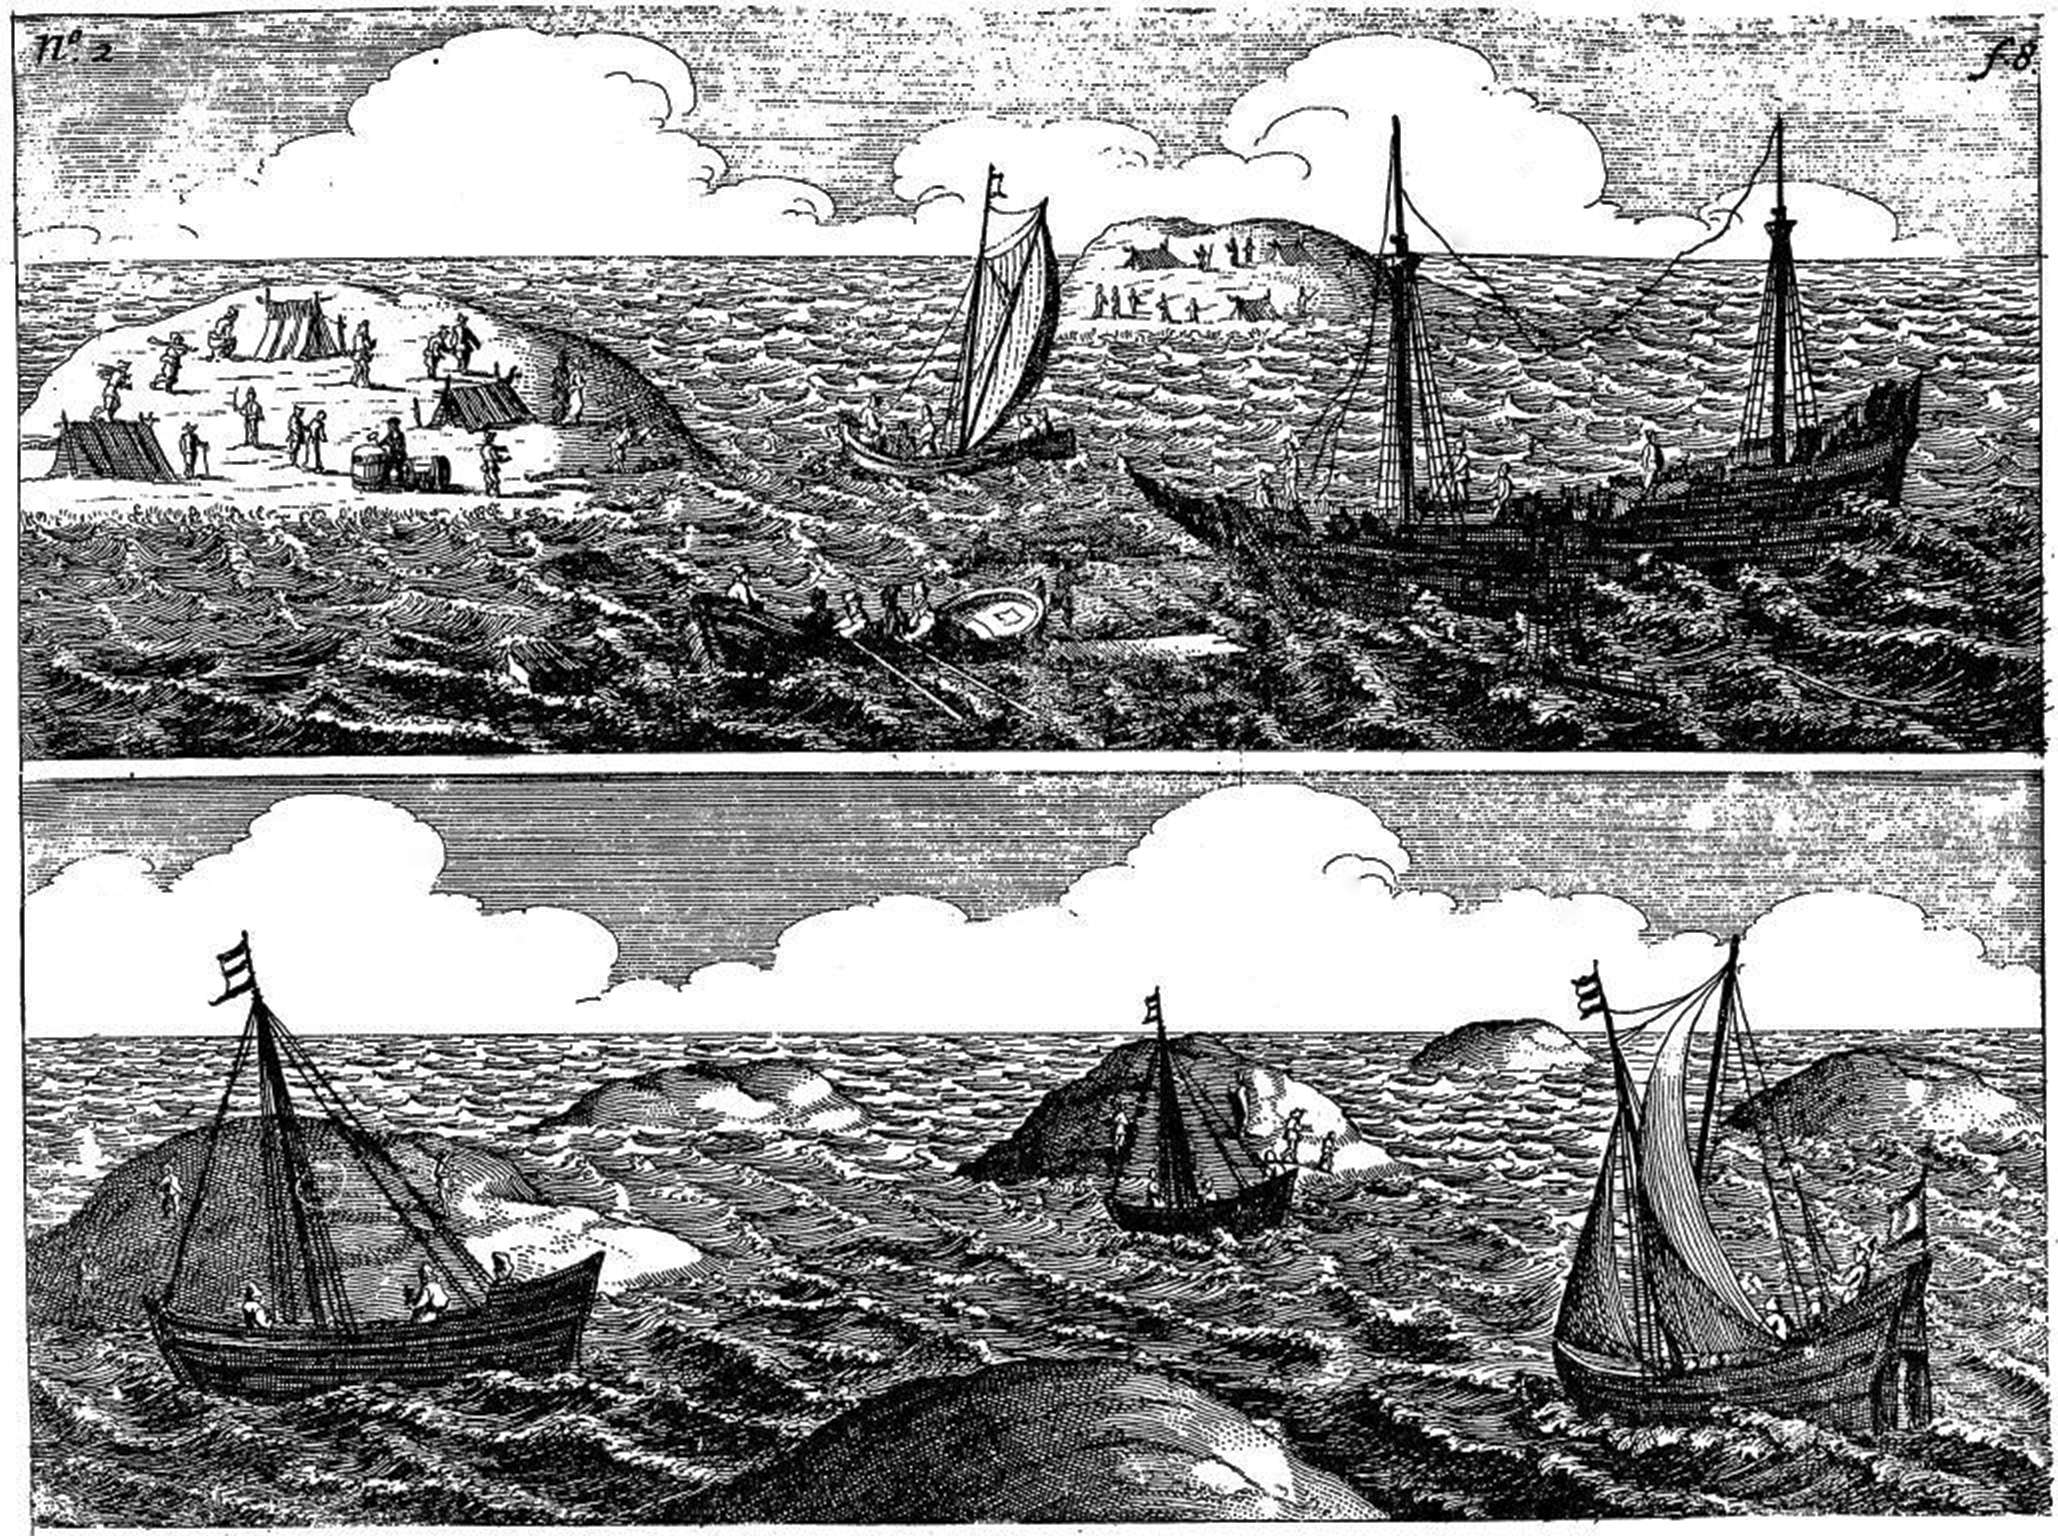
The survivors (top) put up makeshift tents on the islands closest to the Batavia, and (below) the smaller boats made a preliminary exploration of the other islands nearby.
Photo: Plate 2, 1647 Dutch book Ongeluckige voyagie, van't schip Batavia ('Unlucky voyage of the ship Batavia). This plate following page 8.
Permission: Public Domain
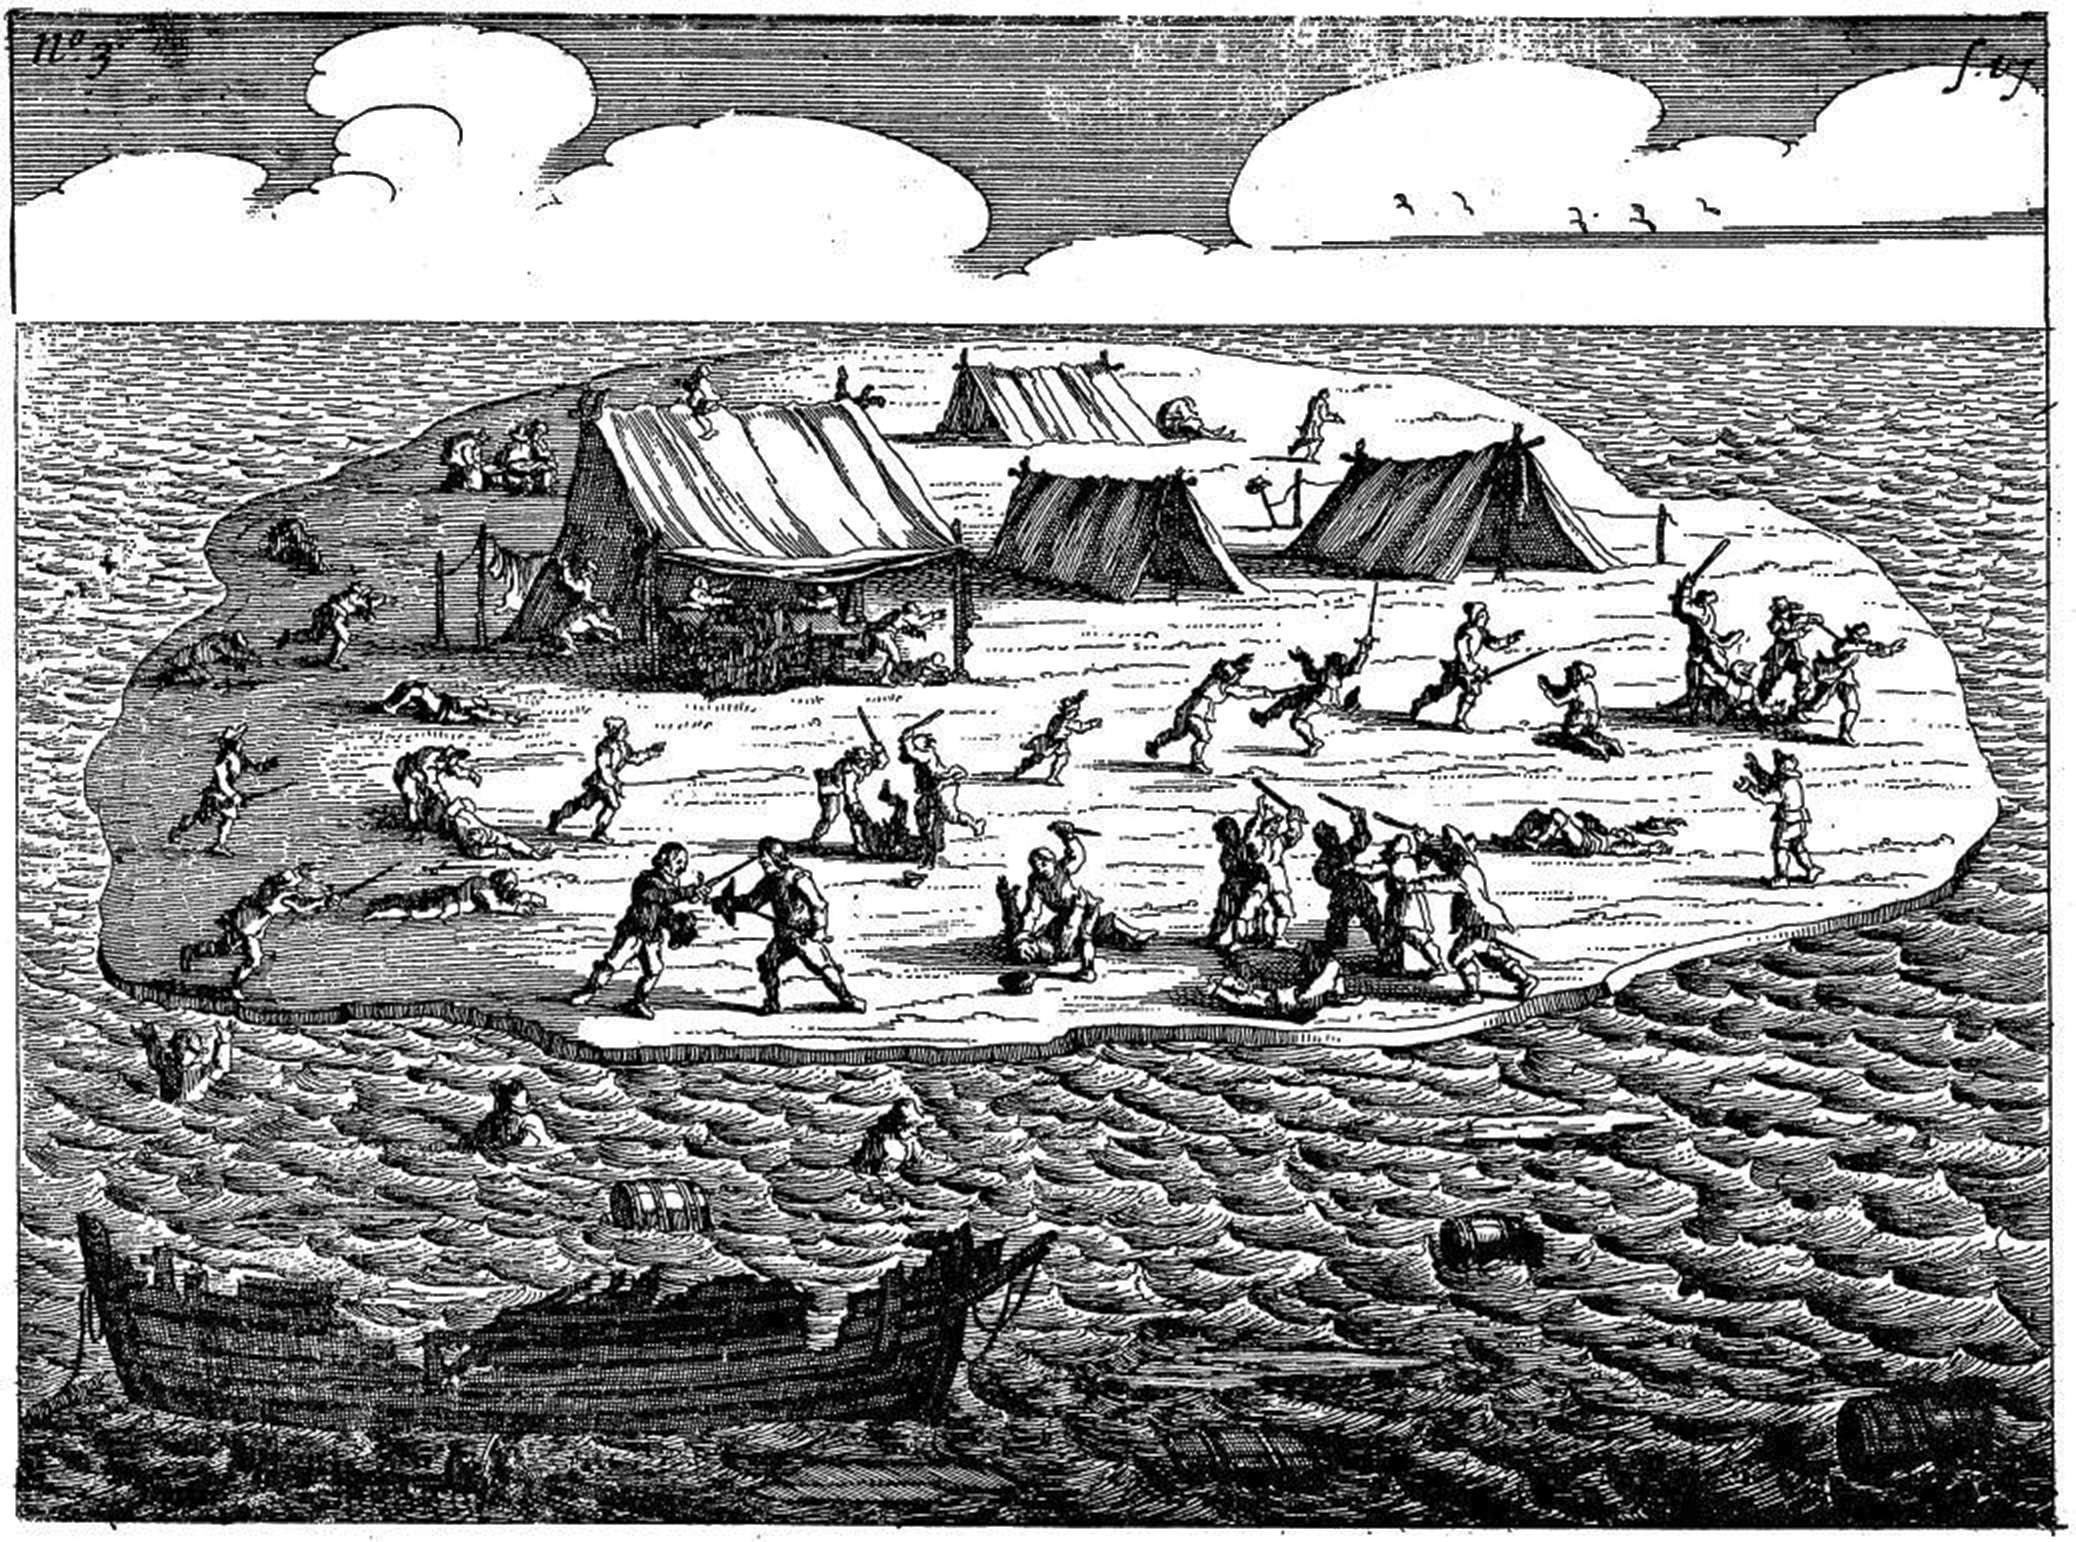
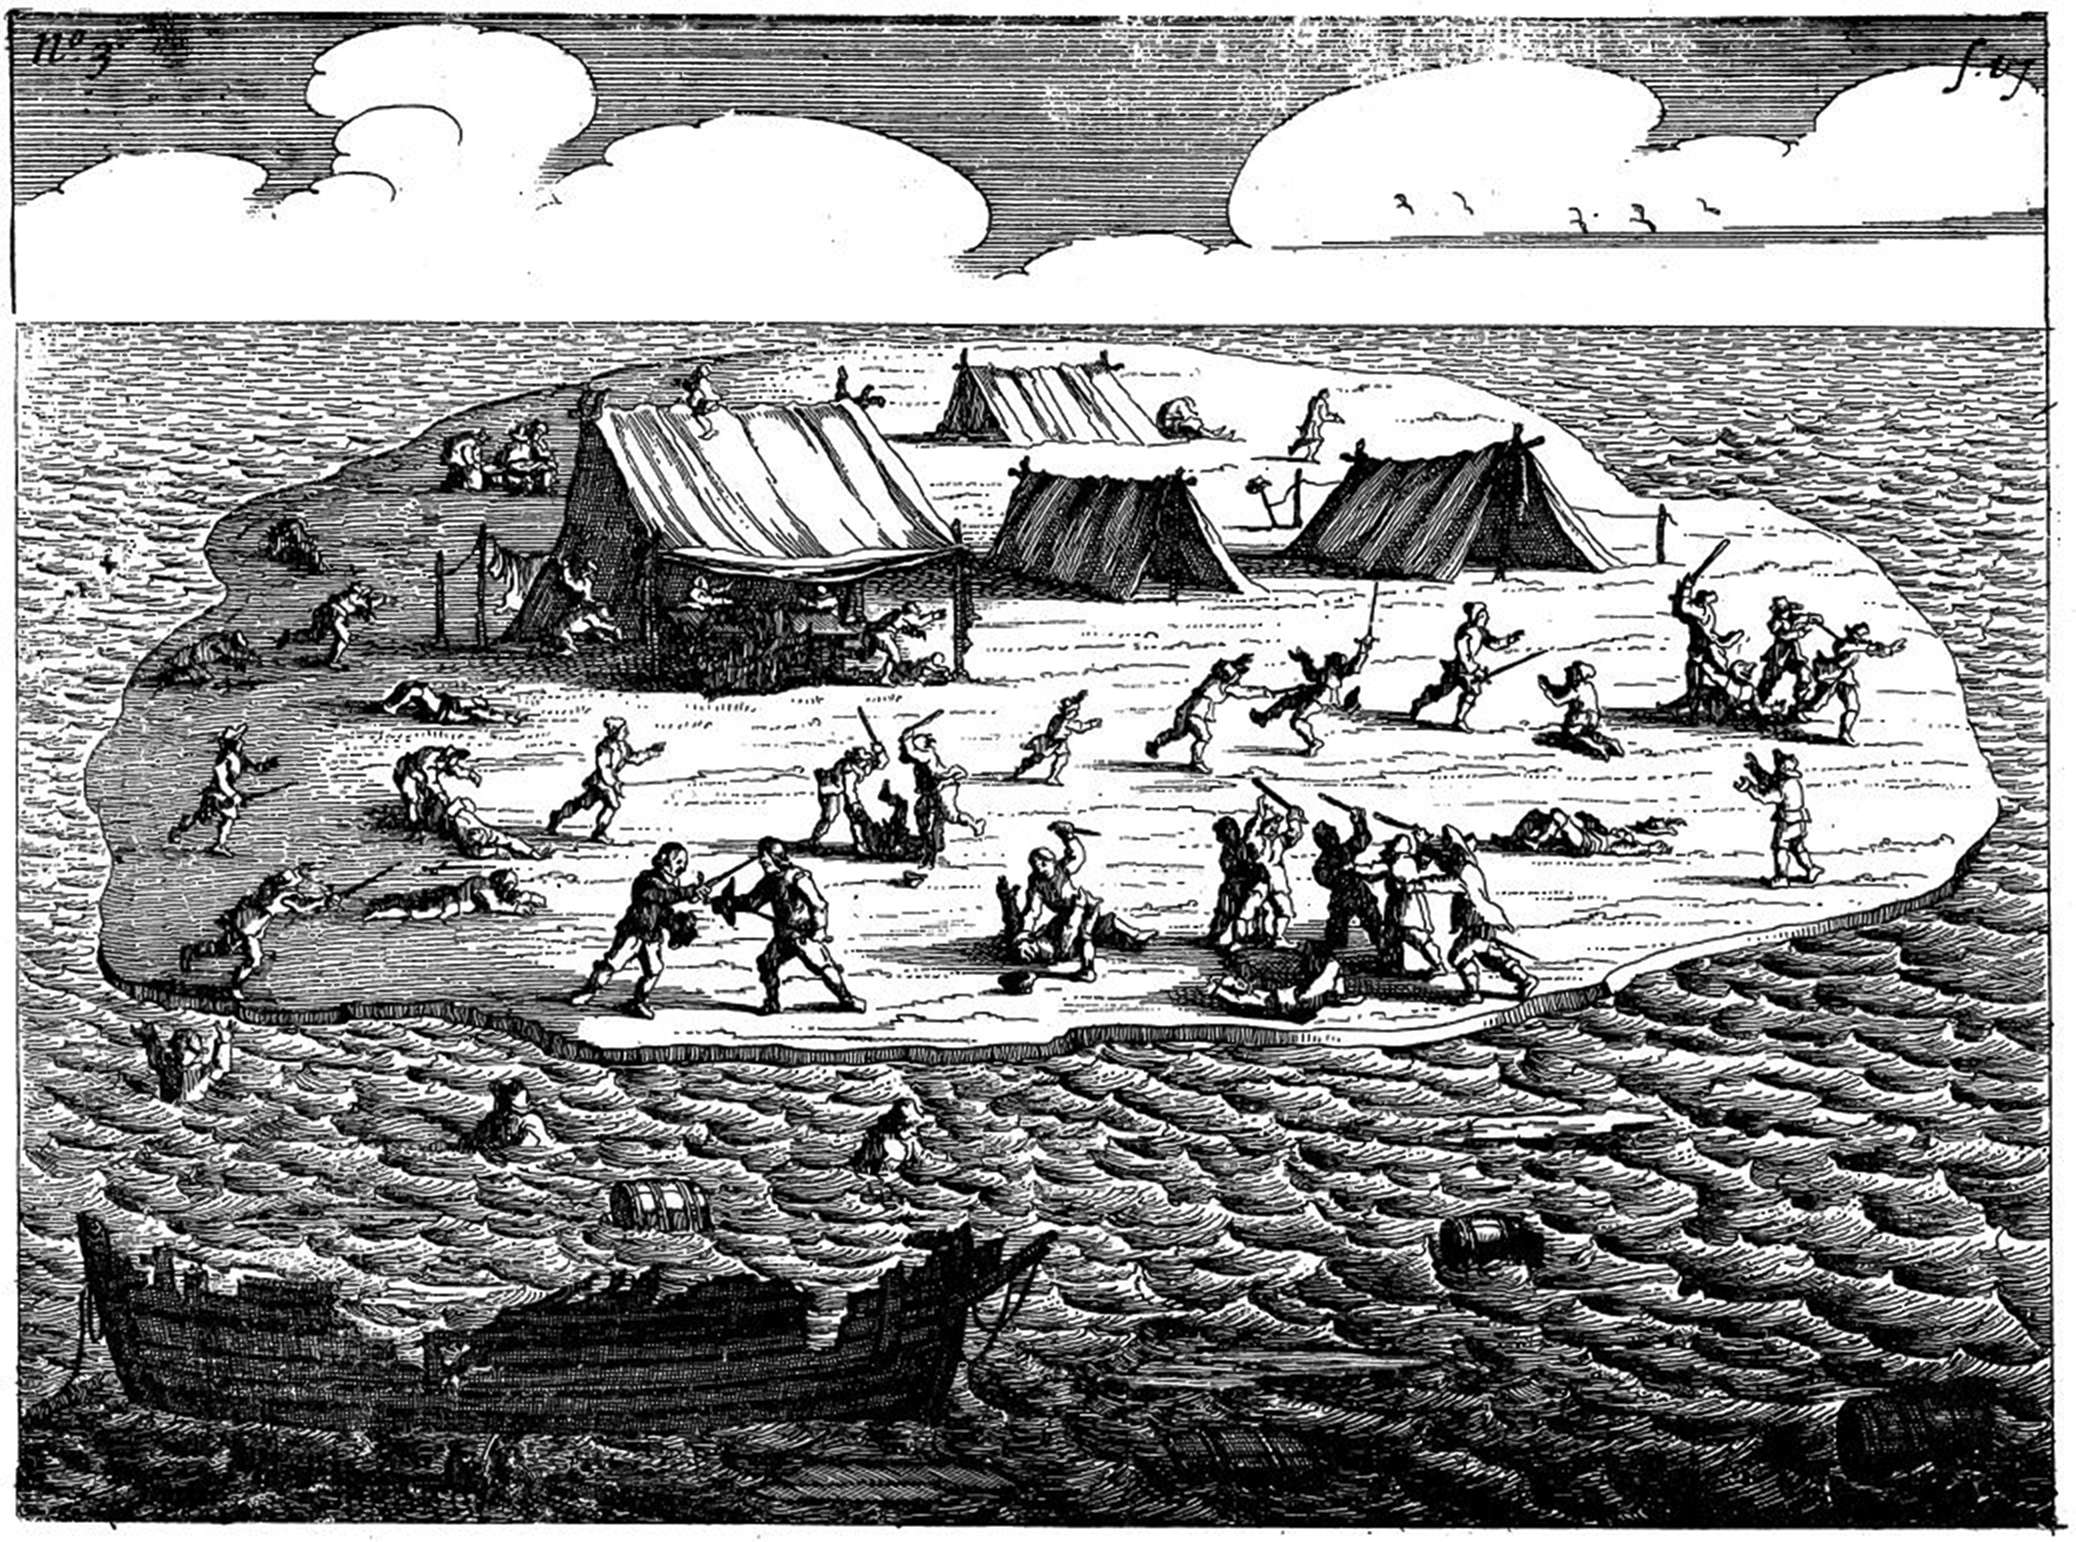
The mutineers take control, with great loss of life.
By this time the Batavia is irreparably damaged.
Photo: Plate 3, 1647 Dutch book Ongeluckige voyagie, van't schip Batavia ('Unlucky voyage of the ship Batavia). This plate following page 17.
Permission: Public Domain
Pelsaert's notes, page 31:
On the morning of the 16th, at daybreak, they weighed the anchor again, and took their course more or less south, with a west-south-west wind. In the afternoon the wind changed to west, than to north, so that they could sail west. Towards evening they saw the wreck of their ship Batavia, and the Commodore was seen from the high island, though the mates said it was not one of the islands. At two o’clock in the night they anchored in a clear, sandy bottom at 27 fathoms depth.
On the morning of the 17th they again weighed the anchor. The wind was north. They were still about two miles from the high island; they approached it in a south-westerley direction. Before noon, having come about the island, they saw close to the wreck, on a long islet, some smoke, at which they were much rejoiced, hoping to find all or most of their people alive. Having cast the anchor, the Commodore, taking with him a cask of water, and bread and wine, went with the boat to the highest island, which was nearest by; but on arriving there he found no one, at which they were all very much astonished. Jumping ashore, they saw a little boat with four men rowing round the northern point. The one whose name was Wiebbie Hayes jumped ashore, meeting the Commodore, and welcoming him, but begging of him to return immediately to the ship, as there were a party of miscreants on the islands about the wreck, who intended to come in two boats and seize the yacht on its arrival.
He related how he had become a captain of forty-seven people, who, to save their lives, had kept all that time on a little island, since some of the people, who were left behind, had turned scoundrels and murdered some one hundred and twenty-five people, being men, women and children. About fourteen days ago the supercargo, Jerome Cornelisz, the chief of these scoundrels, had been captured by him.
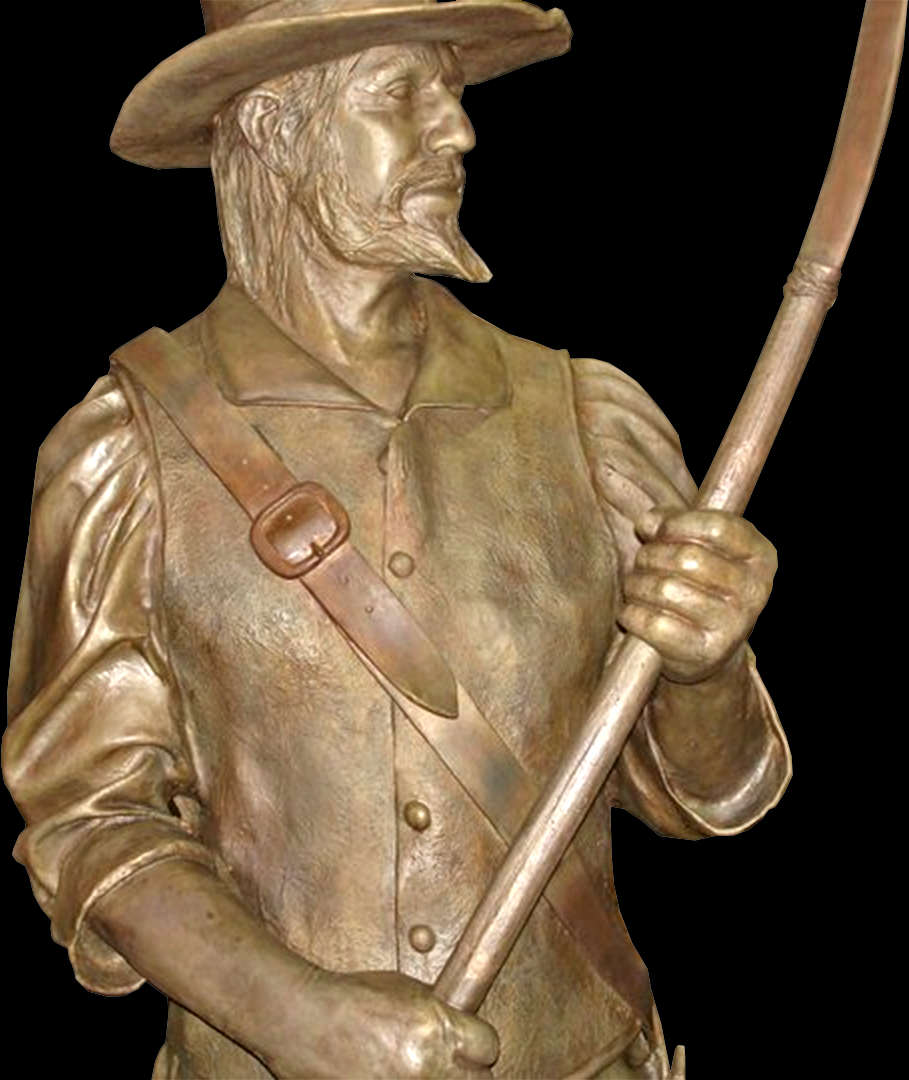
Wiebbie Hayes
This bronze statue of Wiebbie Hayes was commissioned by the City of Geraldton-Greenough, Western Australia.
He and the other soldiers on the voyage were marooned on a larger island in the same island group. When they realised that the mutineers had killed many of the passengers and crew, and meant to land on their island and murder them also, they made weapons from what was to hand - in this case bush timber carved into a handle, and hoop iron beaten and sharpened into a blade bound to the handle to make a form of cutlass.
Photo: Perth Castings Art Foundry
Artist: Tony Horn
Source: https://www.facebook.com/media/set/?set=a.188494561178867.52480.134338836594440&type=3
Francisco Pelsaert
Bruce Martin as Francisco Pelsaert in Richard Mills's Batavia in Melbourne in 2001.
In reality, Pelsaert had long black hair, and a goatee beard.
Photo: Jeff Busby
Source: http://www.opera-opera.com.au/archive/brucemartin.html

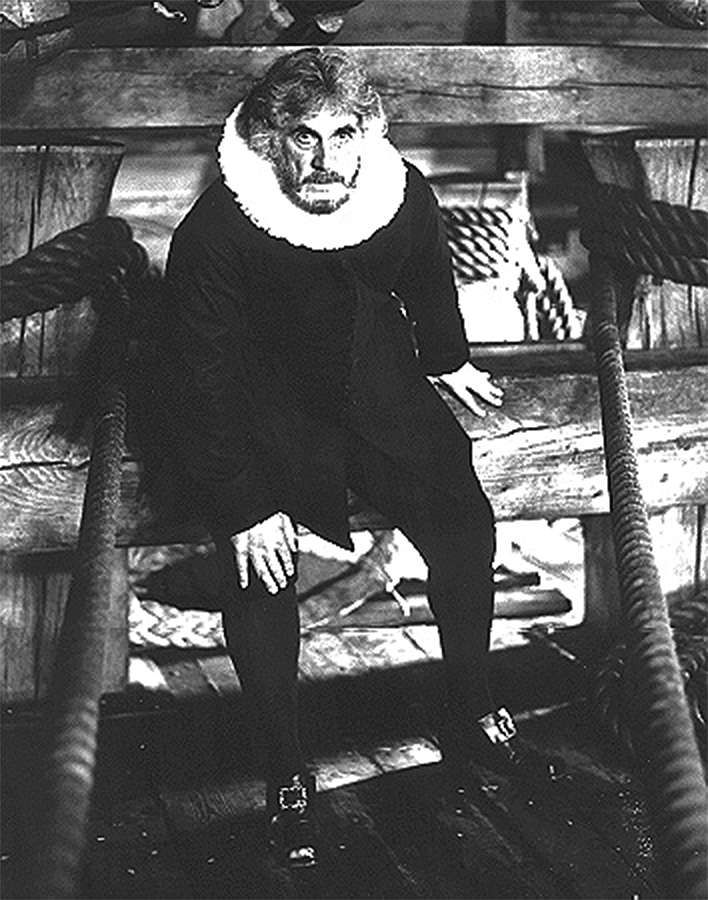
Jeronimus Cornelisz
Michael Lewis as Jeronimus Cornelisz in Richard Mills's Batavia.
Photo: http://www.michaellewis.net.au/audiovisual/photos/files/page2-1032-full.html
The return of Pelsaert in the rescue ship Sardam from Batavia in Java, the head office of the VOC.
Clockwise from top left:
1. Approaching the Abrolhos
2. Hove to at the islands, with fires visible on the islands.
3. Taking control of the islands from the mutineers.
Photo: Plate 4, Dutch book Ongeluckige voyagie, van't schip Batavia ('Unlucky voyage of the ship Batavia). This plate following page 31.
Permission: Public Domain
[p. 32]
Four of his principal counselors and accomplices, viz.- The assistant David van Seevanck, Coenraldt van Huyssen, Gysbert van Welderen, and Cornelis Pietersz, of Utrecht, soldier, had been killed. These had repeatedly come across to fight him and his men, but every time they had been bravely kept off; then they had used traitorous and sinister means to conquer and murder them, offering them peace through the intermediation of their minister, Gysbert Sebastiaensz, whom they forced to go backwards and forwards.
When they came to conclude the peace with solemn oaths, promising to forget and forgive all that had passed, David van Seevanck and Coenraldt van Huyssen tried to bribe some soldiers to treason, offering them each six thousand guilders, if, when they returned next day after the conclusion of the peace, these men would side with them and help to kill the others. But Wiebbie’s men had understood this, and, perceiving that it was aimed at their life, they killed these fellows, and captured their captains as related above.
He further described how that same morning, one rebel, named Wouter Loos, who had been proclaimed chief after the capture of the former Captain Jerome, had attacked them with two boats full of men, whom they had bravely resisted, and kept off, four of Wiebbie Hayes’ men having been severely wounded in the fray. When the Commodore had learnt all these sad tidings with deep regret, he immediately rowed aboard again, ordering Wiebbie Hayes to row back to his people, and to bring the prisoner, Jerome Cornelisz, to the ship, which was done as ordered.
But before the Commodore could get to his ship he saw a rowing boat with people approaching round the southern point of the land, wherefore he prepared for defence with the intention, if possible, to overpower and capture the scoundrels. Meanwhile he continued his course to the ship. On reaching her, he found that the rebels were boldly coming on in the same direction. When they were close enough he could distinguish their red cloth dresses, trimmed all over with gold lace. The Commodore asked them why they came on board armed. They answered that they would tell him when they were on board.

The image at the top left, with four men on a wooden raft, seems to be describing this excerpt from page 17:
Webbye Hays and his men, who were still away looking for fresh water, and who, as had already been related, were successful after twenty days search, made three fires as a signal. But this signal was
taken no notice of, for that was the day of the general murder. Some that escaped the carnage and came to his island on wooden rafts brought him the terrible sad tidings of what had happened. He therefore having with him now forty-five men, resolved to defend himself and his men, and to be ready for resistance if they came to fight him, making for this purpose weapons out of hoops and nails, which they tied to sticks.
The images at top right and bottom right appear to be describing this part of Pelsaert's journal from page 32:
He further described how that same morning, one rebel, named Wouter Loos, who had been proclaimed chief after the capture of the former Captain Jerome, had attacked them with two boats full of men, whom they had bravely resisted, and kept off, four of Wiebbie Hayes' men having been severely wounded in the fray.
Photo: Plate 5, Dutch book Ongeluckige voyagie, van't schip Batavia ('Unlucky voyage of the ship Batavia). This plate following page 32.
Permission: Public Domain
[p. 33]
After this insolent reply he ordered them to throw their weapons into the sea, and to come across or he would know how to force them to obedience. Seeing that that had no escape, they obeyed, and coming on board, they were at once put in irons. Their examinations commenced at once.
[Marginal note: Confession of Jan Hendricksz of Bremen.]
The first one to be examined was Jan Hendricksz, of Bremen, soldier, who immediately let out and confessed to have killed and helped to kill 17 or 20 people, but everything at the express orders of Jerome Cornelisz, their captain, who had forced them to it. Having further been questioned as to the causes and circumstance off all this, and as to what had let them to such inhuman cruelty, he stated his willingness to reveal everything, also how all had happened in the beginning, viz., that he Skipper, Adriaen Jacobsz, Jerome Cornelisz, and the first boatswain had made a compact with the others to seize the vessel Batavia, before it was wrecked, to kill the Commodore and all the crew and passengers, except about 120 who were in the plot, and to throw the dead overboard into the sea; then to go pirating and free-booting with the vessel. Wherefore Jerome Cornelisz and his men on the island had made sure that the Skipper would have killed the Commodore on the way, or have thrown him overboard into the sea, and having been on the island for a month, he thought he could do nothing better than kill all the people but forty, with whom he would seize the yacht on its arrival. He felt, however, that this could not be done unless Wiebbie Hayes and his men, who had been sent to the long island for water twenty days before, were put out of the way. They had started upon this fiendish expedition, and made some attacks already, but had not succeeded.
[Marginal note: Jerome Cornelisz is given up.]
Towards evening Wiebbie Hayes brought Jerome Cornelisz to the Commodore on board ship as a prisoner. The Commodore looked at him with deep sorrow, not being able to conceive what had induced him to forget himself so far that he had become the cause of such inhuman murders. Being examined in the presence of the Council, the Commodore asked him why he had allowed the devil to lead him so far astray from all human feeling, and had done that which had never been so cruelly perpetrated among Christians, without any real need of hunger or thirst, solely out of cold bloodthirstiness, and to attain his wicked ends. To which he repealed that they should not blame him for what had happened, putting it all on David van Seevaneck, Coenraldt van Huyssen and others, who had been killed in the last encounter with Wiebbie Hayes' men.
He said they had forced him to it, threatening otherwise to take his life. One had often to do a great deal to save oneself. He denied ever having had the intention to help to seize the vessel Batavia, and as to the project of seizing any yacht that should come to their rescue he said Seevanck had proposed this, and he only consented, but without meaning it seriously, since he supposed that they would never be delivered form these unfortunate islands. For he had hard one, Ryck Woutersz, say that Skipper Adriaen had intended to seize the vessel, if it had not been wrecked, and to throw the Commodore overboard, which made him think that they could never have reached Batavia. But that the Skipper must have gone to Malacca; or should it have happened that the Commodore had reached Batavia, and that a yacht were sent to their rescue, he would have tried to give warning. In this manner, he tried to excuse himself with his glib tongue, telling the most palpable lies, and making out that he had been altogether innocent and ignorant of everything, often appealing to the mates, as if they could have known his inner thoughts, saying that they would give a similar testimony. At this the matter was left that day, and he was again incarcerated.
On the 18th September before daylight, the Commodore and the Skipper went with the two boats to the long island, were Wiebbie Hayes was with his men. He took the soldiers from thence, arming each with a good musket. With those he proceeded to the island named “Batavia’s Churchyard,” which was close to the wreck; his intention was to catch the remaining scoundrels, who were still there, and make them prisoners. When they saw the Commodore approaching with his two well-manned boats, their hearts immediately failed them,
[Marginal note: The remaining scoundrels taken.]
and their courage sank before they had made any resistance. They said to each other, 'Now we are all dead men' thinking that they were going to be killed in hot haste. But in this they were mistaken. When the Commodore had landed, he caused all the rebels to be bound hand and foot, and to be secured as prisoners; then his first work was to seek the jewels that lay scattered here and there. Those were all found except a gold chain and ring, though the ring came to light after all.
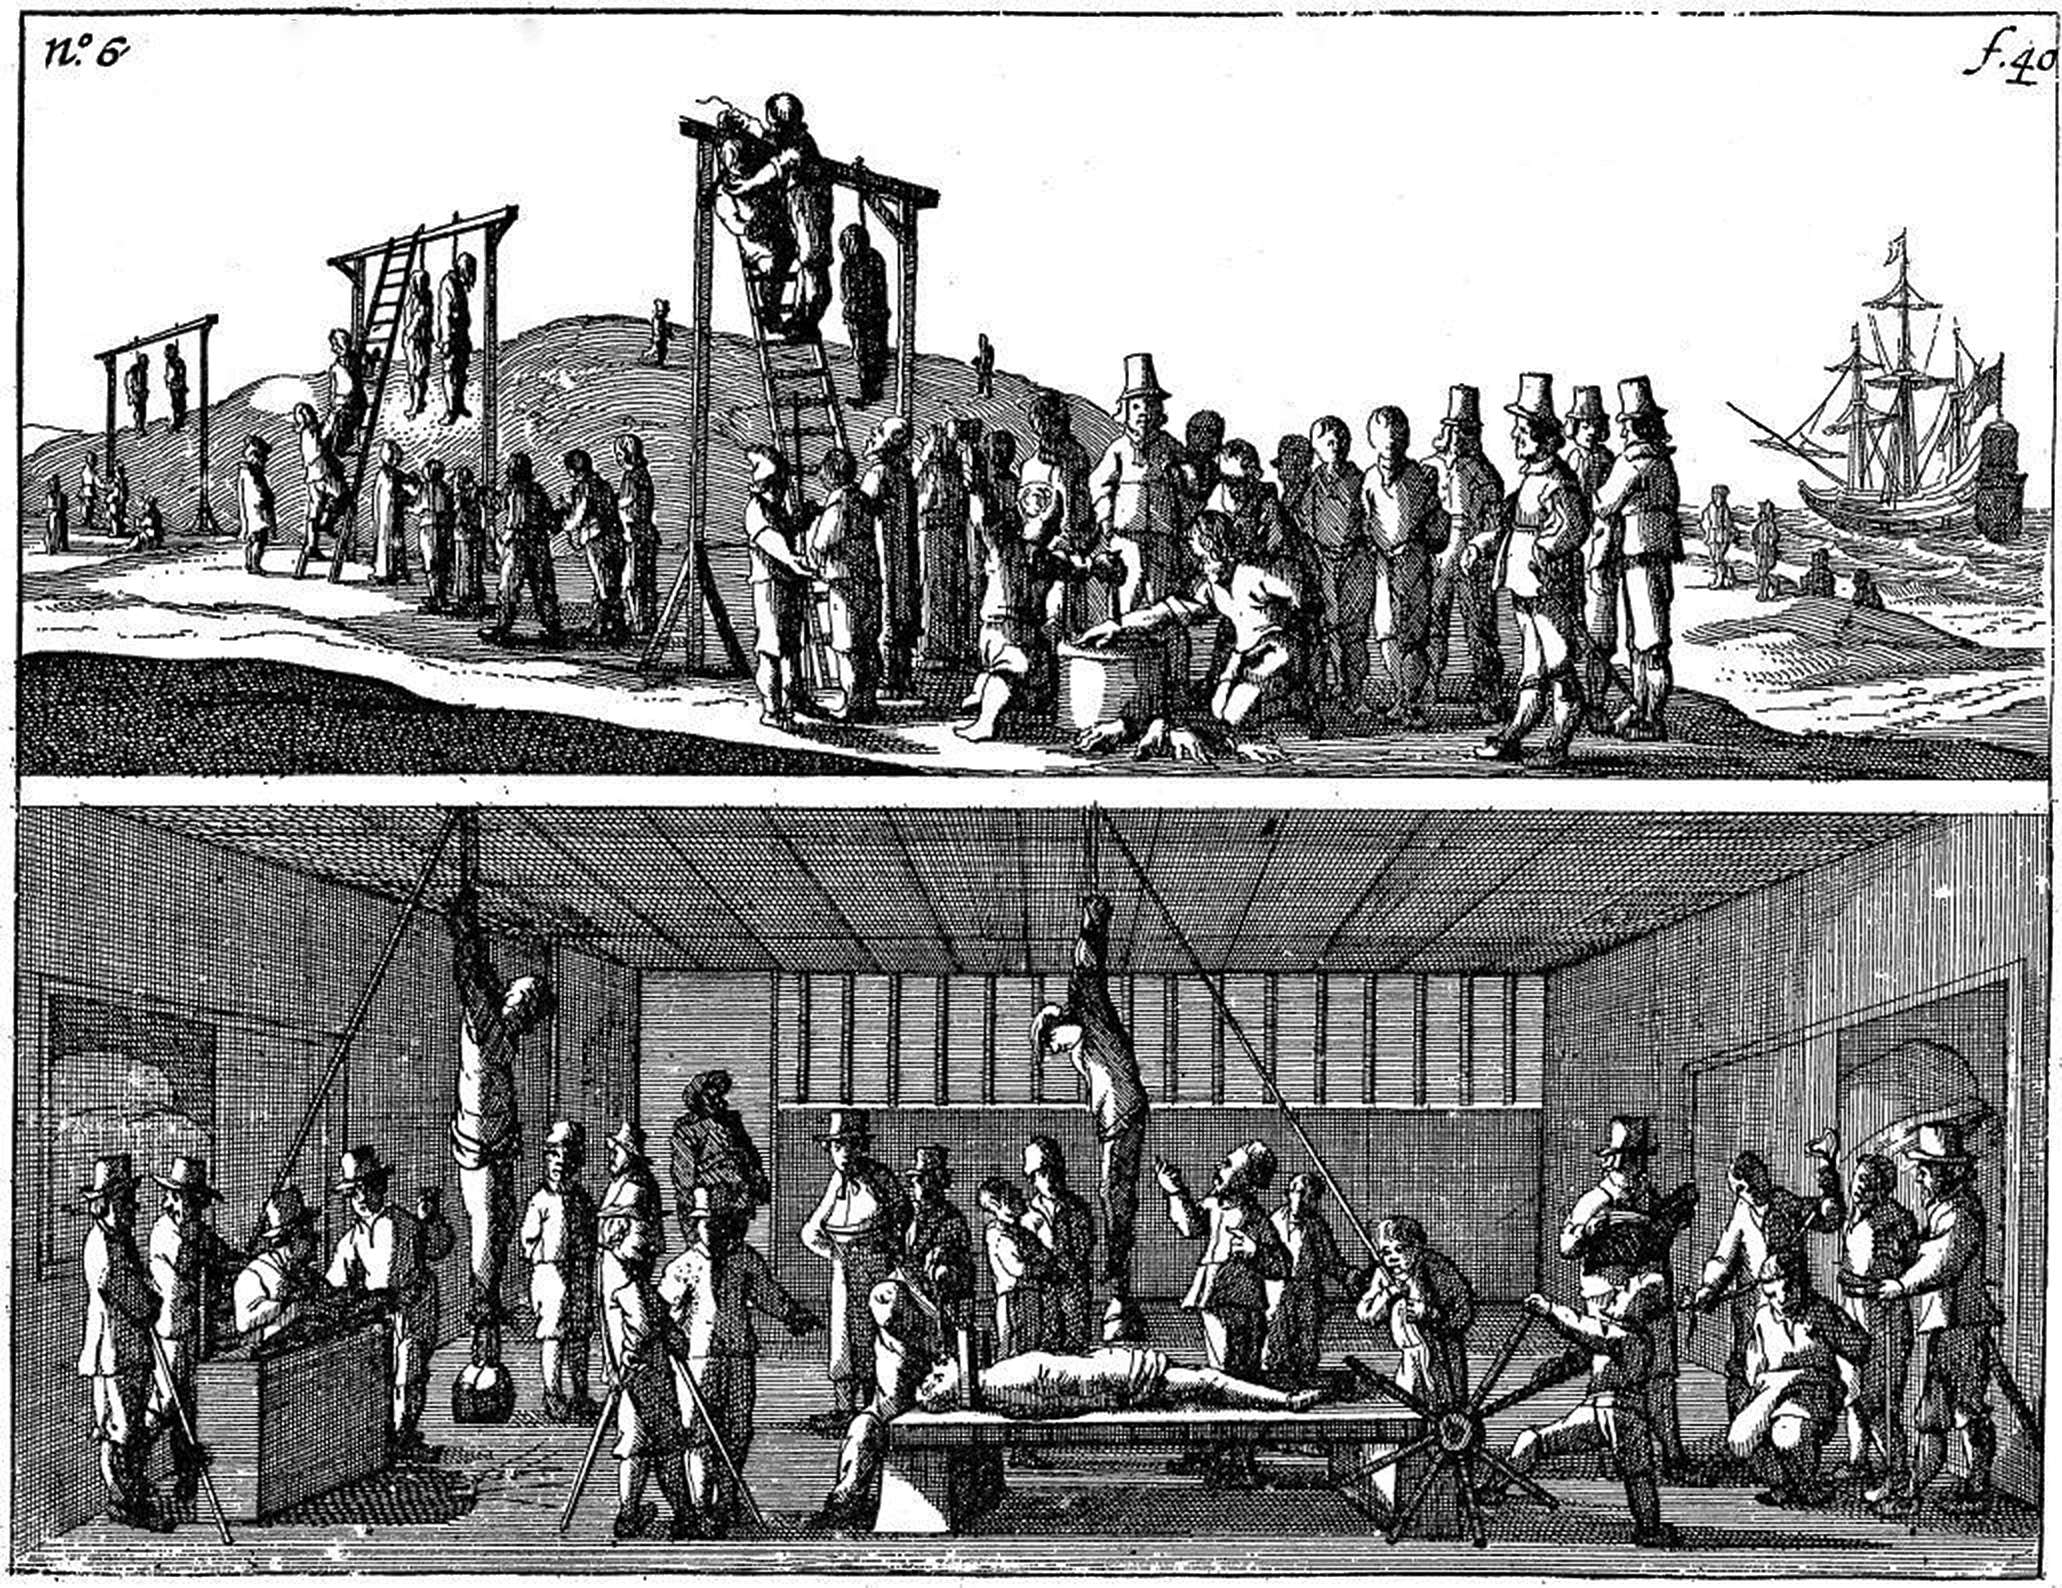
Hanging on the island and the torturing back at the island of Java.
Photo: Plate 6, 1647 Dutch book Ongeluckige voyagie, van't schip Batavia ('Unlucky voyage of the ship Batavia). This plate following page 40.
Permission: Public Domain
Some survivors resisted the mutineers, in particular the group led by Hayes.
This is an image from the 1647 Dutch book Ongeluckige voyagie, van't schip Batavia ("Unlucky voyage of the ship Batavia").
Photo: Scanned from a facsimile of the original book, published in The Voyage of the Batavia (Australian Maritime Series Number Two), Hordern House, 1994.
The overall work is generally attributed either to Francisco Pelsaert or Jan Jansz, but authorship of the plates therein is unknown.
Permission: Public Domain
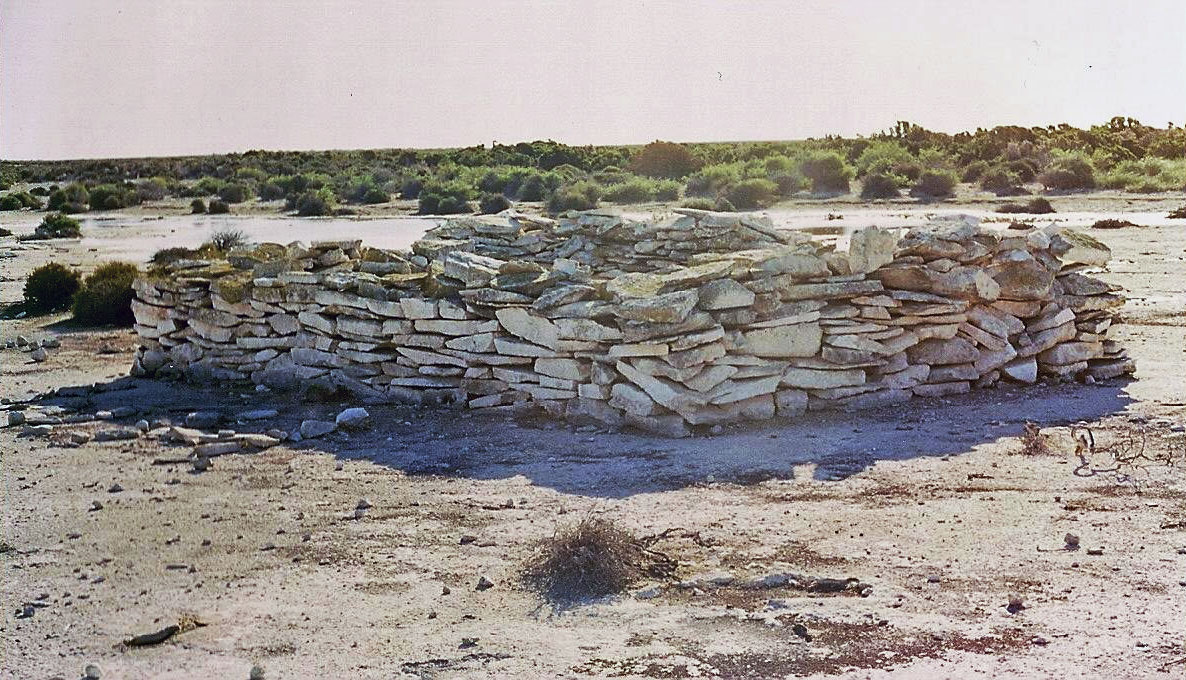

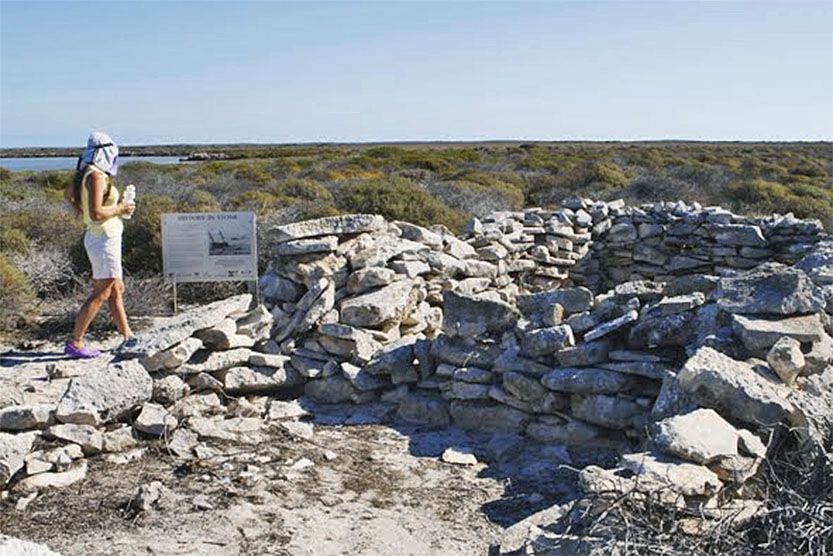
Rectangular fort on West Wallabi Island.
One of the wells may be seen ten or twenty metres away from the fort, directly across from the entrance, in the right hand photograph.
Photo (left) © Brian McRae
Source: http://www.brmcrae.geo.net.au/shipwrecks.htm
Photo (right) © HappyJoe
Source: Panoramio
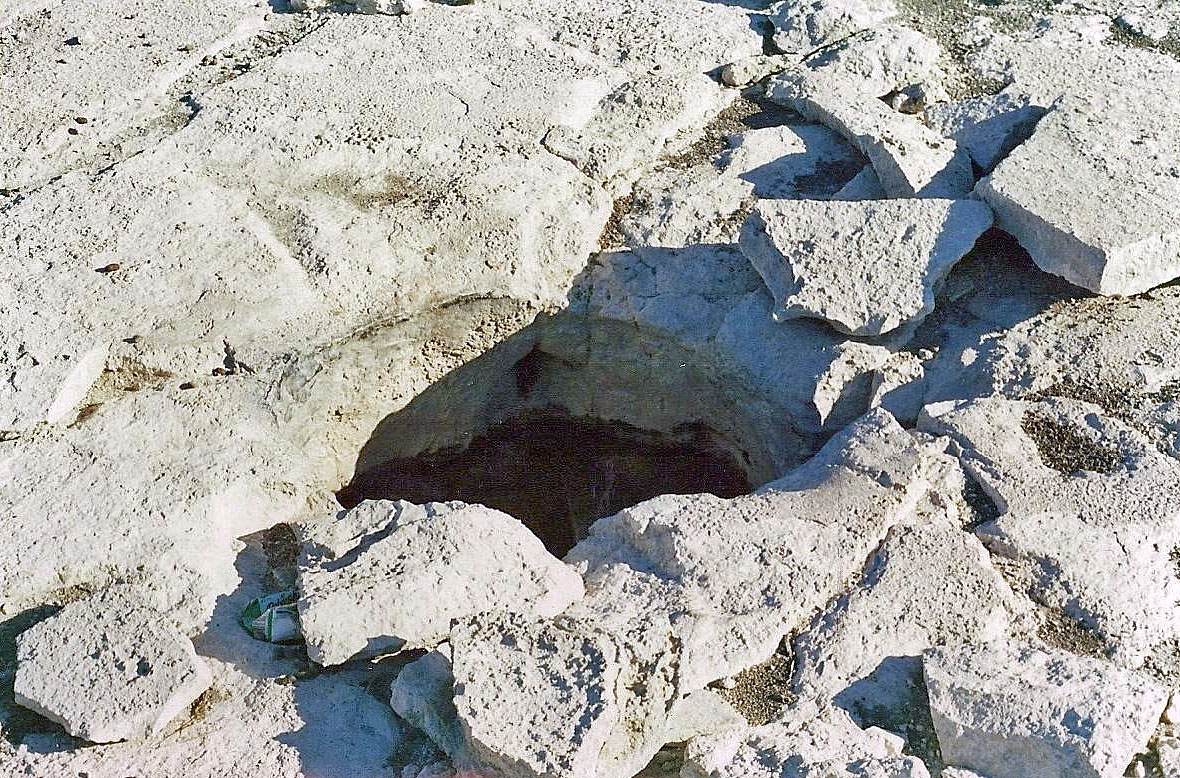
Well on West Wallabi Island, near the rectangular fort.
The mutineers sent some of the soldiers included in the ship's company and commanded by Wiebbe Hayes to West Wallabi Island on the pretext to look for water, hoping that they would die of thirst doing so. The soldiers actually found wells already there, and supposedly stated that they believed the Portuguese had dug these wells at some earlier time. These wells had been dug into solid rock, to a depth of over 1metre and by about 600 mm across. The Dutch soldiers from the Batavia built crude stone forts at the wells to both provide shelter from the constant wind, and for protection from the mutineers should they return and attempt to kill them, which of course history tells us that they certainly did attempt to do.
As is common in shallow wells on low lying islands, there is a lens of fresh water floating above heavier salt water, and the height of water in this well rises and falls to some extent with the tide.
Photo and text: © Brian McRae
Source: http://www.brmcrae.geo.net.au/shipwrecks.htm
The base of West Wallabi Island is the Wallabi Limestone, a dense calcretised coral limestone platform that underlies the entire Wallabi Group. This platform, which rises abruptly from a flat shelf, is about 40 metres thick, and is of Quaternary origin. Reefs that formed during the Eemian interglacial (about 125 000 years ago) when sea levels were higher than at present, are now emergent in places, and constitute the basement of the group's central platform islands, which include West Wallabi Island.
Text above on the geology of the islands: Wikipedia
Fort beside one of the wells on West Wallabi Island after rain.
This photograph partly explains why the well in solid rock was initially dug, and afterwards held water. After rain the water would soak into the cracks in the rock, feeding the lens of fresh water floating on salt water, commonly available on islands of this type, and be available only a metre or so below the surface of this depression on a low lying island.
The well might have been dug by the Portuguese, who had the right to explore this part of the world by the Treaty of Zaragoza, 1529, although there is little concrete evidence of their exploring the west coast of Australia. Their maps and observations of new lands were kept secret for commercial reasons, and most have vanished.
The idea to dig a well at this point into solid rock on an otherwise waterless island, an apparently futile project, would suggest itself at a time when there was still some surface water from rain, as in this photograph. Even a shallow well filled by the surface water as shown here would then access the water held in the cracks in the rock below the ground, even after the surface water had disappeared. This effect often occurs on small, low lying islands composed of porous materials such as coral or lime or sandstone.
Photo: http://historymatrix.wordpress.com/page/2/
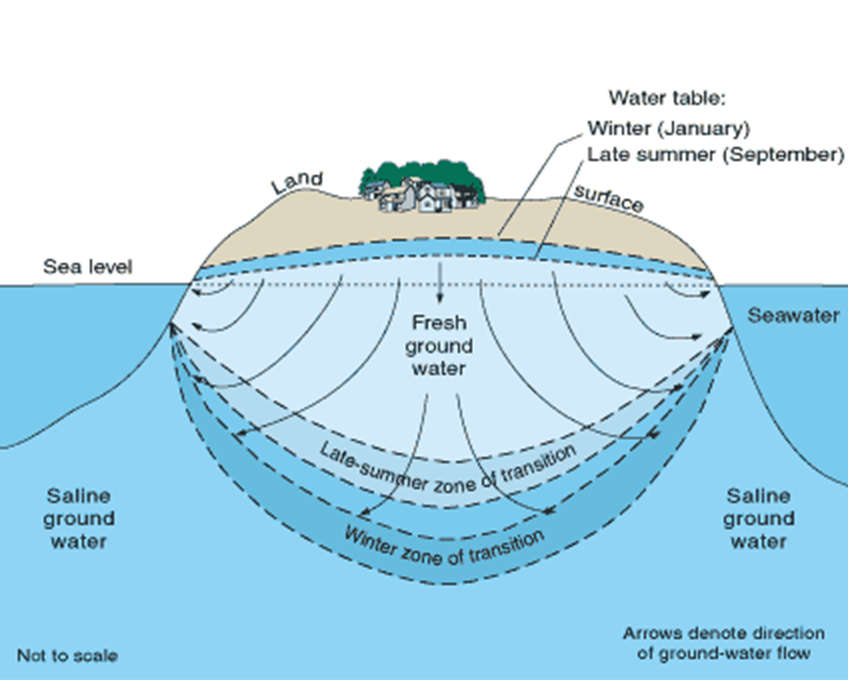
In the late 1800s - early 1900s hydrologists working along Europe's coast observed that fresh ground water, appearing to float as a lens-shaped body on seawater, extended below sea level approximately 40 times the height of the freshwater table above sea level.
Named the Ghyben-Herzberg Principle after the two scientists who described it, this 1-to-40 relation occurs because freshwater is slightly less dense than seawater (1.000 grams per cubic centimetre (g/cm3) versus 1.025 g/cm3).
Thus, for example, if the water table at a given site is 3 feet above sea level, the freshwater-seawater transition zone is 120 feet below sea level, and the vertical thickness of the freshwater body there is 123 feet.
Photo and text: http://pubs.usgs.gov/fs/2000/fs-057-00/

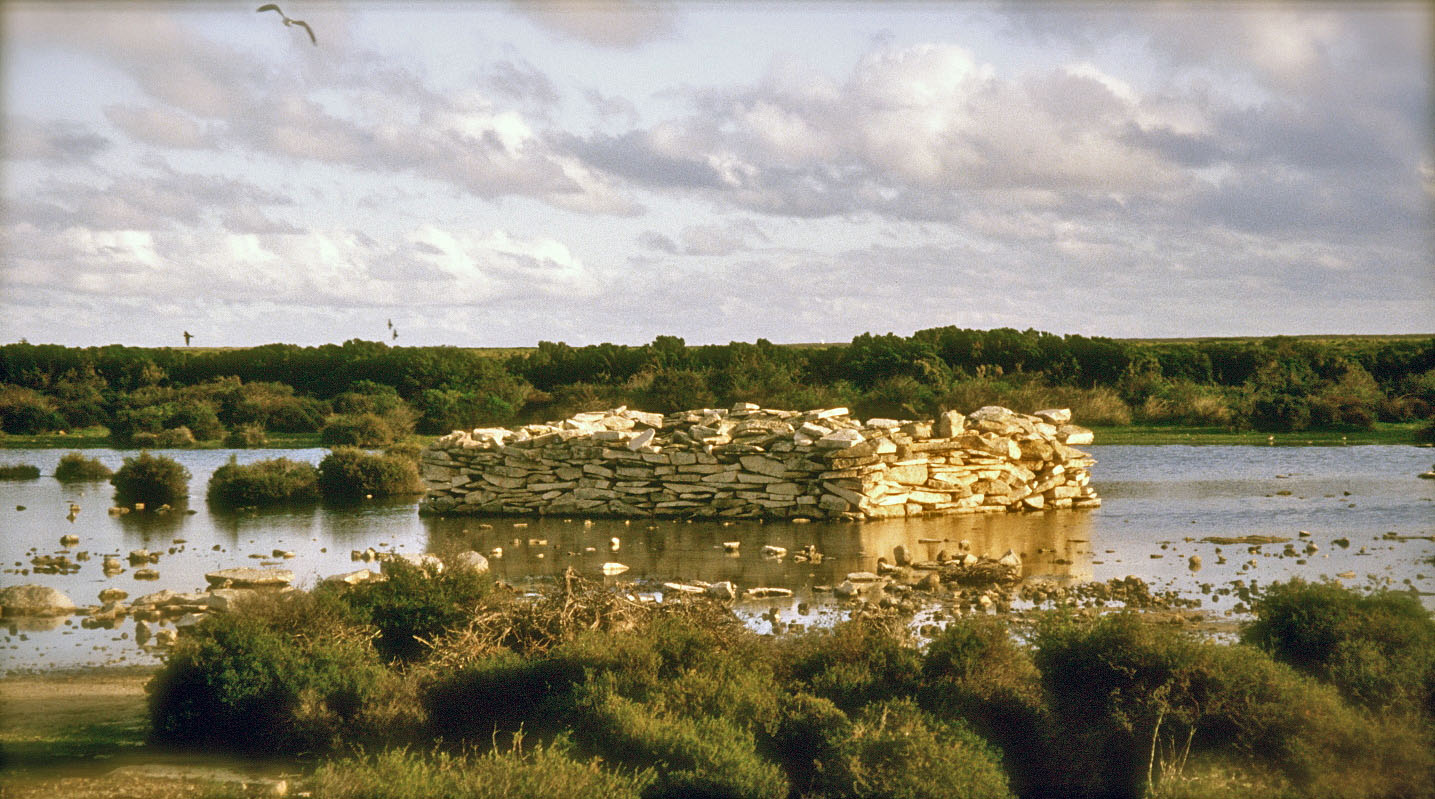
There are at least two forts on the island, built in 1629 by the group led by Wiebbe Hayes , known as the Defenders, who were holding out against the mutineers during the Batavia Mutiny.
Photo (left) © michael.jolly
Source: Panoramio
Photo (right) Rupert Gerritsen, Permission: Creative Commons Attribution-Share Alike 3.0 Unported license
One of the series of maps known as the Dieppe Maps.
It is a map of the world, which includes America and a large promontory of the "Terre Ostrale" (Terra Australis) inscribed in its northern part terre de lucac (Locach). HM 46. Portolan Atlas and Nautical Almanac, France, 1543.
The section of what appears to be the Western Australia coast is believed to have been charted by the Portuguese.
Because many of the inscriptions on the Dieppe maps are written in French, Portuguese or Gallicised Portuguese, it has often been assumed that the Dieppe school of mapmakers were working from Portuguese sources that no longer exist.
It has been assumed that Portuguese cartographers were bribed for information of the latest discoveries, despite the official Portuguese Politica de sigilo (policy of silence).
(Note that most sources say that the Western Australian coast is on the right hand side of the map, to the south east of India. For my money, the coastline on the left of this map looks far more like the Western Australia Coast, with the western side of the Darwin/Arnhem land peninsula to the north, and the west coast of the Eyre Peninsula to the south also shown - with the proviso that the Pacific Ocean has disappeared, and the Australian Continent is joined to South America!
I believe that two quite separate sightings and mappings of the Western Australia coast have been added to the map, one was joined to South America by the map makers, the other, not nearly as well done, in approximately the correct relation to the Indian Ocean. This interpretation is feasible because at the time there was no way of determining longitude at sea - Don )
Photo: Guillaume Brouscon
Permission: Public Domain
Text: Adapted from Wikipedia
One of the first Europeans in Australia, a victim of the Batavia mutiny.
In 1963, shortly after the Batavia was discovered, an expedition to Beacon Island (Batavia's Graveyard) found two skeletons buried in shallow graves in the coral rubble of the small, barren island. The remains displayed here are of a male aged between 35 to 39 years. He is 1.8 metres (6 feet) tall, his right foot is missing and the right shoulder blade is broken. There is a cutting edge wound along the top of his skull.
Other skeletal remains have been found on the island and still others may be buried under the huts of the fishermen who still use the island. However, records show that many of the mutineers victims were driven into the sea to be murdered and their bodies left to the tide and the fishes.
Catalogue BAT A 15507
Photo: Don Hitchcock April 2014
Source and text: The Shipwreck Galleries, Western Australia Museum, Fremantle, Western Australia
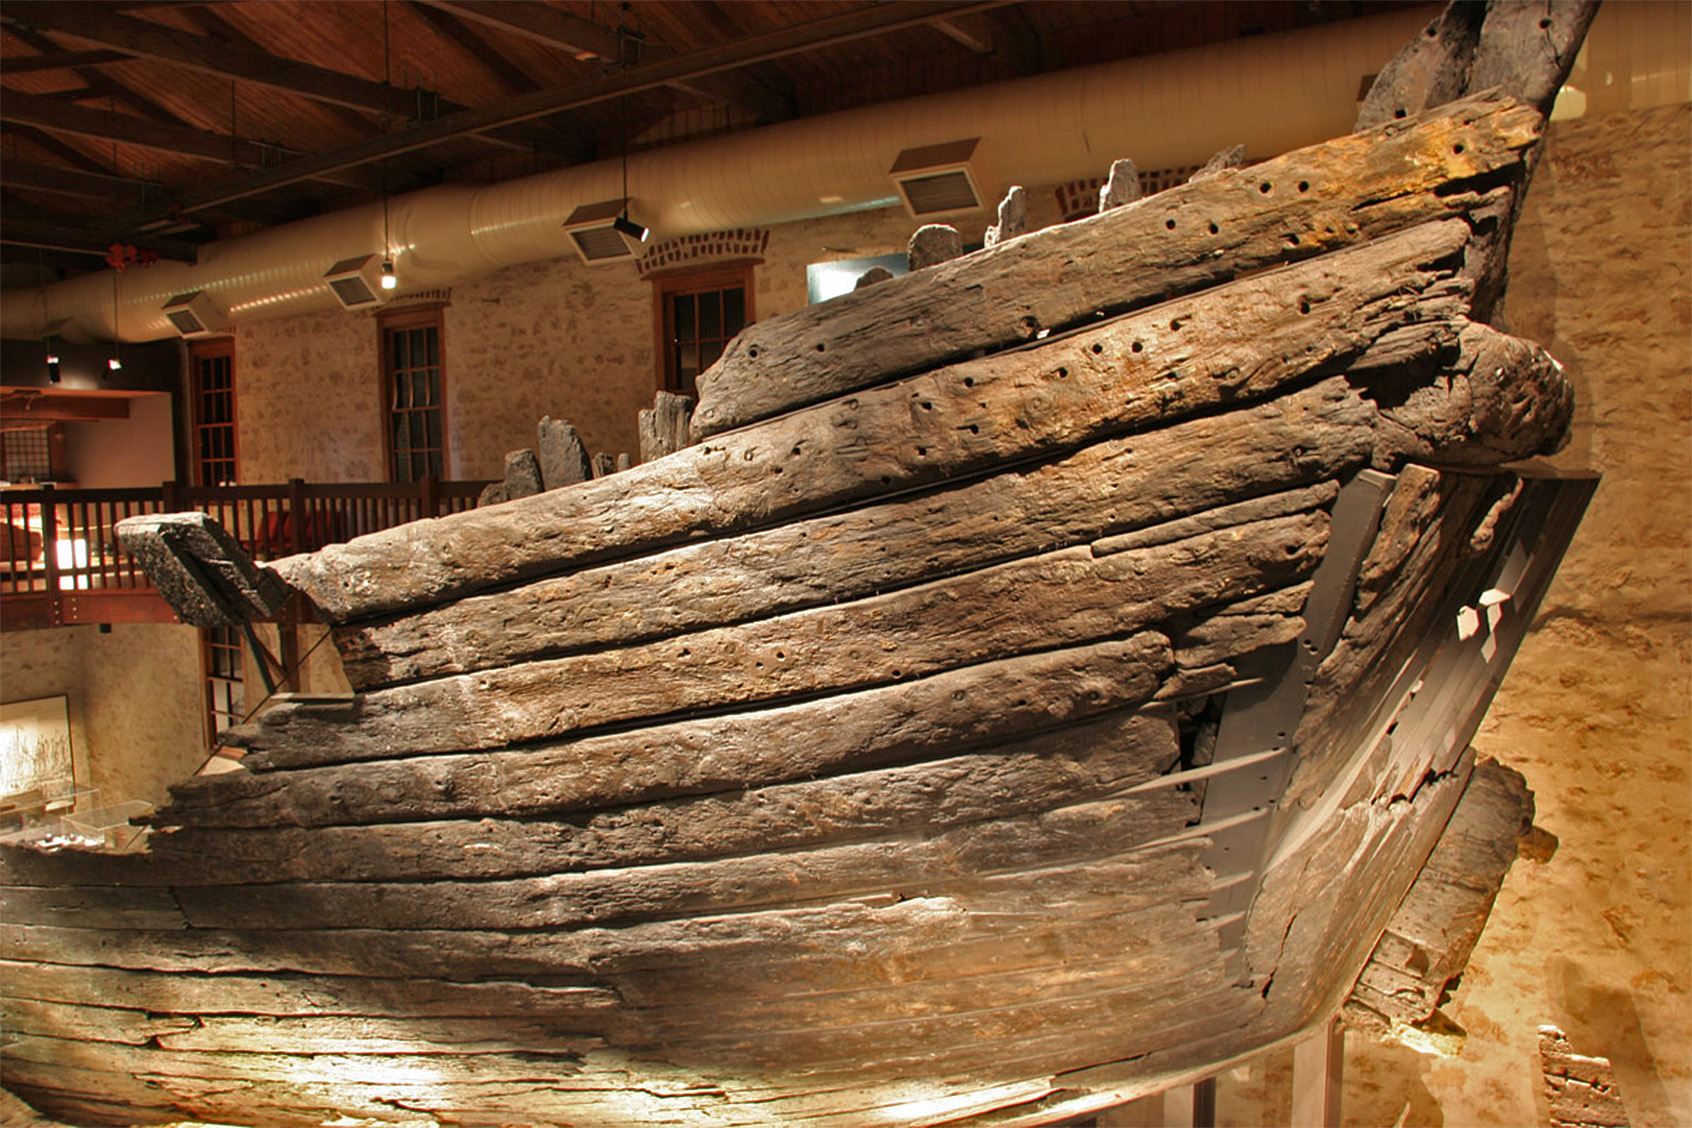
The original timbers of the Batavia, salvaged from the Abrolhos Reef.
Only a small part of the hull of the Batavia survived 343 years on the sea bed.
Photo (left): Don Hitchcock 2014
Photo (right): http://www.museum.wa.gov.au/maritime-archaeology-db/wrecks/batavia
Source and text: The Shipwreck Galleries, Western Australia Museum, Fremantle, Western Australia
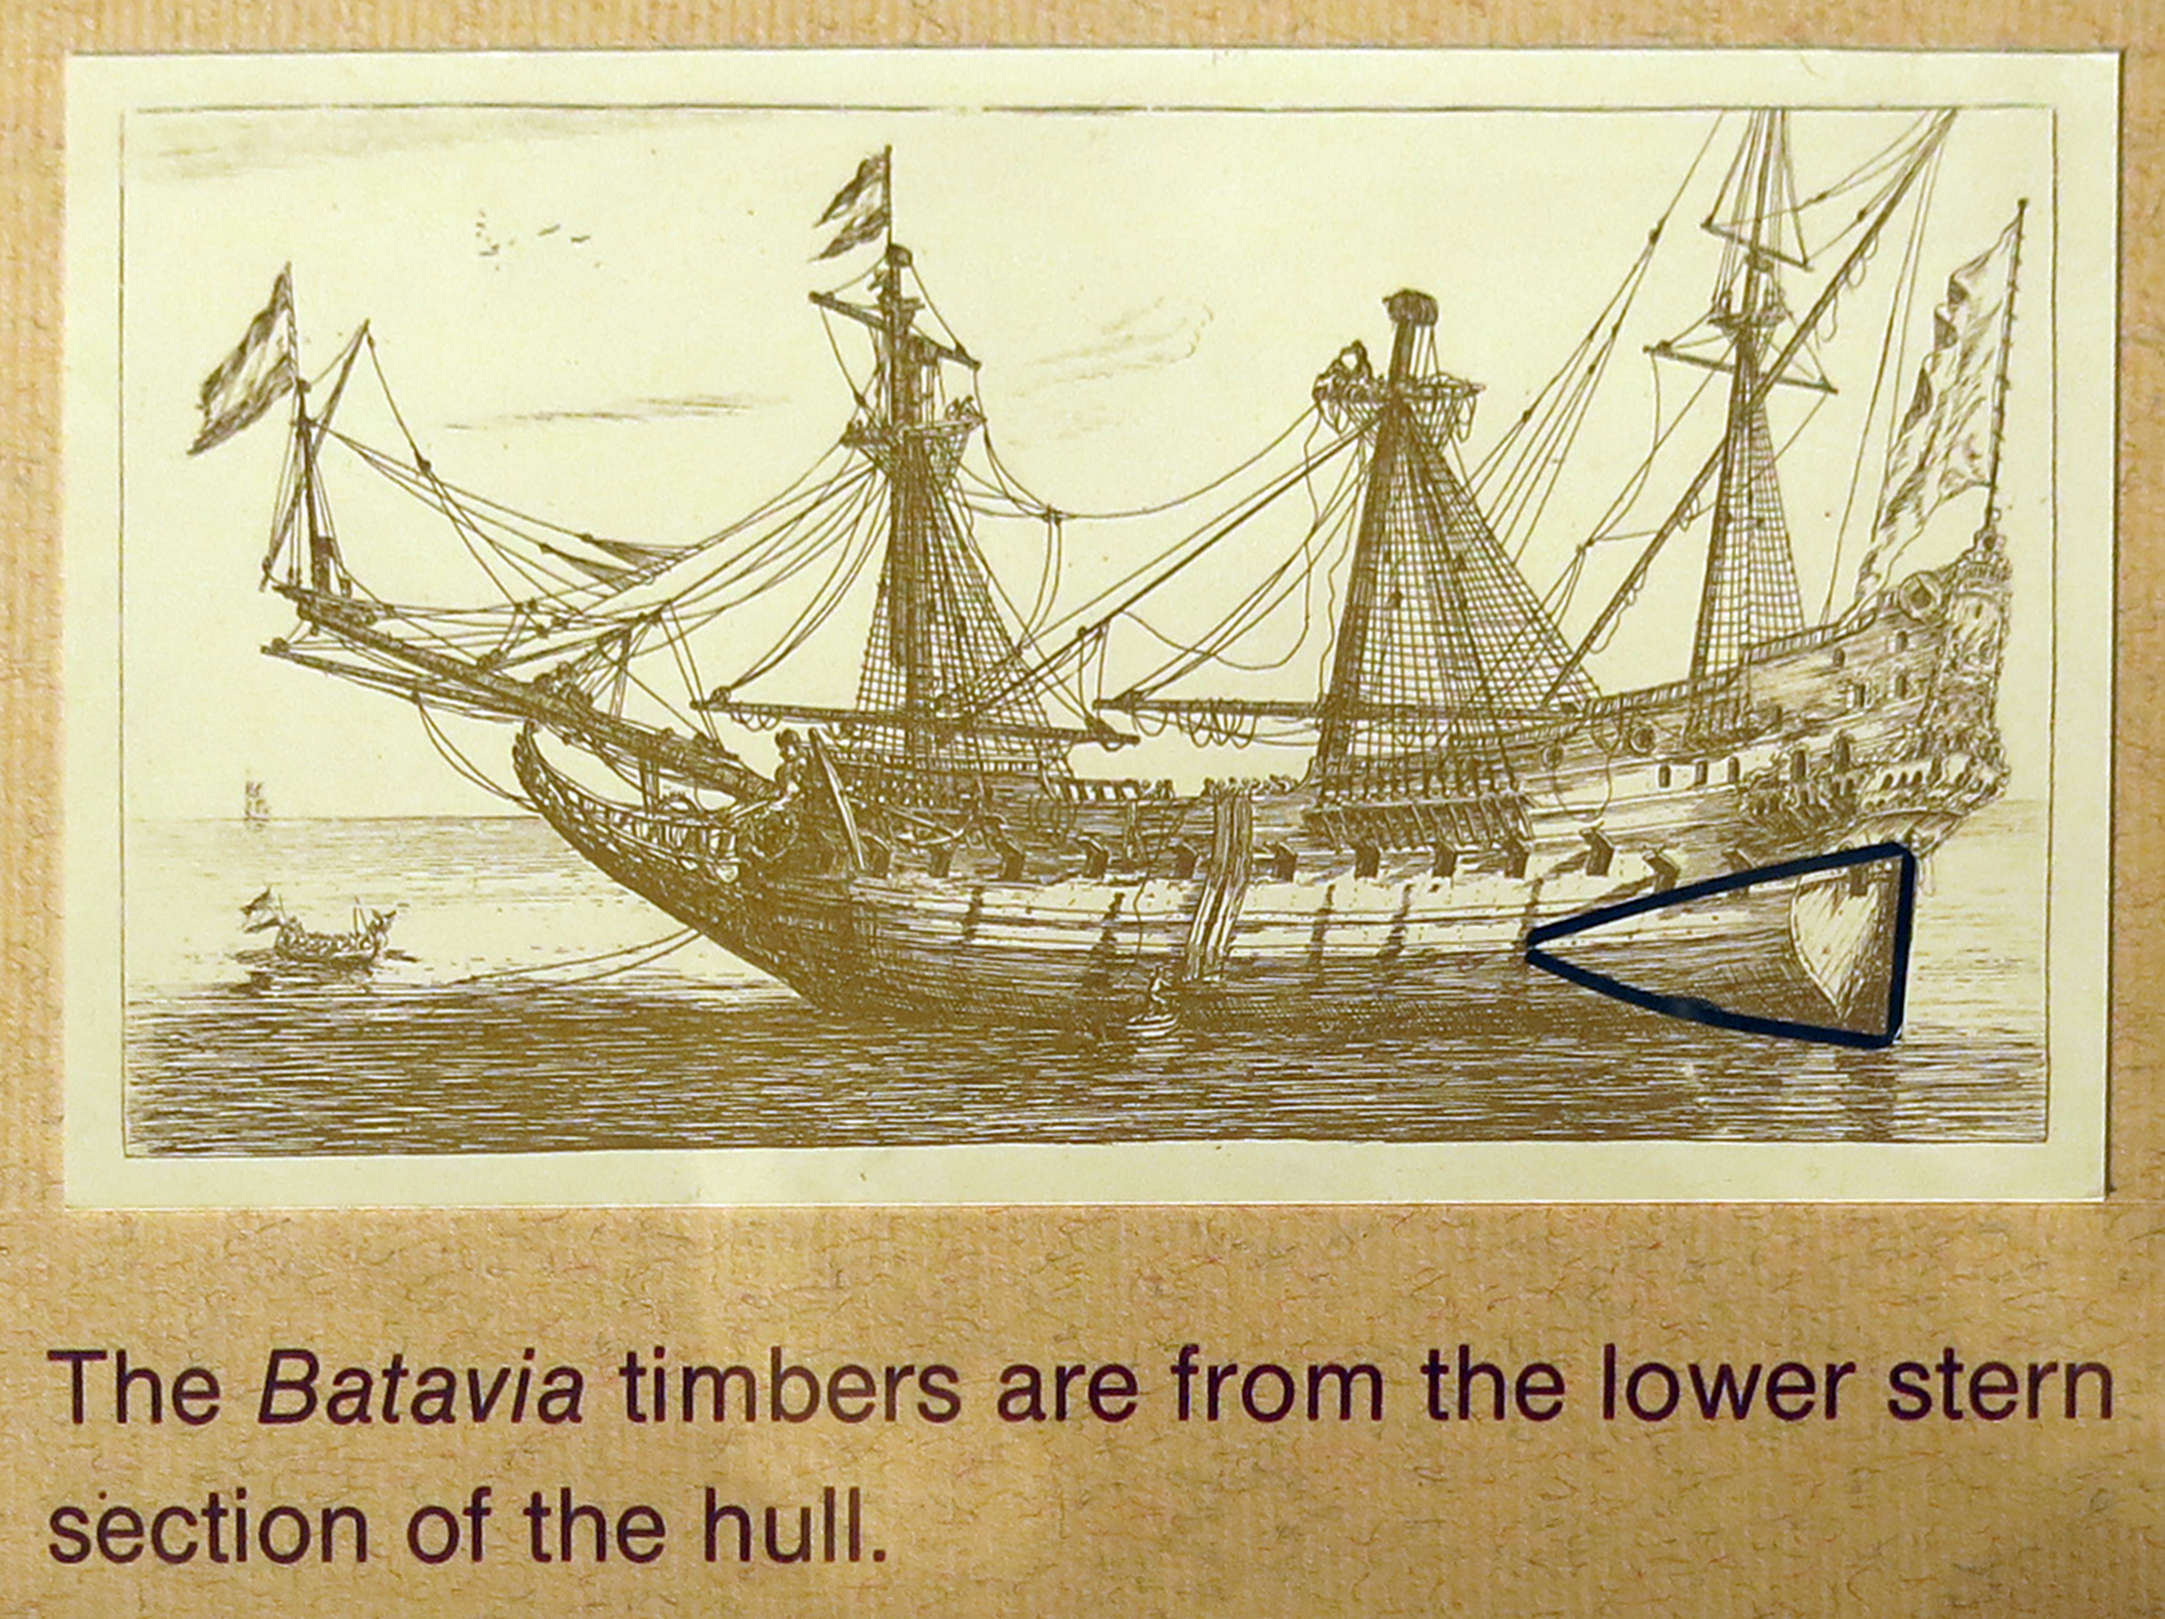
The Batavia timbers are from the lower stern section of the hull, as shown here.
Photo: Don Hitchcock April 2014
Source and text: The Shipwreck Galleries, Western Australia Museum, Fremantle, Western Australia
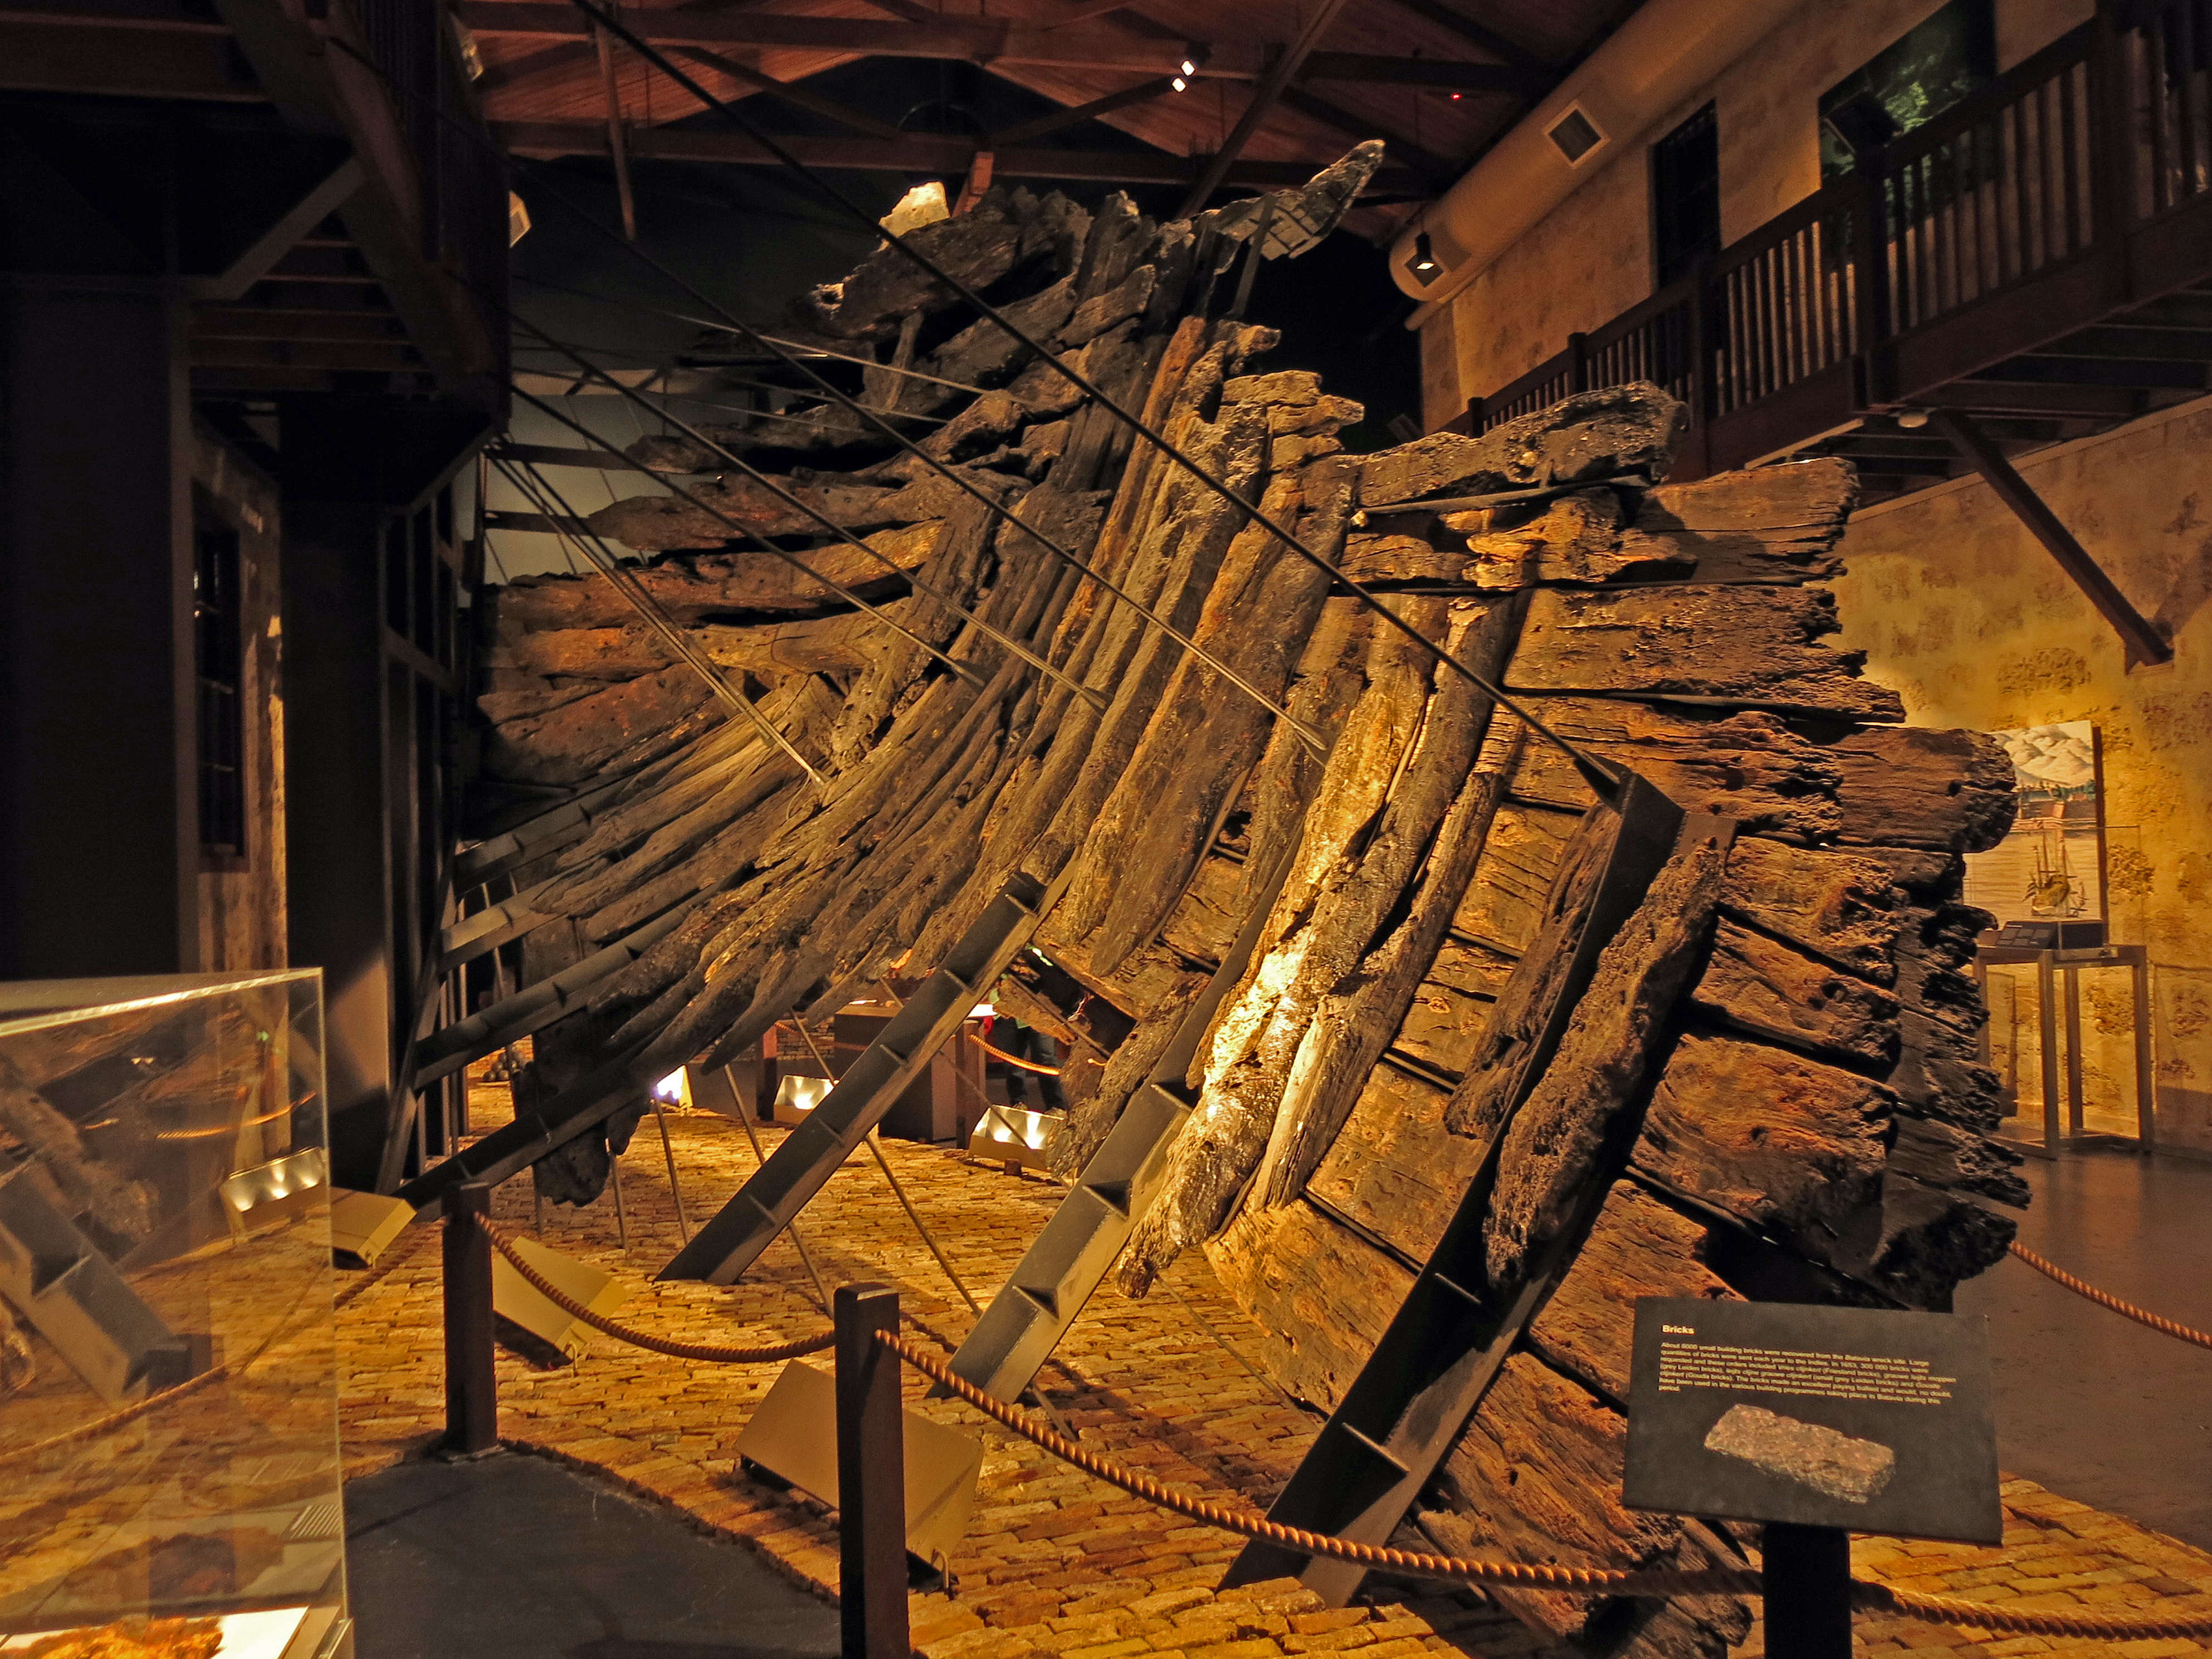
This is the inside of the timbers from the Batavia.
About 5000 small building bricks were recovered from the Batavia wreck site. Large quantities of bricks were sent each year to the Indies.
Photo: Don Hitchcock April 2014
Source and text: The Shipwreck Galleries, Western Australia Museum, Fremantle, Western Australia
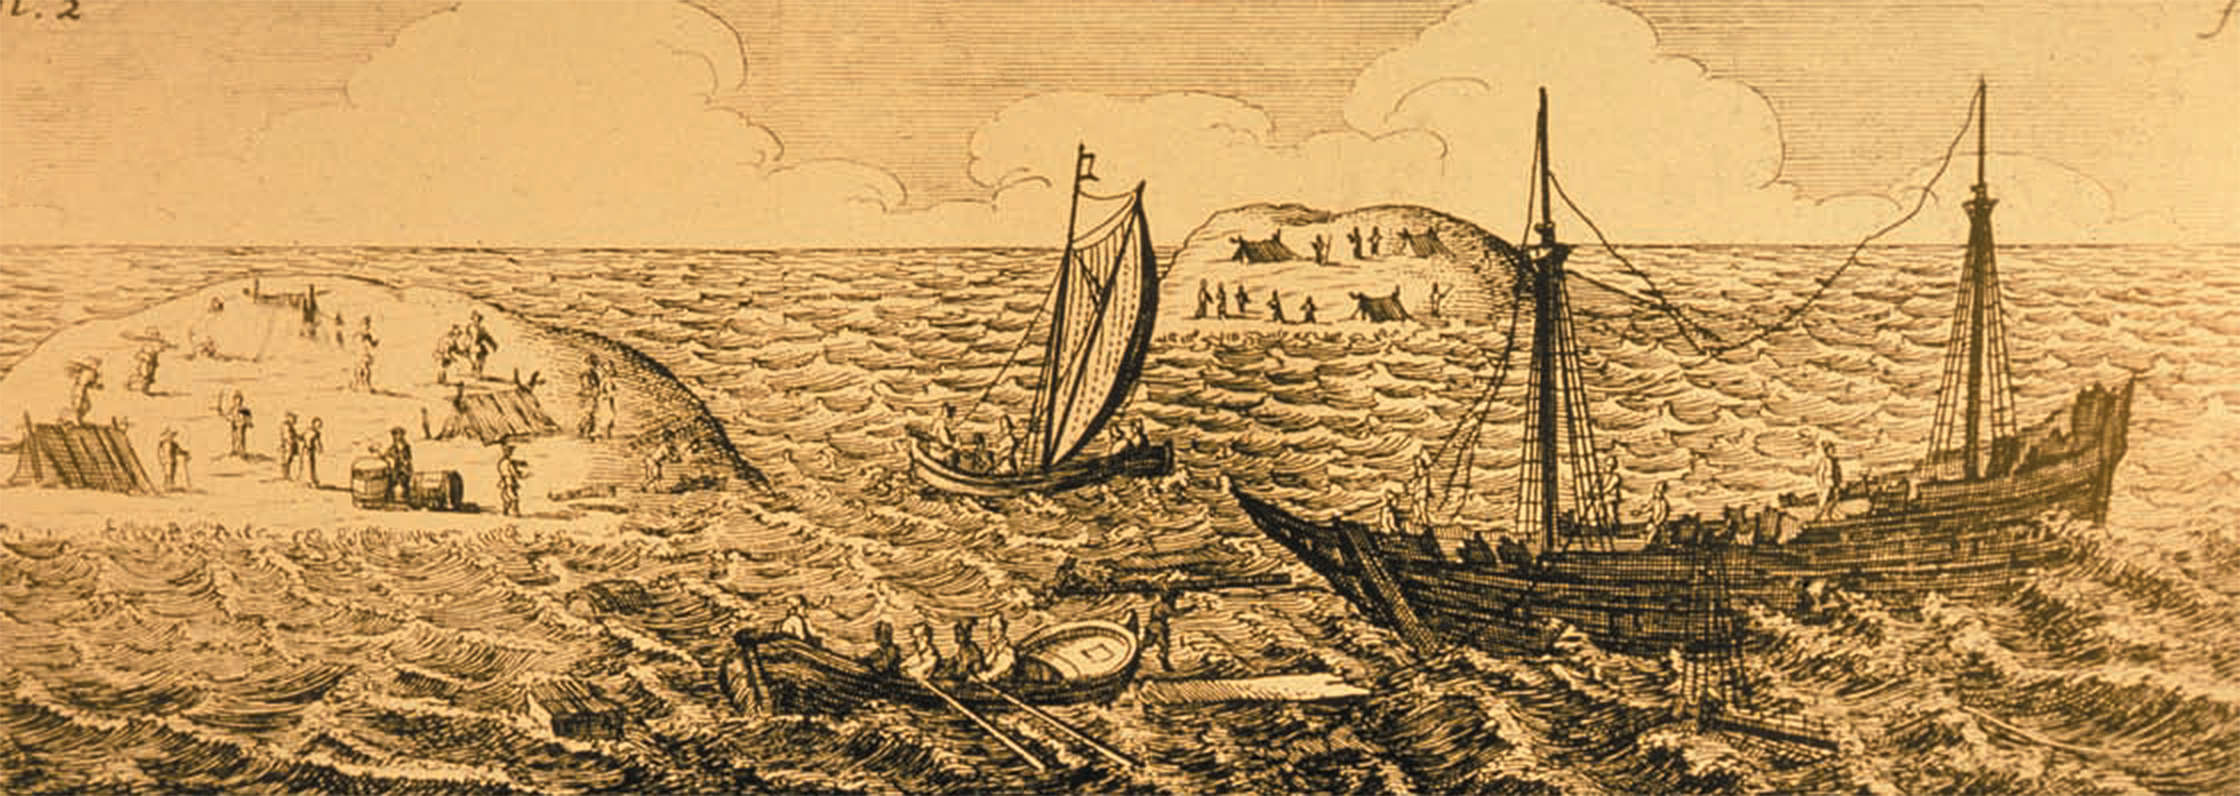
17th century engraving of Batavia and Wallabi Group from an illustration in the Jan Janz 1647 edition of Ongaluckige Voyagie
Source: Drake-Brockman (1963) via Souter et al. (2005)
References
- Drake-Brockman H., 1963: Voyage to disaster: the life of Francisco Pelsaert: covering his Indian report , and the wreck of the ship Batavia in 1629. Angus & Robertson, Sydney.
- Fitzsimons P., 2011: Batavia, Random House Australia
- Souter C., Gainsford M., Anderson R., 2005: Long Island archaeological survey 30 September – 3 October 2005Report—Department of Maritime Archaeology, Western Australian Museum, No. 209. 2005